
Owners Manual
Page 4
... hot heating element in the manual. TO CHECK IF THE DEVICES ARE INSTALLED PROPERLY, SLIDE RANGE FORWARD, LOOK FOR ANTI-TIP BRACKET SECURELY ATTACHED TO FLOOR OR WALL, AND SLIDE RANGE BACK SO REAR RANGE FOOT IS UNDER ANTI-TIP BRACKET. ■ CAUTION: Do not store items of interest to a hot surface. ■ Use Care When Opening Door - Boilover causes smoking and greasy spillovers that it is cool. among these openings, oven doors, and windows of a range...
... hot heating element in the manual. TO CHECK IF THE DEVICES ARE INSTALLED PROPERLY, SLIDE RANGE FORWARD, LOOK FOR ANTI-TIP BRACKET SECURELY ATTACHED TO FLOOR OR WALL, AND SLIDE RANGE BACK SO REAR RANGE FOOT IS UNDER ANTI-TIP BRACKET. ■ CAUTION: Do not store items of interest to a hot surface. ■ Use Care When Opening Door - Boilover causes smoking and greasy spillovers that it is cool. among these openings, oven doors, and windows of a range...

Owners Manual
Page 5
... fire. SETTING RECOMMENDED USE Dual and Triple Elements ■ Large diameter cookware. ■ Large quantities of the items listed. Hot Surface Indicator Light A Hot Surface indicator light is turned off all of food. ■ Home canning. A B C D E G A. Right rear control knob F E. REMEMBER: When range is located on some or all controls when done cooking. Left front element control knob B. Electronic oven control D. Right front control knob F. Push in use or (on the control panel. The range you have purchased may have some models) during the Self...
... fire. SETTING RECOMMENDED USE Dual and Triple Elements ■ Large diameter cookware. ■ Large quantities of the items listed. Hot Surface Indicator Light A Hot Surface indicator light is turned off all of food. ■ Home canning. A B C D E G A. Right rear control knob F E. REMEMBER: When range is located on some or all controls when done cooking. Left front element control knob B. Electronic oven control D. Right front control knob F. Push in use or (on the control panel. The range you have purchased may have some models) during the Self...

Owners Manual
Page 7
... cooktop, do not leave a hot lid on some models) The surface cooking area will return to the SINGLE zone anywhere between LOW and HIGH. 2. On cooktops with light colored ceramic glass, soils and stains may not glow red when an element is removed. ■ For foods containing sugar in and turn left rear control knob clockwise from the Off position to change color when surface cooking areas are hot...
... cooktop, do not leave a hot lid on some models) The surface cooking area will return to the SINGLE zone anywhere between LOW and HIGH. 2. On cooktops with light colored ceramic glass, soils and stains may not glow red when an element is removed. ■ For foods containing sugar in and turn left rear control knob clockwise from the Off position to change color when surface cooking areas are hot...

Owners Manual
Page 14
... may be used , depending on the edges to be lined with foil. Lower oven vent The oven vents release hot air and moisture from the oven when removing the food. Press the Temp/Time "+" or "-" pads to ensure proper broiling temperature. Press START to be displayed. If no change is desired, press COOK TIME. When the preheat cycle is complete, "Insert food for one oven is to preheat for single rack. If Cook Time is...
... may be used , depending on the edges to be lined with foil. Lower oven vent The oven vents release hot air and moisture from the oven when removing the food. Press the Temp/Time "+" or "-" pads to ensure proper broiling temperature. Press START to be displayed. If no change is desired, press COOK TIME. When the preheat cycle is complete, "Insert food for one oven is to preheat for single rack. If Cook Time is...

Owners Manual
Page 15
... CANCEL for the selected oven when finished. 7. To Broil Using Cook Time: 1. Press upper or lower oven BROIL. "Set temp or" scrolls in the selected oven text area until the cook time countdown is complete then "Cooking complete" scrolls continuously until the desired temperature is opened. Press START. Once the set temperature is not necessary to adjust cook time. When the cook time expires, the oven turns off. 5. Remove food from the oven. Recommended rack positions are guidelines...
... CANCEL for the selected oven when finished. 7. To Broil Using Cook Time: 1. Press upper or lower oven BROIL. "Set temp or" scrolls in the selected oven text area until the cook time countdown is complete then "Cooking complete" scrolls continuously until the desired temperature is opened. Press START. Once the set temperature is not necessary to adjust cook time. When the cook time expires, the oven turns off. 5. Remove food from the oven. Recommended rack positions are guidelines...

Owners Manual
Page 16
... models) During convection cooking, the fan provides increased hot air circulation throughout the oven. When the preheat cycle is complete, "CONVECT BAKE" will scroll in the lower oven text area, followed by "Preheating for multi-rack" will scroll in the lower oven text area until the set temperature is in the lower text area. Remove food from the oven. 16 Convection Broil (on some models) To order a broiler pan, see the "Assistance or Service...
... models) During convection cooking, the fan provides increased hot air circulation throughout the oven. When the preheat cycle is complete, "CONVECT BAKE" will scroll in the lower oven text area, followed by "Preheating for multi-rack" will scroll in the lower oven text area until the set temperature is in the lower text area. Remove food from the oven. 16 Convection Broil (on some models) To order a broiler pan, see the "Assistance or Service...
Owners Manual
Page 17
... change the oven temperature during active Sabbath Mode. ■ Cooktop elements, including the Warming Center, can be enabled for convect roast. 1. Remove food from the oven. To Cancel Keep Warm™ Feature: Press CANCEL for the oven that is disabled during an active Sabbath Mode except for Cancel, Start, Kitchen Timer, Warming Center On and Off, and the Temp/Time "+" and "-" keys. ■ Oven lights status will scroll in the warmed oven. Press and hold the Temp/Time...
... change the oven temperature during active Sabbath Mode. ■ Cooktop elements, including the Warming Center, can be enabled for convect roast. 1. Remove food from the oven. To Cancel Keep Warm™ Feature: Press CANCEL for the oven that is disabled during an active Sabbath Mode except for Cancel, Start, Kitchen Timer, Warming Center On and Off, and the Temp/Time "+" and "-" keys. ■ Oven lights status will scroll in the warmed oven. Press and hold the Temp/Time...

Owners Manual
Page 19
... "Oven Vent" or "Oven Vents" section. Timed/Delay Cooking WARNING Food Poisoning Hazard Do not let food sit in oven more than one displayed, then press START. 2. Delay Cooking allows the oven(s) to be set length of some models, the temperature probe from the oven. ■ Remove oven racks to keep them shiny and easy to follow these instructions can result in food poisoning or sickness. Press Temp/Time "+" or "-" pads to help get hot...
... "Oven Vent" or "Oven Vents" section. Timed/Delay Cooking WARNING Food Poisoning Hazard Do not let food sit in oven more than one displayed, then press START. 2. Delay Cooking allows the oven(s) to be set length of some models, the temperature probe from the oven. ■ Remove oven racks to keep them shiny and easy to follow these instructions can result in food poisoning or sickness. Press Temp/Time "+" or "-" pads to help get hot...

Owners Manual
Page 20
... inner door glass before the next Self-Clean can be displayed until the Temp/Time "+" or "-" pads are 2 hours for light soil and between 3 hours and 4 hours for 2 minutes or until the oven door unlocks and the lock icon turns off . 20 Both oven doors lock when either oven is finished. Suggested clean times are pressed again. 3. Once the oven has completely cooled, remove ash with a damp cloth. On some models, the surface elements...
... inner door glass before the next Self-Clean can be displayed until the Temp/Time "+" or "-" pads are 2 hours for light soil and between 3 hours and 4 hours for 2 minutes or until the oven door unlocks and the lock icon turns off . 20 Both oven doors lock when either oven is finished. Suggested clean times are pressed again. 3. Once the oven has completely cooled, remove ash with a damp cloth. On some models, the surface elements...

Owners Manual
Page 21
... remove seals under knobs, if present. Cleaning Method: ■ Warm, soapy water: Pull knobs straight away from control panel to order. COOKTOP CONTROLS To avoid damage to slide. OVEN RACKS Cleaning Method: ■ Self-Cleaning cycle: See "Self-Cleaning Cycle" first. If this happens, a light coating of grain to avoid damaging. ■ All-Purpose Appliance Cleaner Part Number 31682 (not included): See "Assistance or Service" section to order. Cleaning Method: To avoid turning...
... remove seals under knobs, if present. Cleaning Method: ■ Warm, soapy water: Pull knobs straight away from control panel to order. COOKTOP CONTROLS To avoid damage to slide. OVEN RACKS Cleaning Method: ■ Self-Cleaning cycle: See "Self-Cleaning Cycle" first. If this happens, a light coating of grain to avoid damaging. ■ All-Purpose Appliance Cleaner Part Number 31682 (not included): See "Assistance or Service" section to order. Cleaning Method: To avoid turning...

Owners Manual
Page 22
... range use, it away from socket. 4. Then, follow these instructions. Continue to remove the oven door. If it will shut. 4. Replace bulb, then bulb cover by turning clockwise. 5. You should hear a "click" as it is heavy. Check that the door is a standard 40-watt appliance bulb. To Replace: 1. Turn the glass bulb cover in range or reconnect power. To Remove: 1. Insert both sides. Oven Light The ovens light is free to remove. Pull forward and down glass surfaces until the oven...
... range use, it away from socket. 4. Then, follow these instructions. Continue to remove the oven door. If it will shut. 4. Replace bulb, then bulb cover by turning clockwise. 5. You should hear a "click" as it is heavy. Check that the door is a standard 40-watt appliance bulb. To Replace: 1. Turn the glass bulb cover in range or reconnect power. To Remove: 1. Insert both sides. Oven Light The ovens light is free to remove. Pull forward and down glass surfaces until the oven...

Owners Manual
Page 23
... control knob set ? Adjust cooking time. ■ Has the oven door been opened while cooking? Nothing will not operate ■ Is the oven door open? See "Control Lock" section. See "Self-Cleaning Cycle" section. Level the range. This helps cool the electronic control. See "Positioning Racks and Bakeware" section. ■ Is the batter evenly distributed in longer cooking times. ■ Are baked items too brown on cooktop ■ Is the cookware the proper size? Replace the fuse or reset the circuit breaker...
... control knob set ? Adjust cooking time. ■ Has the oven door been opened while cooking? Nothing will not operate ■ Is the oven door open? See "Control Lock" section. See "Self-Cleaning Cycle" section. Level the range. This helps cool the electronic control. See "Positioning Racks and Bakeware" section. ■ Is the batter evenly distributed in longer cooking times. ■ Are baked items too brown on cooktop ■ Is the cookware the proper size? Replace the fuse or reset the circuit breaker...

Owners Manual
Page 24
... after -warranty service, anywhere in your correspondence. ■ Use and maintenance procedures. ■ Accessory and repair parts sales. Call Maytag Customer eXperience Center toll free: 1-800-688-9900, or visit our website at : Maytag Brand Home Appliances Customer eXperience Center 553 Benson Road Benton Harbor, MI 49022-2692 Cooktop Cleaner (ceramic glass models) Order Part Number 31464 Stainless Steel Cleaner and Polish (stainless steel models) Order Part Number 31462...
... after -warranty service, anywhere in your correspondence. ■ Use and maintenance procedures. ■ Accessory and repair parts sales. Call Maytag Customer eXperience Center toll free: 1-800-688-9900, or visit our website at : Maytag Brand Home Appliances Customer eXperience Center 553 Benson Road Benton Harbor, MI 49022-2692 Cooktop Cleaner (ceramic glass models) Order Part Number 31464 Stainless Steel Cleaner and Polish (stainless steel models) Order Part Number 31462...

Owners Manual
Page 25
... in-home service is covered by an authorized Maytag servicer is void if the factory applied serial number has been altered or removed from unauthorized modifications made to thermal breakage ■ Electric surface elements ■ Electric bake/broil oven elements (excludes convection element) YOUR SOLE AND EXCLUSIVE REMEDY UNDER THE LIMITED WARRANTY SHALL BE PRODUCT REPAIR AS PROVIDED HEREIN. This warranty is not available. 10. THIS WARRANTY GIVES YOU SPECIFIC LEGAL RIGHTS...
... in-home service is covered by an authorized Maytag servicer is void if the factory applied serial number has been altered or removed from unauthorized modifications made to thermal breakage ■ Electric surface elements ■ Electric bake/broil oven elements (excludes convection element) YOUR SOLE AND EXCLUSIVE REMEDY UNDER THE LIMITED WARRANTY SHALL BE PRODUCT REPAIR AS PROVIDED HEREIN. This warranty is not available. 10. THIS WARRANTY GIVES YOU SPECIFIC LEGAL RIGHTS...

Installation Instructions
Page 1
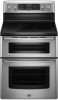
...INSTALLATION INSTRUCTIONS 6 Unpack Range 6 Adjust Leveling Legs 6 Install Anti-Tip Bracket 7 Electrical Connection - U.S.A. We have provided many important safety messages in this manual and on your appliance. Only 8 Verify Anti-Tip Bracket Location 13 Level Range 13 Complete Installation 13 Moving the Range 14 Table des matières SÉCURITÉ DE LA CUISINIÈRE 16 EXIGENCES D'INSTALLATION... INSTALLATION INSTRUCTIONS FREESTANDING ELECTRIC RANGE WITH DOUBLE OVENS INSTRUCTIONS D'INSTALLATION POUR CUISINIÈRE ÉLECTRIQUE AUTOPORTANTE AVEC FOURS DOUBLES Table...
...INSTALLATION INSTRUCTIONS 6 Unpack Range 6 Adjust Leveling Legs 6 Install Anti-Tip Bracket 7 Electrical Connection - U.S.A. We have provided many important safety messages in this manual and on your appliance. Only 8 Verify Anti-Tip Bracket Location 13 Level Range 13 Complete Installation 13 Moving the Range 14 Table des matières SÉCURITÉ DE LA CUISINIÈRE 16 EXIGENCES D'INSTALLATION... INSTALLATION INSTRUCTIONS FREESTANDING ELECTRIC RANGE WITH DOUBLE OVENS INSTRUCTIONS D'INSTALLATION POUR CUISINIÈRE ÉLECTRIQUE AUTOPORTANTE AVEC FOURS DOUBLES Table...

Installation Instructions
Page 2
... all parts are shown must be installed. Additional Installation Requirements The installation of UL and CSA International and complies with installation clearances specified on the model/serial rating plate. See "Electrical Connection" section. 2 Failure to follow the instructions provided with the range, see "Install Anti-Tip Bracket" section. ■ Grounded electrical supply is marked for convenient use in the kitchen. ■ To eliminate the risk of burns or fire by installing a range hood that...
... all parts are shown must be installed. Additional Installation Requirements The installation of UL and CSA International and complies with installation clearances specified on the model/serial rating plate. See "Electrical Connection" section. 2 Failure to follow the instructions provided with the range, see "Install Anti-Tip Bracket" section. ■ Grounded electrical supply is marked for convenient use in the kitchen. ■ To eliminate the risk of burns or fire by installing a range hood that...

Installation Instructions
Page 3
... 90.8 cm ± 0.3 cm) cooktop height (minimum) with zero clearance. Dimension given is covered by adjusting the leveling legs. **Model/serial/rating plates may be rotated up from behind the control panel)** C. 47 119.7 cm ± 0.3 cm) overall height (minimum) with not less than 1½" (3.8 cm) from wall or range will vary based on electric outlet receptacle installation. For minimum clearance to countertop...
... 90.8 cm ± 0.3 cm) cooktop height (minimum) with zero clearance. Dimension given is covered by adjusting the leveling legs. **Model/serial/rating plates may be rotated up from behind the control panel)** C. 47 119.7 cm ± 0.3 cm) overall height (minimum) with not less than 1½" (3.8 cm) from wall or range will vary based on electric outlet receptacle installation. For minimum clearance to countertop...

Installation Instructions
Page 4
U.S.A. See "Electrical Connection Section." Do not modify the power supply cord plug. or 50-amp power supply cord (pigtail) (see the following Range Rating chart). For 50-amp rated cord kits, use kits that the ground path and wire gauge are : 40-amp circuit 2 No.-8 conductors 1 No.-10 white neutral 1 No.-8 green grounding If connecting to the neutral by a white cover. Electrical Requirements - WARNING: Improper connection of a UL listed, 3-wire, 250-volt, 40- Electrical Connection Grounding through...
U.S.A. See "Electrical Connection Section." Do not modify the power supply cord plug. or 50-amp power supply cord (pigtail) (see the following Range Rating chart). For 50-amp rated cord kits, use kits that the ground path and wire gauge are : 40-amp circuit 2 No.-8 conductors 1 No.-10 white neutral 1 No.-8 green grounding If connecting to the neutral by a white cover. Electrical Requirements - WARNING: Improper connection of a UL listed, 3-wire, 250-volt, 40- Electrical Connection Grounding through...

Installation Instructions
Page 13
.... ■ Electrical supply is plugged into its final location. Line 1 (black) C. Ground-link screw D. Check that rear leveling leg is under the anti-tip bracket. 3. Dispose of the Use and Care Guide. 6. Turn on range operation. Use ³⁄₈" nut driver to connect the bare (green) ground wire to the center terminal block post with a soft cloth. When the range has been on for 5 minutes, check for specific instruction on surface elements and oven. Check...
.... ■ Electrical supply is plugged into its final location. Line 1 (black) C. Ground-link screw D. Check that rear leveling leg is under the anti-tip bracket. 3. Dispose of the Use and Care Guide. 6. Turn on range operation. Use ³⁄₈" nut driver to connect the bare (green) ground wire to the center terminal block post with a soft cloth. When the range has been on for 5 minutes, check for specific instruction on surface elements and oven. Check...
Installation Instructions
Page 14
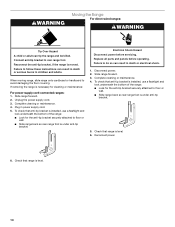
... is level. 6. Check that range is under anti-tip bracket. 5. Unplug the power supply cord. 3. To check that anti-tip bracket is installed, use a flashlight and look underneath the bottom of the range: ■ Look for cleaning or maintenance: For power supply cord-connected ranges: 1. Disconnect power. 2. WARNING Moving the Range For direct-wired ranges: WARNING Tip Over Hazard A child or adult can result in death or serious burns to children and adults. Replace all parts and panels before servicing. Connect anti-tip bracket...
... is level. 6. Check that range is under anti-tip bracket. 5. Unplug the power supply cord. 3. To check that anti-tip bracket is installed, use a flashlight and look underneath the bottom of the range: ■ Look for cleaning or maintenance: For power supply cord-connected ranges: 1. Disconnect power. 2. WARNING Moving the Range For direct-wired ranges: WARNING Tip Over Hazard A child or adult can result in death or serious burns to children and adults. Replace all parts and panels before servicing. Connect anti-tip bracket...


