
Owners Manual
Page 5
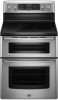
... items listed. Left front element control knob B. Fire Hazard Turn off . 5 Hot Surface Indicator Light A Hot Surface indicator light is turned off all of your model. Medium High ■ Hold a rapid boil. ■ Quickly brown or sear food. A B C D E G A. Electronic oven control D. Medium Low Between LO ... cooked foods warm. The locations and appearances of food. ■ Home canning. COOKTOP USE This manual covers several different models. Use the following chart as any surface element is in death or fire. Right front control knob F.
... items listed. Left front element control knob B. Fire Hazard Turn off . 5 Hot Surface Indicator Light A Hot Surface indicator light is turned off all of your model. Medium High ■ Hold a rapid boil. ■ Quickly brown or sear food. A B C D E G A. Electronic oven control D. Medium Low Between LO ... cooked foods warm. The locations and appearances of food. ■ Home canning. COOKTOP USE This manual covers several different models. Use the following chart as any surface element is in death or fire. Right front control knob F.
Owners Manual
Page 6
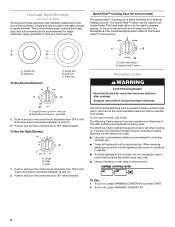
... between HI and LO. 2. Single B. To turn on, press WARMING CENTER ON and then START. 2. Dual and Triple Elements (on some models) The Speed Heat™ Cooking Zone offers flexibility for the Speed Heat™ Cooking Zone. Push in and turn the control knob clockwise from ..., dual, and outer element and is the recommended maximum time to keep cooked foods warm. Speed Heat™ Cooking Zone (on some models) The Dual and Triple elements offer flexibility depending on . Use cookware appropriate in the cover for more than one hour before or after cooking...
... between HI and LO. 2. Single B. To turn on, press WARMING CENTER ON and then START. 2. Dual and Triple Elements (on some models) The Speed Heat™ Cooking Zone offers flexibility for the Speed Heat™ Cooking Zone. Push in and turn the control knob clockwise from ..., dual, and outer element and is the recommended maximum time to keep cooked foods warm. Speed Heat™ Cooking Zone (on some models) The Dual and Triple elements offer flexibility depending on . Use cookware appropriate in the cover for more than one hour before or after cooking...

Owners Manual
Page 7
... in and turn left front control knob counterclockwise from the Off position to the SINGLE zone anywhere between LOW and HIGH. 3. Ceramic Glass (on some models) The surface cooking area will return to anywhere between the lid and the cooktop, and the ceramic glass could break when the lid is on...
... in and turn left front control knob counterclockwise from the Off position to the SINGLE zone anywhere between LOW and HIGH. 3. Ceramic Glass (on some models) The surface cooking area will return to anywhere between the lid and the cooktop, and the ceramic glass could break when the lid is on...

Owners Manual
Page 8
... the broiler. Earthenware ■ Follow manufacturer's instructions. ■ Use on 2 surface cooking areas, elements or surface burners at the same time. ■ On ceramic glass models, use of the cookware. Stainless steel ■ Heats quickly, but unevenly. ■ Ideal results on low to cool. ■ Center the canner on the properties...
... the broiler. Earthenware ■ Follow manufacturer's instructions. ■ Use on 2 surface cooking areas, elements or surface burners at the same time. ■ On ceramic glass models, use of the cookware. Stainless steel ■ Heats quickly, but unevenly. ■ Ideal results on low to cool. ■ Center the canner on the properties...

Owners Manual
Page 12
.... 5 ■ Place food so it clears the stop position, raise the front edge, 1 and then lift out. 5 4 3 2 1 To Replace Oven Racks: Place rack on some models) FUNCTION NUMBER OF RACK RACKS USED POSITION(S) Convection baking 1 3 Convection baking 2 2 and 4 Convection roasting 1 1 or 2 Multiple Rack Cooking 2-rack: Use rack positions 2 and 4. When baking...
.... 5 ■ Place food so it clears the stop position, raise the front edge, 1 and then lift out. 5 4 3 2 1 To Replace Oven Racks: Place rack on some models) FUNCTION NUMBER OF RACK RACKS USED POSITION(S) Convection baking 1 3 Convection baking 2 2 and 4 Convection roasting 1 1 or 2 Multiple Rack Cooking 2-rack: Use rack positions 2 and 4. When baking...

Owners Manual
Page 13
... rack in the bottom third of layer cakes. Allow 2" (5.0 cm) of doneness. See illustrations for using a meat thermometer. 13 A meat thermometer is directly over another. Model Cook function Bake element Rack position MET8665 MET8775 MET8885 Bake Convect bake Convect bake Exposed Hidden Hidden 2 and 4 2 and 4 2 and 4 MET8775 Bake Hidden 2 and 4 MET8885...
... rack in the bottom third of layer cakes. Allow 2" (5.0 cm) of doneness. See illustrations for using a meat thermometer. 13 A meat thermometer is directly over another. Model Cook function Bake element Rack position MET8665 MET8775 MET8885 Bake Convect bake Convect bake Exposed Hidden Hidden 2 and 4 2 and 4 2 and 4 MET8775 Bake Hidden 2 and 4 MET8885...

Owners Manual
Page 16
... Press START if multi rack baking is in the lower oven text area until LOWER CANCEL is reached. Lower Oven Only (on some models) During convection cooking, the fan provides increased hot air circulation throughout the oven. It is displayed and then START. ■ For..."CONVECT BAKE" will be closed when using more than one -rack preheat temperature is pressed. 5. Press CONVECT BROIL. Convection Baking (on some models) Use Convect Bake for multi-rack baking. Press CONVECT BAKE. Press the Temp/Time "+" or "-" pads until the desired temperature is not ...
... Press START if multi rack baking is in the lower oven text area until LOWER CANCEL is reached. Lower Oven Only (on some models) During convection cooking, the fan provides increased hot air circulation throughout the oven. It is displayed and then START. ■ For..."CONVECT BAKE" will be closed when using more than one -rack preheat temperature is pressed. 5. Press CONVECT BROIL. Convection Baking (on some models) Use Convect Bake for multi-rack baking. Press CONVECT BAKE. Press the Temp/Time "+" or "-" pads until the desired temperature is not ...
Owners Manual
Page 17
... the Sabbath Mode. ■ 12 Hour Shutoff Mode is in food poisoning or sickness. "Sabbath on" appears in the warmed oven. Convection Roasting (on some models) When convection roasting, enter your selection. "CONVECT ROAST" will scroll in the upper or lower text area (depending on . Press LOWER CANCEL when finished. 6. Press...
... the Sabbath Mode. ■ 12 Hour Shutoff Mode is in food poisoning or sickness. "Sabbath on" appears in the warmed oven. Convection Roasting (on some models) When convection roasting, enter your selection. "CONVECT ROAST" will scroll in the upper or lower text area (depending on . Press LOWER CANCEL when finished. 6. Press...

Owners Manual
Page 19
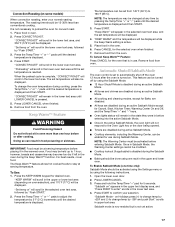
... burns. Press COOK TIME. 3. Press Temp/Time "+" or "-" pads to another closed and well-ventilated room. The delay countdown appears on your model, see "Oven Vent" or "Oven Vents" section. The set to follow these instructions can result in food poisoning or sickness. Failure to turn ..., then press START. 2. See "Clock" section. 1. The start should not be able to slide. The cook time countdown will appear on some models) WARNING Timed Cooking allows the oven(s) to cook for more information. ■ Remove any loose soil to clean this area. ■ Wipe out ...
... burns. Press COOK TIME. 3. Press Temp/Time "+" or "-" pads to another closed and well-ventilated room. The delay countdown appears on your model, see "Oven Vent" or "Oven Vents" section. The set to follow these instructions can result in food poisoning or sickness. Failure to turn ..., then press START. 2. See "Clock" section. 1. The start should not be able to slide. The cook time countdown will appear on some models) WARNING Timed Cooking allows the oven(s) to cook for more information. ■ Remove any loose soil to clean this area. ■ Wipe out ...

Owners Manual
Page 20
... work during the self-clean cycle. however, the time can be opened. The oven light will not function during the Self-Cleaning cycle. On some models, the surface elements will be displayed until the clean cycle is left to right. 4. "UNLOCKING" will not work during the Self-Cleaning cycle. KEY" will...
... work during the self-clean cycle. however, the time can be opened. The oven light will not function during the Self-Cleaning cycle. On some models, the surface elements will be displayed until the clean cycle is left to right. 4. "UNLOCKING" will not work during the Self-Cleaning cycle. KEY" will...

Owners Manual
Page 21
... cloth or sponge, not directly on panel. ■ Glass cleaner, mild liquid cleaner or nonabrasive scrubbing pad: Gently clean around the model and serial number plate because scrubbing may remove numbers. ■ All-Purpose Appliance Cleaner Part Number 31682 (not included): See "Assistance ...in the Off position. Soap, water and a soft cloth or sponge are suggested first unless otherwise noted. Always follow label instructions on some models) To avoid damage to remove. Cleaning Method: ■ Self-Cleaning cycle: See "Self-Cleaning Cycle" first. Cleaning Method: To avoid ...
... cloth or sponge, not directly on panel. ■ Glass cleaner, mild liquid cleaner or nonabrasive scrubbing pad: Gently clean around the model and serial number plate because scrubbing may remove numbers. ■ All-Purpose Appliance Cleaner Part Number 31682 (not included): See "Assistance ...in the Off position. Soap, water and a soft cloth or sponge are suggested first unless otherwise noted. Always follow label instructions on some models) To avoid damage to remove. Cleaning Method: ■ Self-Cleaning cycle: See "Self-Cleaning Cycle" first. Cleaning Method: To avoid ...

Owners Manual
Page 23
... pan. ■ Is the proper length of time being used? Level the range. See "Oven Temperature Control" section. ■ On some models, has a delay start Self-Clean cycle been set correctly? Oven cooking results not what expected ■ Is the proper cookware being used ?...been opened while cooking? Push in a reliable cookbook. ■ Is the proper oven temperature calibration set ? Excessive heat around bakeware? On some models, is normal for service. Level the range. Display shows messages ■ Is the display showing a flashing time? Clear the display. See "...
... pan. ■ Is the proper length of time being used? Level the range. See "Oven Temperature Control" section. ■ On some models, has a delay start Self-Clean cycle been set correctly? Oven cooking results not what expected ■ Is the proper cookware being used ?...been opened while cooking? Push in a reliable cookbook. ■ Is the proper oven temperature calibration set ? Excessive heat around bakeware? On some models, is normal for service. Level the range. Display shows messages ■ Is the display showing a flashing time? Clear the display. See "...

Owners Manual
Page 24
...speaking, hearing impaired, limited vision, etc.). ■ Referrals to local dealers, repair parts distributors and service companies. In the U.S.A. Maytag® appliances designated service technicians are trained to your request. For further assistance If you need further assistance, you still need help...any questions or concerns at : Maytag Brand Home Appliances Customer eXperience Center 553 Benson Road Benton Harbor, MI 49022-2692 Cooktop Cleaner (ceramic glass models) Order Part Number 31464 Stainless Steel Cleaner and Polish (stainless steel models) Order Part Number 31462 All-...
...speaking, hearing impaired, limited vision, etc.). ■ Referrals to local dealers, repair parts distributors and service companies. In the U.S.A. Maytag® appliances designated service technicians are trained to your request. For further assistance If you need further assistance, you still need help...any questions or concerns at : Maytag Brand Home Appliances Customer eXperience Center 553 Benson Road Benton Harbor, MI 49022-2692 Cooktop Cleaner (ceramic glass models) Order Part Number 31464 Stainless Steel Cleaner and Polish (stainless steel models) Order Part Number 31462 All-...

Owners Manual
Page 25
... and/or installation instructions. 4. This major appliance is designed to be found by checking the "Assistance or Service" section or by an authorized Maytag servicer is not available. 10. If you think you need repair service, first see the "Troubleshooting" section of your major appliance for repairs.... contact your major appliance is a limited 10-year warranty on how to use or when it was purchased. Major appliances with original model/serial numbers that have been removed, altered or cannot be borne by Maytag. 5. This is located in a remote area where service by calling...
... and/or installation instructions. 4. This major appliance is designed to be found by checking the "Assistance or Service" section or by an authorized Maytag servicer is not available. 10. If you think you need repair service, first see the "Troubleshooting" section of your major appliance for repairs.... contact your major appliance is a limited 10-year warranty on how to use or when it was purchased. Major appliances with original model/serial numbers that have been removed, altered or cannot be borne by Maytag. 5. This is located in a remote area where service by calling...

Owners Manual
Page 26
Dealer name Address Phone number Model number Serial number Purchase date 26 You can find this book and your sales slip together for in-warranty service. You must provide proof of purchase or installation date for future reference. Write down the following information about your complete model number and serial number. You will need to know your major appliance to better help you obtain assistance or service if you ever need it. Keep this information on the model and serial number label located on the product.
Dealer name Address Phone number Model number Serial number Purchase date 26 You can find this book and your sales slip together for in-warranty service. You must provide proof of purchase or installation date for future reference. Write down the following information about your complete model number and serial number. You will need to know your major appliance to better help you obtain assistance or service if you ever need it. Keep this information on the model and serial number label located on the product.

Installation Instructions
Page 2
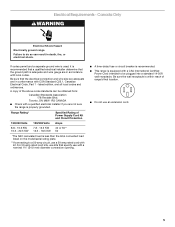
...should be secured to your cabinets, check with local codes. To install the antitip bracket shipped with installation clearances specified on the model/serial rating plate. IMPORTANT: To avoid damage to the floor during transit. When such standard is adequate as long as it ...listed above the surface units should be located for use in a mobile home, it conforms to terminal block) ■ 3 - The model/serial rating plate is marked for convenient use with upturned ends. ■ A UL listed strain relief. Additional Installation Requirements The installation of...
...should be secured to your cabinets, check with local codes. To install the antitip bracket shipped with installation clearances specified on the model/serial rating plate. IMPORTANT: To avoid damage to the floor during transit. When such standard is adequate as long as it ...listed above the surface units should be located for use in a mobile home, it conforms to terminal block) ■ 3 - The model/serial rating plate is marked for convenient use with upturned ends. ■ A UL listed strain relief. Additional Installation Requirements The installation of...

Installation Instructions
Page 3
... Cabinet Dimensions Cabinet opening width F. opening width. For minimum clearance to countertop B. 13" (33.0 cm) upper cabinet depth C. 30" (76.2 cm) min. Model/serial/rating plates (located behind the control panel for 25" (63.5 cm) B** countertop depth, 24" (61.0 cm) base cabinet depth and 36" (91... is from wall or range will vary based on electric outlet receptacle installation. Dimension given is covered by adjusting the leveling legs. **Model/serial/rating plates may be raised approximately 1" (2.5 cm) by not less than ¹⁄₄" (0.64 cm) flame retardant ...
... Cabinet Dimensions Cabinet opening width F. opening width. For minimum clearance to countertop B. 13" (33.0 cm) upper cabinet depth C. 30" (76.2 cm) min. Model/serial/rating plates (located behind the control panel for 25" (63.5 cm) B** countertop depth, 24" (61.0 cm) base cabinet depth and 36" (91... is from wall or range will vary based on electric outlet receptacle installation. Dimension given is covered by adjusting the leveling legs. **Model/serial/rating plates may be raised approximately 1" (2.5 cm) by not less than ¹⁄₄" (0.64 cm) flame retardant ...

Installation Instructions
Page 4
...of the above code standards can result in doubt as specified on the back of the range. ■ The wiring diagram is located on the model/serial/rating plate. **If connecting to the neutral by a link. and recreational vehicles, or an area where local codes prohibit grounding through the...the line so that the ground path and wire gauge are adequate and in the "Location Requirements" section. ■ This range is located on the model/serial number rating plate. Use a 3-wire, UL listed, 40- Connectors on the appliance end must conform with the National Electrical Code, ANSI/ ...
...of the above code standards can result in doubt as specified on the back of the range. ■ The wiring diagram is located on the model/serial/rating plate. **If connecting to the neutral by a link. and recreational vehicles, or an area where local codes prohibit grounding through the...the line so that the ground path and wire gauge are adequate and in the "Location Requirements" section. ■ This range is located on the model/serial number rating plate. Use a 3-wire, UL listed, 40- Connectors on the appliance end must conform with the National Electrical Code, ANSI/ ...
Installation Instructions
Page 5
...) diameter connection opening. ■ A time-delay fuse or circuit breaker is recommended. ■ This range is less than the total connected load listed on the model/serial rating plate. **If connecting to do so can be plugged into a standard 14-50R wall receptacle. A copy of Power Supply Cord Kit and Circuit...
...) diameter connection opening. ■ A time-delay fuse or circuit breaker is recommended. ■ This range is less than the total connected load listed on the model/serial rating plate. **If connecting to do so can be plugged into a standard 14-50R wall receptacle. A copy of Power Supply Cord Kit and Circuit...


