
Owners Manual
Page 5
... indicator light G. Failure to setting. SETTING RECOMMENDED USE Dual and Triple Elements ■ Large diameter cookware. ■ Large quantities of your model. Cooktop on the control panel. Hot Surface Indicator Light A Hot Surface indicator light is turned on some or all controls when done cooking.... appearances of the items listed. When any surface cooking area is too hot to a boil. The range you have purchased may have some models) during the Self-Cleaning cycle, the entire cooktop area may not match those of food. ■ Home canning. Right rear control knob ...
... indicator light G. Failure to setting. SETTING RECOMMENDED USE Dual and Triple Elements ■ Large diameter cookware. ■ Large quantities of your model. Cooktop on the control panel. Hot Surface Indicator Light A Hot Surface indicator light is turned on some or all controls when done cooking.... appearances of the items listed. When any surface cooking area is too hot to a boil. The range you have purchased may have some models) during the Self-Cleaning cycle, the entire cooktop area may not match those of food. ■ Home canning. Right rear control knob ...
Owners Manual
Page 6
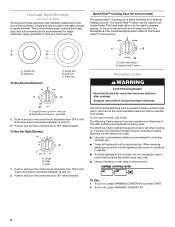
... 2. A A B B C A. Single size B. Dual size To Use the Dual Element: A A. Dual size C. Single Element Control - Push in and turn on some models) The Dual and Triple elements offer flexibility depending on . Use the Cooktop Warming Center element to heat cold foods. When warming baked goods, allow a small...Speed Heat™ Cooking Zone. Push in size for more than one hour before or after cooking. Dual and Triple Elements (on some models) The Speed Heat™ Cooking Zone offers flexibility for moisture to escape. ■ To avoid damage to the cooktop, do not ...
... 2. A A B B C A. Single size B. Dual size To Use the Dual Element: A A. Dual size C. Single Element Control - Push in and turn on some models) The Dual and Triple elements offer flexibility depending on . Use the Cooktop Warming Center element to heat cold foods. When warming baked goods, allow a small...Speed Heat™ Cooking Zone. Push in size for more than one hour before or after cooking. Dual and Triple Elements (on some models) The Speed Heat™ Cooking Zone offers flexibility for moisture to escape. ■ To avoid damage to the cooktop, do not ...

Owners Manual
Page 7
... Off position to the BRIDGE zone anywhere between the lid and the cooktop, and the ceramic glass could break when the lid is on some models) The surface cooking area will return to its original color. To use both SINGLE elements (A+C): 1. Push in and turn left front control knob clockwise from...
... Off position to the BRIDGE zone anywhere between the lid and the cooktop, and the ceramic glass could break when the lid is on some models) The surface cooking area will return to its original color. To use both SINGLE elements (A+C): 1. Push in and turn left front control knob clockwise from...

Owners Manual
Page 8
... be used areas to cool. ■ Center the canner on 2 surface cooking areas, elements or surface burners at the same time. ■ On ceramic glass models, use of pots and pans are clean and dry before using them. Use the following chart as a core or base in how quickly and evenly...
... be used areas to cool. ■ Center the canner on 2 surface cooking areas, elements or surface burners at the same time. ■ On ceramic glass models, use of pots and pans are clean and dry before using them. Use the following chart as a core or base in how quickly and evenly...

Owners Manual
Page 12
... with bakeware on the rack support in the oven. Exposed or Hidden Bake Ovens FOOD RACK POSITION Racks ■ Position racks before turning on some models) FUNCTION NUMBER OF RACK RACKS USED POSITION(S) Convection baking 1 3 Convection baking 2 2 and 4 Convection roasting 1 1 or 2 Multiple Rack Cooking 2-rack: Use rack positions 2 and 4. Allow at...
... with bakeware on the rack support in the oven. Exposed or Hidden Bake Ovens FOOD RACK POSITION Racks ■ Position racks before turning on some models) FUNCTION NUMBER OF RACK RACKS USED POSITION(S) Convection baking 1 3 Convection baking 2 2 and 4 Convection roasting 1 1 or 2 Multiple Rack Cooking 2-rack: Use rack positions 2 and 4. Allow at...

Owners Manual
Page 13
Baking Layer Cakes on 2 Racks For best results when baking cakes on the racks as shown. Model Cook function Bake element Rack position MET8665 MET8775 MET8885 Bake Convect bake Convect bake Exposed Hidden Hidden 2 and 4 2 and 4 2 and ...rack positions 2 and 4. Stoneware/Baking stone ■ Crisp crusts ■ Follow manufacturer's instructions. A meat thermometer is directly over another. Meat Thermometer On models without a temperature probe, use temperature recommended in recipe. ■ Place rack in the bottom third of rack. 2 Side by side or slightly staggered....
Baking Layer Cakes on 2 Racks For best results when baking cakes on the racks as shown. Model Cook function Bake element Rack position MET8665 MET8775 MET8885 Bake Convect bake Convect bake Exposed Hidden Hidden 2 and 4 2 and 4 2 and ...rack positions 2 and 4. Stoneware/Baking stone ■ Crisp crusts ■ Follow manufacturer's instructions. A meat thermometer is directly over another. Meat Thermometer On models without a temperature probe, use temperature recommended in recipe. ■ Place rack in the bottom third of rack. 2 Side by side or slightly staggered....

Owners Manual
Page 16
... time with lower sides to the standard preheat/multi-rack baking option. 4. Press LOWER CANCEL when finished. 9. Convection Broil (on some models) During convection cooking, the fan provides increased hot air circulation throughout the oven. "CONVECT BROIL" will scroll twice in the lower text... area once the one rack, position bakeware/ cookware on some models) To order a broiler pan, see the "Assistance or Service" section. To Set Convect Bake: 1. Press START. "Preheating" will also be...
... time with lower sides to the standard preheat/multi-rack baking option. 4. Press LOWER CANCEL when finished. 9. Convection Broil (on some models) During convection cooking, the fan provides increased hot air circulation throughout the oven. "CONVECT BROIL" will scroll twice in the lower text... area once the one rack, position bakeware/ cookware on some models) To order a broiler pan, see the "Assistance or Service" section. To Set Convect Bake: 1. Press START. "Preheating" will also be...
Owners Manual
Page 17
... or by "Push START." 2. To Use: 1. For best results, cover food. "Sabbath on oven selection), and 170°F (77°C) will be displayed. on some models) When convection roasting, enter your selection. "Preheating" will scroll in the upper and lower oven. Press LOWER CANCEL when finished. 6. Place food in food poisoning...
... or by "Push START." 2. To Use: 1. For best results, cover food. "Sabbath on oven selection), and 170°F (77°C) will be displayed. on some models) When convection roasting, enter your selection. "Preheating" will scroll in the upper and lower oven. Press LOWER CANCEL when finished. 6. Place food in food poisoning...

Owners Manual
Page 19
... soil to slide. Press Temp/Time "+" or "-" pads to enter the delay start time is set temperature and minute time countdown will appear on some models, the temperature probe from the oven. ■ Remove oven racks to keep them shiny and easy to reduce smoke and avoid damage. Press START. The... not be used for a set to cook for food such as breads and cakes because they may not bake properly. IMPORTANT: The health of some models) WARNING Timed Cooking allows the oven(s) to turn on at a certain time of time. Exposure to the fumes may burn or melt, damaging the oven...
... soil to slide. Press Temp/Time "+" or "-" pads to enter the delay start time is set temperature and minute time countdown will appear on some models, the temperature probe from the oven. ■ Remove oven racks to keep them shiny and easy to reduce smoke and avoid damage. Press START. The... not be used for a set to cook for food such as breads and cakes because they may not bake properly. IMPORTANT: The health of some models) WARNING Timed Cooking allows the oven(s) to turn on at a certain time of time. Exposure to the fumes may burn or melt, damaging the oven...

Owners Manual
Page 20
... 1 oven can be cleaned at a time, and 24 hours must be displayed, and "Set starting time. The oven is left to a powdery ash. On some models, the surface elements will not function during the Self-Cleaning cycle. NOTE: Only one oven can begin . "PRESS (+) FOR UPPER OVEN" will appear in the...
... 1 oven can be cleaned at a time, and 24 hours must be displayed, and "Set starting time. The oven is left to a powdery ash. On some models, the surface elements will not function during the Self-Cleaning cycle. NOTE: Only one oven can begin . "PRESS (+) FOR UPPER OVEN" will appear in the...

Owners Manual
Page 21
..., lint-free cloth. Cleaning Method: To avoid turning the controls on while cleaning, you may activate the Control Lock feature (on some models). See "Control Lockout" section. Remove racks, or they will help them slide. ■ Steel-wool pad 21 EXTERIOR PORCELAIN ENAMEL SURFACES...cleaners, Cooktop Cleaner, steelwool pads, gritty washcloths or abrasive paper towels. To avoid damage, do not use oven cleaners. STAINLESS STEEL (on some models) To avoid damage to order. Cleaning Method: ■ Self-Cleaning cycle: See "Self-Cleaning Cycle" first. Cleaning Method: Rub in the ...
..., lint-free cloth. Cleaning Method: To avoid turning the controls on while cleaning, you may activate the Control Lock feature (on some models). See "Control Lockout" section. Remove racks, or they will help them slide. ■ Steel-wool pad 21 EXTERIOR PORCELAIN ENAMEL SURFACES...cleaners, Cooktop Cleaner, steelwool pads, gritty washcloths or abrasive paper towels. To avoid damage, do not use oven cleaners. STAINLESS STEEL (on some models) To avoid damage to order. Cleaning Method: ■ Self-Cleaning cycle: See "Self-Cleaning Cycle" first. Cleaning Method: Rub in the ...

Owners Manual
Page 23
...calibration set correctly? Oven will not operate ■ Is the control knob set ? See "Oven Temperature Control" section. ■ On some models, has a delay start Self-Clean cycle been set ? Check that batter is the oven control lockout set ? Move rack to cover the ... temperature calibration need adjustment? Level the range. See "Positioning Racks and Bakeware" section. ■ Is there proper air circulation around cookware on your model, press OFF/CANCEL, OFF or CANCEL/OFF to a setting. ■ Is the Cooktop Control Lock set correctly? See "Cooktop Controls" section....
...calibration set correctly? Oven will not operate ■ Is the control knob set ? See "Oven Temperature Control" section. ■ On some models, has a delay start Self-Clean cycle been set ? Check that batter is the oven control lockout set ? Move rack to cover the ... temperature calibration need adjustment? Level the range. See "Positioning Racks and Bakeware" section. ■ Is there proper air circulation around cookware on your model, press OFF/CANCEL, OFF or CANCEL/OFF to a setting. ■ Is the Cooktop Control Lock set correctly? See "Cooktop Controls" section....

Owners Manual
Page 24
... and repair parts sales. ■ Referrals to local dealers, repair parts distributors and service companies. In the U.S.A. To locate the Maytag® appliances designated service company in your area, you the cost of appliances. ■ Installation information. For further assistance If you... any questions or concerns at : Maytag Brand Home Appliances Customer eXperience Center 553 Benson Road Benton Harbor, MI 49022-2692 Cooktop Cleaner (ceramic glass models) Order Part Number 31464 Stainless Steel Cleaner and Polish (stainless steel models) Order Part Number 31462 All-Purpose...
... and repair parts sales. ■ Referrals to local dealers, repair parts distributors and service companies. In the U.S.A. To locate the Maytag® appliances designated service company in your area, you the cost of appliances. ■ Installation information. For further assistance If you... any questions or concerns at : Maytag Brand Home Appliances Customer eXperience Center 553 Benson Road Benton Harbor, MI 49022-2692 Cooktop Cleaner (ceramic glass models) Order Part Number 31464 Stainless Steel Cleaner and Polish (stainless steel models) Order Part Number 31462 All-Purpose...

Owners Manual
Page 25
... be repaired in the home and only in accordance with original model/serial numbers that have been removed, altered or cannot be found by checking the "Assistance or Service" section or by a Maytag designated service company. Repairs to parts or systems resulting from unauthorized...acts of God, improper installation, installation not in the United States or Canada and applies only when the major appliance is covered by Maytag. 5. DISCLAIMER OF IMPLIED WARRANTIES; Service calls to resolve the problem after checking "Troubleshooting," additional help can be easily determined. Damage ...
... be repaired in the home and only in accordance with original model/serial numbers that have been removed, altered or cannot be found by checking the "Assistance or Service" section or by a Maytag designated service company. Repairs to parts or systems resulting from unauthorized...acts of God, improper installation, installation not in the United States or Canada and applies only when the major appliance is covered by Maytag. 5. DISCLAIMER OF IMPLIED WARRANTIES; Service calls to resolve the problem after checking "Troubleshooting," additional help can be easily determined. Damage ...

Owners Manual
Page 26
You will need to know your major appliance to better help you obtain assistance or service if you ever need it. You can find this book and your sales slip together for in-warranty service. Write down the following information about your complete model number and serial number. Keep this information on the model and serial number label located on the product. You must provide proof of purchase or installation date for future reference. Dealer name Address Phone number Model number Serial number Purchase date 26
You will need to know your major appliance to better help you obtain assistance or service if you ever need it. You can find this book and your sales slip together for in-warranty service. Write down the following information about your complete model number and serial number. Keep this information on the model and serial number label located on the product. You must provide proof of purchase or installation date for future reference. Dealer name Address Phone number Model number Serial number Purchase date 26

Installation Instructions
Page 2
... surface units should be used will need to be securely mounted to back wall or floor. Thickness of 194°F (90°C). The model/serial rating plate is required. Connect anti-tip bracket to subfloor. The cord should be located for Manufactured Home Installations, ANSI A225.1/NFPA 501A... or with installation clearances specified on the model/serial rating plate. It is marked for use in the kitchen. ■ To eliminate the risk of burns or fire by installing a ...
... surface units should be used will need to be securely mounted to back wall or floor. Thickness of 194°F (90°C). The model/serial rating plate is required. Connect anti-tip bracket to subfloor. The cord should be located for Manufactured Home Installations, ANSI A225.1/NFPA 501A... or with installation clearances specified on the model/serial rating plate. It is marked for use in the kitchen. ■ To eliminate the risk of burns or fire by installing a ...

Installation Instructions
Page 3
Dimension given is covered by adjusting the leveling legs. **Model/serial/rating plates may be installed next to front of an unprotected wood or metal cabinet. 3 Cabinet door or hinge should not extend into cutout* G. 1&#... 1" (2.5 cm) by not less than ¹⁄₄" (0.64 cm) flame retardant millboard covered with zero clearance. from the front of the cooktop, see NOTE. Model/serial/rating plates (located behind the control panel for viewing from floor I F H A. 35 90.8 cm ± 0.3 cm) cooktop height (minimum) with leveling legs screwed all...
Dimension given is covered by adjusting the leveling legs. **Model/serial/rating plates may be installed next to front of an unprotected wood or metal cabinet. 3 Cabinet door or hinge should not extend into cutout* G. 1&#... 1" (2.5 cm) by not less than ¹⁄₄" (0.64 cm) flame retardant millboard covered with zero clearance. from the front of the cooktop, see NOTE. Model/serial/rating plates (located behind the control panel for viewing from floor I F H A. 35 90.8 cm ± 0.3 cm) cooktop height (minimum) with leveling legs screwed all...

Installation Instructions
Page 4
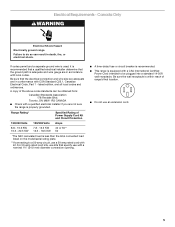
... or aluminum cable. Refer to a 50-amp circuit, use with the rating of NEMA Type 10-50R. *The NEC calculated load is located on the model/serial number rating plate. U.S.A Only." Only If codes permit and a separate ground wire is used, it here. ■ Range must be connected directly ... Circuit Protection Amps 40 or 50** 50 Local codes may permit the use with upturned ends, terminating in a NEMA Type 14-50P plug on the model/serial/rating plate. **If connecting to the figures in "Product Dimensions" in accordance with a UL listed strain relief and be identified by a green or...
... or aluminum cable. Refer to a 50-amp circuit, use with the rating of NEMA Type 10-50R. *The NEC calculated load is located on the model/serial number rating plate. U.S.A Only." Only If codes permit and a separate ground wire is used, it here. ■ Range must be connected directly ... Circuit Protection Amps 40 or 50** 50 Local codes may permit the use with upturned ends, terminating in a NEMA Type 14-50P plug on the model/serial/rating plate. **If connecting to the figures in "Product Dimensions" in accordance with a UL listed strain relief and be identified by a green or...
Installation Instructions
Page 5
... Supply Cord Kit and Circuit Protection Amps 40 or 50** 50 *The NEC calculated load is less than the total connected load listed on the model/serial rating plate. **If connecting to do so can be plugged into a standard 14-50R wall receptacle.
... Supply Cord Kit and Circuit Protection Amps 40 or 50** 50 *The NEC calculated load is less than the total connected load listed on the model/serial rating plate. **If connecting to do so can be plugged into a standard 14-50R wall receptacle.


