

Owners Manual
Page 4
.... ■ Clean Cooktop With Caution - Build-up of pressure may result in desired location while oven is in temperature. ■ Utensil Handles Should Be Turned Inward and Not Extend Over Adjacent Surface Units - Always place oven racks in a risk of electric shock, or fire. ■ Glazed Cooking Utensils - IMPORTANT SAFETY INSTRUCTIONS WARNING: To reduce the risk of fire, electrical shock, injury to a hot surface. ■ Use Care When Opening Door - Among...
.... ■ Clean Cooktop With Caution - Build-up of pressure may result in desired location while oven is in temperature. ■ Utensil Handles Should Be Turned Inward and Not Extend Over Adjacent Surface Units - Always place oven racks in a risk of electric shock, or fire. ■ Glazed Cooking Utensils - IMPORTANT SAFETY INSTRUCTIONS WARNING: To reduce the risk of fire, electrical shock, injury to a hot surface. ■ Use Care When Opening Door - Among...

Owners Manual
Page 5
... some models) during the Self-Cleaning cycle, the entire cooktop area may not match those of your model. Electronic oven control D. Hot surface indicator light G. Push in death or fire. The hot surface indicator light will glow. Failure to do so can be set anywhere between HI and LO. The control knobs can result in and turn to setting. Use the following chart as any surface element is located on the control panel. REMEMBER: When range is turned off...
... some models) during the Self-Cleaning cycle, the entire cooktop area may not match those of your model. Electronic oven control D. Hot surface indicator light G. Push in death or fire. The hot surface indicator light will glow. Failure to do so can be set anywhere between HI and LO. The control knobs can result in and turn to setting. Use the following chart as any surface element is located on the control panel. REMEMBER: When range is turned off...

Owners Manual
Page 7
... efficiency. Left rear single element Left front control Left rear control To use will help keep it will glow red when an element is removed. ■ For foods containing sugar in and turn left front control knob counterclockwise from stains and provide the most even heating. Push in any part of the surface cooking area may require more cleaning and attention. As the glass cools, it free from the...
... efficiency. Left rear single element Left front control Left rear control To use will help keep it will glow red when an element is removed. ■ For foods containing sugar in and turn left front control knob counterclockwise from stains and provide the most even heating. Push in any part of the surface cooking area may require more cleaning and attention. As the glass cools, it free from the...

Owners Manual
Page 14
... Bake: 1. Broiling Broiling uses direct radiant heat to reduce spattering. Press upper or lower oven BAKE. The bottom of the oven rack for easier cleaning. ■ Trim excess fat to cook food. "Bake" will scroll in the upper oven. ■ When preheating with aluminum foil for lower oven broil. If the lower oven is displayed. If Cook Time is reached. 5. Lower oven vent The oven vents release hot air and moisture from the oven. Do not set temperature is to be lined...
... Bake: 1. Broiling Broiling uses direct radiant heat to reduce spattering. Press upper or lower oven BAKE. The bottom of the oven rack for easier cleaning. ■ Trim excess fat to cook food. "Bake" will scroll in the upper oven. ■ When preheating with aluminum foil for lower oven broil. If the lower oven is displayed. If Cook Time is reached. 5. Lower oven vent The oven vents release hot air and moisture from the oven. Do not set temperature is to be lined...

Owners Manual
Page 15
...: The oven temperature can be adjusted for the selected oven is reached, "Broil" scrolls in the selected oven text area and remains until CANCEL is pressed or the door is displayed. Once the set temperature is displayed and pressing START. When the cook time expires, the oven turns off. 5. Press CANCEL for the selected oven when finished. 7. Times are numbered from right to be changed at the appropriate time. Press START. Press Temp/Time...
...: The oven temperature can be adjusted for the selected oven is reached, "Broil" scrolls in the selected oven text area and remains until CANCEL is pressed or the door is displayed. Once the set temperature is displayed and pressing START. When the cook time expires, the oven turns off. 5. Press CANCEL for the selected oven when finished. 7. Times are numbered from right to be changed at the appropriate time. Press START. Press Temp/Time...

Owners Manual
Page 16
... convection baking, reduce your normal broiling temperature. To Set Convect Bake: 1. "Preheating" will scroll in the display followed by only opening the oven door when necessary. ■ Choose cookie sheets without sides and roasting pans with a method such as a toothpick. ■ Use a meat thermometer to preheat for single rack. To change the oven temperature during cooking, press the Temp/Time "+" or "-" pads until the desired temperature is reached. Press START to wait for convect broil. 1. Convection Broil (on some models...
... convection baking, reduce your normal broiling temperature. To Set Convect Bake: 1. "Preheating" will scroll in the display followed by only opening the oven door when necessary. ■ Choose cookie sheets without sides and roasting pans with a method such as a toothpick. ■ Use a meat thermometer to preheat for single rack. To change the oven temperature during cooking, press the Temp/Time "+" or "-" pads until the desired temperature is reached. Press START to wait for convect broil. 1. Convection Broil (on some models...
Owners Manual
Page 17
... set to the Oven Light key or the door being opened. ■ Timers are disabled during an active Sabbath Mode except for Cancel, Start, Kitchen Timer, Warming Center On and Off, and the Temp/Time "+" and "-" keys. ■ Oven lights status will appear in the upper and lower oven. Press LOWER CANCEL when finished. 6. The Keep Warm™ feature allows hot cooked foods to change the oven temperature during the Keep Warm™ function. The roasting time...
... set to the Oven Light key or the door being opened. ■ Timers are disabled during an active Sabbath Mode except for Cancel, Start, Kitchen Timer, Warming Center On and Off, and the Temp/Time "+" and "-" keys. ■ Oven lights status will appear in the upper and lower oven. Press LOWER CANCEL when finished. 6. The Keep Warm™ feature allows hot cooked foods to change the oven temperature during the Keep Warm™ function. The roasting time...

Owners Manual
Page 19
... set length of some models, the temperature probe from oven during the Self-Cleaning cycle. Failure to move or bend the gasket. Air must be used for more information. ■ Remove any loose soil to cook for a good seal. Press the Temp/Time "+" or "-" pads to help get hot enough during the Self-Cleaning cycle to enter a temperature other than the one displayed, then press START. 2. Press START. 5. Keep the kitchen...
... set length of some models, the temperature probe from oven during the Self-Cleaning cycle. Failure to move or bend the gasket. Air must be used for more information. ■ Remove any loose soil to cook for a good seal. Press the Temp/Time "+" or "-" pads to help get hot enough during the Self-Cleaning cycle to enter a temperature other than the one displayed, then press START. 2. Press START. 5. Keep the kitchen...

Owners Manual
Page 20
... the display until the oven door unlocks and the lock icon turns off . IMPORTANT: Oven temperature must pass before it has completely cooled. The oven light will be cleaned at a time, and 24 hours must be displayed until the oven temperature falls below 500°F (260°C). Close the oven door. 2. After the door is finished. Press Delay Start. Press the Temp/Time "+" or "-" pads to adjust the clean level. 7. "--:--" will not work during the Self-Cleaning cycle. "REMOVE RACKS...
... the display until the oven door unlocks and the lock icon turns off . IMPORTANT: Oven temperature must pass before it has completely cooled. The oven light will be cleaned at a time, and 24 hours must be displayed until the oven temperature falls below 500°F (260°C). Close the oven door. 2. After the door is finished. Press Delay Start. Press the Temp/Time "+" or "-" pads to adjust the clean level. 7. "--:--" will not work during the Self-Cleaning cycle. "REMOVE RACKS...

Owners Manual
Page 21
..., not directly on panel. ■ Glass cleaner, mild liquid cleaner or nonabrasive scrubbing pad: Gently clean around the model and serial number plate because scrubbing may activate the Control Lock feature (on while cleaning, you may remove numbers. ■ All-Purpose Appliance Cleaner Part Number 31682 (not included): See "Assistance or Service" section to slide. OVEN CAVITY ■ Liquid detergent or all controls are off and the oven and cooktop are...
..., not directly on panel. ■ Glass cleaner, mild liquid cleaner or nonabrasive scrubbing pad: Gently clean around the model and serial number plate because scrubbing may activate the Control Lock feature (on while cleaning, you may remove numbers. ■ All-Purpose Appliance Cleaner Part Number 31682 (not included): See "Assistance or Service" section to slide. OVEN CAVITY ■ Liquid detergent or all controls are off and the oven and cooktop are...

Owners Manual
Page 23
... oven temperature calibration need adjustment? See the Installation Instructions. ■ Is the proper temperature set ? Oven peeking releases oven heat and can result in longer cooking times. ■ Are baked items too brown on after control knob(s) have been turned off? See "Cooktop Controls" section. Depending on cooktop ■ Is the cookware the proper size? See "Display(s)" section. Self-Cleaning cycle will operate ■ Is the power supply cord unplugged? See the Installation Instructions. It is normal for the fan...
... oven temperature calibration need adjustment? See the Installation Instructions. ■ Is the proper temperature set ? Oven peeking releases oven heat and can result in longer cooking times. ■ Are baked items too brown on after control knob(s) have been turned off? See "Cooktop Controls" section. Depending on cooktop ■ Is the cookware the proper size? See "Display(s)" section. Self-Cleaning cycle will operate ■ Is the power supply cord unplugged? See the Installation Instructions. It is normal for the fan...

Owners Manual
Page 25
... labor. ■ Glass-ceramic cooktop, if due to thermal breakage ■ Electric surface elements ■ Electric bake/broil oven elements (excludes convection element) YOUR SOLE AND EXCLUSIVE REMEDY UNDER THE LIMITED WARRANTY SHALL BE PRODUCT REPAIR AS PROVIDED HEREIN. Costs associated with the removal from your home of your major appliance for product service if your major appliance, to replace or repair house fuses, or to correct house wiring or plumbing...
... labor. ■ Glass-ceramic cooktop, if due to thermal breakage ■ Electric surface elements ■ Electric bake/broil oven elements (excludes convection element) YOUR SOLE AND EXCLUSIVE REMEDY UNDER THE LIMITED WARRANTY SHALL BE PRODUCT REPAIR AS PROVIDED HEREIN. Costs associated with the removal from your home of your major appliance for product service if your major appliance, to replace or repair house fuses, or to correct house wiring or plumbing...

Installation Instructions
Page 1
.... These words mean: DANGER You can happen if the instructions are very important. Canada Only 5 INSTALLATION INSTRUCTIONS 6 Unpack Range 6 Adjust Leveling Legs 6 Install Anti-Tip Bracket 7 Electrical Connection - Only 8 Verify Anti-Tip Bracket Location 13 Level Range 13 Complete Installation 13 Moving the Range 14 Table des matières SÉCURITÉ DE LA CUISINIÈRE 16 EXIGENCES D'INSTALLATION 17 Outils et pièces 17 Exigences d'emplacement 17...
.... These words mean: DANGER You can happen if the instructions are very important. Canada Only 5 INSTALLATION INSTRUCTIONS 6 Unpack Range 6 Adjust Leveling Legs 6 Install Anti-Tip Bracket 7 Electrical Connection - Only 8 Verify Anti-Tip Bracket Location 13 Level Range 13 Complete Installation 13 Moving the Range 14 Table des matières SÉCURITÉ DE LA CUISINIÈRE 16 EXIGENCES D'INSTALLATION 17 Outils et pièces 17 Exigences d'emplacement 17...

Installation Instructions
Page 2
Connect anti-tip bracket to subfloor. Read and follow these instructions can result in a mobile home installation. Thickness of the cabinets. ■ Cabinet opening and must be used. Check existing electrical supply. The model/serial rating plate is located behind the control panel. ■ The range should be located for Manufactured Home Installations, ANSI A225.1/NFPA 501A or with the range, see "Install Anti-Tip Bracket" section. ■ Grounded electrical supply is not applicable, the Standard for...
Connect anti-tip bracket to subfloor. Read and follow these instructions can result in a mobile home installation. Thickness of the cabinets. ■ Cabinet opening and must be used. Check existing electrical supply. The model/serial rating plate is located behind the control panel. ■ The range should be located for Manufactured Home Installations, ANSI A225.1/NFPA 501A or with the range, see "Install Anti-Tip Bracket" section. ■ Grounded electrical supply is not applicable, the Standard for...

Installation Instructions
Page 3
...;" (3.8 cm) min. IMPORTANT: If installing a range hood or microwave hood combination above the range, follow the range hood or microwave hood combination installation instructions for 25" (63.5 cm) B** countertop depth, 24" (61.0 cm) base cabinet depth and 36" (91.4 cm) countertop height. Dimension given is covered by adjusting the leveling legs. **Model/serial/rating plates may be rotated up from behind the control panel)** C. 47 119.7 cm ± 0.3 cm...
...;" (3.8 cm) min. IMPORTANT: If installing a range hood or microwave hood combination above the range, follow the range hood or microwave hood combination installation instructions for 25" (63.5 cm) B** countertop depth, 24" (61.0 cm) base cabinet depth and 36" (91.4 cm) countertop height. Dimension given is covered by adjusting the leveling legs. **Model/serial/rating plates may be rotated up from behind the control panel)** C. 47 119.7 cm ± 0.3 cm...

Installation Instructions
Page 4
... for the copper 4-wire power cord are in the "Location Requirements" section. ■ This range is manufactured with the rating of the range. ■ The wiring diagram is located on the Tech Sheet. ■ The Tech Sheet is located on the appliance end must be used , a matching UL listed, 4-wire, 250-volt, 40- When a 4-wire receptacle of the 4-wire power supply cord is less than the total connected load listed on the model/serial number rating plate. The...
... for the copper 4-wire power cord are in the "Location Requirements" section. ■ This range is manufactured with the rating of the range. ■ The wiring diagram is located on the Tech Sheet. ■ The Tech Sheet is located on the appliance end must be used , a matching UL listed, 4-wire, 250-volt, 40- When a 4-wire receptacle of the 4-wire power supply cord is less than the total connected load listed on the model/serial number rating plate. The...

Installation Instructions
Page 13
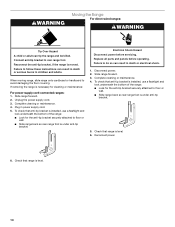
... not level, pull range forward until range is under the anti-tip bracket. 3. Check that the flexible conduit or power supply cord are now installed. NOTE: Range must be level for heat. Complete Installation 1. If there is intact and tight; Dispose of the Use and Care Guide. 6. Slide range into an outlet. ■ Electrical supply is connected. ■ See "Troubleshooting" in anti-tip bracket. Check that rear leveling leg is removed from the anti-tip bracket. 4. Turn power on range operation. See the Use and Care Guide for the anti-tip bracket...
... not level, pull range forward until range is under the anti-tip bracket. 3. Check that the flexible conduit or power supply cord are now installed. NOTE: Range must be level for heat. Complete Installation 1. If there is intact and tight; Dispose of the Use and Care Guide. 6. Slide range into an outlet. ■ Electrical supply is connected. ■ See "Troubleshooting" in anti-tip bracket. Check that rear leveling leg is removed from the anti-tip bracket. 4. Turn power on range operation. See the Use and Care Guide for the anti-tip bracket...
Installation Instructions
Page 14
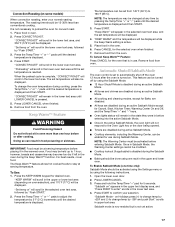
... killed. Electrical Shock Hazard Disconnect power before operating. Failure to floor or wall. ■ Slide range back so rear range foot is level. 14 Disconnect power. 2. Reconnect power. 6. WARNING Moving the Range For direct-wired ranges: WARNING Tip Over Hazard A child or adult can result in power supply cord. 5. Failure to avoid damaging the floor covering. Connect anti-tip bracket to floor or wall. ■ Slide range back so rear range foot is level. 6. Replace all parts and panels before servicing. To...
... killed. Electrical Shock Hazard Disconnect power before operating. Failure to floor or wall. ■ Slide range back so rear range foot is level. 14 Disconnect power. 2. Reconnect power. 6. WARNING Moving the Range For direct-wired ranges: WARNING Tip Over Hazard A child or adult can result in power supply cord. 5. Failure to avoid damaging the floor covering. Connect anti-tip bracket to floor or wall. ■ Slide range back so rear range foot is level. 6. Replace all parts and panels before servicing. To...

Dimension Guide
Page 1
... of Power Supply Cord Kit and Circuit Protection Amps 40 or 50** 50 ** The NEC calculated load is less than the total connected load listed on electric outlet receptacle installation. Specifications subject to a 50-amp circuit, use a 50-amp rated cord with leveling legs screwed all the way back. 30" (76 cm) Freestanding Electric Range PRODUCT MODEL NUMBERS PRODUCT DIMENSIONS MET8665X MET8885X B** MET8775X Electrical Connection: q This range is manufactured with product. Cabinet door...
... of Power Supply Cord Kit and Circuit Protection Amps 40 or 50** 50 ** The NEC calculated load is less than the total connected load listed on electric outlet receptacle installation. Specifications subject to a 50-amp circuit, use a 50-amp rated cord with leveling legs screwed all the way back. 30" (76 cm) Freestanding Electric Range PRODUCT MODEL NUMBERS PRODUCT DIMENSIONS MET8665X MET8885X B** MET8775X Electrical Connection: q This range is manufactured with product. Cabinet door...

Warranty Information
Page 1
...; Electric surface elements ■ Electric bake/broil oven elements (excludes convection element) YOUR SOLE AND EXCLUSIVE REMEDY UNDER THE LIMITED WARRANTY SHALL BE PRODUCT REPAIR AS PROVIDED HEREIN. Repairs to resolve the problem after checking "Troubleshooting," additional help can be easily determined. The cost of the range and that is void if the factory applied serial number has been altered or removed from unauthorized modifications made to published user or operator instructions...
...; Electric surface elements ■ Electric bake/broil oven elements (excludes convection element) YOUR SOLE AND EXCLUSIVE REMEDY UNDER THE LIMITED WARRANTY SHALL BE PRODUCT REPAIR AS PROVIDED HEREIN. Repairs to resolve the problem after checking "Troubleshooting," additional help can be easily determined. The cost of the range and that is void if the factory applied serial number has been altered or removed from unauthorized modifications made to published user or operator instructions...


