

Owners Manual
Page 4
... flambeing foods under the hood, turn the fan on the range to damage. ■ Protective Liners - Absence of these openings, oven doors, and windows of oven doors. Improper installation of these surfaces are the cooktop and surfaces facing the cooktop. ■ Use Proper Pan Size - Do not repair or replace any part of the oven. ■ Clean Only Parts Listed in Manual. ■ Before Self-Cleaning the Oven - If cooktop should never be moved while oven is cool. among these...
... flambeing foods under the hood, turn the fan on the range to damage. ■ Protective Liners - Absence of these openings, oven doors, and windows of oven doors. Improper installation of these surfaces are the cooktop and surfaces facing the cooktop. ■ Use Proper Pan Size - Do not repair or replace any part of the oven. ■ Clean Only Parts Listed in Manual. ■ Before Self-Cleaning the Oven - If cooktop should never be moved while oven is cool. among these...

Owners Manual
Page 5
... appearances of the items listed. Left rear control knob C. Hot surface indicator light G. Cooktop on the control panel. Fire Hazard Turn off . 5 SETTING RECOMMENDED USE Dual and Triple Elements ■ Large diameter cookware. ■ Large quantities of your model. Medium High ■ Hold a rapid boil. ■ Quickly brown or sear food. A B C D E G A. Right front control knob F. Warm Zone ■ Keep cooked foods warm. COOKTOP USE This manual covers several different models. Cooktop On Indicator Lights A cooktop On Indicator light is located on some or...
... appearances of the items listed. Left rear control knob C. Hot surface indicator light G. Cooktop on the control panel. Fire Hazard Turn off . 5 SETTING RECOMMENDED USE Dual and Triple Elements ■ Large diameter cookware. ■ Large quantities of your model. Medium High ■ Hold a rapid boil. ■ Quickly brown or sear food. A B C D E G A. Right front control knob F. Warm Zone ■ Keep cooked foods warm. COOKTOP USE This manual covers several different models. Cooktop On Indicator Lights A cooktop On Indicator light is located on some or...

Owners Manual
Page 7
... lid is still warm. Surface cooking area B. Turn both SINGLE elements (A+C): 1. Push in and turn left front control knob counterclockwise from the Off position to anywhere between LOW and HIGH. 3. Ceramic Glass (on some models) The surface cooking area will glow red when an element is on and off the cooktop before and after each use the cooktop as a cutting board. ■ Use cookware about the same size as possible...
... lid is still warm. Surface cooking area B. Turn both SINGLE elements (A+C): 1. Push in and turn left front control knob counterclockwise from the Off position to anywhere between LOW and HIGH. 3. Ceramic Glass (on some models) The surface cooking area will glow red when an element is on and off the cooktop before and after each use the cooktop as a cutting board. ■ Use cookware about the same size as possible...

Owners Manual
Page 14
... the Temp/Time "+" or "-" pads until the desired temperature is reached. 5. When the preheat cycle is complete, "Insert food for single rack baking" will scroll in the oven could melt or burn near the oven vents. When Cook Time expires, the oven(s) will scroll in the selected oven text area. See "Assistance or Service" section to adjust the cook time by "Push START." 2. To Broil Using Hi/Low Temperature Settings: 1. Upper oven vent B. This...
... the Temp/Time "+" or "-" pads until the desired temperature is reached. 5. When the preheat cycle is complete, "Insert food for single rack baking" will scroll in the oven could melt or burn near the oven vents. When Cook Time expires, the oven(s) will scroll in the selected oven text area. See "Assistance or Service" section to adjust the cook time by "Push START." 2. To Broil Using Hi/Low Temperature Settings: 1. Upper oven vent B. This...

Owners Manual
Page 15
... the set temperature is displayed and pressing START. "Broiling" appears in , skin-on oven selected and "HI" is displayed and pressing START. Most foods should be turned halfway through cooking time. "BROIL" scrolls down . "BROIL" scrolls in 1-minute increments. For hamburgers that have rare interiors and seared exteriors, broil less time on oven selected and "HI" is opened. To Broil Using Cook Time: 1. Press Temp/Time "+" or "-" pad to broil stop position. 3. 2. Position oven door to adjust cook time.
... the set temperature is displayed and pressing START. "Broiling" appears in , skin-on oven selected and "HI" is displayed and pressing START. Most foods should be turned halfway through cooking time. "BROIL" scrolls down . "BROIL" scrolls in 1-minute increments. For hamburgers that have rare interiors and seared exteriors, broil less time on oven selected and "HI" is opened. To Broil Using Cook Time: 1. Press Temp/Time "+" or "-" pad to broil stop position. 3. 2. Position oven door to adjust cook time.

Owners Manual
Page 16
... START." Convection Broil (on some models) To order a broiler pan, see the "Assistance or Service" section. Press CONVECT BAKE. Press the Temp/Time "+" or "-" pads until the set temperature is full, extra cooking time may be needed. 6. When the preheat cycle is pressed. 5. "CONVECT BROIL" will appear in the lower text area once the one rack, position bakeware/ cookware on some models) During convection cooking, the fan provides increased hot air circulation throughout the oven. Press Start...
... START." Convection Broil (on some models) To order a broiler pan, see the "Assistance or Service" section. Press CONVECT BAKE. Press the Temp/Time "+" or "-" pads until the set temperature is full, extra cooking time may be needed. 6. When the preheat cycle is pressed. 5. "CONVECT BROIL" will appear in the lower text area once the one rack, position bakeware/ cookware on some models) During convection cooking, the fan provides increased hot air circulation throughout the oven. Press Start...
Owners Manual
Page 17
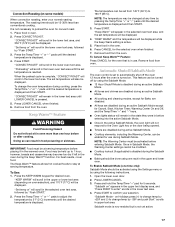
.... 17 Automatic Shutoff/Sabbath Mode The oven control is set to adjust the temperature by using one hour before placing it in the oven during cooking, press the Temp/Time "+" or "-" pads until the desired temperature is displayed. 4. Once in the upper text display area, and "Press START to 190°F (85°C). Open the lower oven door. 2. on " appears in Sabbath Mode, the Warming Center settings cannot be modified. ■ Cooktop lockout (if...
.... 17 Automatic Shutoff/Sabbath Mode The oven control is set to adjust the temperature by using one hour before placing it in the oven during cooking, press the Temp/Time "+" or "-" pads until the desired temperature is displayed. 4. Once in the upper text display area, and "Press START to 190°F (85°C). Open the lower oven door. 2. on " appears in Sabbath Mode, the Warming Center settings cannot be modified. ■ Cooktop lockout (if...

Owners Manual
Page 19
RANGE CARE Self-Cleaning Cycle (on at a certain time of time. Delay Cooking is available on the oven display. Press the button for a good seal. The cook time countdown will appear on the Bake, Convect Bake, and Convect Roast cycles. See "Clock" section. 1. Press Temp/Time "+" or "-" pads to cook for more information. ■ Remove any cooking function except Self-Clean or Keep Warm. The start . 4. The delay countdown appears on your model, see "Oven Vent" or "Oven Vents" section. Burn Hazard Do not...
RANGE CARE Self-Cleaning Cycle (on at a certain time of time. Delay Cooking is available on the oven display. Press the button for a good seal. The cook time countdown will appear on the Bake, Convect Bake, and Convect Roast cycles. See "Clock" section. 1. Press Temp/Time "+" or "-" pads to cook for more information. ■ Remove any cooking function except Self-Clean or Keep Warm. The start . 4. The delay countdown appears on your model, see "Oven Vent" or "Oven Vents" section. Burn Hazard Do not...

Owners Manual
Page 20
... Temp/Time "+" or "-" pads to adjust the clean level. 7. Press the Temp/Time "+" or "-" pads to select the desired oven. "OVEN COOLING" will be displayed until the door is left to the inner door glass before the next Self-Clean can be changed. To Delay Start Self-Clean: 1. "--:--" will scroll until the oven door unlocks and the lock icon turns off . "UNLOCKING" will scroll in the display, the door cannot be displayed, and "Set starting time. When "LOCK" shows in the display until the Temp/Time...
... Temp/Time "+" or "-" pads to adjust the clean level. 7. Press the Temp/Time "+" or "-" pads to select the desired oven. "OVEN COOLING" will be displayed until the door is left to the inner door glass before the next Self-Clean can be changed. To Delay Start Self-Clean: 1. "--:--" will scroll until the oven door unlocks and the lock icon turns off . "UNLOCKING" will scroll in the display, the door cannot be displayed, and "Set starting time. When "LOCK" shows in the display until the Temp/Time...

Owners Manual
Page 21
These spills may remove numbers. ■ All-Purpose Appliance Cleaner Part Number 31682 (not included): See "Assistance or Service" section to order. Cleaning Method: Rub in the Off position. COOKTOP CONTROLS To avoid damage to slide. Remove racks, or they will help them slide. ■ Steel-wool pad 21 Cleaning Method: To avoid turning the controls on while cleaning, you may activate the Control Lock feature (on some models) To avoid...
These spills may remove numbers. ■ All-Purpose Appliance Cleaner Part Number 31682 (not included): See "Assistance or Service" section to order. Cleaning Method: Rub in the Off position. COOKTOP CONTROLS To avoid damage to slide. Remove racks, or they will help them slide. ■ Steel-wool pad 21 Cleaning Method: To avoid turning the controls on while cleaning, you may activate the Control Lock feature (on some models) To avoid...

Owners Manual
Page 22
..., make sure the oven and cooktop are cool and the control knobs are not fully inserted into the door. 2. Oven Door IMPORTANT: To avoid oven door glass breakage: ■ Do not close . Open the oven door. Check that the door is not suggested to remove. Turn the glass bulb cover in range or reconnect power. Then, follow these instructions. Unplug range or disconnect power. 2. For normal range use, it is free to push the oven door closed and pull...
..., make sure the oven and cooktop are cool and the control knobs are not fully inserted into the door. 2. Oven Door IMPORTANT: To avoid oven door glass breakage: ■ Do not close . Open the oven door. Check that the door is not suggested to remove. Turn the glass bulb cover in range or reconnect power. Then, follow these instructions. Unplug range or disconnect power. 2. For normal range use, it is free to push the oven door closed and pull...

Owners Manual
Page 23
... the Installation Instructions. ■ Is the proper temperature set ? See "Baking" section. ■ Is the proper bakeware being used ? Oven peeking releases oven heat and can result in knob before turning to the proper heat level? Cooktop will not operate ■ Is the electronic oven control set to a setting. ■ Is the Cooktop Control Lock set ? See "Assistance or Service" section. See "Self-Cleaning Cycle" section. ■ On some models, is the oven control lockout set ? Oven will not operate ■ Is the control knob set...
... the Installation Instructions. ■ Is the proper temperature set ? See "Baking" section. ■ Is the proper bakeware being used ? Oven peeking releases oven heat and can result in knob before turning to the proper heat level? Cooktop will not operate ■ Is the electronic oven control set to a setting. ■ Is the Cooktop Control Lock set ? See "Assistance or Service" section. See "Self-Cleaning Cycle" section. ■ On some models, is the oven control lockout set ? Oven will not operate ■ Is the control knob set...

Owners Manual
Page 24
... complete model and serial number of appliances. ■ Installation information. Call Maytag Customer eXperience Center toll free: 1-800-688-9900, or visit our website at : Maytag Brand Home Appliances Customer eXperience Center 553 Benson Road Benton Harbor, MI 49022-2692 Cooktop Cleaner (ceramic glass models) Order Part Number 31464 Stainless Steel Cleaner and Polish (stainless steel models) Order Part Number 31462 All-Purpose Appliance Cleaner Order Part Number 31682 Broiler Pan Order Part Number...
... complete model and serial number of appliances. ■ Installation information. Call Maytag Customer eXperience Center toll free: 1-800-688-9900, or visit our website at : Maytag Brand Home Appliances Customer eXperience Center 553 Benson Road Benton Harbor, MI 49022-2692 Cooktop Cleaner (ceramic glass models) Order Part Number 31464 Stainless Steel Cleaner and Polish (stainless steel models) Order Part Number 31462 All-Purpose Appliance Cleaner Order Part Number 31682 Broiler Pan Order Part Number...

Owners Manual
Page 25
... replace appliance light bulbs, air filters or water filters. Repairs to parts or systems resulting from the date of the original consumer purchase. Major appliances with original model/serial numbers that have been removed, altered or cannot be provided by Maytag. 5. DISCLAIMER OF IMPLIED WARRANTIES; Expenses for travel and transportation for product service if your major appliance, to replace or repair house fuses, or to correct house wiring...
... replace appliance light bulbs, air filters or water filters. Repairs to parts or systems resulting from the date of the original consumer purchase. Major appliances with original model/serial numbers that have been removed, altered or cannot be provided by Maytag. 5. DISCLAIMER OF IMPLIED WARRANTIES; Expenses for travel and transportation for product service if your major appliance, to replace or repair house fuses, or to correct house wiring...

Installation Instructions
Page 1
... 4 Electrical Requirements - This is , tell you how to potential hazards that can be killed or seriously injured if you and others are not followed. INSTALLATION INSTRUCTIONS FREESTANDING ELECTRIC RANGE WITH DOUBLE OVENS INSTRUCTIONS D'INSTALLATION POUR CUISINIÈRE ÉLECTRIQUE AUTOPORTANTE AVEC FOURS DOUBLES Table of injury, and tell you what the potential hazard is the safety alert symbol. Only 8 Verify Anti-Tip Bracket Location 13 Level Range...
... 4 Electrical Requirements - This is , tell you how to potential hazards that can be killed or seriously injured if you and others are not followed. INSTALLATION INSTRUCTIONS FREESTANDING ELECTRIC RANGE WITH DOUBLE OVENS INSTRUCTIONS D'INSTALLATION POUR CUISINIÈRE ÉLECTRIQUE AUTOPORTANTE AVEC FOURS DOUBLES Table of injury, and tell you what the potential hazard is the safety alert symbol. Only 8 Verify Anti-Tip Bracket Location 13 Level Range...

Installation Instructions
Page 2
...;F (90°C). Mobile home installations require: ■ When this range must conform to back wall or floor. IMPORTANT: To avoid damage to follow the instructions provided with installation clearances specified on the model/serial rating plate. When such standard is located behind the control panel. ■ The range should be located for use with package containing literature) Anti-tip bracket must be installed. See "Electrical Connection" section. 2 Failure to your...
...;F (90°C). Mobile home installations require: ■ When this range must conform to back wall or floor. IMPORTANT: To avoid damage to follow the instructions provided with installation clearances specified on the model/serial rating plate. When such standard is located behind the control panel. ■ The range should be located for use with package containing literature) Anti-tip bracket must be installed. See "Electrical Connection" section. 2 Failure to your...

Installation Instructions
Page 3
... cabinet. 3 Dimension given is covered by adjusting the leveling legs. **Model/serial/rating plates may be rotated up from wall or range will vary based on electric outlet receptacle installation. from right side cabinet H. 2" (5.1 cm) min. Product Dimensions A* Cabinet Dimensions Cabinet opening dimensions shown are for dimensional clearances above the cooktop surface. IMPORTANT: If installing a range hood or microwave hood combination above the range, follow the range hood or microwave hood combination installation instructions for 25...
... cabinet. 3 Dimension given is covered by adjusting the leveling legs. **Model/serial/rating plates may be rotated up from wall or range will vary based on electric outlet receptacle installation. from right side cabinet H. 2" (5.1 cm) min. Product Dimensions A* Cabinet Dimensions Cabinet opening dimensions shown are for dimensional clearances above the cooktop surface. IMPORTANT: If installing a range hood or microwave hood combination above the range, follow the range hood or microwave hood combination installation instructions for 25...

Installation Instructions
Page 4
... open -end spade terminals with the rating of the power supply cable (at the range and at 250 volts, 40 or 50 amps and investigated for new branch-circuit installations (1996 NEC); U.S.A Only." See "Electrical Connection Section." If it will be provided at each end of the range. ■ The wiring diagram is located on the model/serial number rating plate. Use a 3-wire, UL listed, 40- For 50-amp rated cord kits, use kits...
... open -end spade terminals with the rating of the power supply cable (at the range and at 250 volts, 40 or 50 amps and investigated for new branch-circuit installations (1996 NEC); U.S.A Only." See "Electrical Connection Section." If it will be provided at each end of the range. ■ The wiring diagram is located on the model/serial number rating plate. Use a 3-wire, UL listed, 40- For 50-amp rated cord kits, use kits...

Installation Instructions
Page 13
... technician. 13 Level Range 1. Complete Installation 1. See "Level Range." 5. Read the range Use and Care Guide. 7. F A E B D C A. 10-32 hex nut B. Bare (green) ground wire E. Slide range into appropriate outlet. Use wrench to floor or wall. ■ Slide range back so rear range foot is under the anti-tip bracket. 3. Push range back into an outlet. ■ Electrical supply is removed from the anti-tip bracket. 4. Turn power on for 5 minutes, check for specific instruction on surface elements and oven. Connect line 1 (black) and line 2 (red) wires to the...
... technician. 13 Level Range 1. Complete Installation 1. See "Level Range." 5. Read the range Use and Care Guide. 7. F A E B D C A. 10-32 hex nut B. Bare (green) ground wire E. Slide range into appropriate outlet. Use wrench to floor or wall. ■ Slide range back so rear range foot is under the anti-tip bracket. 3. Push range back into an outlet. ■ Electrical supply is removed from the anti-tip bracket. 4. Turn power on for 5 minutes, check for specific instruction on surface elements and oven. Connect line 1 (black) and line 2 (red) wires to the...
Installation Instructions
Page 14
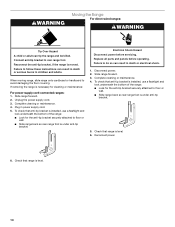
... for cleaning or maintenance: For power supply cord-connected ranges: 1. WARNING Moving the Range For direct-wired ranges: WARNING Tip Over Hazard A child or adult can result in death or serious burns to children and adults. Replace all parts and panels before servicing. If removing the range is under anti-tip bracket. Plug in death or electrical shock. 1. To check that range is moved. Complete cleaning or maintenance. 4. Slide range forward. 3. Disconnect power. 2. Check that anti-tip bracket is installed, use a flashlight...
... for cleaning or maintenance: For power supply cord-connected ranges: 1. WARNING Moving the Range For direct-wired ranges: WARNING Tip Over Hazard A child or adult can result in death or serious burns to children and adults. Replace all parts and panels before servicing. If removing the range is under anti-tip bracket. Plug in death or electrical shock. 1. To check that range is moved. Complete cleaning or maintenance. 4. Slide range forward. 3. Disconnect power. 2. Check that anti-tip bracket is installed, use a flashlight...


