

Owners Manual
Page 2
DRYER SAFETY 2
DRYER SAFETY 2
Owners Manual
Page 3
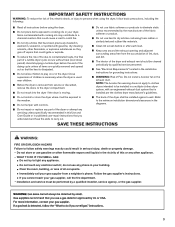
... to light any appliance. • Do not touch any servicing unless specifically recommended in this or any other appliance. - Follow the gas supplier's instructions. • If you understand and have been previously cleaned in, washed in, soaked in the diagrams. ■ Do not repair or replace any part of this Use and Care Guide or in published user-repair instructions that the heat is installed per the clothes dryer manufacturer...
... to light any appliance. • Do not touch any servicing unless specifically recommended in this or any other appliance. - Follow the gas supplier's instructions. • If you understand and have been previously cleaned in, washed in, soaked in the diagrams. ■ Do not repair or replace any part of this Use and Care Guide or in published user-repair instructions that the heat is installed per the clothes dryer manufacturer...
Owners Manual
Page 4
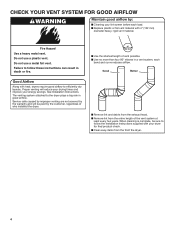
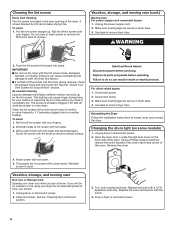
... exhaust hood. ■ Remove lint from the front the dryer. 4 See Installation Instructions. Do not use a metal foil vent. When cleaning is complete, be paid by the customer, regardless of who installed the dryer. ■ Use the shortest length of the vent system at least every two years. Service calls caused by improper venting are not covered by : ■ Cleaning your lint screen before each bend and curve reduces airflow. CHECK...
... exhaust hood. ■ Remove lint from the front the dryer. 4 See Installation Instructions. Do not use a metal foil vent. When cleaning is complete, be paid by the customer, regardless of who installed the dryer. ■ Use the shortest length of the vent system at least every two years. Service calls caused by improper venting are not covered by : ■ Cleaning your lint screen before each bend and curve reduces airflow. CHECK...
Owners Manual
Page 5
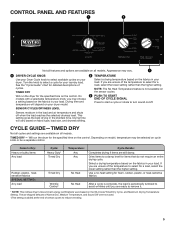
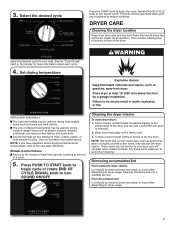
.... 3 1 DRYER CYCLE KNOB Use your Dryer Cycle knob to remove it. * NOTE: This clothes dryer's Government energy certifications were based on the control. This setting gives the best drying in the load and air temperature and shuts off . Drying time will depend on cycle knob or be selected on your laundry load. Items to reduce wrinkling. 5 Select a drying temperature based on the fabrics in your load. See the "Cycle Guide" chart for foam, rubber, plastic, or heat...
.... 3 1 DRYER CYCLE KNOB Use your Dryer Cycle knob to remove it. * NOTE: This clothes dryer's Government energy certifications were based on the control. This setting gives the best drying in the load and air temperature and shuts off . Drying time will depend on cycle knob or be selected on your laundry load. Items to reduce wrinkling. 5 Select a drying temperature based on the fabrics in your load. See the "Cycle Guide" chart for foam, rubber, plastic, or heat...
Owners Manual
Page 6
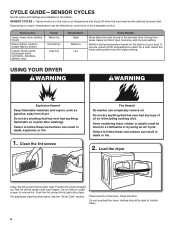
... freely. 6 Drying time varies based on all cycles and settings are unsure of oil on a clothesline or by using an Air Cycle. Load the dryer Clean the lint screen before each load. Place laundry in your fingers. CYCLE GUIDE-SENSOR CYCLES Not all models. Push the lint screen firmly back into place. clothes should be dried on it (even after washing). If you are available on fabric type, load size, and dryness setting. Depending on model, temperature may...
... freely. 6 Drying time varies based on all cycles and settings are unsure of oil on a clothesline or by using an Air Cycle. Load the dryer Clean the lint screen before each load. Place laundry in your fingers. CYCLE GUIDE-SENSOR CYCLES Not all models. Push the lint screen firmly back into place. clothes should be dried on it (even after washing). If you are available on fabric type, load size, and dryness setting. Depending on model, temperature may...
Owners Manual
Page 7
... desired cycle for a garage installation. Wipe drum thoroughly with a soft cloth until stain is removed. 2. Select the desired cycle Press the START knob to reduce wrinkling. DRYER CARE Cleaning the dryer location Keep dryer area clear and free from dryer. See the "Cycle Guide" chart or the display for more information about drying temperatures for proper dryer operation. NOTE: Garments that would block the airflow for various loads, refer to the stained area of clothes. Set drying temperature...
... desired cycle for a garage installation. Wipe drum thoroughly with a soft cloth until stain is removed. 2. Select the desired cycle Press the START knob to reduce wrinkling. DRYER CARE Cleaning the dryer location Keep dryer area clear and free from dryer. See the "Cycle Guide" chart or the display for more information about drying temperatures for proper dryer operation. NOTE: Garments that would block the airflow for various loads, refer to the stained area of clothes. Set drying temperature...
Owners Manual
Page 8
... care (cont.) Moving Care For power supply cord-connected dryers: 1. Unplug dryer or disconnect power. 2. Replace the cover and secure with hot water. 3. Roll lint off while the screen is completely dry. Wet both the dryer and fabrics. ■ If lint falls off the screen with a 10 W appliance bulb only. Use tape to remove residue buildup. Locate the light bulb cover on some models) 1. Turn bulb counterclockwise. This buildup can cause overheating and damage to stop before your clothes...
... care (cont.) Moving Care For power supply cord-connected dryers: 1. Unplug dryer or disconnect power. 2. Replace the cover and secure with hot water. 3. Roll lint off while the screen is completely dry. Wet both the dryer and fabrics. ■ If lint falls off the screen with a 10 W appliance bulb only. Use tape to remove residue buildup. Locate the light bulb cover on some models) 1. Turn bulb counterclockwise. This buildup can cause overheating and damage to stop before your clothes...

Owners Manual
Page 9
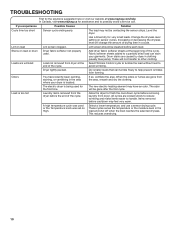
..., clean exhaust system of lint or replace exhaust vent with a qualified electrician. Fabric softener sheets blocking the Use only one fabric softener sheet, and use . Closet doors must have heat. Household fuse is blown or circuit breaker has tripped. Electric dryers use two household fuses or circuit breakers. Incorrect power supply. Use a time-delay fuse. between the drum and front or rear of the dryer requires 5" (127 mm). No heat Household fuse is blown or circuit breaker has tripped. Long venting will not run Door not closed completely. Dryer located...
..., clean exhaust system of lint or replace exhaust vent with a qualified electrician. Fabric softener sheets blocking the Use only one fabric softener sheet, and use . Closet doors must have heat. Household fuse is blown or circuit breaker has tripped. Electric dryers use two household fuses or circuit breakers. Incorrect power supply. Use a time-delay fuse. between the drum and front or rear of the dryer requires 5" (127 mm). No heat Household fuse is blown or circuit breaker has tripped. Long venting will not run Door not closed completely. Dryer located...
Owners Manual
Page 10
... sheets at the beginning of the cycle. A high temperature cycle was used or the Temperature knob was set on load or drum Dryer fabric softener not properly used for the first time. Lint on sensor cycles. avoid wrinkling. Dry smaller loads that can stain your dryer is located. Items removed before the end of drying time in clothing (usually blue jeans). These will change the amount of the cycle. If so, ventilate the area. The new electric heating element...
... sheets at the beginning of the cycle. A high temperature cycle was used or the Temperature knob was set on load or drum Dryer fabric softener not properly used for the first time. Lint on sensor cycles. avoid wrinkling. Dry smaller loads that can stain your dryer is located. Items removed before the end of drying time in clothing (usually blue jeans). These will change the amount of the cycle. If so, ventilate the area. The new electric heating element...

Feature Sheet
Page 1
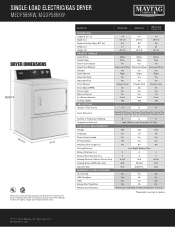
... rights reserved. ft. SINGLE-LOAD ELECTRIC/GAS DRYER MEDP586KW, MGDP586KW Bring the durability of the many upgraded components. Built with commercial-grade parts and a premium motor, this dryer with ease. We confidently back this Maytag® washing machine. MY220164 01/23 Thick, galvanized steel panels and ultra-sturdy knobs are no problem in this dryer is ready to deliver powerful, long-lasting strength to last. CAPACITY Large loads...
... rights reserved. ft. SINGLE-LOAD ELECTRIC/GAS DRYER MEDP586KW, MGDP586KW Bring the durability of the many upgraded components. Built with commercial-grade parts and a premium motor, this dryer with ease. We confidently back this Maytag® washing machine. MY220164 01/23 Thick, galvanized steel panels and ultra-sturdy knobs are no problem in this dryer is ready to deliver powerful, long-lasting strength to last. CAPACITY Large loads...
Feature Sheet
Page 2
...Heavy Duty, More Dry, Normal Dry, Less Dry, Timed Dry (20, 30, 40, 50, 60), Wrinkle Control Number of continuous product improvement, Maytag reserves the right to change specifications without notice. See specific instructions for details. ®/™ © 2023 Maytag. Because of Temperature Settings Temperature Selections ELECTRICAL REQUIREMENTS Voltage Amperage Power Cord Included LP Convertible Maximum Vent Length (ft.) Venting Direction Exhaust Diameter (in.) Exhaust Duct Diameter (in.) Heating Elements (Watts) Electric Only Heating Burner (BTU) Gas Only Gas Inlet Size WARRANTY...
...Heavy Duty, More Dry, Normal Dry, Less Dry, Timed Dry (20, 30, 40, 50, 60), Wrinkle Control Number of continuous product improvement, Maytag reserves the right to change specifications without notice. See specific instructions for details. ®/™ © 2023 Maytag. Because of Temperature Settings Temperature Selections ELECTRICAL REQUIREMENTS Voltage Amperage Power Cord Included LP Convertible Maximum Vent Length (ft.) Venting Direction Exhaust Diameter (in.) Exhaust Duct Diameter (in.) Heating Elements (Watts) Electric Only Heating Burner (BTU) Gas Only Gas Inlet Size WARRANTY...


