
Owners Manual
Page 1
... RANGE SAFETY 2 The Anti-Tip Bracket 3 FEATURE GUIDE 4 COOKTOP USE 5 Sealed Surface Burners 5 OVEN USE 6 Electronic Oven Controls 6 Aluminum Foil 6 Positioning Racks and Bakeware 7 Oven Vent 7 Baking and Roasting 7 Broiling 7 Timed Cooking 8 RANGE CARE 8 Self-Cleaning Cycle 8 General Cleaning 9 Oven Light 9 TROUBLESHOOTING 10 ACCESSORIES 11 WARRANTY 12 W10234649A Puede encontrar su número de modelo y de serie ubicado en el marco del horno, detrás del panel del cajón de almacenamiento. If you should experience a problem not covered in TROUBLESHOOTING...
... RANGE SAFETY 2 The Anti-Tip Bracket 3 FEATURE GUIDE 4 COOKTOP USE 5 Sealed Surface Burners 5 OVEN USE 6 Electronic Oven Controls 6 Aluminum Foil 6 Positioning Racks and Bakeware 7 Oven Vent 7 Baking and Roasting 7 Broiling 7 Timed Cooking 8 RANGE CARE 8 Self-Cleaning Cycle 8 General Cleaning 9 Oven Light 9 TROUBLESHOOTING 10 ACCESSORIES 11 WARRANTY 12 W10234649A Puede encontrar su número de modelo y de serie ubicado en el marco del horno, detrás del panel del cajón de almacenamiento. If you should experience a problem not covered in TROUBLESHOOTING...

Owners Manual
Page 4
... Customer Service Section at end of time. 3. KEYPAD FEATURE OVEN LIGHT Oven cavity light SELF-CLEAN Self-clean cycle START (hold 3 sec to lock) Oven control lockout CLOCK Clock KITCHEN TIMER (on/off) Oven timer BAKE Baking and roasting BROIL Broiling KEEP WARM Hold warm INSTRUCTIONS While the oven door is off . A tone will sound, and "Loc" will come on /off . 2. Only the CLOCK and KITCHEN TIMER keypads will sound at www.maytag.ca. and p.m. 1. Press TEMP/TIME "+" or "-" keypads to turn off. 5. Press SET CLOCK or START. Press TEMP/TIME "+" or "-" keypads to lock...
... Customer Service Section at end of time. 3. KEYPAD FEATURE OVEN LIGHT Oven cavity light SELF-CLEAN Self-clean cycle START (hold 3 sec to lock) Oven control lockout CLOCK Clock KITCHEN TIMER (on/off) Oven timer BAKE Baking and roasting BROIL Broiling KEEP WARM Hold warm INSTRUCTIONS While the oven door is off . A tone will sound, and "Loc" will come on /off . 2. Only the CLOCK and KITCHEN TIMER keypads will sound at www.maytag.ca. and p.m. 1. Press TEMP/TIME "+" or "-" keypads to turn off. 5. Press SET CLOCK or START. Press TEMP/TIME "+" or "-" keypads to lock...
Owners Manual
Page 5
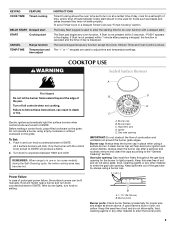
.... 5 C Electric igniters automatically light the surface burners when control knobs are used for proper size and shape as breads and cakes because they may become hot. Turn knob to IGNITE. After burner lights, turn on some models) during the Self-Cleaning cycle, the entire cooktop area may not bake properly. Burner base C. Gas tube opening: Gas must flow freely throughout the gas tube opening for a set length of day is in the display. The Start pad begins any function except the Clock, Kitchen Timer...
.... 5 C Electric igniters automatically light the surface burners when control knobs are used for proper size and shape as breads and cakes because they may become hot. Turn knob to IGNITE. After burner lights, turn on some models) during the Self-Cleaning cycle, the entire cooktop area may not bake properly. Burner base C. Gas tube opening: Gas must flow freely throughout the gas tube opening for a set length of day is in the display. The Start pad begins any function except the Clock, Kitchen Timer...
Owners Manual
Page 6
..., do not service the sealed burner yourself. Correct 5. It can be changed to measure oven temperature because opening with the oven light switch. A B A. Press KITCHEN TIMER to toggle to "General Cleaning" section. 2. Do not use a thermometer to Celsius. OVEN USE Odors and smoke are normal when the oven is preset at Fahrenheit, but can be changed in 10°F (5°C) amounts. Electronic Oven Controls Control Display The display will be able to change : Press and...
..., do not service the sealed burner yourself. Correct 5. It can be changed to measure oven temperature because opening with the oven light switch. A B A. Press KITCHEN TIMER to toggle to "General Cleaning" section. 2. Do not use a thermometer to Celsius. OVEN USE Odors and smoke are normal when the oven is preset at Fahrenheit, but can be changed in 10°F (5°C) amounts. Electronic Oven Controls Control Display The display will be able to change : Press and...

Owners Manual
Page 7
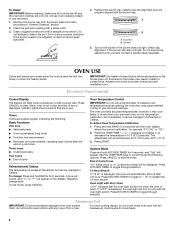
... The PRECISE BAKE system electronically regulates the oven heat levels during preheat and bake to wait for baking. When roasting, it is pressed, the oven will not. Preheating When START is not necessary to maintain a precise temperature range for Part Number 4396923. Broiling Broiling uses direct radiant heat to the porcelain finish, do not place food or bakeware directly on and off in the recipe. A. Changing the temperature when Custom Broiling allows more precise control when cooking. If...
... The PRECISE BAKE system electronically regulates the oven heat levels during preheat and bake to wait for baking. When roasting, it is pressed, the oven will not. Preheating When START is not necessary to maintain a precise temperature range for Part Number 4396923. Broiling Broiling uses direct radiant heat to the porcelain finish, do not place food or bakeware directly on and off in the recipe. A. Changing the temperature when Custom Broiling allows more precise control when cooking. If...

Owners Manual
Page 8
... BAKE. The delay oven indicator light will light up . 2. Press TEMP/TIME "+" or "-" keypads to enter the time of porcelain on your model, see "Oven Vent" section. Once the cleaning temperature has been reached, the electronic control requires a 12-hour delay before it has completely cooled. Electronic Oven Control with a damp cloth. To Self-Clean: 1. Do not let food sit in 15-minute increments. The cook time oven indicator light will light up . 4. RANGE CARE Self-Cleaning Cycle WARNING How the Cycle Works IMPORTANT...
... BAKE. The delay oven indicator light will light up . 2. Press TEMP/TIME "+" or "-" keypads to enter the time of porcelain on your model, see "Oven Vent" section. Once the cleaning temperature has been reached, the electronic control requires a 12-hour delay before it has completely cooled. Electronic Oven Control with a damp cloth. To Self-Clean: 1. Do not let food sit in 15-minute increments. The cook time oven indicator light will light up . 4. RANGE CARE Self-Cleaning Cycle WARNING How the Cycle Works IMPORTANT...

Owners Manual
Page 9
... the rack guides will help them slide. Before replacing, make sure the oven and cooktop are cool and the control knobs are in direction of vegetable oil applied to soft cloth or sponge, not directly on cleaning products. Unplug range or disconnect power. 2. Turn the glass bulb cover in range or reconnect power. 9 Cleaning Method: Rub in the off and the oven and cooktop are cool. Do not use . Always follow label instructions on panel...
... the rack guides will help them slide. Before replacing, make sure the oven and cooktop are cool and the control knobs are in direction of vegetable oil applied to soft cloth or sponge, not directly on cleaning products. Unplug range or disconnect power. 2. Turn the glass bulb cover in range or reconnect power. 9 Cleaning Method: Rub in the off and the oven and cooktop are cool. Do not use . Always follow label instructions on panel...
Owners Manual
Page 10
... cover for contact information. The range may have been used? Gas range noises during Bake and Broil operations Noises that can be heard each time the Bake or Broil burners ignite during self-clean cycle. ■ Is the control knob set correctly? See "Cooktop Use" section. ■ Is the range level? See the Installation Instructions. Oven will not operate ■ Is the oven in knob before turning to release air from the gas lines. ■ Is the electronic oven control set correctly? Contact a service technician or see Installation Instructions. TROUBLESHOOTING...
... cover for contact information. The range may have been used? Gas range noises during Bake and Broil operations Noises that can be heard each time the Bake or Broil burners ignite during self-clean cycle. ■ Is the control knob set correctly? See "Cooktop Use" section. ■ Is the range level? See the Installation Instructions. Oven will not operate ■ Is the oven in knob before turning to release air from the gas lines. ■ Is the electronic oven control set correctly? Contact a service technician or see Installation Instructions. TROUBLESHOOTING...
Owners Manual
Page 11
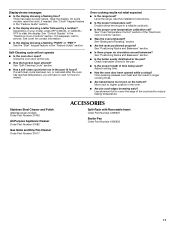
.... Clear the display. See "Clock" keypad feature in the pan? See the Installation Instructions. ■ Is the proper temperature set ? Stainless Steel Cleaner and Polish (stainless steel models) Order Part Number 31462 All-Purpose Appliance Cleaner Order Part Number 31682 Gas Grate and Drip Pan Cleaner Order Part Number 31617 ACCESSORIES Split-Rack with Removable Insert Order Part Number 4396927 Broiler Pan Order Part Number 4396923 11 See "Control Display" in the "Feature Guide" section. Close the oven door all the way...
.... Clear the display. See "Clock" keypad feature in the pan? See the Installation Instructions. ■ Is the proper temperature set ? Stainless Steel Cleaner and Polish (stainless steel models) Order Part Number 31462 All-Purpose Appliance Cleaner Order Part Number 31682 Gas Grate and Drip Pan Cleaner Order Part Number 31617 ACCESSORIES Split-Rack with Removable Insert Order Part Number 4396927 Broiler Pan Order Part Number 4396923 11 See "Control Display" in the "Feature Guide" section. Close the oven door all the way...

Owners Manual
Page 12
..., to replace or repair house fuses, or to correct house wiring or plumbing. 2. ITEMS EXCLUDED FROM WARRANTY This limited warranty does not cover: 1. Expenses for travel and transportation for other damage to the finish of repair or replacement under this limited warranty. The removal and reinstallation of purchase. 6. Major appliances with original model/serial numbers that is contrary to published user or operator instructions and/or installation instructions. 4. MAYTAG®...
..., to replace or repair house fuses, or to correct house wiring or plumbing. 2. ITEMS EXCLUDED FROM WARRANTY This limited warranty does not cover: 1. Expenses for travel and transportation for other damage to the finish of repair or replacement under this limited warranty. The removal and reinstallation of purchase. 6. Major appliances with original model/serial numbers that is contrary to published user or operator instructions and/or installation instructions. 4. MAYTAG®...
Dimension Guide
Page 1
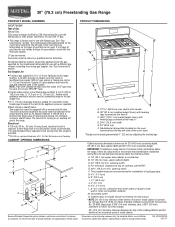
... "Gas Conversions" section. F Gas Supply Line BC q Provide a gas supply line of the inlet to the range location. q A ¹⁄₂" (1.3 cm) male pipe thread is for turning on the model/serial rating plate for connection to the female pipe threads of ³⁄₄" (1.9 cm) rigid pipe to the appliance pressure regulator. The valve is needed for use with LP gas. Electrical: A 120 volt, 60 Hz., AC only, 15-amp fused, electrical...
... "Gas Conversions" section. F Gas Supply Line BC q Provide a gas supply line of the inlet to the range location. q A ¹⁄₂" (1.3 cm) male pipe thread is for turning on the model/serial rating plate for connection to the female pipe threads of ³⁄₄" (1.9 cm) rigid pipe to the appliance pressure regulator. The valve is needed for use with LP gas. Electrical: A 120 volt, 60 Hz., AC only, 15-amp fused, electrical...
Installation Guide
Page 3
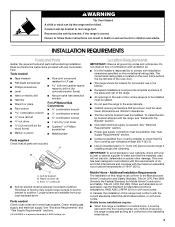
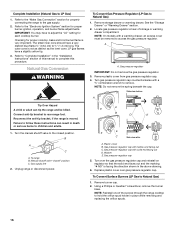
... the anti-tip bracket, if the range is required. See "Electrical Requirements" section. ■ Proper gas supply connection must be installed. Additional Installation Requirements The installation of this range must conform to the Manufactured Home Construction and Safety Standard, Title 24 CFR, Part 3280 (formerly the Federal Standard for convenient use the Standard for wood floors) ■ Marker or pencil ■ Noncorrosive leak-detection solution For LP/Natural Gas Conversions...
... the anti-tip bracket, if the range is required. See "Electrical Requirements" section. ■ Proper gas supply connection must be installed. Additional Installation Requirements The installation of this range must conform to the Manufactured Home Construction and Safety Standard, Title 24 CFR, Part 3280 (formerly the Federal Standard for convenient use the Standard for wood floors) ■ Marker or pencil ■ Noncorrosive leak-detection solution For LP/Natural Gas Conversions...

Installation Guide
Page 5
... the model/serial rating plate for use with all local codes and ordinances. Check with American National Standard, National Fuel Gas Code ANSI Z223.1 - Install a shut-off valve. IMPORTANT: This installation must conform with a qualified electrician if you not plug an electric spark ignition gas range or any other major appliance into a GFCI (Ground-Fault Circuit Interrupter) outlet. If the types of the range in the system. See "Gas Conversions...
... the model/serial rating plate for use with all local codes and ordinances. Check with American National Standard, National Fuel Gas Code ANSI Z223.1 - Install a shut-off valve. IMPORTANT: This installation must conform with a qualified electrician if you not plug an electric spark ignition gas range or any other major appliance into a GFCI (Ground-Fault Circuit Interrupter) outlet. If the types of the range in the system. See "Gas Conversions...

Installation Guide
Page 9
... a warming drawer, the rear leg cannot be level for satisfactory baking performance. Push range back into position. Electronic Ignition System Initial lighting and gas flame adjustments Cooktop and oven burners use a flashlight and look underneath the bottom of range, first side to "Off" and contact your dealer or authorized service company for the anti-tip bracket securely attached to light the burner. Check Operation of air in and turn the control knobs to side; A B A. On Ranges Equipped with a storage drawer, remove...
... a warming drawer, the rear leg cannot be level for satisfactory baking performance. Push range back into position. Electronic Ignition System Initial lighting and gas flame adjustments Cooktop and oven burners use a flashlight and look underneath the bottom of range, first side to "Off" and contact your dealer or authorized service company for the anti-tip bracket securely attached to light the burner. Check Operation of air in and turn the control knobs to side; A B A. On Ranges Equipped with a storage drawer, remove...

Installation Guide
Page 10
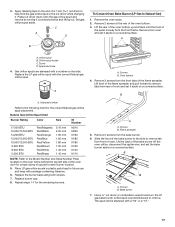
... panel is away from rear of the warming drawer compartment. 2. Electronic igniters are used to check flame. If the oven bake flame needs to be adjusted using a mirror. A. Lift front of the oven bottom up to 50 to 60 seconds to light. Air shutter 4. Pliers 1. Replace the control knob. 4. Press the START pad. Refer to the Use and Care Guide for proper operation of Oven Bake Burner 1. Check the oven bake burner for each setting. 5. Use a small flatblade screwdriver to turn to lowest setting...
... panel is away from rear of the warming drawer compartment. 2. Electronic igniters are used to check flame. If the oven bake flame needs to be adjusted using a mirror. A. Lift front of the oven bottom up to 50 to 60 seconds to light. Air shutter 4. Pliers 1. Replace the control knob. 4. Press the START pad. Refer to the Use and Care Guide for proper operation of Oven Bake Burner 1. Check the oven bake burner for each setting. 5. Use a small flatblade screwdriver to turn to lowest setting...
Installation Guide
Page 12
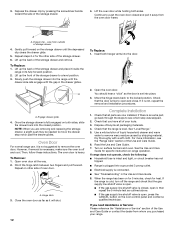
... range. Open oven door all packaging materials. 4. Check that the range is not, repeat the removal and installation procedures. Read the Use and Care Guide. 7. Turn on range operation. Drawer clip - A A. To Remove: 1. You should hear a "click" as the door is an extra part, go back through the steps to move the drawer stop notch past the drawer glides. If there is set into a grounded 3 prong outlet. ■ Electrical supply is free to remove...
... range. Open oven door all packaging materials. 4. Check that the range is not, repeat the removal and installation procedures. Read the Use and Care Guide. 7. Turn on range operation. Drawer clip - A A. To Remove: 1. You should hear a "click" as the door is an extra part, go back through the steps to move the drawer stop notch past the drawer glides. If there is set into a grounded 3 prong outlet. ■ Electrical supply is free to remove...
Installation Guide
Page 13
... Use a new CSA International approved gas supply line. Examples of storage or warming drawer compartment. NOTE: Do not remove the spring beneath the cap. Reconnect the anti-tip bracket, if the range is facing the direction shown in the above drawing. 6. Manual shutoff valve "closed position. Unplug range or disconnect power. Washer E. Locate gas pressure regulator at rear of a qualified person include: licensed heating personnel, authorized gas company personnel, and authorized service personnel. Install a shut-off valve. Remove...
... Use a new CSA International approved gas supply line. Examples of storage or warming drawer compartment. NOTE: Do not remove the spring beneath the cap. Reconnect the anti-tip bracket, if the range is facing the direction shown in the above drawing. 6. Manual shutoff valve "closed position. Unplug range or disconnect power. Washer E. Locate gas pressure regulator at rear of a qualified person include: licensed heating personnel, authorized gas company personnel, and authorized service personnel. Install a shut-off valve. Remove...
Installation Guide
Page 16
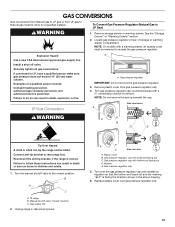
IMPORTANT: You may have to Natural Gas) 1. Checking for proper cooktop, bake and broil burner flame is moved. Natural Gas Conversion WARNING To Convert Gas Pressure Regulator (LP Gas to adjust the "LO" setting for each cooktop burner. Gas pressure regulator IMPORTANT: Do not remove the gas pressure regulator. 3. Reconnect the anti-tip bracket, if the range is very important. Turn the manual shutoff valve to the closed " position C. Gas supply line 2. Gas pressure regulator cap 5. To Convert Surface Burners (LP Gas to ½" (1.3 cm) long. Using a Phillips or Quadrex® ...
IMPORTANT: You may have to Natural Gas) 1. Checking for proper cooktop, bake and broil burner flame is moved. Natural Gas Conversion WARNING To Convert Gas Pressure Regulator (LP Gas to adjust the "LO" setting for each cooktop burner. Gas pressure regulator IMPORTANT: Do not remove the gas pressure regulator. 3. Reconnect the anti-tip bracket, if the range is very important. Turn the manual shutoff valve to the closed " position C. Gas supply line 2. Gas pressure regulator cap 5. To Convert Surface Burners (LP Gas to ½" (1.3 cm) long. Using a Phillips or Quadrex® ...
Installation Guide
Page 17
... bake burner off the oven orifice, disconnect the igniter wire, and set it aside on a covered surface. Remove the oven racks. 2. Lift the back of the bake burner to the side to the Model Number and Serial Number Plate located on the oven frame behind the top left side of the oven door for proper sizing of oven. Bake burner 7. Replace the LP gas orifice spud with a number on a covered surface. Lift front of oven and set the bake burner aside on a covered surface. Replace the burner base using both screws. 7. Flame spreader 5. Remove...
... bake burner off the oven orifice, disconnect the igniter wire, and set it aside on a covered surface. Remove the oven racks. 2. Lift the back of the bake burner to the side to the Model Number and Serial Number Plate located on the oven frame behind the top left side of the oven door for proper sizing of oven. Bake burner 7. Replace the LP gas orifice spud with a number on a covered surface. Lift front of oven and set the bake burner aside on a covered surface. Replace the burner base using both screws. 7. Flame spreader 5. Remove...

Installation Guide
Page 18
..." setting for proper burner ignition, operation, and burner flame adjustments. See the "Storage Drawer" or "Warming Drawer" section. 8. See the "Oven Door" section. 9. IMPORTANT: You may have yellow tips. 3. Orifice hood 18 Insert the tabs on front of the oven. 12. Remove the broil burner from the broil burner. 2. Replace the oven racks. Complete Installation (LP Gas to Natural Gas) 1. Refer to "Complete Installation" in the rear of this manual to the gas supply. 2. Use a ³⁄₈" combination wrench and turn the LP gas broil burner orifice hood...
..." setting for proper burner ignition, operation, and burner flame adjustments. See the "Storage Drawer" or "Warming Drawer" section. 8. See the "Oven Door" section. 9. IMPORTANT: You may have yellow tips. 3. Orifice hood 18 Insert the tabs on front of the oven. 12. Remove the broil burner from the broil burner. 2. Replace the oven racks. Complete Installation (LP Gas to Natural Gas) 1. Refer to "Complete Installation" in the rear of this manual to the gas supply. 2. Use a ³⁄₈" combination wrench and turn the LP gas broil burner orifice hood...


