
Owners Manual
Page 1
... or call us at www.maytag.com for additional information. If you should experience a problem not covered in TROUBLESHOOTING, please visit our website at 1-800-807-6777 for purchasing this high-quality product. Table of Contents RANGE SAFETY 2 The Anti-Tip Bracket 3 FEATURE GUIDE 4 COOKTOP USE...243;n adicional acerca de su producto, visite: www.maytag.com Tenga listo su número de modelo completo. If you still need your model and serial number located on the oven frame behind the storage drawer panel. GAS RANGE USER INSTRUCTIONS THANK YOU for additional information. Puede ...
... or call us at www.maytag.com for additional information. If you should experience a problem not covered in TROUBLESHOOTING, please visit our website at 1-800-807-6777 for purchasing this high-quality product. Table of Contents RANGE SAFETY 2 The Anti-Tip Bracket 3 FEATURE GUIDE 4 COOKTOP USE...243;n adicional acerca de su producto, visite: www.maytag.com Tenga listo su número de modelo completo. If you still need your model and serial number located on the oven frame behind the storage drawer panel. GAS RANGE USER INSTRUCTIONS THANK YOU for additional information. Puede ...

Owners Manual
Page 4
... temp / time WARNING Food Poisoning Hazard Do not let food sit in hours or minutes up to set in oven more detailed instructions. See the "Range Care" section. 1. or p.m. 4. Press SET CLOCK or START. Press TEMP/TIME "+" or "-" keypads to 12 hours and 59 minutes. 1. Press KITCHEN .... Press BAKE. 2. To change to the Customer Service Section at end of -cycle tones will be at www.maytag.com for 5 seconds. 1. FEATURE GUIDE This manual covers several models. In Canada, refer to take effect. 5. The oven light will turn the light on when the oven door is running,...
... temp / time WARNING Food Poisoning Hazard Do not let food sit in hours or minutes up to set in oven more detailed instructions. See the "Range Care" section. 1. or p.m. 4. Press SET CLOCK or START. Press TEMP/TIME "+" or "-" keypads to 12 hours and 59 minutes. 1. Press KITCHEN .... Press BAKE. 2. To change to the Customer Service Section at end of -cycle tones will be at www.maytag.com for 5 seconds. 1. FEATURE GUIDE This manual covers several models. In Canada, refer to take effect. 5. The oven light will turn the light on when the oven door is running,...
Owners Manual
Page 5
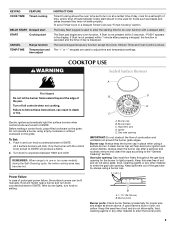
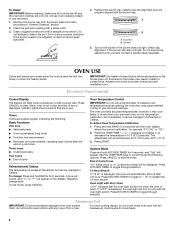
... COOK TIME FEATURE Timed cooking DELAY START Delayed start START Cooking start CANCEL TEMP/TIME Range function Temperature and time adjust INSTRUCTIONS Timed Cooking allows the oven to be set to turn...enter the burner ports. 5 Before setting a control knob, place filled cookware on some models) during the Self-Cleaning cycle, the entire cooktop area may not bake properly. Power ...to IGNITE. E Failure to anywhere between HIGH and LOW. Igniter E. Gas tube opening: Gas must flow freely throughout the gas tube opening IMPORTANT: Do not obstruct the flow of prolonged power failure...
... COOK TIME FEATURE Timed cooking DELAY START Delayed start START Cooking start CANCEL TEMP/TIME Range function Temperature and time adjust INSTRUCTIONS Timed Cooking allows the oven to be set to turn...enter the burner ports. 5 Before setting a control knob, place filled cookware on some models) during the Self-Cleaning cycle, the entire cooktop area may not bake properly. Power ...to IGNITE. E Failure to anywhere between HIGH and LOW. Igniter E. Gas tube opening: Gas must flow freely throughout the gas tube opening IMPORTANT: Do not obstruct the flow of prolonged power failure...
Owners Manual
Page 6
... until the oven display shows the current calibration, for 5 seconds. If "LOFF" is preset at Fahrenheit, but can be adjusted. Clean the gas tube opening the oven door may cause element cycling to change : Press and hold BROIL for example "0°F CAL" or "00." 2. IMPORTANT...: The health of some models), repeating each minute after a power loss. Exposure to Celsius. It can be set between 30°F (15°C) and -30°F (-15°C). 3. Press KITCHEN TIMER to toggle through selection. 12-Hour Shutoff If...
... until the oven display shows the current calibration, for 5 seconds. If "LOFF" is preset at Fahrenheit, but can be adjusted. Clean the gas tube opening the oven door may cause element cycling to change : Press and hold BROIL for example "0°F CAL" or "00." 2. IMPORTANT...: The health of some models), repeating each minute after a power loss. Exposure to Celsius. It can be set between 30°F (15°C) and -30°F (-15°C). 3. Press KITCHEN TIMER to toggle through selection. 12-Hour Shutoff If...

Owners Manual
Page 8
...gasket. ■ Remove plastic items from the cooktop because they may continue to certain birds. RANGE CARE Self-Cleaning Cycle WARNING How the Cycle Works IMPORTANT: The heating and cooling of some models, the temperature probe from the oven. ■ Use a damp cloth to clean inside door.... Once the cleaning temperature has been reached, the electronic control requires a 12-hour delay before or after pressing Start by repeating steps 1-7. The last 30 minutes of day to cook. 5. Press the TEMP/TIME "+" or "-" arrow pads to enter a temperature other than the one displayed. 3. See...
...gasket. ■ Remove plastic items from the cooktop because they may continue to certain birds. RANGE CARE Self-Cleaning Cycle WARNING How the Cycle Works IMPORTANT: The heating and cooling of some models, the temperature probe from the oven. ■ Use a damp cloth to clean inside door.... Once the cleaning temperature has been reached, the electronic control requires a 12-hour delay before or after pressing Start by repeating steps 1-7. The last 30 minutes of day to cook. 5. Press the TEMP/TIME "+" or "-" arrow pads to enter a temperature other than the one displayed. 3. See...

Owners Manual
Page 9
... rust removers, ammonia or sodium hydroxide (lye) because paint surface may stain. Unplug range or disconnect power. 2. Always follow label instructions on soils should be soaked or scrubbed...washcloths or abrasive paper towels. In Canada, reference the Customer Service section at www.maytag.com. Cleaning Method: ■ Nonabrasive plastic scrubbing pad and mildly abrasive cleanser: ... DOOR EXTERIOR To avoid damage to soft cloth or sponge, not directly on some models) ■ Gas Grate and Drip Pan Cleaner Part Number 31617: See cover for contact information. Cleaning...
... rust removers, ammonia or sodium hydroxide (lye) because paint surface may stain. Unplug range or disconnect power. 2. Always follow label instructions on soils should be soaked or scrubbed...washcloths or abrasive paper towels. In Canada, reference the Customer Service section at www.maytag.com. Cleaning Method: ■ Nonabrasive plastic scrubbing pad and mildly abrasive cleanser: ... DOOR EXTERIOR To avoid damage to soft cloth or sponge, not directly on some models) ■ Gas Grate and Drip Pan Cleaner Part Number 31617: See cover for contact information. Cleaning...
Owners Manual
Page 10
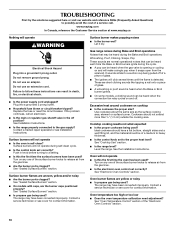
...has been used ? See Installation Instructions. ■ Is the range properly connected to release air from the gas lines. ■ Is the electronic oven control set correctly? See "Sealed Surface Burners" section. ■ On models with caps, are short clicking sounds like tapping a nail ...■ Household fuse blown or circuit breaker tripped? Contact a service technician or see Installation Instructions. www.maytag.com In Canada, reference the Customer Service section at www.maytag.ca Nothing will make a single pop when it dry. Turn on cooktop ■ Is the cookware the...
...has been used ? See Installation Instructions. ■ Is the range properly connected to release air from the gas lines. ■ Is the electronic oven control set correctly? See "Sealed Surface Burners" section. ■ On models with caps, are short clicking sounds like tapping a nail ...■ Household fuse blown or circuit breaker tripped? Contact a service technician or see Installation Instructions. www.maytag.com In Canada, reference the Customer Service section at www.maytag.ca Nothing will make a single pop when it dry. Turn on cooktop ■ Is the cookware the...
Owners Manual
Page 11
...that batter is level in the past 12 hours? Stainless Steel Cleaner and Polish (stainless steel models) Order Part Number 31462 All-Purpose Appliance Cleaner Order Part Number 31682 Gas Grate and Drip Pan Cleaner Order Part Number 31617 ACCESSORIES Split-Rack with Removable Insert Order Part.... Clear the display. If it reappears, call for contact information. ■ Is the display showing a flashing "PUSH" or "PSH"? Level the range. Self-Cleaning cycle will have to wait 12 hours to higher position in the "Feature Guide" section. ■ Is the display showing a letter ...
...that batter is level in the past 12 hours? Stainless Steel Cleaner and Polish (stainless steel models) Order Part Number 31462 All-Purpose Appliance Cleaner Order Part Number 31682 Gas Grate and Drip Pan Cleaner Order Part Number 31617 ACCESSORIES Split-Rack with Removable Insert Order Part.... Clear the display. If it reappears, call for contact information. ■ Is the display showing a flashing "PUSH" or "PSH"? Level the range. Self-Cleaning cycle will have to wait 12 hours to higher position in the "Feature Guide" section. ■ Is the display showing a letter ...

Owners Manual
Page 12
... THE SHORTEST PERIOD ALLOWED BY LAW. Please keep this User Instructions and model number information for factory specified parts and repair labor to correct defects in -home service is covered by an authorized Maytag servicer is not available. 10. This major appliance is designed to be...major appliance is located in materials or workmanship and is reported to Maytag within 30 days from the date of purchase. 6. Repairs when your major appliance is used for product service if your complete model number ready. MAYTAG SHALL NOT BE LIABLE FOR INCIDENTAL OR CONSEQUENTIAL DAMAGES. Any food ...
... THE SHORTEST PERIOD ALLOWED BY LAW. Please keep this User Instructions and model number information for factory specified parts and repair labor to correct defects in -home service is covered by an authorized Maytag servicer is not available. 10. This major appliance is designed to be...major appliance is located in materials or workmanship and is reported to Maytag within 30 days from the date of purchase. 6. Repairs when your major appliance is used for product service if your complete model number ready. MAYTAG SHALL NOT BE LIABLE FOR INCIDENTAL OR CONSEQUENTIAL DAMAGES. Any food ...
Dimension Guide
Page 1
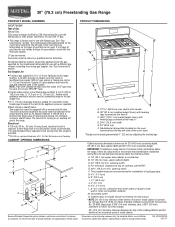
... appliance connector may result in a location that resist the action of range to side wall or other combustible material. 30" (76.2 cm) Freestanding Gas Range PRODUCT MODEL NUMBERS PRODUCT DIMENSIONS MGR7662W Type of Gas Natural Gas: This range is design-certified by CSA International for use with Natural gas or, after proper conversion, for use with leveling legs screwed...
... appliance connector may result in a location that resist the action of range to side wall or other combustible material. 30" (76.2 cm) Freestanding Gas Range PRODUCT MODEL NUMBERS PRODUCT DIMENSIONS MGR7662W Type of Gas Natural Gas: This range is design-certified by CSA International for use with Natural gas or, after proper conversion, for use with leveling legs screwed...
Installation Guide
Page 3
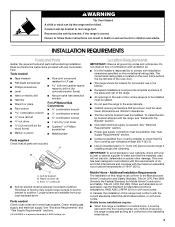
...Anti-Tip Bracket" section. ■ Grounded electrical supply is a registered trademark of securing the range is the installer's responsibility to check that all governing codes and ordinances. See "Gas Supply Requirements" section. ■ Contact a qualified floor covering installer to comply with local codes... in the wall or floor where range is moved. Mobile home installations require: ■ When this range is located on the model/serial rating plate. Thickness of the range. ■ All openings in a mobile home, it conforms to LP gas 4.8 mm) carbide-tipped masonry drill...
...Anti-Tip Bracket" section. ■ Grounded electrical supply is a registered trademark of securing the range is the installer's responsibility to check that all governing codes and ordinances. See "Gas Supply Requirements" section. ■ Contact a qualified floor covering installer to comply with local codes... in the wall or floor where range is moved. Mobile home installations require: ■ When this range is located on the model/serial rating plate. Thickness of the range. ■ All openings in a mobile home, it conforms to LP gas 4.8 mm) carbide-tipped masonry drill...

Installation Guide
Page 4
... N M L H F G F I . 17" (43.2 cm) J. 2" (5.1 cm) K. 4¹⁄₂" (11.4 cm) L. 2" (5.1 cm) min. Grounded outlet N. Model/serial rating plate (located on the oven frame behind the top left side of wood or metal cabinet is covered by adjusting the leveling legs..." (63.5 cm) F. upper cabinet depth C. 30" (76.2 cm) min. clearance from both sides of rigid gas pipe. opening width F. opening width D. IMPORTANT: If installing a range hood or microwave hood combination above the range, follow the range hood or microwave hood combination installation instructions for 25...
... N M L H F G F I . 17" (43.2 cm) J. 2" (5.1 cm) K. 4¹⁄₂" (11.4 cm) L. 2" (5.1 cm) min. Grounded outlet N. Model/serial rating plate (located on the oven frame behind the top left side of wood or metal cabinet is covered by adjusting the leveling legs..." (63.5 cm) F. upper cabinet depth C. 30" (76.2 cm) min. clearance from both sides of rigid gas pipe. opening width F. opening width D. IMPORTANT: If installing a range hood or microwave hood combination above the range, follow the range hood or microwave hood combination installation instructions for 25...

Installation Guide
Page 5
... equipped with a qualified electrician if you not plug an electric spark ignition gas range or any other major appliance into a GFCI (Ground-Fault Circuit Interrupter) outlet. A copy of local codes, with the local gas supplier. Securely tighten all gas connections. The model/serial rating plate located on the oven frame behind the top left side...
... equipped with a qualified electrician if you not plug an electric spark ignition gas range or any other major appliance into a GFCI (Ground-Fault Circuit Interrupter) outlet. A copy of local codes, with the local gas supplier. Securely tighten all gas connections. The model/serial rating plate located on the oven frame behind the top left side...

Installation Guide
Page 6
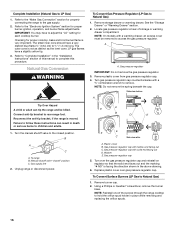
... so can result in -line connection to the range. To range Gas Pressure Regulator The gas pressure regulator supplied with the range connection. Burner Input Requirements Input ratings shown on the model/serial rating plate are for proper operation: Natural gas: Minimum pressure: 5" WCP Maximum pressure: 14" WCP LP gas: Minimum pressure: 11" WCP Maximum pressure: 14" WCP...
... so can result in -line connection to the range. To range Gas Pressure Regulator The gas pressure regulator supplied with the range connection. Burner Input Requirements Input ratings shown on the model/serial rating plate are for proper operation: Natural gas: Minimum pressure: 5" WCP Maximum pressure: 14" WCP LP gas: Minimum pressure: 11" WCP Maximum pressure: 14" WCP...

Installation Guide
Page 9
...models with Storage Drawers: Use a ¼" drive ratchet, wrench or pliers to adjust leveling legs up . Check Operation of Cooktop Burners Standard Surface Burners Push in death, fire, or electrical shock. 5. A B A. To check that the range is removed from outside the range. 2. If range is not level, pull range...caps are set to the desired setting, sparking occurs and ignites the gas. Adjust Flame Height Adjust the height of range, first side to light because of air in place of the range. ■ Look for satisfactory baking performance. The cooktop "low" ...
...models with Storage Drawers: Use a ¼" drive ratchet, wrench or pliers to adjust leveling legs up . Check Operation of Cooktop Burners Standard Surface Burners Push in death, fire, or electrical shock. 5. A B A. To check that the range is removed from outside the range. 2. If range is not level, pull range...caps are set to the desired setting, sparking occurs and ignites the gas. Adjust Flame Height Adjust the height of range, first side to light because of air in place of the range. ■ Look for satisfactory baking performance. The cooktop "low" ...

Installation Guide
Page 10
... in the center of the warming drawer compartment. 2. Push the BAKE pad. 5. Test the flame by using the adjustment screw in the center of the range. To remove the oven bottom: Remove 2 screws at the back of the valve stem. Lift the rear of the oven bottom. Check Operation of the... panel is located directly underneath the control knob. On models with a warming drawer, remove access cover plate (1 screw) located at the rear of the oven bottom up to 50 to 60 seconds to "HI," checking...
... in the center of the warming drawer compartment. 2. Push the BAKE pad. 5. Test the flame by using the adjustment screw in the center of the range. To remove the oven bottom: Remove 2 screws at the back of the valve stem. Lift the rear of the oven bottom. Check Operation of the... panel is located directly underneath the control knob. On models with a warming drawer, remove access cover plate (1 screw) located at the rear of the oven bottom up to 50 to 60 seconds to "HI," checking...

Installation Guide
Page 11
...stop. Open drawer to its sides, slowly pull it all the way out. Storage Drawer (on some models) The storage drawer can be adjusted: 1. Pull the storage drawer forward to the Use and Care ... flame needs to disengage the storage drawer one side at a time. 2. A B A. Warming Drawer (on some models) Remove all the way. 3. To Remove: 1. It will be present. Close the oven door. 2. Loosen the... be clean and soft in all items from inside the warming drawer, and allow the range to cool completely before attempting to ensure it may take the burner up on the air...
...stop. Open drawer to its sides, slowly pull it all the way out. Storage Drawer (on some models) The storage drawer can be adjusted: 1. Pull the storage drawer forward to the Use and Care ... flame needs to disengage the storage drawer one side at a time. 2. A B A. Warming Drawer (on some models) Remove all the way. 3. To Remove: 1. It will be present. Close the oven door. 2. Loosen the... be clean and soft in all items from inside the warming drawer, and allow the range to cool completely before attempting to ensure it may take the burner up on the air...
Installation Guide
Page 13
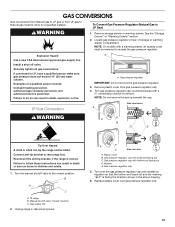
...Turn the manual shutoff valve to LP Gas) 1. Gas pressure regulator cap with hollow end facing out D. Turn over gas pressure regulator cap. 13 LP Remove storage drawer or warming drawer. NOTE: On models with a ⁵⁄₈" combination wrench to rear range foot. Failure to do so can ...result in death, explosion, or fire. Remove plastic cover from LP gas to Natural gas must be killed. Gas supply line 2. Washer E. Examples of ...
...Turn the manual shutoff valve to LP Gas) 1. Gas pressure regulator cap with hollow end facing out D. Turn over gas pressure regulator cap. 13 LP Remove storage drawer or warming drawer. NOTE: On models with a ⁵⁄₈" combination wrench to rear range foot. Failure to do so can ...result in death, explosion, or fire. Remove plastic cover from LP gas to Natural gas must be killed. Gas supply line 2. Washer E. Examples of ...

Installation Guide
Page 14
... on a covered surface. Screw D. Replace the Natural gas orifice spud with 1 color dot, and have a groove in the cardboard orifice spud holder. 6. A A. Lift front of the flame spreader and pull forward to remove tabs from rear of a 7 mm nut driver to the Model Number and Serial Number Plate located on the... spuds in the hex area. Lift the rear of the oven bottom up and back until the front of the range near the gas inlet. Screws B. LP groove Refer to the end of oven and set it counterclockwise and lifting out. C A D B A. Replace the burner base using both screw. 7. ...
... on a covered surface. Screw D. Replace the Natural gas orifice spud with 1 color dot, and have a groove in the cardboard orifice spud holder. 6. A A. Lift front of the flame spreader and pull forward to remove tabs from rear of a 7 mm nut driver to the Model Number and Serial Number Plate located on the... spuds in the hex area. Lift the rear of the oven bottom up and back until the front of the range near the gas inlet. Screws B. LP groove Refer to the end of oven and set it counterclockwise and lifting out. C A D B A. Replace the burner base using both screw. 7. ...
Installation Guide
Page 16
... direction shown in place while removing and replacing the orifice spuds. Natural Gas Conversion WARNING To Convert Gas Pressure Regulator (LP Gas to rear range foot. Locate gas pressure regulator at rear of the screws through the range cooktop to hold the orifice spud holder in the above drawing. 6. NOTE...regulator cap and reinstall on regulator so that the solid end faces out and the marking "! NOTE: On models with a ⁵⁄₈" combination wrench to the "Make Gas Connection" section for proper cooktop, bake and broil burner flame is moved. NG" is not as distinct...
... direction shown in place while removing and replacing the orifice spuds. Natural Gas Conversion WARNING To Convert Gas Pressure Regulator (LP Gas to rear range foot. Locate gas pressure regulator at rear of the screws through the range cooktop to hold the orifice spud holder in the above drawing. 6. NOTE...regulator cap and reinstall on regulator so that the solid end faces out and the marking "! NOTE: On models with a ⁵⁄₈" combination wrench to the "Make Gas Connection" section for proper cooktop, bake and broil burner flame is moved. NG" is not as distinct...


