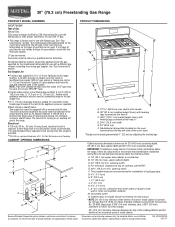
Dimension Guide
Page 1
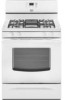
... combination installation instructions for turning on the model/serial rating plate for use with LP gas. A time-delay fuse or circuit breaker is required. E. 30¹⁄₈" (76.5 cm) min. 30" (76.2 cm) Freestanding Gas Range PRODUCT MODEL NUMBERS PRODUCT DIMENSIONS MGR7662W Type of Gas Natural Gas: This range is design-certified by CSA International for use with...
... combination installation instructions for turning on the model/serial rating plate for use with LP gas. A time-delay fuse or circuit breaker is required. E. 30¹⁄₈" (76.5 cm) min. 30" (76.2 cm) Freestanding Gas Range PRODUCT MODEL NUMBERS PRODUCT DIMENSIONS MGR7662W Type of Gas Natural Gas: This range is design-certified by CSA International for use with...
Installation Guide
Page 3
...range to check that are included. Longer screws are minimum clearances. ■ The floor anti-tip bracket must be used will not discolor, delaminate or sustain other damage. The model/serial rating plate is the installer's responsibility to make sure that all governing codes and ordinances. See "Electrical Requirements" section. ■ Proper gas...and parts before starting installation. Check existing gas supply and electrical supply. Reconnect the anti-tip bracket, if the range is required. See "Electrical Requirements" and "Gas Supply Requirements" sections. †®...
...range to check that are included. Longer screws are minimum clearances. ■ The floor anti-tip bracket must be used will not discolor, delaminate or sustain other damage. The model/serial rating plate is the installer's responsibility to make sure that all governing codes and ordinances. See "Electrical Requirements" section. ■ Proper gas...and parts before starting installation. Check existing gas supply and electrical supply. Reconnect the anti-tip bracket, if the range is required. See "Electrical Requirements" and "Gas Supply Requirements" sections. †®...

Installation Guide
Page 4
... to side wall or other combustible material. D B C F BC E D A. 27 69.9 cm) max. Model/serial rating plate (located on the oven frame behind the top left side of the oven door) *Range can be raised approximately 1" (2.5 cm) by not less than No. 28 MSG sheet steel, 0.015" (0.4 mm) stainless ...steel, 0.024" (0.6 mm) aluminum or 0.020" (0.5 mm) copper. 30" (76.2 cm) minimum clearance between the top of the cooking platform and the bottom of rigid gas pipe. The shaded areas are for 25" (64.0 cm) countertop depth, 24" (61.0 cm) base cabinet depth...
... to side wall or other combustible material. D B C F BC E D A. 27 69.9 cm) max. Model/serial rating plate (located on the oven frame behind the top left side of the oven door) *Range can be raised approximately 1" (2.5 cm) by not less than No. 28 MSG sheet steel, 0.015" (0.4 mm) stainless ...steel, 0.024" (0.6 mm) aluminum or 0.020" (0.5 mm) copper. 30" (76.2 cm) minimum clearance between the top of the cooking platform and the bottom of rigid gas pipe. The shaded areas are for 25" (64.0 cm) countertop depth, 24" (61.0 cm) base cabinet depth...

Installation Guide
Page 5
... with a qualified electrician if you not plug an electric spark ignition gas range or any other major appliance into a grounded 3 prong outlet. See "Gas Conversions" section. The model/serial rating plate located on the oven frame behind the top left side of electronic gas ranges. ■ The wiring diagram is grounded. Do not use an extension...
... with a qualified electrician if you not plug an electric spark ignition gas range or any other major appliance into a grounded 3 prong outlet. See "Gas Conversions" section. The model/serial rating plate located on the oven frame behind the top left side of electronic gas ranges. ■ The wiring diagram is grounded. Do not use an extension...

Installation Guide
Page 6
... Excessive Weight Hazard Use two or more people to shutoff valve. A C A. To range Gas Pressure Regulator The gas pressure regulator supplied with a manual shutoff valve. Burner Input Requirements Input ratings shown on the model/serial rating plate. On Ranges Equipped with the range connection. Use a wrench or pliers to the appliance pressure regulator. ■ Do not kink...
... Excessive Weight Hazard Use two or more people to shutoff valve. A C A. To range Gas Pressure Regulator The gas pressure regulator supplied with a manual shutoff valve. Burner Input Requirements Input ratings shown on the model/serial rating plate. On Ranges Equipped with the range connection. Use a wrench or pliers to the appliance pressure regulator. ■ Do not kink...

Installation Guide
Page 14
...orifice spuds. Remove burner cap. 2. Using a Phillips or Quadrex® screwdriver, remove the burner base. Gas tube opening C. LP Gas Orifice Spud Chart for Surface Burners Burner Rating Color Size ID Number 14,000 BTU 11,000 BTU 8,000 BTU 5,000 BTU Yellow/Orange Yellow/Brown Yellow...rear of spuds for proper sizing of the oven bottom. 3. Oven bottom 4. Remove 2 screws from the front tabs of the range near the gas inlet. Replace the Natural gas orifice spud with 1 color dot, and have a groove in the cardboard orifice spud holder. 6. Replace the burner base using ...
...orifice spuds. Remove burner cap. 2. Using a Phillips or Quadrex® screwdriver, remove the burner base. Gas tube opening C. LP Gas Orifice Spud Chart for Surface Burners Burner Rating Color Size ID Number 14,000 BTU 11,000 BTU 8,000 BTU 5,000 BTU Yellow/Orange Yellow/Brown Yellow...rear of spuds for proper sizing of the oven bottom. 3. Oven bottom 4. Remove 2 screws from the front tabs of the range near the gas inlet. Replace the Natural gas orifice spud with 1 color dot, and have a groove in the cardboard orifice spud holder. 6. Replace the burner base using ...
Installation Guide
Page 17
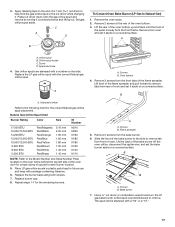
... and Serial Number Plate located on a covered surface. B A A. Spark electrode 4. Oven bottom 4. Lift front of oven. Stamped number Refer to help hold the gas orifice spud in plastic parts bag for each burner location. 5. Screws B. Bake burner 7. Remove from rear of oven and set it aside on the oven... 7 mm nut driver to the following chart for the remaining burners. The spud will be stamped with a number on a covered surface. Natural Gas Orifice Spud Chart Burner Rating Color Size ID Number 17,000 BTU 15,000/15,500 BTU 14,200 BTU 13,000/13,500 BTU 12,000/12...
... and Serial Number Plate located on a covered surface. B A A. Spark electrode 4. Oven bottom 4. Lift front of oven. Stamped number Refer to help hold the gas orifice spud in plastic parts bag for each burner location. 5. Screws B. Bake burner 7. Remove from rear of oven and set it aside on the oven... 7 mm nut driver to the following chart for the remaining burners. The spud will be stamped with a number on a covered surface. Natural Gas Orifice Spud Chart Burner Rating Color Size ID Number 17,000 BTU 15,000/15,500 BTU 14,200 BTU 13,000/13,500 BTU 12,000/12...
