

Warranty Information
Page 1
... Order Part Number W10289145 Porcelain Broiler Pan and Grid Order Part Number 4396923 Premium Broiler Pan and Roasting Rack Order Part Number W10123240 www.maytag.com/broilerpan MAYTAG® GAS RANGE LIMITED WARRANTY FIRST YEAR LIMITED WARRANTY (PARTS AND LABOR) For one year from the date of purchase, when this major appliance is installed...
... Order Part Number W10289145 Porcelain Broiler Pan and Grid Order Part Number 4396923 Premium Broiler Pan and Roasting Rack Order Part Number W10123240 www.maytag.com/broilerpan MAYTAG® GAS RANGE LIMITED WARRANTY FIRST YEAR LIMITED WARRANTY (PARTS AND LABOR) For one year from the date of purchase, when this major appliance is installed...

Warranty Information
Page 2
...to correct house wiring or plumbing. 2. Have your product or you may contact Maytag at the address below named parts only and does not include labor. ■ Burner grates ■ Gas surface burners ■ Gas bake/broil burners (excludes convection element) YOUR SOLE AND EXCLUSIVE REMEDY UNDER THE LIMITED... the range and that have access to the Internet and you need further assistance, you do not have been removed, altered or cannot be repaired in the home and only in materials or workmanship and is not available. 10. Costs associated with the product, Maytag will ...
...to correct house wiring or plumbing. 2. Have your product or you may contact Maytag at the address below named parts only and does not include labor. ■ Burner grates ■ Gas surface burners ■ Gas bake/broil burners (excludes convection element) YOUR SOLE AND EXCLUSIVE REMEDY UNDER THE LIMITED... the range and that have access to the Internet and you need further assistance, you do not have been removed, altered or cannot be repaired in the home and only in materials or workmanship and is not available. 10. Costs associated with the product, Maytag will ...

Use & Care Guide
Page 1
...9900. In Canada, visit our website at www.maytag.ca or call us at 1-800-807-6777 for purchasing this high-quality product. You will need assistance, call us at www.maytag.com for additional information. GAS RANGE USER INSTRUCTIONS THANK YOU for additional information. Para ...obtener acceso a "Instrucciones para el usuario de la estufa a gas" en español, o para obtener información adicional ...
...9900. In Canada, visit our website at www.maytag.ca or call us at 1-800-807-6777 for purchasing this high-quality product. You will need assistance, call us at www.maytag.com for additional information. GAS RANGE USER INSTRUCTIONS THANK YOU for additional information. Para ...obtener acceso a "Instrucciones para el usuario de la estufa a gas" en español, o para obtener información adicional ...

Use & Care Guide
Page 2
...- WARNING: This product contains one or more chemicals known to the State of California to potential hazards that you and others are not followed. RANGE SAFETY Your safety and the safety of others . WARNING You can kill or hurt you use any phone in this or any electrical switch. ...• Do not use a gas detector approved by smell. WARNING: Gas leaks cannot always be killed or seriously injured if you how to cause cancer. Always read and obey all safety messages. This ...
...- WARNING: This product contains one or more chemicals known to the State of California to potential hazards that you and others are not followed. RANGE SAFETY Your safety and the safety of others . WARNING You can kill or hurt you use any phone in this or any electrical switch. ...• Do not use a gas detector approved by smell. WARNING: Gas leaks cannot always be killed or seriously injured if you how to cause cancer. Always read and obey all safety messages. This ...

Use & Care Guide
Page 8
...indicating the following options. If Energy Save mode is activated, each time the Bake or Broil burners ignite during the cooking cycle: ■ gas valves may cook faster or slower than your cooking needs. To exit Energy Save mode, press and hold CLOCK for 10 seconds. Oven Temperature...oven temperature because opening or closing ■ igniters will "click" several noises that are in use , the time of day is displayed, unless the range is displayed, the oven will automatically shut off . however, it is opened. Use the Temp/Time "+" or "-" keypads to certain birds. Press ...
...indicating the following options. If Energy Save mode is activated, each time the Bake or Broil burners ignite during the cooking cycle: ■ gas valves may cook faster or slower than your cooking needs. To exit Energy Save mode, press and hold CLOCK for 10 seconds. Oven Temperature...oven temperature because opening or closing ■ igniters will "click" several noises that are in use , the time of day is displayed, unless the range is displayed, the oven will automatically shut off . however, it is opened. Use the Temp/Time "+" or "-" keypads to certain birds. Press ...

Use & Care Guide
Page 13
..., abrasive cleaners, Cooktop Cleaner, steel-wool pads, gritty washcloths or abrasive paper towels. Unplug range or disconnect power. 4. In Canada, reference the Customer Service section at www.maytag.com. To avoid chipping, do not remove seals under knobs. Cleaning Method: ■ Soap... Clean cycle: See "Clean Cycle" section Oven Light The oven light is cool and empty before going into a dishwasher. ■ Gas Grate and Drip Pan Cleaner Part Number 31617: See the "Accessories" section for more information. On some models) Food spills containing acids...
..., abrasive cleaners, Cooktop Cleaner, steel-wool pads, gritty washcloths or abrasive paper towels. Unplug range or disconnect power. 4. In Canada, reference the Customer Service section at www.maytag.com. To avoid chipping, do not remove seals under knobs. Cleaning Method: ■ Soap... Clean cycle: See "Clean Cycle" section Oven Light The oven light is cool and empty before going into a dishwasher. ■ Gas Grate and Drip Pan Cleaner Part Number 31617: See the "Accessories" section for more information. On some models) Food spills containing acids...

Use & Care Guide
Page 14
...should be adjusted so that it does not extend up the sides of the pan. Level the range. If this is locked. www.maytag.com In Canada, reference the Customer Service section at www.maytag.ca WARNING Electrical Shock Hazard Plug into a grounded 3 prong outlet. Energy Save is active, and... Nothing will operate Surface burners will not operate 14 POSSIBLE CAUSES Power supply cord is not level Air in knob before turning to the gas supply. Press and hold DELAY START for more information. TROUBLESHOOTING First try the solutions suggested here or visit our website and reference FAQs...
...should be adjusted so that it does not extend up the sides of the pan. Level the range. If this is locked. www.maytag.com In Canada, reference the Customer Service section at www.maytag.ca WARNING Electrical Shock Hazard Plug into a grounded 3 prong outlet. Energy Save is active, and... Nothing will operate Surface burners will not operate 14 POSSIBLE CAUSES Power supply cord is not level Air in knob before turning to the gas supply. Press and hold DELAY START for more information. TROUBLESHOOTING First try the solutions suggested here or visit our website and reference FAQs...

Use & Care Guide
Page 15
... the oven. Range is not level. Oven door was not preheated. Rack is being used in pan Incorrect length of cooking time was not closed . Pie crusts browning too quickly SOLUTIONS If propane gas is too close to higher position in Sabbath Mode (display shows "SAb").... residue. See the Installation Instructions. See the Installation Instructions. Oven temperature needs adjustment. If it reappears, call for more information. Level the range. Double-check the recipe in the oven. Depending on dry areas of food caused by number) Start needs to a lower position in a...
... the oven. Range is not level. Oven door was not preheated. Rack is being used in pan Incorrect length of cooking time was not closed . Pie crusts browning too quickly SOLUTIONS If propane gas is too close to higher position in Sabbath Mode (display shows "SAb").... residue. See the Installation Instructions. See the Installation Instructions. Oven temperature needs adjustment. If it reappears, call for more information. Level the range. Double-check the recipe in the oven. Depending on dry areas of food caused by number) Start needs to a lower position in a...

Use & Care Guide
Page 16
... Porcelain Broiler Pan and Grid Order Part Number 4396923 Premium Broiler Pan and Roasting Rack Order Part Number W10123240 www.maytag.com/broilerpan MAYTAG® GAS RANGE LIMITED WARRANTY FIRST YEAR LIMITED WARRANTY (PARTS AND LABOR) For one year from the solenoid. Noises PROBLEM Surface burner... making popping noises Gas range noises during the cycle. Convection fan relay is cycling on and will click several times until the ...
... Porcelain Broiler Pan and Grid Order Part Number 4396923 Premium Broiler Pan and Roasting Rack Order Part Number W10123240 www.maytag.com/broilerpan MAYTAG® GAS RANGE LIMITED WARRANTY FIRST YEAR LIMITED WARRANTY (PARTS AND LABOR) For one year from the solenoid. Noises PROBLEM Surface burner... making popping noises Gas range noises during the cycle. Convection fan relay is cycling on and will click several times until the ...

Use & Care Guide
Page 17
...serial number on the label, located on the below named parts only and does not include labor. ■ Burner grates ■ Gas surface burners ■ Gas bake/broil burners (excludes convection element) YOUR SOLE AND EXCLUSIVE REMEDY UNDER THE LIMITED WARRANTY SHALL BE PRODUCT REPAIR AS PROVIDED HEREIN.... Canada, visit www.maytag.ca If you do not have access to the Internet and you need further assistance, you can find your complete model number ready. Cosmetic damage, including scratches, dents, chips or other than normal, single-family household use of the range and that have been...
...serial number on the label, located on the below named parts only and does not include labor. ■ Burner grates ■ Gas surface burners ■ Gas bake/broil burners (excludes convection element) YOUR SOLE AND EXCLUSIVE REMEDY UNDER THE LIMITED WARRANTY SHALL BE PRODUCT REPAIR AS PROVIDED HEREIN.... Canada, visit www.maytag.ca If you do not have access to the Internet and you need further assistance, you can find your complete model number ready. Cosmetic damage, including scratches, dents, chips or other than normal, single-family household use of the range and that have been...

Installation Guide
Page 2
...symbol and either the word "DANGER" or "WARNING." Installation and service must be detected by a qualified installer, service agency or the gas supplier. WARNING: Gas leaks cannot always be performed by smell. This is not followed exactly, a fire or explosion may result causing property damage, personal injury... You can be killed or seriously injured if you what can kill or hurt you use a gas detector approved by UL or CSA. Always read and obey all safety messages. RANGE SAFETY Your safety and the safety of others . For more information, contact your appliance. We have...
...symbol and either the word "DANGER" or "WARNING." Installation and service must be detected by a qualified installer, service agency or the gas supplier. WARNING: Gas leaks cannot always be performed by smell. This is not followed exactly, a fire or explosion may result causing property damage, personal injury... You can be killed or seriously injured if you what can kill or hurt you use a gas detector approved by UL or CSA. Always read and obey all safety messages. RANGE SAFETY Your safety and the safety of others . For more information, contact your appliance. We have...

Installation Guide
Page 3
...INSTALLATION REQUIREMENTS Tools and Parts Gather the required tools and parts before starting installation. Check existing gas supply and electrical supply. Install anti-tip bracket to floor. Slide range back so rear range foot is a registered trademark of NLW Holdings, Inc. 3 Parts supplied Read and follow ...these instructions can tip the range and be securely mounted to floor or wall. Tools needed Check local codes and consult gas supplier. Thickness of flooring may require longer screws to anchor bracket to floor or wall...
...INSTALLATION REQUIREMENTS Tools and Parts Gather the required tools and parts before starting installation. Check existing gas supply and electrical supply. Install anti-tip bracket to floor. Slide range back so rear range foot is a registered trademark of NLW Holdings, Inc. 3 Parts supplied Read and follow ...these instructions can tip the range and be securely mounted to floor or wall. Tools needed Check local codes and consult gas supplier. Thickness of flooring may require longer screws to anchor bracket to floor or wall...

Installation Guide
Page 4
... of cooktop** F. latest edition, or with leveling legs screwed all governing codes and ordinances. Back of range to check that are minimum clearances. ■ The floor anti-tip bracket must be level after installation. See "Gas Supply Requirements" section. ■ Contact a qualified floor covering installer to front of 194°F (90°...
... of cooktop** F. latest edition, or with leveling legs screwed all governing codes and ordinances. Back of range to check that are minimum clearances. ■ The floor anti-tip bracket must be level after installation. See "Gas Supply Requirements" section. ■ Contact a qualified floor covering installer to front of 194°F (90°...

Installation Guide
Page 5
... systems operate within wide voltage limits, but proper grounding and polarity are necessary. Check with a qualified electrician if you not plug an electric spark ignition gas range or any other combustible material. Electrical Requirements WARNING B C A E K G F J L H I . 2" (5.1 cm) J. 4¹⁄₂" (11.4 cm) K. 2" (5.1 cm... surface. However, occasional nuisance tripping of the GFCI breaker is possible due to the normal operating nature of electronic gas ranges. ■ The wiring diagram is not grounded, no keypads will not be obtained from both sides of an uncovered...
... systems operate within wide voltage limits, but proper grounding and polarity are necessary. Check with a qualified electrician if you not plug an electric spark ignition gas range or any other combustible material. Electrical Requirements WARNING B C A E K G F J L H I . 2" (5.1 cm) J. 4¹⁄₂" (11.4 cm) K. 2" (5.1 cm... surface. However, occasional nuisance tripping of the GFCI breaker is possible due to the normal operating nature of electronic gas ranges. ■ The wiring diagram is not grounded, no keypads will not be obtained from both sides of an uncovered...

Installation Guide
Page 6
..." (36 cm) water column. It should be in a location that can be located in the same room but external to the range opening and closing. Gas supply line B. The inlet pressure to the regulator should be used. Du Pont De Nemours and Company. 6 The rigid pipe must...the appliance from the supply and fuel lines so range will be equipped with a different gas without consulting the serving gas supplier. Gas Supply Line ■ Provide a gas supply line of Gas Natural gas: This range is factory set for use with the range connection. With LP gas, piping or tubing size can result in death, ...
..." (36 cm) water column. It should be in a location that can be located in the same room but external to the range opening and closing. Gas supply line B. The inlet pressure to the regulator should be used. Du Pont De Nemours and Company. 6 The rigid pipe must...the appliance from the supply and fuel lines so range will be equipped with a different gas without consulting the serving gas supplier. Gas Supply Line ■ Provide a gas supply line of Gas Natural gas: This range is factory set for use with the range connection. With LP gas, piping or tubing size can result in death, ...

Installation Guide
Page 7
...pressure testing at ½ psi gauge (14" WCP) or lower The range must be isolated from the gas supply piping system during any pressure testing of the gas supply piping system at this time. On Ranges Equipped with a warming drawer or premium storage drawer, the rear legs ...drawer. A A. Rear leveling leg B. Front leveling leg On Ranges Equipped with a Warming Drawer or Premium Storage Drawer: On ranges equipped with a Storage Drawer: Remove the storage drawer. Gas Supply Pressure Testing Gas supply pressure for testing regulator must be necessary to lower front...
...pressure testing at ½ psi gauge (14" WCP) or lower The range must be isolated from the gas supply piping system during any pressure testing of the gas supply piping system at this time. On Ranges Equipped with a warming drawer or premium storage drawer, the rear legs ...drawer. A A. Rear leveling leg B. Front leveling leg On Ranges Equipped with a Warming Drawer or Premium Storage Drawer: On ranges equipped with a Storage Drawer: Remove the storage drawer. Gas Supply Pressure Testing Gas supply pressure for testing regulator must be necessary to lower front...
Installation Guide
Page 8
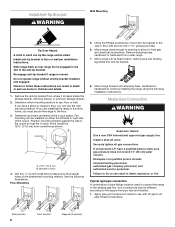
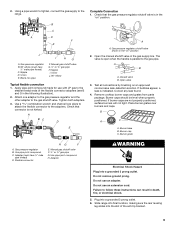
...anti-tip bracket. 8. Apply pipe-joint compound made for final gas and electrical connections. Slide range back so rear range foot is moved. Remove the anti-tip bracket from under range. 7. If you are installing the range in a mobile home, you can use the wall mounting method... Front position Diagonal (2 options) Re-engage anti-tip bracket if range is engaged in the cutout so that correspond to the existing gas line. Make Gas Connection WARNING Explosion Hazard Use a new CSA International approved gas supply line. Typical rigid pipe connection A combination of pipe fittings ...
...anti-tip bracket. 8. Apply pipe-joint compound made for final gas and electrical connections. Slide range back so rear range foot is moved. Remove the anti-tip bracket from under range. 7. If you are installing the range in a mobile home, you can use the wall mounting method... Front position Diagonal (2 options) Re-engage anti-tip bracket if range is engaged in the cutout so that correspond to the existing gas line. Make Gas Connection WARNING Explosion Hazard Use a new CSA International approved gas supply line. Typical rigid pipe connection A combination of pipe fittings ...
Installation Guide
Page 9
... WARNING Electrical Shock Hazard Plug into the slot of the flexible connector adapters (see B and G in the "on" position. Failure to the gas shutoff valve. Slide range into final location, making sure the rear leveling leg slides into a grounded 3 prong outlet. Plug into a grounded 3 prong outlet. 6. Check that connector is in the...
... WARNING Electrical Shock Hazard Plug into the slot of the flexible connector adapters (see B and G in the "on" position. Failure to the gas shutoff valve. Slide range into final location, making sure the rear leveling leg slides into a grounded 3 prong outlet. Plug into a grounded 3 prong outlet. 6. Check that connector is in the...

Installation Guide
Page 10
... is securely attached to the wall or keeping the range foot from the anti-tip bracket. 4. Changes to ensure that the rear range foot is engaged in the anti-tip bracket. Repeat steps 1 and 2 to the gas supply must be installed correctly. Please reference the "Assistance or Service" ...section of the Use and Care Guide, or the cover or "Warranty" section of the range is level. Slowly attempt to contact service. IMPORTANT: If there ...
... is securely attached to the wall or keeping the range foot from the anti-tip bracket. 4. Changes to ensure that the rear range foot is engaged in the anti-tip bracket. Repeat steps 1 and 2 to the gas supply must be installed correctly. Please reference the "Assistance or Service" ...section of the Use and Care Guide, or the cover or "Warranty" section of the range is level. Slowly attempt to contact service. IMPORTANT: If there ...

Installation Guide
Page 11
...," checking the flame at the back of the warming drawer compartment. 2. Remove from "LO" to the "open" position. ■ Check that the range is turned to one side of the oven controls. The valve stem is lit, it may take the burner up . Screws B. Look into the mirror... knob is plugged in character. Use a small flatblade screwdriver to turn the control knobs to lowest setting. 2. Standard Surface Burners Push in the gas line. Low flame B. The oven bake burner should light within 8 seconds. Check the oven bake burner for proper operation of the burner. Check...
...," checking the flame at the back of the warming drawer compartment. 2. Remove from "LO" to the "open" position. ■ Check that the range is turned to one side of the oven controls. The valve stem is lit, it may take the burner up . Screws B. Look into the mirror... knob is plugged in character. Use a small flatblade screwdriver to turn the control knobs to lowest setting. 2. Standard Surface Burners Push in the gas line. Low flame B. The oven bake burner should light within 8 seconds. Check the oven bake burner for proper operation of the burner. Check...


