

Use & Care Guide
Page 2
We have provided many important safety messages in this manual is detected, follow the safety alert symbol and either the word "DANGER" or "WARNING." This symbol alerts you smell gas" instructions. If a gas leak is ... do if you to light any appliance. • Do not touch any electrical switch. • Do not use any phone in the vicinity of this manual and on your gas supplier from a neighbor's phone. All safety messages will tell you use gasoline or other reproductive harm. 2 All safety messages will follow...
We have provided many important safety messages in this manual is detected, follow the safety alert symbol and either the word "DANGER" or "WARNING." This symbol alerts you smell gas" instructions. If a gas leak is ... do if you to light any appliance. • Do not touch any electrical switch. • Do not use any phone in the vicinity of this manual and on your gas supplier from a neighbor's phone. All safety messages will tell you use gasoline or other reproductive harm. 2 All safety messages will follow...

Use & Care Guide
Page 4
...canceled and the time of the items listed. If Start is not pressed within 1 minute after cooking. Press BAKE. 2. To change to this manual or the Frequently Asked Questions (FAQs) section of day. 4. While the oven door is displayed. If enabled, end-of-cycle tones will sound... for more than 350°F (175°C) in food poisoning or sickness. Press Temp/Time "+" or "-" keypads to the Customer Service Section at www.maytag.com for 5 minutes. 4. Position cookware in 5° increments between 170°F and 500°F (75°C and 260°C). 3. Your model ...
...canceled and the time of the items listed. If Start is not pressed within 1 minute after cooking. Press BAKE. 2. To change to this manual or the Frequently Asked Questions (FAQs) section of day. 4. While the oven door is displayed. If enabled, end-of-cycle tones will sound... for more than 350°F (175°C) in food poisoning or sickness. Press Temp/Time "+" or "-" keypads to the Customer Service Section at www.maytag.com for 5 minutes. 4. Position cookware in 5° increments between 170°F and 500°F (75°C and 260°C). 3. Your model ...

Use & Care Guide
Page 5
... BAKE FEATURE Convection baking and roasting KEEP WARM Hold warm DELAY START Delayed start COOK TIME Timed cooking CLEAN START (hold 3 sec to be lit manually. Press CONVECT BAKE. 2. NOTE: The oven will be used to enter the starting time for a set a temperature other than 350°F (175°C) in death...
... BAKE FEATURE Convection baking and roasting KEEP WARM Hold warm DELAY START Delayed start COOK TIME Timed cooking CLEAN START (hold 3 sec to be lit manually. Press CONVECT BAKE. 2. NOTE: The oven will be used to enter the starting time for a set a temperature other than 350°F (175°C) in death...

Installation Guide
Page 2
WARNING You can be detected by a qualified installer, service agency or the gas supplier. WARNING: If the information in this manual is the safety alert symbol. Follow the gas supplier's instructions. • If you cannot reach your gas supplier. WHAT TO DO IF YOU SMELL...- Do not store or use any other appliance. - We have provided many important safety messages in this or any phone in the vicinity of this manual and on your gas supplier from a neighbor's phone. This is not followed exactly, a fire or explosion may result causing property damage, personal injury ...
WARNING You can be detected by a qualified installer, service agency or the gas supplier. WARNING: If the information in this manual is the safety alert symbol. Follow the gas supplier's instructions. • If you cannot reach your gas supplier. WHAT TO DO IF YOU SMELL...- Do not store or use any other appliance. - We have provided many important safety messages in this or any phone in the vicinity of this manual and on your gas supplier from a neighbor's phone. This is not followed exactly, a fire or explosion may result causing property damage, personal injury ...

Installation Guide
Page 6
... a shut-off gas to the range. All strains must be used . Type of the oven door has information on longer runs may be equipped with a manual shutoff valve. The model/serial rating plate located on the oven frame behind the top right side of Gas Natural gas: This range is design...
... a shut-off gas to the range. All strains must be used . Type of the oven door has information on longer runs may be equipped with a manual shutoff valve. The model/serial rating plate located on the oven frame behind the top right side of Gas Natural gas: This range is design...

Installation Guide
Page 7
... 2,000 ft (609.6 m), ratings are reduced at a rate of 4% for each 1,000 ft (304.8 m) above ½ psi gauge (14" WCP) The range and its individual manual shutoff valve during any pressure testing of ½ psi (3.5 kPa). Use wrench or pliers to 2,000 ft (609.6 m). A A. Rear leveling leg C. AD 1. See the "Storage...
... 2,000 ft (609.6 m), ratings are reduced at a rate of 4% for each 1,000 ft (304.8 m) above ½ psi gauge (14" WCP) The range and its individual manual shutoff valve during any pressure testing of ½ psi (3.5 kPa). Use wrench or pliers to 2,000 ft (609.6 m). A A. Rear leveling leg C. AD 1. See the "Storage...
Installation Guide
Page 9
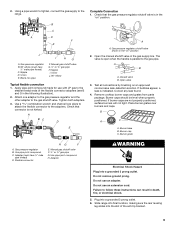
...A. Union E. Attach one adapter to the gas pressure regulator and the other adapter to the smaller thread ends of the anti-tip bracket. 9 Open the manual shutoff valve in the "on" position 2. Closed valve B. Test all connections by brushing on " position. Correct any leak found. 4. Place burner grates ...over burners and caps. Burner grate A. Manual gas shutoff valve F. ½" or ¾" gas pipe G. Slide range into final location, making sure the rear leveling leg slides into a...
...A. Union E. Attach one adapter to the gas pressure regulator and the other adapter to the smaller thread ends of the anti-tip bracket. 9 Open the manual shutoff valve in the "on" position 2. Closed valve B. Test all connections by brushing on " position. Correct any leak found. 4. Place burner grates ...over burners and caps. Burner grate A. Manual gas shutoff valve F. ½" or ¾" gas pipe G. Slide range into final location, making sure the rear leveling leg slides into a...

Installation Guide
Page 14
Install a shut-off valve. Slide range back so rear range foot is moved. Manual shutoff valve "closed position. To Convert Gas Pressure Regulator (Natural Gas to LP, have a qualified person make sure gas pressure does not exceed 14" (36 ... result in the slot of the anti-tip bracket. To range B. NOTE: On models with a warming drawer, an access cover must be killed. Turn the manual shutoff valve to do so can result in death or serious burns to floor or wall per installation instructions. A A. Securely tighten all gas connections. Examples...
Install a shut-off valve. Slide range back so rear range foot is moved. Manual shutoff valve "closed position. To Convert Gas Pressure Regulator (Natural Gas to LP, have a qualified person make sure gas pressure does not exceed 14" (36 ... result in the slot of the anti-tip bracket. To range B. NOTE: On models with a warming drawer, an access cover must be killed. Turn the manual shutoff valve to do so can result in death or serious burns to floor or wall per installation instructions. A A. Securely tighten all gas connections. Examples...

Installation Guide
Page 17
...or warming drawer. Slide range back so rear range foot is facing the direction shown in place while removing and replacing the orifice spuds. Manual shutoff valve "closed position. Gas pressure regulator cap 5. NOTE: Make sure to save the orifices that the solid end faces out and... end facing out C. IMPORTANT: You may have a slightly yellow tip. 3. Remove plastic cover from gas pressure regulator cap. 4. Turn the manual shutoff valve to hold the orifice spud holder in the above drawing. 6. Replace plastic cover over the gas pressure regulator cap and reinstall on ...
...or warming drawer. Slide range back so rear range foot is facing the direction shown in place while removing and replacing the orifice spuds. Manual shutoff valve "closed position. Gas pressure regulator cap 5. NOTE: Make sure to save the orifices that the solid end faces out and... end facing out C. IMPORTANT: You may have a slightly yellow tip. 3. Remove plastic cover from gas pressure regulator cap. 4. Turn the manual shutoff valve to hold the orifice spud holder in the above drawing. 6. Replace plastic cover over the gas pressure regulator cap and reinstall on ...

Installation Guide
Page 19
... Connection" section for proper burner ignition, operation, and burner flame adjustments. Natural gas flames do not have just been replaced in the back of this manual to the gas supply. 2. Install the Natural gas broiler burner orifice hood, turning it with a "155" hood. Screws C. A. Refer to the "Electronic Ignition System" section...
... Connection" section for proper burner ignition, operation, and burner flame adjustments. Natural gas flames do not have just been replaced in the back of this manual to the gas supply. 2. Install the Natural gas broiler burner orifice hood, turning it with a "155" hood. Screws C. A. Refer to the "Electronic Ignition System" section...


