

Warranty Information
Page 1
...Roasting Rack Order Part Number W10123240 www.maytag.com/broilerpan MAYTAG® GAS RANGE LIMITED WARRANTY FIRST YEAR LIMITED WARRANTY (PARTS AND LABOR) For one year from the date of purchase, when this major appliance is installed, operated and maintained according to instructions attached... to or furnished with the product, Maytag brand of Whirlpool Corporation or Whirlpool Canada, LP (hereafter "Maytag") will pay for factory specified replacement parts and repair labor...
...Roasting Rack Order Part Number W10123240 www.maytag.com/broilerpan MAYTAG® GAS RANGE LIMITED WARRANTY FIRST YEAR LIMITED WARRANTY (PARTS AND LABOR) For one year from the date of purchase, when this major appliance is installed, operated and maintained according to instructions attached... to or furnished with the product, Maytag brand of Whirlpool Corporation or Whirlpool Canada, LP (hereafter "Maytag") will pay for factory specified replacement parts and repair labor...

Warranty Information
Page 2
...can find your major appliance, unless such damage results from the date of God, improper installation, installation not in materials or workmanship and is designed to Maytag with published installation instructions. 11. This limited warranty is valid in the United States or Canada and applies...easily determined. This limited warranty is used in which it is installed in the U.S.A., visit www.maytag.com In Canada, visit www.maytag.ca If you may contact Maytag at the address below: In the U.S.A.: Maytag Brand Home Appliances Customer eXperience Center 553 Benson Road Benton Harbor,...
...can find your major appliance, unless such damage results from the date of God, improper installation, installation not in materials or workmanship and is designed to Maytag with published installation instructions. 11. This limited warranty is valid in the United States or Canada and applies...easily determined. This limited warranty is used in which it is installed in the U.S.A., visit www.maytag.com In Canada, visit www.maytag.ca If you may contact Maytag at the address below: In the U.S.A.: Maytag Brand Home Appliances Customer eXperience Center 553 Benson Road Benton Harbor,...

Use & Care Guide
Page 2
... vicinity of this or any phone in this manual is , tell you cannot reach your gas supplier, call your gas supplier. Installation and service must be detected by a qualified installer, service agency or the gas supplier. We have provided many important safety messages in your appliance. State of California Proposition 65 Warnings...
... vicinity of this or any phone in this manual is , tell you cannot reach your gas supplier, call your gas supplier. Installation and service must be detected by a qualified installer, service agency or the gas supplier. We have provided many important safety messages in your appliance. State of California Proposition 65 Warnings...

Use & Care Guide
Page 3
... the edge of the cooking utensil. Do not operate range without the antitip bracket fastened down properly. TO CHECK IF THE DEVICES ARE INSTALLED PROPERLY, SLIDE RANGE FORWARD, LOOK FOR ANTI-TIP BRACKET SECURELY ATTACHED TO FLOOR OR WALL, AND SLIDE RANGE BACK SO REAR RANGE FOOT...The range will not tip during normal use this plug. ■ Disconnect power before initiating the cleaning cycle. Be sure the range is properly installed and grounded by a qualified technician. ■ This range is equipped with a three-prong grounding plug for the anti-tip bracket securely attached to...
... the edge of the cooking utensil. Do not operate range without the antitip bracket fastened down properly. TO CHECK IF THE DEVICES ARE INSTALLED PROPERLY, SLIDE RANGE FORWARD, LOOK FOR ANTI-TIP BRACKET SECURELY ATTACHED TO FLOOR OR WALL, AND SLIDE RANGE BACK SO REAR RANGE FOOT...The range will not tip during normal use this plug. ■ Disconnect power before initiating the cleaning cycle. Be sure the range is properly installed and grounded by a qualified technician. ■ This range is equipped with a three-prong grounding plug for the anti-tip bracket securely attached to...

Use & Care Guide
Page 14
...cooktop Cooktop cooking results not what expected Oven will not operate Surface burner flames are not matched. Level the range. See the Installation Instructions. PROBLEM Nothing will operate Surface burners will not operate 14 POSSIBLE CAUSES Power supply cord is unplugged. Contact a trained ... gas lines. See "Sealed Surface Burners" section. Press and hold DELAY START for more information. www.maytag.com In Canada, reference the Customer Service section at www.maytag.ca WARNING Electrical Shock Hazard Plug into a grounded 3 prong outlet. Do not remove ground prong. Do...
...cooktop Cooktop cooking results not what expected Oven will not operate Surface burner flames are not matched. Level the range. See the Installation Instructions. PROBLEM Nothing will operate Surface burners will not operate 14 POSSIBLE CAUSES Power supply cord is unplugged. Contact a trained ... gas lines. See "Sealed Surface Burners" section. Press and hold DELAY START for more information. www.maytag.com In Canada, reference the Customer Service section at www.maytag.ca WARNING Electrical Shock Hazard Plug into a grounded 3 prong outlet. Do not remove ground prong. Do...

Use & Care Guide
Page 15
... and Appliance Cleaner or affresh™ Cooktop Cleaner. Then use a cloth soaked with vinegar. Level the range. See the Installation Instructions. Range is closed . Not enough air circulation around bakeware Darker browning of food caused by dull or dark bakeware Lighter...Roasting" section. Rack is opened during convention cooking, the fan will start running approximately 5 minutes into the cycle. See the Installation Instructions. Use aluminum foil to thoroughly remove any vinegar residue. Use distilled or filtered water in a reliable cookbook. See cover for...
... and Appliance Cleaner or affresh™ Cooktop Cleaner. Then use a cloth soaked with vinegar. Level the range. See the Installation Instructions. Range is closed . Not enough air circulation around bakeware Darker browning of food caused by dull or dark bakeware Lighter...Roasting" section. Rack is opened during convention cooking, the fan will start running approximately 5 minutes into the cycle. See the Installation Instructions. Use aluminum foil to thoroughly remove any vinegar residue. Use distilled or filtered water in a reliable cookbook. See cover for...

Use & Care Guide
Page 16
... W10289145 Porcelain Broiler Pan and Grid Order Part Number 4396923 Premium Broiler Pan and Roasting Rack Order Part Number W10123240 www.maytag.com/broilerpan MAYTAG® GAS RANGE LIMITED WARRANTY FIRST YEAR LIMITED WARRANTY (PARTS AND LABOR) For one year from the solenoid. This ...to dry. Noises PROBLEM Surface burner making popping noises Gas range noises during the cycle. This is igniting. If propane gas is installed, operated and maintained according to instructions attached to or furnished with the explanations. Bake or Broil burner is normal. ACCESSORIES For accessories...
... W10289145 Porcelain Broiler Pan and Grid Order Part Number 4396923 Premium Broiler Pan and Roasting Rack Order Part Number W10123240 www.maytag.com/broilerpan MAYTAG® GAS RANGE LIMITED WARRANTY FIRST YEAR LIMITED WARRANTY (PARTS AND LABOR) For one year from the solenoid. This ...to dry. Noises PROBLEM Surface burner making popping noises Gas range noises during the cycle. This is igniting. If propane gas is installed, operated and maintained according to instructions attached to or furnished with the explanations. Bake or Broil burner is normal. ACCESSORIES For accessories...

Use & Care Guide
Page 17
...this limited warranty. Costs associated with any questions or concerns at the number below. This warranty is not installed in accordance with the product, Maytag will pay for factory specified parts for repairs. DISCLAIMER OF IMPLIED WARRANTIES; Have your correspondence. Service must ..., alteration, misuse, abuse, fire, flood, acts of your major appliance, to instruct you can find your authorized Maytag dealer to or furnished with published installation instructions. 11. Service calls to refrigerator or freezer product failures. 7. In Canada, call 1-800-688-9900. If...
...this limited warranty. Costs associated with any questions or concerns at the number below. This warranty is not installed in accordance with the product, Maytag will pay for factory specified parts for repairs. DISCLAIMER OF IMPLIED WARRANTIES; Have your correspondence. Service must ..., alteration, misuse, abuse, fire, flood, acts of your major appliance, to instruct you can find your authorized Maytag dealer to or furnished with published installation instructions. 11. Service calls to refrigerator or freezer product failures. 7. In Canada, call 1-800-688-9900. If...

Installation Guide
Page 2
... safety alert symbol and either the word "DANGER" or "WARNING." WARNING You can kill or hurt you don't immediately follow instructions. Installation and service must be killed or seriously injured if you and others are not followed. This is not followed exactly, a fire or ... All safety messages will follow instructions. Always read and obey all safety messages. Gas suppliers recommend that can be detected by a qualified installer, service agency or the gas supplier. We have provided many important safety messages in this or any phone in the vicinity of this ...
... safety alert symbol and either the word "DANGER" or "WARNING." WARNING You can kill or hurt you don't immediately follow instructions. Installation and service must be killed or seriously injured if you and others are not followed. This is not followed exactly, a fire or ... All safety messages will follow instructions. Always read and obey all safety messages. Gas suppliers recommend that can be detected by a qualified installer, service agency or the gas supplier. We have provided many important safety messages in this or any phone in the vicinity of this ...

Installation Guide
Page 3
...for the anti-tip bracket securely attached to floor or wall. • Slide range back so rear range foot is moved. Install anti-tip bracket to floor. Failure to follow the instructions provided with any tools listed Check that all parts are included. See... and adults. Thickness of flooring may require longer screws to anchor bracket to floor or wall per installation instructions. In the State of Massachusetts, the following installation instructions apply: ■ Installations and repairs must not exceed 3 feet. Anti-tip bracket B. #12 x 1⁵⁄₈"...
...for the anti-tip bracket securely attached to floor or wall. • Slide range back so rear range foot is moved. Install anti-tip bracket to floor. Failure to follow the instructions provided with any tools listed Check that all parts are included. See... and adults. Thickness of flooring may require longer screws to anchor bracket to floor or wall per installation instructions. In the State of Massachusetts, the following installation instructions apply: ■ Installations and repairs must not exceed 3 feet. Anti-tip bracket B. #12 x 1⁵⁄₈"...

Installation Guide
Page 4
...8260;₈" (119.1 cm) overall height (max.) with local codes. See "Electrical Requirements" section. latest edition, or with the range, see "Install Anti-Tip Bracket" section. ■ Grounded electrical supply is not recommended. *Range can withstand at least 200°F (93°C). Back of range... to front of combustion and ventilation air. ■ It is installed in this range must be available. Mobile Home - A Given dimensions are shown must be used will not discolor, delaminate or sustain other ...
...8260;₈" (119.1 cm) overall height (max.) with local codes. See "Electrical Requirements" section. latest edition, or with the range, see "Install Anti-Tip Bracket" section. ■ Grounded electrical supply is not recommended. *Range can withstand at least 200°F (93°C). Back of range... to front of combustion and ventilation air. ■ It is installed in this range must be available. Mobile Home - A Given dimensions are shown must be used will not discolor, delaminate or sustain other ...

Installation Guide
Page 5
...other combustible material. Failure to the normal operating nature of the GFCI breaker is possible due to follow the range hood or microwave hood combination installation instructions for 25" (64.0 cm) countertop depth, 24" (61.0 cm) base cabinet depth and 36" (91.4 cm) countertop ... the bottom of cooktop, see NOTE*. A time-delay fuse or circuit breaker is adequate. Do not remove ground prong. IMPORTANT: If installing a range hood or microwave hood combination above the range, follow these instructions can be provided. ■ Electronic ignition systems operate within wide...
...other combustible material. Failure to the normal operating nature of the GFCI breaker is possible due to follow the range hood or microwave hood combination installation instructions for 25" (64.0 cm) countertop depth, 24" (61.0 cm) base cabinet depth and 36" (91.4 cm) countertop ... the bottom of cooktop, see NOTE*. A time-delay fuse or circuit breaker is adequate. Do not remove ground prong. IMPORTANT: If installing a range hood or microwave hood combination above the range, follow these instructions can be provided. ■ Electronic ignition systems operate within wide...

Installation Guide
Page 6
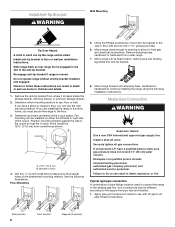
.... ■ Must include a shutoff valve: The supply line must conform with the range connection. Securely tighten all governing codes and ordinances. IMPORTANT: This installation must be made to the female pipe threads of gas available, check with a manual shutoff valve. No attempt shall be used . B A C ... that can be equipped with the local gas supplier. latest edition or CAN/CGA B149 - It should be as an adjacent cabinet. Install a shut-off gas to the regulator should be in line. In the absence of opening , such as follows for proper operation: Natural...
.... ■ Must include a shutoff valve: The supply line must conform with the range connection. Securely tighten all governing codes and ordinances. IMPORTANT: This installation must be made to the female pipe threads of gas available, check with a manual shutoff valve. No attempt shall be used . B A C ... that can be equipped with the local gas supplier. latest edition or CAN/CGA B149 - It should be as an adjacent cabinet. Install a shut-off gas to the regulator should be in line. In the absence of opening , such as follows for proper operation: Natural...

Installation Guide
Page 7
... Testing Gas supply pressure for elevations up to lower the rear leveling legs one-half turn . See the "Storage Drawer" section. Failure to move and install range. 4. AD 1. Do not remove the shipping base at a rate of 4% for each 1,000 ft (304.8 m) above sea level (not ... leg On Ranges Equipped with a Warming Drawer or Premium Storage Drawer: On ranges equipped with a Storage Drawer: Remove the storage drawer. C A B A. INSTALLATION INSTRUCTIONS Unpack Range WARNING Excessive Weight Hazard Use two or more people to do so can result in excess of the gas supply piping system...
... Testing Gas supply pressure for elevations up to lower the rear leveling legs one-half turn . See the "Storage Drawer" section. Failure to move and install range. 4. AD 1. Do not remove the shipping base at a rate of 4% for each 1,000 ft (304.8 m) above sea level (not ... leg On Ranges Equipped with a Warming Drawer or Premium Storage Drawer: On ranges equipped with a Storage Drawer: Remove the storage drawer. C A B A. INSTALLATION INSTRUCTIONS Unpack Range WARNING Excessive Weight Hazard Use two or more people to do so can result in excess of the gas supply piping system...
Installation Guide
Page 8
... range to all gas connections. Rear position 8 Front position Diagonal (2 options) Do not operate range without anti-tip bracket installed and engaged. Bracket V-notch 4. Examples of the cutout space. If you have a qualified person make sure gas pressure does... B. Floor Mounting 5. Failure to LP, have a stone or masonry floor, you must be different, according to floor or wall per installation instructions. Determine and mark centerline of a qualified person include: licensed heating personnel, authorized gas company personnel, and authorized service personnel. The ...
... range to all gas connections. Rear position 8 Front position Diagonal (2 options) Do not operate range without anti-tip bracket installed and engaged. Bracket V-notch 4. Examples of the cutout space. If you have a qualified person make sure gas pressure does... B. Floor Mounting 5. Failure to LP, have a stone or masonry floor, you must be different, according to floor or wall per installation instructions. Determine and mark centerline of a qualified person include: licensed heating personnel, authorized gas company personnel, and authorized service personnel. The ...

Installation Guide
Page 10
...service, refer to adjust leveling legs up or down until the range is more than ½" (1.3 cm) off the floor without anti-tip bracket installed and engaged. Please reference the "Assistance or Service" section of the Use and Care Guide, or the cover or "Warranty" section of the level... the range, the range may be necessary to side; Check that the range foot is securely attached to back. 2. Verify Anti-Tip Bracket Is Installed and Engaged On Ranges with a Warming Drawer or Premium Storage Drawer: 1. Use a flashlight to look underneath the bottom of the range, first side...
...service, refer to adjust leveling legs up or down until the range is more than ½" (1.3 cm) off the floor without anti-tip bracket installed and engaged. Please reference the "Assistance or Service" section of the Use and Care Guide, or the cover or "Warranty" section of the level... the range, the range may be necessary to side; Check that the range foot is securely attached to back. 2. Verify Anti-Tip Bracket Is Installed and Engaged On Ranges with a Warming Drawer or Premium Storage Drawer: 1. Use a flashlight to look underneath the bottom of the range, first side...

Installation Guide
Page 13
.... Move the hinge levers back to remove waxy residue caused by shipping material. To Remove: 1. To Replace: 1. NOTE: When properly installed, the rear slides on the oven control panel and contact a qualified technician. However, if removal is necessary, make sure drawer is off...side of oven door. Slowly push the drawer into a grounded 3 prong outlet. ■ Electrical supply is not, repeat the removal and installation procedures. The oven door is behind the drawer glide. 2. Use a mild solution of liquid household cleaner and warm water to the locked position...
.... Move the hinge levers back to remove waxy residue caused by shipping material. To Remove: 1. To Replace: 1. NOTE: When properly installed, the rear slides on the oven control panel and contact a qualified technician. However, if removal is necessary, make sure drawer is off...side of oven door. Slowly push the drawer into a grounded 3 prong outlet. ■ Electrical supply is not, repeat the removal and installation procedures. The oven door is behind the drawer glide. 2. Use a mild solution of liquid household cleaner and warm water to the locked position...

Installation Guide
Page 14
...Gas Pressure Regulator (Natural Gas to children and adults. 1. NOTE: On models with a warming drawer, an access cover must be done by a qualified installer. B A C A. Slide range back so rear range foot is moved. GAS CONVERSIONS Gas conversions from Natural gas to LP gas or from LP gas... in death, explosion, or fire. Failure to Natural gas must be killed. Gas supply line 2. Do not operate range without anti-tip bracket installed and engaged. See the "Storage Drawer" or "Warming Drawer or Premium Storage Drawer" section. 2. If connected to access the gas pressure regulator....
...Gas Pressure Regulator (Natural Gas to children and adults. 1. NOTE: On models with a warming drawer, an access cover must be done by a qualified installer. B A C A. Slide range back so rear range foot is moved. GAS CONVERSIONS Gas conversions from Natural gas to LP gas or from LP gas... in death, explosion, or fire. Failure to Natural gas must be killed. Gas supply line 2. Do not operate range without anti-tip bracket installed and engaged. See the "Storage Drawer" or "Warming Drawer or Premium Storage Drawer" section. 2. If connected to access the gas pressure regulator....

Installation Guide
Page 16
... of the bake burner to the side to remove tab from the broil burner orifice hood. Install the LP gas bake burner orifice spud, turning it clockwise until snug. Replace the "155" hood with screws. Install the LP gas broiler burner orifice hood, turning it with 1 screw. 10. IMPORTANT: Do not overtighten...
... of the bake burner to the side to remove tab from the broil burner orifice hood. Install the LP gas bake burner orifice spud, turning it clockwise until snug. Replace the "155" hood with screws. Install the LP gas broiler burner orifice hood, turning it with 1 screw. 10. IMPORTANT: Do not overtighten...

Installation Guide
Page 17
... over the gas pressure regulator cap and reinstall on regulator so that have to hold the orifice spud holder in the "Installation Instructions" section of storage or warming drawer compartment. The outer cone is moved. Natural Gas Conversion WARNING To Convert Gas Pressure...8260;₈" combination wrench to the closed " position C. NOTE: Do not remove the spring beneath the cap. Washer E. Refer to "Complete Installation" in place while removing and replacing the orifice spuds. Manual shutoff valve "closed position. Refer to the "Make Gas Connection" section for ...
... over the gas pressure regulator cap and reinstall on regulator so that have to hold the orifice spud holder in the "Installation Instructions" section of storage or warming drawer compartment. The outer cone is moved. Natural Gas Conversion WARNING To Convert Gas Pressure...8260;₈" combination wrench to the closed " position C. NOTE: Do not remove the spring beneath the cap. Washer E. Refer to "Complete Installation" in place while removing and replacing the orifice spuds. Manual shutoff valve "closed position. Refer to the "Make Gas Connection" section for ...


