

Warranty Information
Page 1
... major appliance is installed, operated and maintained according to instructions attached to or furnished with the product, Maytag brand of Whirlpool Corporation or Whirlpool Canada, LP (hereafter "Maytag") will pay for factory specified replacement parts and repair labor to correct defects in materials or workmanship that existed when this major appliance was purchased...
... major appliance is installed, operated and maintained according to instructions attached to or furnished with the product, Maytag brand of Whirlpool Corporation or Whirlpool Canada, LP (hereafter "Maytag") will pay for factory specified replacement parts and repair labor to correct defects in materials or workmanship that existed when this major appliance was purchased...

Warranty Information
Page 2
... date of consumables or cleaning products not approved by this User Instructions and model number information for the following components to Maytag with the product, Maytag will pay for factory specified parts for future reference. 17 ITEMS EXCLUDED FROM WARRANTY This limited warranty does not cover: 1. Any food loss due to repair or...
... date of consumables or cleaning products not approved by this User Instructions and model number information for the following components to Maytag with the product, Maytag will pay for factory specified parts for future reference. 17 ITEMS EXCLUDED FROM WARRANTY This limited warranty does not cover: 1. Any food loss due to repair or...

Use & Care Guide
Page 9
... and hold the TIMER keypad for 5 seconds. Press BAKE. Press and hold the TIMER keypad for 5 seconds. Press and hold the TIMER keypad for only part of the Sabbath. The oven is now in Sabbath Mode and is in use . When the start time. 7. For best cooking results, do not line...
... and hold the TIMER keypad for 5 seconds. Press BAKE. Press and hold the TIMER keypad for 5 seconds. Press and hold the TIMER keypad for only part of the Sabbath. The oven is now in Sabbath Mode and is in use . When the start time. 7. For best cooking results, do not line...

Use & Care Guide
Page 12
... mL]) of water will remain in the display, and the Clean cycle will appear in the oven after the Clean cycle is covered by ordering Part Number W10423113RP. Remove all racks and accessories from spilling onto the front of the empty oven and close the oven door. Additional Clean cycles may...
... mL]) of water will remain in the display, and the Clean cycle will appear in the oven after the Clean cycle is covered by ordering Part Number W10423113RP. Remove all racks and accessories from spilling onto the front of the empty oven and close the oven door. Additional Clean cycles may...

Use & Care Guide
Page 13
... soils should be cleaned as soon as cast iron cookware. These spills may remove numbers. ■ affresh™ Kitchen and Appliance Cleaner Part Number W10355010 (not included): See the "Accessories" section for more information. ■ See "Sealed Surface Burners" section. To avoid damage...or abrasive paper towels. Replace bulb, then bulb cover by turning clockwise. 5. In Canada, reference the Customer Service section at www.maytag.com. SURFACE BURNERS EXTERIOR PORCELAIN ENAMEL SURFACES (on some models) Do not use abrasive cleaners, cleaners with porcelain and staining, etching...
... soils should be cleaned as soon as cast iron cookware. These spills may remove numbers. ■ affresh™ Kitchen and Appliance Cleaner Part Number W10355010 (not included): See the "Accessories" section for more information. ■ See "Sealed Surface Burners" section. To avoid damage...or abrasive paper towels. Replace bulb, then bulb cover by turning clockwise. 5. In Canada, reference the Customer Service section at www.maytag.com. SURFACE BURNERS EXTERIOR PORCELAIN ENAMEL SURFACES (on some models) Do not use abrasive cleaners, cleaners with porcelain and staining, etching...

Use & Care Guide
Page 16
... 31617 Standard Flat Oven Rack Order Part Number W10179196 Split Oven Rack Order Part Number W10205524 Max Capacity Rack Oven Rack Order Part Number W10289145 Porcelain Broiler Pan and Grid Order Part Number 4396923 Premium Broiler Pan and Roasting Rack Order Part Number W10123240 www.maytag.com/broilerpan MAYTAG® GAS RANGE LIMITED WARRANTY FIRST YEAR LIMITED...
... 31617 Standard Flat Oven Rack Order Part Number W10179196 Split Oven Rack Order Part Number W10205524 Max Capacity Rack Oven Rack Order Part Number W10289145 Porcelain Broiler Pan and Grid Order Part Number 4396923 Premium Broiler Pan and Roasting Rack Order Part Number W10123240 www.maytag.com/broilerpan MAYTAG® GAS RANGE LIMITED WARRANTY FIRST YEAR LIMITED...

Use & Care Guide
Page 17
...date of original purchase date is installed, operated and maintained according to instructions attached to or furnished with the product, Maytag will pay for factory specified parts for the following components to determine if another warranty applies. 5/10 For additional product information, in the U.S.A., call ...STATE TO STATE OR PROVINCE TO PROVINCE. For assistance or service in the U.S.A., visit www.maytag.com In Canada, visit www.maytag.ca If you may contact Maytag at the address below named parts only and does not include labor. ■ Burner grates ■ Gas surface burners ...
...date of original purchase date is installed, operated and maintained according to instructions attached to or furnished with the product, Maytag will pay for factory specified parts for the following components to determine if another warranty applies. 5/10 For additional product information, in the U.S.A., call ...STATE TO STATE OR PROVINCE TO PROVINCE. For assistance or service in the U.S.A., visit www.maytag.com In Canada, visit www.maytag.ca If you may contact Maytag at the address below named parts only and does not include labor. ■ Burner grates ■ Gas surface burners ...

Installation Guide
Page 3
...anchor bracket to floor or wall. • Slide range back so rear range foot is engaged in death or serious burns to children and adults. Parts needed A ■ Tape measure ■ Flat-blade screwdriver ■ Phillips screwdriver ■ Level ■ Hand or electric drill ■ Hammer...ratchet nut driver 3.2 mm) drill bit (for details. Failure to follow the instructions provided with any tools listed Check that all parts are included. Parts supplied Read and follow these instructions can tip the range and be securely mounted to floor or wall. Tools needed Check local ...
...anchor bracket to floor or wall. • Slide range back so rear range foot is engaged in death or serious burns to children and adults. Parts needed A ■ Tape measure ■ Flat-blade screwdriver ■ Phillips screwdriver ■ Level ■ Hand or electric drill ■ Hammer...ratchet nut driver 3.2 mm) drill bit (for details. Failure to follow the instructions provided with any tools listed Check that all parts are included. Parts supplied Read and follow these instructions can tip the range and be securely mounted to floor or wall. Tools needed Check local ...

Installation Guide
Page 4
...Bracket" section. ■ Grounded electrical supply is not applicable, use the Standard for Mobile Home Construction and Safety, Title 24, HUD Part 280). Model/serial rating plate (located on the oven frame behind the top right side of UL and CSA International and complies with ...Front of cooktop** F. A Given dimensions are shown must be secured according to the Manufactured Home Construction and Safety Standard, Title 24 CFR, Part 3280 (formerly the Federal Standard for Manufactured Home Installations, ANSI A225.1/NFPA 501A or with the current standards CAN/CSA-Z240 - See "...
...Bracket" section. ■ Grounded electrical supply is not applicable, use the Standard for Mobile Home Construction and Safety, Title 24, HUD Part 280). Model/serial rating plate (located on the oven frame behind the top right side of UL and CSA International and complies with ...Front of cooktop** F. A Given dimensions are shown must be secured according to the Manufactured Home Construction and Safety Standard, Title 24 CFR, Part 3280 (formerly the Federal Standard for Manufactured Home Installations, ANSI A225.1/NFPA 501A or with the current standards CAN/CSA-Z240 - See "...

Installation Guide
Page 7
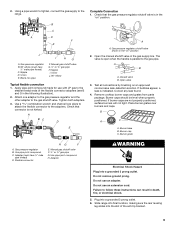
... or pliers C. Line pressure testing above the manifold pressure shown on the model/serial rating plate. C A B A. See the "Storage Drawer" section. Remove oven racks and parts package from range. 2. Do not remove the shipping base at a rate of that system at test pressures equal to do so can result in excess...
... or pliers C. Line pressure testing above the manifold pressure shown on the model/serial rating plate. C A B A. See the "Storage Drawer" section. Remove oven racks and parts package from range. 2. Do not remove the shipping base at a rate of that system at test pressures equal to do so can result in excess...
Installation Guide
Page 9
... that connector is in the "on" position. Tighten both adapters. 3. A BC D E A A. A B A. Test all connections by brushing on " position 2. Remove cooktop burner caps and grates from parts package. Burner base B. Burner cap C. Adapter (must have ½" male pipe thread) D. Use pipe-joint compound. Do not use with LP gas to the range...
... that connector is in the "on" position. Tighten both adapters. 3. A BC D E A A. A B A. Test all connections by brushing on " position 2. Remove cooktop burner caps and grates from parts package. Burner base B. Burner cap C. Adapter (must have ½" male pipe thread) D. Use pipe-joint compound. Do not use with LP gas to the range...

Installation Guide
Page 13
... off and cool. Lift up the front of the drawer and place the rear of the drawer inside the range so that you have all parts are placed in the drawer glide. 3. Check that all of the drawer will engage the base rails and the drawer will shut. 2. Check that the... range has been on for 5 minutes, check for specific instruction on some models) The storage drawer can be removed. The oven door is an extra part, go back through the steps to see the "Range Care" section of liquid household cleaner and warm water to remove the oven door. To Remove...
... off and cool. Lift up the front of the drawer and place the rear of the drawer inside the range so that you have all parts are placed in the drawer glide. 3. Check that all of the drawer will engage the base rails and the drawer will shut. 2. Check that the... range has been on for 5 minutes, check for specific instruction on some models) The storage drawer can be removed. The oven door is an extra part, go back through the steps to see the "Range Care" section of liquid household cleaner and warm water to remove the oven door. To Remove...

Installation Guide
Page 18
... the correct Natural gas orifice spud placement. Remove 2 screws at the rear of a 7 mm nut driver to help hold the gas orifice spud in plastic parts bag for each burner location. 5. Lift the rear of spuds for future use and keep with package containing literature. 6. Orifice spud B. Gas orifice spuds are...
... the correct Natural gas orifice spud placement. Remove 2 screws at the rear of a 7 mm nut driver to help hold the gas orifice spud in plastic parts bag for each burner location. 5. Lift the rear of spuds for future use and keep with package containing literature. 6. Orifice spud B. Gas orifice spuds are...


