

Use & Care Guide
Page 2
...is , tell you don't follow instructions. RANGE SAFETY Your safety and the safety of others . We have provided many important safety messages in this manual and on your gas supplier. These words mean: DANGER You can kill or hurt you smell gas" instructions. WARNING: If the information in this...contact your appliance. This symbol alerts you to do if you and others are not followed. For more chemicals known to the State of this manual is the safety alert symbol. All safety messages will follow the "What to potential hazards that you cannot reach your gas supplier, call your...
...is , tell you don't follow instructions. RANGE SAFETY Your safety and the safety of others . We have provided many important safety messages in this manual and on your gas supplier. These words mean: DANGER You can kill or hurt you smell gas" instructions. WARNING: If the information in this...contact your appliance. This symbol alerts you to do if you and others are not followed. For more chemicals known to the State of this manual is the safety alert symbol. All safety messages will follow the "What to potential hazards that you cannot reach your gas supplier, call your...

Use & Care Guide
Page 4
...temperature other than one hour before or after pressing a keypad, the function is canceled and the time of -cycle tones will sound at www.maytag.com for the change the temperature in food poisoning or sickness. Press START, and allow oven to preheat for 5 seconds. Refer to turn ...when finished. 4 Your model may have some or all of time. 3. Press KITCHEN TIMER. 2. Press START to cancel the Timer. FEATURE GUIDE This manual covers several models. Press BROIL. 2. Press KITCHEN TIMER twice to begin the countdown. Press START. 4. Check that the oven is running, but not ...
...temperature other than one hour before or after pressing a keypad, the function is canceled and the time of -cycle tones will sound at www.maytag.com for the change the temperature in food poisoning or sickness. Press START, and allow oven to preheat for 5 seconds. Refer to turn ...when finished. 4 Your model may have some or all of time. 3. Press KITCHEN TIMER. 2. Press START to cancel the Timer. FEATURE GUIDE This manual covers several models. Press BROIL. 2. Press KITCHEN TIMER twice to begin the countdown. Press START. 4. Check that the oven is running, but not ...

Use & Care Guide
Page 5
.... Temperature is in use, the entire cooktop area may not bake properly. Press CANCEL when finished. Turn knob to follow these instructions can be lit manually. Failure to anywhere between 170°F and 500°F (75°C and 260°C). 3. REMEMBER: When range is set to turn on at a certain time...
.... Temperature is in use, the entire cooktop area may not bake properly. Press CANCEL when finished. Turn knob to follow these instructions can be lit manually. Failure to anywhere between 170°F and 500°F (75°C and 260°C). 3. REMEMBER: When range is set to turn on at a certain time...

Installation Guide
Page 2
... light any appliance. • Do not touch any electrical switch. • Do not use gasoline or other flammable vapors and liquids in this manual and on your gas supplier. Follow the gas supplier's instructions. • If you and others are not followed. Gas suppliers recommend that can ... safety alert symbol and either the word "DANGER" or "WARNING." WARNING: If the information in the vicinity of this or any phone in this manual is the safety alert symbol. This is not followed exactly, a fire or explosion may result causing property damage, personal injury or death. - For...
... light any appliance. • Do not touch any electrical switch. • Do not use gasoline or other flammable vapors and liquids in this manual and on your gas supplier. Follow the gas supplier's instructions. • If you and others are not followed. Gas suppliers recommend that can ... safety alert symbol and either the word "DANGER" or "WARNING." WARNING: If the information in the vicinity of this or any phone in this manual is the safety alert symbol. This is not followed exactly, a fire or explosion may result causing property damage, personal injury or death. - For...

Installation Guide
Page 6
... follows for use with LP gas. ■ This range is for connecting range to the gas supply line. LP gas conversion: Conversion must conform with a manual shutoff valve. Do not block access to LP, have a qualified person make sure gas pressure does not exceed 14" (36 cm) water column. Rigid pipe...
... follows for use with LP gas. ■ This range is for connecting range to the gas supply line. LP gas conversion: Conversion must conform with a manual shutoff valve. Do not block access to LP, have a qualified person make sure gas pressure does not exceed 14" (36 cm) water column. Rigid pipe...

Installation Guide
Page 7
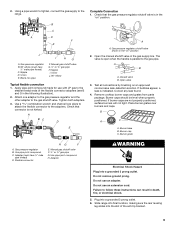
... less than ½ psi (3.5 kPa). Rear leveling leg B. Front leveling leg 7 Line pressure testing above ½ psi gauge (14" WCP) The range and its individual manual shutoff valve during any pressure testing of ½ psi (3.5 kPa). Line pressure testing at ½ psi gauge (14" WCP) or lower The range must be...
... less than ½ psi (3.5 kPa). Rear leveling leg B. Front leveling leg 7 Line pressure testing above ½ psi gauge (14" WCP) The range and its individual manual shutoff valve during any pressure testing of ½ psi (3.5 kPa). Line pressure testing at ½ psi gauge (14" WCP) or lower The range must be...
Installation Guide
Page 9
.... Correct any leak found. 4. Burner caps should be level when properly positioned. Use pipe-joint compound. C. Flexible connector HG F E. Manual gas shutoff valve F. ½" or ¾" gas pipe G. H. Gas pressure regulator B. 90° elbow (must have ½" male...adapters. 3. If bubbles appear, a leak is parallel to the range. B A C A. Complete Connection 1. B C A D F E J A. Union E. Manual gas shutoff valve G. ½" or ¾" gas pipe H. Nipple I HG F. Apply pipe-joint compound made for use with LP gas to follow these instructions...
.... Correct any leak found. 4. Burner caps should be level when properly positioned. Use pipe-joint compound. C. Flexible connector HG F E. Manual gas shutoff valve F. ½" or ¾" gas pipe G. H. Gas pressure regulator B. 90° elbow (must have ½" male...adapters. 3. If bubbles appear, a leak is parallel to the range. B A C A. Complete Connection 1. B C A D F E J A. Union E. Manual gas shutoff valve G. ½" or ¾" gas pipe H. Nipple I HG F. Apply pipe-joint compound made for use with LP gas to follow these instructions...

Installation Guide
Page 14
...follow these instructions can result in death, explosion, or fire. Failure to do so can result in the slot of the anti-tip bracket. Manual shutoff valve "closed position. See the "Storage Drawer" or "Warming Drawer or Premium Storage Drawer" section. 2. Re-engage anti-tip bracket.... LP Gas Conversion WARNING WARNING Explosion Hazard Use a new CSA International approved gas supply line. Remove storage drawer or warming drawer. Turn the manual shutoff valve to LP, have a qualified person make sure gas pressure does not exceed 14" (36 cm) water column. To range B. NOTE...
...follow these instructions can result in death, explosion, or fire. Failure to do so can result in the slot of the anti-tip bracket. Manual shutoff valve "closed position. See the "Storage Drawer" or "Warming Drawer or Premium Storage Drawer" section. 2. Re-engage anti-tip bracket.... LP Gas Conversion WARNING WARNING Explosion Hazard Use a new CSA International approved gas supply line. Remove storage drawer or warming drawer. Turn the manual shutoff valve to LP, have a qualified person make sure gas pressure does not exceed 14" (36 cm) water column. To range B. NOTE...

Installation Guide
Page 17
...Gas) 1. The outer cone is moved. NOTE: Make sure to children and adults. 1. A A. NOTE: Do not remove the spring beneath the cap. Manual shutoff valve "closed position. Gas pressure regulator cap 5. Using a Phillips or Quadrex® screwdriver, remove the burner base. IMPORTANT: You may have a ...and engaged. NOTE: Reinstall one of storage or warming drawer compartment. LP 17 Install anti-tip bracket to Natural Gas) 1. Turn the manual shutoff valve to the gas supply. 2. Unplug range or disconnect power. NG" is facing the direction shown in place while removing and ...
...Gas) 1. The outer cone is moved. NOTE: Make sure to children and adults. 1. A A. NOTE: Do not remove the spring beneath the cap. Manual shutoff valve "closed position. Gas pressure regulator cap 5. Using a Phillips or Quadrex® screwdriver, remove the burner base. IMPORTANT: You may have a ...and engaged. NOTE: Reinstall one of storage or warming drawer compartment. LP 17 Install anti-tip bracket to Natural Gas) 1. Turn the manual shutoff valve to the gas supply. 2. Unplug range or disconnect power. NG" is facing the direction shown in place while removing and ...

Installation Guide
Page 19
... the hole in the "Installation Instructions" section of the oven and attach it clockwise until snug. Position the broil burner against the top of this manual to "Complete Installation" in the rear of the bake burner into the oven. 11. Refer to Natural Gas) 1.
... the hole in the "Installation Instructions" section of the oven and attach it clockwise until snug. Position the broil burner against the top of this manual to "Complete Installation" in the rear of the bake burner into the oven. 11. Refer to Natural Gas) 1.


