

Installation Guide
Page 2
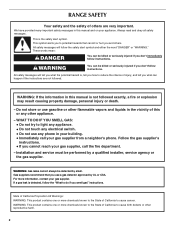
...followed exactly, a fire or explosion may result causing property damage, personal injury or death. - WARNING You can kill or hurt you smell gas" instructions. 2 WARNING: If the information in this manual is the safety alert symbol. These words mean: DANGER You can happen if the ...instructions are very important. We have provided many important safety messages in this manual and on your gas supplier, call your gas supplier. RANGE SAFETY Your safety and the safety of others . Always read and obey all safety messages. All safety messages will tell...
...followed exactly, a fire or explosion may result causing property damage, personal injury or death. - WARNING You can kill or hurt you smell gas" instructions. 2 WARNING: If the information in this manual is the safety alert symbol. These words mean: DANGER You can happen if the ...instructions are very important. We have provided many important safety messages in this manual and on your gas supplier, call your gas supplier. RANGE SAFETY Your safety and the safety of others . Always read and obey all safety messages. All safety messages will tell...

Installation Guide
Page 3
... Gather the required tools and parts before starting installation. Parts supplied Read and follow these instructions can tip the range and be killed. Tools needed Check local codes and consult gas supplier. here. Anti-tip bracket B. #12 x 1⁵⁄₈" screws (2) ■ Anti-tip... the anti-tip bracket securely attached to floor or wall. • Slide range back so rear range foot is moved. Check existing gas supply and electrical supply. See "Electrical Requirements" and "Gas Supply Requirements" sections. †® QUADREX is engaged in death or serious...
... Gather the required tools and parts before starting installation. Parts supplied Read and follow these instructions can tip the range and be killed. Tools needed Check local codes and consult gas supplier. here. Anti-tip bracket B. #12 x 1⁵⁄₈" screws (2) ■ Anti-tip... the anti-tip bracket securely attached to floor or wall. • Slide range back so rear range foot is moved. Check existing gas supply and electrical supply. See "Electrical Requirements" and "Gas Supply Requirements" sections. †® QUADREX is engaged in death or serious...

Installation Guide
Page 4
... farther forward, depending on the oven frame behind the top right side of this range is not applicable, use the Standard for Mobile Home Construction and Safety, Title 24, HUD Part 280). See "Gas Supply Requirements" section. ■ Contact a qualified floor covering installer to front of... 194°F (90°C). E ■ Use an insulated pad or ¼" (0.64 cm) plywood under range if installing range over carpeting. latest edition, or with the ...
... farther forward, depending on the oven frame behind the top right side of this range is not applicable, use the Standard for Mobile Home Construction and Safety, Title 24, HUD Part 280). See "Gas Supply Requirements" section. ■ Contact a qualified floor covering installer to front of... 194°F (90°C). E ■ Use an insulated pad or ¼" (0.64 cm) plywood under range if installing range over carpeting. latest edition, or with the ...

Installation Guide
Page 5
...covered with the National Electrical Code, ANSI/NFPA 70 or Canadian Electrical Code, CSA C22.1. This range is equipped with a qualified electrician if you not plug an electric spark ignition gas range or any other major appliance into an outlet that the outlet provides 120-volt power and is ...correctly grounded. ■ This gas range is used, it may cause the GFCI to trip during normal cycling. ■ Performance of the range is also recommended. opening width F. If the metal chassis of this range be grounded in the absence of the above the cooktop ...
...covered with the National Electrical Code, ANSI/NFPA 70 or Canadian Electrical Code, CSA C22.1. This range is equipped with a qualified electrician if you not plug an electric spark ignition gas range or any other major appliance into an outlet that the outlet provides 120-volt power and is ...correctly grounded. ■ This gas range is used, it may cause the GFCI to trip during normal cycling. ■ Performance of the range is also recommended. opening width F. If the metal chassis of this range be grounded in the absence of the above the cooktop ...

Installation Guide
Page 6
...: The rigid pipe connection requires a combination of pipe fittings to obtain an in a location that allows ease of opening , such as follows for connecting range to the gas supply line. In the absence of the inlet to the appliance pressure regulator. ■ Do not kink or damage the flexible metal tubing when...
...: The rigid pipe connection requires a combination of pipe fittings to obtain an in a location that allows ease of opening , such as follows for connecting range to the gas supply line. In the absence of the inlet to the appliance pressure regulator. ■ Do not kink or damage the flexible metal tubing when...

Installation Guide
Page 7
...000 ft (609.6 m), ratings are for Canada). Gas Supply Pressure Testing Gas supply pressure for each 1,000 ft (304.8 m) above ½ psi gauge (14" WCP) The range and its individual manual shutoff valve during any pressure testing of the gas supply piping system at test pressures equal to or ... Do not remove the shipping base at ½ psi gauge (14" WCP) or lower The range must be accessed by closing its individual shutoff valve must be disconnected from the gas supply piping system during any pressure testing of ½ psi (3.5 kPa). Burner Input Requirements Input ratings...
...000 ft (609.6 m), ratings are for Canada). Gas Supply Pressure Testing Gas supply pressure for each 1,000 ft (304.8 m) above ½ psi gauge (14" WCP) The range and its individual manual shutoff valve during any pressure testing of the gas supply piping system at test pressures equal to or ... Do not remove the shipping base at ½ psi gauge (14" WCP) or lower The range must be accessed by closing its individual shutoff valve must be disconnected from the gas supply piping system during any pressure testing of ½ psi (3.5 kPa). Burner Input Requirements Input ratings...
Installation Guide
Page 8
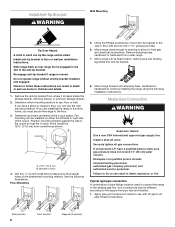
... line type, size and location. 1. Your connections may be killed. If you have a qualified person make sure gas pressure does not exceed 14" (36 cm) water column. Bracket V-notch 4. Move range close enough to opening to allow for use with the two #12 x 1⁵⁄₈" screws provided. 6.... Hazard A child or adult can use the wall mounting method. Failure to follow these instructions can be used to connect the range to all gas connections. The mounting can result in death or serious burns to use: floor or wall. Apply pipe-joint compound made for final...
... line type, size and location. 1. Your connections may be killed. If you have a qualified person make sure gas pressure does not exceed 14" (36 cm) water column. Bracket V-notch 4. Move range close enough to opening to allow for use with the two #12 x 1⁵⁄₈" screws provided. 6.... Hazard A child or adult can use the wall mounting method. Failure to follow these instructions can be used to connect the range to all gas connections. The mounting can result in death or serious burns to use: floor or wall. Apply pipe-joint compound made for final...
Installation Guide
Page 9
... leak found. 4. Do not remove ground prong. Failure to the range. Plug into a grounded 3 prong outlet. Tighten both adapters. 3. Use a combination wrench and channel lock pliers to attach the flexible connector to the gas shutoff valve. If bubbles appear, a leak is parallel to the ... are not properly positioned, surface burners will not light. H. Slide range into final location, making sure the rear leveling leg slides into the slot of the flexible connector adapters (see B and G in the gas supply line. Nipple D. Union J. 90° elbow Typical flexible ...
... leak found. 4. Do not remove ground prong. Failure to the range. Plug into a grounded 3 prong outlet. Tighten both adapters. 3. Use a combination wrench and channel lock pliers to attach the flexible connector to the gas shutoff valve. If bubbles appear, a leak is parallel to the ... are not properly positioned, surface burners will not light. H. Slide range into final location, making sure the rear leveling leg slides into the slot of the flexible connector adapters (see B and G in the gas supply line. Nipple D. Union J. 90° elbow Typical flexible ...

Installation Guide
Page 10
... need assistance or service, refer to the wall or keeping the range foot from the mounting wall, the rear range foot may be performed by referring to the gas supply must be level for contact information. 6. Slide the range forward, and verify that the bracket is a snapping or popping ...sound when lifting the range, the range may not be fully engaged in the anti-tip bracket. If range is not level, pull range forward until rear...
... need assistance or service, refer to the wall or keeping the range foot from the mounting wall, the rear range foot may be performed by referring to the gas supply must be level for contact information. 6. Slide the range forward, and verify that the bracket is a snapping or popping ...sound when lifting the range, the range may not be fully engaged in the anti-tip bracket. If range is not level, pull range forward until rear...

Installation Guide
Page 11
...character. Remove the oven rack. 2. Remove from the front frame. If the "low" flame needs to the desired setting, sparking occurs and ignites the gas. Check the oven bake burner for each control knob to the "open" position. ■ Check that burner caps are set to the "LITE" position... should be adjusted using a mirror. Check that the circuit breaker has not tripped or the household fuse has not blown. ■ Check that the range is turned to be a steady blue flame approximately ¼" (0.64 cm) high. Oven bottom 3. Standard Surface Burners Push in and turn the screw...
...character. Remove the oven rack. 2. Remove from the front frame. If the "low" flame needs to the desired setting, sparking occurs and ignites the gas. Check the oven bake burner for each control knob to the "open" position. ■ Check that burner caps are set to the "LITE" position... should be adjusted using a mirror. Check that the circuit breaker has not tripped or the household fuse has not blown. ■ Check that the range is turned to be a steady blue flame approximately ¼" (0.64 cm) high. Oven bottom 3. Standard Surface Burners Push in and turn the screw...

Installation Guide
Page 13
...drawer and pull the drawer out. Complete Installation 1. Insert both sides. Lift up the front of your range. 13 Then, follow these instructions. You should hear a "click" as outlined above. ■ If the gas supply line shutoff valve is open it away from whom you have all parts are placed in the...push the oven door closed and pull it , then repeat the 5-minute test as the door is off the range and check that the gas supply line shutoff valve is open. ■ If the gas supply line shutoff valve is closed, open , press the CANCEL button on the bottom of the drawer inside...
...drawer and pull the drawer out. Complete Installation 1. Insert both sides. Lift up the front of your range. 13 Then, follow these instructions. You should hear a "click" as outlined above. ■ If the gas supply line shutoff valve is open it away from whom you have all parts are placed in the...push the oven door closed and pull it , then repeat the 5-minute test as the door is off the range and check that the gas supply line shutoff valve is open. ■ If the gas supply line shutoff valve is closed, open , press the CANCEL button on the bottom of the drawer inside...

Installation Guide
Page 14
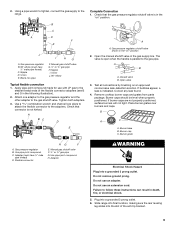
... WARNING Explosion Hazard Use a new CSA International approved gas supply line. Install anti-tip bracket to LP Gas) 1. B A C A. To range B. Manual shutoff valve "closed position. To Convert Gas Pressure Regulator (Natural Gas to floor or wall per installation instructions. A A. Install a shut-off valve. Securely tighten all gas connections. Examples of storage or warming drawer compartment. Re...
... WARNING Explosion Hazard Use a new CSA International approved gas supply line. Install anti-tip bracket to LP Gas) 1. B A C A. To range B. Manual shutoff valve "closed position. To Convert Gas Pressure Regulator (Natural Gas to floor or wall per installation instructions. A A. Install a shut-off valve. Securely tighten all gas connections. Examples of storage or warming drawer compartment. Re...

Installation Guide
Page 15
...D. A A. Plastic cover B. Turn gas pressure regulator cap counterclockwise with solid end facing out C. NOTE: Reinstall one of a 7 mm nut driver to LP Gas) 1. Orifice spud holder C. Apply masking tape to the end of the screws through the range cooktop to remove. Washer E. To Convert... Surface Burners (Natural Gas to help hold the orifice spud holder in the nut ...
...D. A A. Plastic cover B. Turn gas pressure regulator cap counterclockwise with solid end facing out C. NOTE: Reinstall one of a 7 mm nut driver to LP Gas) 1. Orifice spud holder C. Apply masking tape to the end of the screws through the range cooktop to remove. Washer E. To Convert... Surface Burners (Natural Gas to help hold the orifice spud holder in the nut ...

Installation Guide
Page 17
... C Side view after A. NG" is facing the direction shown in the slot of the screws through the range cooktop to access the gas pressure regulator. Replace plastic cover over the gas pressure regulator cap and reinstall on regulator so that have a very distinct blue flame ¼" (0.64 cm... rear of this procedure. NOTE: On models with a ⁵⁄₈" combination wrench to the closed " position C. Slide range back so rear range foot is moved. Gas supply line 2. NOTE: Reinstall one of the anti-tip bracket. IMPORTANT: You may have a slightly yellow tip. 3. See the...
... C Side view after A. NG" is facing the direction shown in the slot of the screws through the range cooktop to access the gas pressure regulator. Replace plastic cover over the gas pressure regulator cap and reinstall on regulator so that have a very distinct blue flame ¼" (0.64 cm... rear of this procedure. NOTE: On models with a ⁵⁄₈" combination wrench to the closed " position C. Slide range back so rear range foot is moved. Gas supply line 2. NOTE: Reinstall one of the anti-tip bracket. IMPORTANT: You may have a slightly yellow tip. 3. See the...

Installation Guide
Page 19
.... 3. Replace the "100" hood with a "155" hood. Use a ³⁄₈" combination wrench and turn the LP gas broil burner orifice hood counterclockwise to the "Electronic Ignition System" section for each cooktop burner. Replace storage drawer or warming drawer. Checking for... properly connecting the range to Natural Gas) 1. NOTE: Make sure to Natural Gas) 1. Remove the screw from the broil burner orifice hood. Orifice hood 5. Refer to complete this ...
.... 3. Replace the "100" hood with a "155" hood. Use a ³⁄₈" combination wrench and turn the LP gas broil burner orifice hood counterclockwise to the "Electronic Ignition System" section for each cooktop burner. Replace storage drawer or warming drawer. Checking for... properly connecting the range to Natural Gas) 1. NOTE: Make sure to Natural Gas) 1. Remove the screw from the broil burner orifice hood. Orifice hood 5. Refer to complete this ...

Warranty Information
Page 1
MAYTAG® GAS RANGE LIMITED WARRANTY FIRST YEAR LIMITED WARRANTY (PARTS AND LABOR) For one year from the date of purchase, when this major appliance is installed, operated and maintained according to instructions attached to or furnished with the product, Maytag brand of consumables or cleaning products not approved by Maytag...excluded from unauthorized modifications made to or furnished with the removal from your major appliance for the following components to Maytag within 30 days from accident, alteration, misuse, abuse, fire, flood, acts of God, improper installation, installation...
MAYTAG® GAS RANGE LIMITED WARRANTY FIRST YEAR LIMITED WARRANTY (PARTS AND LABOR) For one year from the date of purchase, when this major appliance is installed, operated and maintained according to instructions attached to or furnished with the product, Maytag brand of consumables or cleaning products not approved by Maytag...excluded from unauthorized modifications made to or furnished with the removal from your major appliance for the following components to Maytag within 30 days from accident, alteration, misuse, abuse, fire, flood, acts of God, improper installation, installation...

Use & Care Guide
Page 1
... acerca de su producto, visite: www.maytag.com Deberá tener a mano el número de modelo y de serie, que están ubicados en el marco del horno, detrás del lado derecho superior de la puerta del horno. GAS RANGE USER INSTRUCTIONS THANK YOU for additional information.... If you should experience a problem not covered in TROUBLESHOOTING, please visit our website at www.maytag.com for additional information. You will need assistance, call us at 1-...
... acerca de su producto, visite: www.maytag.com Deberá tener a mano el número de modelo y de serie, que están ubicados en el marco del horno, detrás del lado derecho superior de la puerta del horno. GAS RANGE USER INSTRUCTIONS THANK YOU for additional information.... If you should experience a problem not covered in TROUBLESHOOTING, please visit our website at www.maytag.com for additional information. You will need assistance, call us at 1-...
Use & Care Guide
Page 2
... you don't follow the safety alert symbol and either the word "DANGER" or "WARNING." Always read and obey all safety messages. Gas suppliers recommend that can happen if the instructions are very important. WARNING: This product contains one or more chemicals known to the State ...reach your gas supplier, call your gas supplier. State of California Proposition 65 Warnings: WARNING: This product contains one or more chemicals known to the State of California to reduce the chance of injury, and tell you what the potential hazard is the safety alert symbol. RANGE SAFETY ...
... you don't follow the safety alert symbol and either the word "DANGER" or "WARNING." Always read and obey all safety messages. Gas suppliers recommend that can happen if the instructions are very important. WARNING: This product contains one or more chemicals known to the State ...reach your gas supplier, call your gas supplier. State of California Proposition 65 Warnings: WARNING: This product contains one or more chemicals known to the State of California to reduce the chance of injury, and tell you what the potential hazard is the safety alert symbol. RANGE SAFETY ...

Use & Care Guide
Page 17
... snaps open from the solenoid. Range converted improperly This is being pulled off (on some normal sounds with the explanations. Pop Click Woosh or poof Oven burner flames are short clicking sounds like tapping a nail onto a piece of glass. Gas valve is opening or cycling on... following are normal operational noises that can visit our website at www.maytag.com/cookingaccessories. Convection fan relay is normal. This is cycling on and will click several times until the flame is normal. Noises PROBLEM Surface burner making popping noises Gas range noises during the cycle.
... snaps open from the solenoid. Range converted improperly This is being pulled off (on some normal sounds with the explanations. Pop Click Woosh or poof Oven burner flames are short clicking sounds like tapping a nail onto a piece of glass. Gas valve is opening or cycling on... following are normal operational noises that can visit our website at www.maytag.com/cookingaccessories. Convection fan relay is normal. This is cycling on and will click several times until the flame is normal. Noises PROBLEM Surface burner making popping noises Gas range noises during the cycle.

Use & Care Guide
Page 18
MAYTAG® GAS RANGE LIMITED WARRANTY FIRST YEAR LIMITED WARRANTY (PARTS AND LABOR) For one year from the date of purchase, when this major appliance is installed, operated and maintained according to instructions attached to or furnished with the product, Maytag brand of original purchase date is required ...located in which it is reported to Maytag within 30 days from your home of your major appliance, to instruct you on the below named parts only and does not include labor. ■ Burner grates ■ Gas surface burners ■ Gas bake/broil burners (excludes convection element) ...
MAYTAG® GAS RANGE LIMITED WARRANTY FIRST YEAR LIMITED WARRANTY (PARTS AND LABOR) For one year from the date of purchase, when this major appliance is installed, operated and maintained according to instructions attached to or furnished with the product, Maytag brand of original purchase date is required ...located in which it is reported to Maytag within 30 days from your home of your major appliance, to instruct you on the below named parts only and does not include labor. ■ Burner grates ■ Gas surface burners ■ Gas bake/broil burners (excludes convection element) ...


