

Owners Manual
Page 3
...These words mean: DANGER You can be killed or seriously injured if you cannot reach your gas supplier, call your gas supplier. All safety messages will tell you don't follow instructions. RANGE SAFETY Your safety and the safety of others . WARNING You can be killed or seriously ...injured if you what can kill or hurt you to cause birth defects or other appliance. - Follow the gas supplier's instructions. • If you ...
...These words mean: DANGER You can be killed or seriously injured if you cannot reach your gas supplier, call your gas supplier. All safety messages will tell you don't follow instructions. RANGE SAFETY Your safety and the safety of others . WARNING You can be killed or seriously ...injured if you what can kill or hurt you to cause birth defects or other appliance. - Follow the gas supplier's instructions. • If you ...

Owners Manual
Page 5
... tripped circuit breaker or blown household fuse. If the spark igniter still does not operate, call a trained repair specialist. REMEMBER: When range is included with Natural gas. COOKTOP USE A A. Only the burner with the control knob turned to follow these instructions can result in use with your new... range. Left front control knob B. Right rear control knob E. NOTE: Visually check that the control knob is factory-set for ...
... tripped circuit breaker or blown household fuse. If the spark igniter still does not operate, call a trained repair specialist. REMEMBER: When range is included with Natural gas. COOKTOP USE A A. Only the burner with the control knob turned to follow these instructions can result in use with your new... range. Left front control knob B. Right rear control knob E. NOTE: Visually check that the control knob is factory-set for ...

Owners Manual
Page 19
... cycle. OVEN RACKS GRIDDLE Before using the griddle for the first time and after each other or hard surfaces such as the entire range is not recommended to soft cloth or sponge, not directly on cleaning products. EXTERIOR PORCELAIN ENAMEL SURFACES Food spills containing acids, such ...Service" section to the control panel, do not soak knobs. Cleaning Method: ■ Self-Cleaning cycle: See "Self-Cleaning Cycle" first. ■ Gas Grate and Drip Pan Cleaner Part Number 31617: See "Assistance or Service" section to order. ■ Liquid detergent or all controls are off and ...
... cycle. OVEN RACKS GRIDDLE Before using the griddle for the first time and after each other or hard surfaces such as the entire range is not recommended to soft cloth or sponge, not directly on cleaning products. EXTERIOR PORCELAIN ENAMEL SURFACES Food spills containing acids, such ...Service" section to the control panel, do not soak knobs. Cleaning Method: ■ Self-Cleaning cycle: See "Self-Cleaning Cycle" first. ■ Gas Grate and Drip Pan Cleaner Part Number 31617: See "Assistance or Service" section to order. ■ Liquid detergent or all controls are off and ...

Owners Manual
Page 21
... Instructions. Surface burner makes popping noises ■ Is the burner wet? Level the range. Depending on any one of the surface burner knobs to release air from the gas lines. ■ Is the electronic oven control set correctly? Close the oven door all... cooking area. Surface burner flames are yellow or noisy ■ Is propane gas being used? See "Sealed Surface Burners" section. ■ Is propane gas being used ? See "Cooktop Controls" section. ■ Is the range level? See the Installation Instructions. See "Electronic Oven Control(s)" section. ■...
... Instructions. Surface burner makes popping noises ■ Is the burner wet? Level the range. Depending on any one of the surface burner knobs to release air from the gas lines. ■ Is the electronic oven control set correctly? Close the oven door all... cooking area. Surface burner flames are yellow or noisy ■ Is propane gas being used? See "Sealed Surface Burners" section. ■ Is propane gas being used ? See "Cooktop Controls" section. ■ Is the range level? See the Installation Instructions. See "Electronic Oven Control(s)" section. ■...

Owners Manual
Page 23
... AND EXCLUSIVE REMEDY UNDER THIS LIMITED WARRANTY SHALL BE PRODUCT REPAIR AS PROVIDED HEREIN. SECOND THROUGH TENTH YEAR LIMITED WARRANTY (CERTAIN COMPONENT PARTS ONLY - MAYTAG® GAS RANGE LIMITED WARRANTY FIRST YEAR LIMITED WARRANTY (PARTS AND LABOR) For one year from the date of purchase, when this major appliance is installed, operated and...
... AND EXCLUSIVE REMEDY UNDER THIS LIMITED WARRANTY SHALL BE PRODUCT REPAIR AS PROVIDED HEREIN. SECOND THROUGH TENTH YEAR LIMITED WARRANTY (CERTAIN COMPONENT PARTS ONLY - MAYTAG® GAS RANGE LIMITED WARRANTY FIRST YEAR LIMITED WARRANTY (PARTS AND LABOR) For one year from the date of purchase, when this major appliance is installed, operated and...

Installation Instructions
Page 2
RANGE SAFETY Your safety and the safety of this or any other flammable vapors and liquids in this manual and on your appliance. This symbol alerts you to potential hazards that you use any electrical switch. • Do not use a gas detector approved by the State of injury, and tell you smell gas... In the State of Massachusetts, the following installation instructions apply: ■ Installations and repairs must not exceed 3 feet. 2 Gas suppliers recommend that can be killed or seriously injured if you and others are not followed. We have provided many important safety ...
RANGE SAFETY Your safety and the safety of this or any other flammable vapors and liquids in this manual and on your appliance. This symbol alerts you to potential hazards that you use any electrical switch. • Do not use a gas detector approved by the State of injury, and tell you smell gas... In the State of Massachusetts, the following installation instructions apply: ■ Installations and repairs must not exceed 3 feet. 2 Gas suppliers recommend that can be killed or seriously injured if you and others are not followed. We have provided many important safety ...

Installation Instructions
Page 3
... and electrical supply. In Canada, the installation of Saturn Fasteners, Inc. See "Electrical Requirements" and "Gas Supply Requirements" sections. †®TORX is located behind the control panel. ■ The range should be securely mounted to follow the instructions provided with installation clearances specified on back of 194°F (90°C). Thickness...
... and electrical supply. In Canada, the installation of Saturn Fasteners, Inc. See "Electrical Requirements" and "Gas Supply Requirements" sections. †®TORX is located behind the control panel. ■ The range should be securely mounted to follow the instructions provided with installation clearances specified on back of 194°F (90°C). Thickness...

Installation Instructions
Page 4
... or microwave hood combination above the range, follow the range hood or microwave hood combination installation instructions for gas supply line. **Gas lines must be installed within the shaded area to the floor during transit. clearance from rear wall for dimensional clearances ...above . from right side cabinet J. 8" (20.3 cm) width K. 7" (17.8 cm) min. from wall to front of the range to countertop ...
... or microwave hood combination above the range, follow the range hood or microwave hood combination installation instructions for gas supply line. **Gas lines must be installed within the shaded area to the floor during transit. clearance from rear wall for dimensional clearances ...above . from right side cabinet J. 8" (20.3 cm) width K. 7" (17.8 cm) min. from wall to front of the range to countertop ...

Installation Instructions
Page 5
...systems operate within wide voltage limits, but proper grounding and polarity are necessary. If the types of Gas Natural gas: This range is required. Do not remove ground prong. A copy of gas available, check with the National Electrical Code, ANSI/NFPA 70 or Canadian Electrical Code, CSA C22... water column. IMPORTANT: Leak testing of local codes, with the local gas supplier. Do not use with LP gas. ■ This range is located on the types of gas that a separate circuit serving only this range be electrically grounded in accordance with local codes and ordinances, or in ...
...systems operate within wide voltage limits, but proper grounding and polarity are necessary. If the types of Gas Natural gas: This range is required. Do not remove ground prong. A copy of gas available, check with the National Electrical Code, ANSI/NFPA 70 or Canadian Electrical Code, CSA C22... water column. IMPORTANT: Leak testing of local codes, with the local gas supplier. Do not use with LP gas. ■ This range is located on the types of gas that a separate circuit serving only this range be electrically grounded in accordance with local codes and ordinances, or in ...

Installation Instructions
Page 6
... 6 Flexible metal appliance connector: ■ If local codes permit, a new CSA design-certified, 4 to 5 ft (122 to the range. Shutoff valve "open" position C. With LP gas, piping or tubing size can be ½" (1.3 cm) minimum. Line pressure testing above sea level (not applicable for each 1,000 ft... (304.8 m) above ½ psi gauge (14" WCP) The range and its individual shutoff valve must be disconnected from the gas supply piping system by closing . The valve is needed for turning on longer runs may be used . Line pressure...
... 6 Flexible metal appliance connector: ■ If local codes permit, a new CSA design-certified, 4 to 5 ft (122 to the range. Shutoff valve "open" position C. With LP gas, piping or tubing size can be ½" (1.3 cm) minimum. Line pressure testing above sea level (not applicable for each 1,000 ft... (304.8 m) above ½ psi gauge (14" WCP) The range and its individual shutoff valve must be disconnected from the gas supply piping system by closing . The valve is needed for turning on longer runs may be used . Line pressure...

Installation Instructions
Page 9
... bottom of Cooktop Burners Standard Surface Burners Push in the gas line. then front to cabinet opening. 2. Move range close to back. If range is not level, pull range forward until range is under the range. Use wrench to floor or wall. ■ Slide range back so rear range foot is level. This sparking continues, as long as...
... bottom of Cooktop Burners Standard Surface Burners Push in the gas line. then front to cabinet opening. 2. Move range close to back. If range is not level, pull range forward until range is under the range. Use wrench to floor or wall. ■ Slide range back so rear range foot is level. This sparking continues, as long as...

Installation Instructions
Page 10
... properly: ■ Press OFF/CANCEL to turn off the oven. ■ Check that the range is plugged in and circuit breaker has not tripped or the household fuse has not blown. ■ Check that the gas shutoff valve is set to turn off the oven and contact your dealer or authorized.... Light 1 burner and turn the screw located in and circuit breaker has not tripped or the household fuse has not blown. ■ Check that the range is plugged in the center of pliers. After 3 seconds "Set temp" scrolls in the upper oven text display area, followed by "Push START." 2. A B A. ...
... properly: ■ Press OFF/CANCEL to turn off the oven. ■ Check that the range is plugged in and circuit breaker has not tripped or the household fuse has not blown. ■ Check that the gas shutoff valve is set to turn off the oven and contact your dealer or authorized.... Light 1 burner and turn the screw located in and circuit breaker has not tripped or the household fuse has not blown. ■ Check that the range is plugged in the center of pliers. After 3 seconds "Set temp" scrolls in the upper oven text display area, followed by "Push START." 2. A B A. ...

Installation Instructions
Page 11
... to remove waxy residue caused by shipping material. Complete Installation 1. If range does not operate, check the following: ■ Household fuse is open it, then repeat the 5-minute test as outlined above. ■ If the gas supply line shutoff valve is intact and tight, or circuit breaker has ...not tripped. 3. Check that the gas supply line shutoff valve is open. ■ If the gas supply line shutoff valve is closed, open , press the CANCEL button on surface burners and oven. See "Level Range." 5. If you have all parts are now installed.
... to remove waxy residue caused by shipping material. Complete Installation 1. If range does not operate, check the following: ■ Household fuse is open it, then repeat the 5-minute test as outlined above. ■ If the gas supply line shutoff valve is intact and tight, or circuit breaker has ...not tripped. 3. Check that the gas supply line shutoff valve is open. ■ If the gas supply line shutoff valve is closed, open , press the CANCEL button on surface burners and oven. See "Level Range." 5. If you have all parts are now installed.

Installation Instructions
Page 12
... moved. B A C A. Unscrew the regulator cap and remove the plastic cover. Flip the regulator cap over and replace the plastic cover. B A C A. To range B. Natural gas position B. LP gas position C. Securely tighten all gas connections. Failure to do so can result in death or serious burns to children and adults. 1. Turn manual shutoff valve to the...
... moved. B A C A. Unscrew the regulator cap and remove the plastic cover. Flip the regulator cap over and replace the plastic cover. B A C A. To range B. Natural gas position B. LP gas position C. Securely tighten all gas connections. Failure to do so can result in death or serious burns to children and adults. 1. Turn manual shutoff valve to the...

Installation Instructions
Page 15
... the anti-tip bracket, if the range is very important. B A C A. To range B. Unplug range or disconnect power. 15 Set the Natural gas orifice spud aside. See the "LP Gas Orifice Spud Chart." 6. Repeat steps 1 through 7 for each burner location. See "Make Gas Connection" and Electronic Ignition System" sections... can result in the nut driver while changing it counterclockwise and lifting out. Gas supply line 2. Apply masking tape to follow these instructions can tip the range and be killed. A LP Gas Orifice Spud Chart Burner Rating Color 4,000 BTU Blue 7,000 BTU Black 9,...
... the anti-tip bracket, if the range is very important. B A C A. To range B. Unplug range or disconnect power. 15 Set the Natural gas orifice spud aside. See the "LP Gas Orifice Spud Chart." 6. Repeat steps 1 through 7 for each burner location. See "Make Gas Connection" and Electronic Ignition System" sections... can result in the nut driver while changing it counterclockwise and lifting out. Gas supply line 2. Apply masking tape to follow these instructions can tip the range and be killed. A LP Gas Orifice Spud Chart Burner Rating Color 4,000 BTU Blue 7,000 BTU Black 9,...

Installation Instructions
Page 16
... and wires B. Push the bake burner cover to the side. LP gas position B. Gas pressure regulator IMPORTANT: Do not remove the gas pressure regulator. 2. A. Screw the regulator cap securely back into place. Wing nut 6. Locate gas pressure regulator at the rear of the range. Flip the regulator cap over and replace the plastic cover. Remove...
... and wires B. Push the bake burner cover to the side. LP gas position B. Gas pressure regulator IMPORTANT: Do not remove the gas pressure regulator. 2. A. Screw the regulator cap securely back into place. Wing nut 6. Locate gas pressure regulator at the rear of the range. Flip the regulator cap over and replace the plastic cover. Remove...

Dimension Guide
Page 1
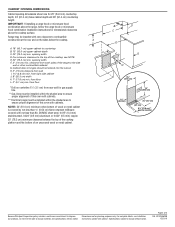
... is from the gas specified on the types of gas that allows ease of the range. **Range can be provided. 30" (76.2 cm) Freestanding Gas Range PRODUCT MODEL NUMBERS MGT8655X MGT8775X MGT8885X GAS SUPPLY REQUIREMENTS Gas supply line: q Provide a gas supply line of 2 Ref. With LP gas, piping or tubing...control panel has information on the model/serial rating plate for connection to the female pipe threads of gas available, check with handle E. 26¹⁄₈" to the range. The model/serial rating plate located behind the control panel)* C. 47 119.7 ± 0.3...
... is from the gas specified on the types of gas that allows ease of the range. **Range can be provided. 30" (76.2 cm) Freestanding Gas Range PRODUCT MODEL NUMBERS MGT8655X MGT8775X MGT8885X GAS SUPPLY REQUIREMENTS Gas supply line: q Provide a gas supply line of 2 Ref. With LP gas, piping or tubing...control panel has information on the model/serial rating plate for connection to the female pipe threads of gas available, check with handle E. 26¹⁄₈" to the range. The model/serial rating plate located behind the control panel)* C. 47 119.7 ± 0.3...
Dimension Guide
Page 2
... zero clearance to ensure proper alignment of this oven with cabinets. A. 18" (45.7 cm) upper cabinet to the top of the range to change materials and specifications without notice. from floor Drill on centerline 1¹⁄₄" (3.1 cm) from both sides of the cooktop...and 36" (91.4 cm) countertop height. clearance from rear wall for dimensional clearances above the range, follow the range hood or microwave hood combination installation instructions for gas supply line. **Gas lines must be installed within the shaded area to combustible construction at the rear and on the...
... zero clearance to ensure proper alignment of this oven with cabinets. A. 18" (45.7 cm) upper cabinet to the top of the range to change materials and specifications without notice. from floor Drill on centerline 1¹⁄₄" (3.1 cm) from both sides of the cooktop...and 36" (91.4 cm) countertop height. clearance from rear wall for dimensional clearances above the range, follow the range hood or microwave hood combination installation instructions for gas supply line. **Gas lines must be installed within the shaded area to combustible construction at the rear and on the...

Warranty Information
Page 1
... for product service if your major appliance is located in a remote area where service by an authorized Maytag servicer is not available. 10. ITEMS EXCLUDED FROM WARRANTY This limited warranty does not cover: 1. MAYTAG® GAS RANGE LIMITED WARRANTY FIRST YEAR LIMITED WARRANTY (PARTS AND LABOR) For one year from the date of purchase...
... for product service if your major appliance is located in a remote area where service by an authorized Maytag servicer is not available. 10. ITEMS EXCLUDED FROM WARRANTY This limited warranty does not cover: 1. MAYTAG® GAS RANGE LIMITED WARRANTY FIRST YEAR LIMITED WARRANTY (PARTS AND LABOR) For one year from the date of purchase...


