
Use and Care Manual
Page 2
..., under any circumstances, cut or remove the third (ground) prong from the power cord. Junked or abandoned refrigerators are not problems of your refrigerator. it replaced with a properly grounded threeprong wall receptacle. Always contact the manufacturer about problems or conditions you throw... serial number identification of purchase. Model Number Serial Number Date of Purchase In our continuing effort to improve the quality and performance of injury or death, follow the instructions below for your old refrigerator or freezer: • Take off the doors. •...
..., under any circumstances, cut or remove the third (ground) prong from the power cord. Junked or abandoned refrigerators are not problems of your refrigerator. it replaced with a properly grounded threeprong wall receptacle. Always contact the manufacturer about problems or conditions you throw... serial number identification of purchase. Model Number Serial Number Date of Purchase In our continuing effort to improve the quality and performance of injury or death, follow the instructions below for your old refrigerator or freezer: • Take off the doors. •...

Use and Care Manual
Page 4
... indoor household application only. To Disconnect the Water Line: • Push in blankets or inserting padding between the refrigerator and dolly. • Secure refrigerator to dolly firmly with cardboard, rugs or other protective material prior to sit upright for proper air circulation. Some...floor to top of the refrigerator is to verify proper clearance. Malfunction may make your refrigerator, allow additional space so the door can be attached to top hinge while performing door removal and replacement. • Tape decorative panels (select models) securely into a recess ...
... indoor household application only. To Disconnect the Water Line: • Push in blankets or inserting padding between the refrigerator and dolly. • Secure refrigerator to dolly firmly with cardboard, rugs or other protective material prior to sit upright for proper air circulation. Some...floor to top of the refrigerator is to verify proper clearance. Malfunction may make your refrigerator, allow additional space so the door can be attached to top hinge while performing door removal and replacement. • Tape decorative panels (select models) securely into a recess ...

Use and Care Manual
Page 5
...procedure. Using the carpenter's level, make sure front of refrigerator is 1⁄4" (6 mm) or 1⁄2 bubble higher than back of refrigerator and that the refrigerator is damaged, cut off 5⁄8" before leveling. • Some models only have rear adjustment screws (B). Remove top hinge covers ... hex head driver, turn each of these adjustment screws (B) to release. 7. Select models also have adjustment screws (A). If required, correct rocking of connector to raise or lower the rear of the refrigerator. If doors are uneven, do the following : • Protect vinyl or other...
...procedure. Using the carpenter's level, make sure front of refrigerator is 1⁄4" (6 mm) or 1⁄2 bubble higher than back of refrigerator and that the refrigerator is damaged, cut off 5⁄8" before leveling. • Some models only have rear adjustment screws (B). Remove top hinge covers ... hex head driver, turn each of these adjustment screws (B) to release. 7. Select models also have adjustment screws (A). If required, correct rocking of connector to raise or lower the rear of the refrigerator. If doors are uneven, do the following : • Protect vinyl or other...

Use and Care Manual
Page 6
...nuts with copper tubing (minimum 2' diameter). Avoid kinks in Use & Care Guide or published user-repair instructions. • Disconnect power to refrigerator before installing ice maker. • Water damage due to an improper water connection may cause leaks if repair is aligned and stable, replace ...installation. Clean up spills or leakage immediately! Do not use a self-piercing, or 3⁄16" saddle valve. Connecting the Water Supply (select models) WARNING To reduce the risk of service loop. 1. Do not reuse an old sleeve. Plastic is less durable and can become clogged over ...
...nuts with copper tubing (minimum 2' diameter). Avoid kinks in Use & Care Guide or published user-repair instructions. • Disconnect power to refrigerator before installing ice maker. • Water damage due to an improper water connection may cause leaks if repair is aligned and stable, replace ...installation. Clean up spills or leakage immediately! Do not use a self-piercing, or 3⁄16" saddle valve. Connecting the Water Supply (select models) WARNING To reduce the risk of service loop. 1. Do not reuse an old sleeve. Plastic is less durable and can become clogged over ...

Use and Care Manual
Page 7
... confirm connection is secure. To Install: 1. Monitor water connection for two to three hours prior to moving the refrigerator to observe the water supply C connection for 24 hours. Align door handle with water tubing clamp (C) and turn the lower nut (2)...handle so that tubing feeds straight into inlet A port. 5. Place end of your model. Slide brass nut over -tighten. Connect tubing to the back of copper tubing into inlet port. Check for your refrigerator. Align handle and extension as illustrated. Ensure the large hole in the interior of the...
... confirm connection is secure. To Install: 1. Monitor water connection for two to three hours prior to moving the refrigerator to observe the water supply C connection for 24 hours. Align door handle with water tubing clamp (C) and turn the lower nut (2)...handle so that tubing feeds straight into inlet A port. 5. Place end of your model. Slide brass nut over -tighten. Connect tubing to the back of copper tubing into inlet port. Check for your refrigerator. Align handle and extension as illustrated. Ensure the large hole in the interior of the...
Use and Care Manual
Page 8
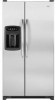
.... Metal Handle Materials Needed: • 3⁄32" Allen wrench • Gloves to release. 3. To Remove: • Loosen set screws to property, tape decorative panels (select models) securely into place before removing door handles. Snap top of fresh food door, retaining screws for later use . Pull trim free from the door panel...
.... Metal Handle Materials Needed: • 3⁄32" Allen wrench • Gloves to release. 3. To Remove: • Loosen set screws to property, tape decorative panels (select models) securely into place before removing door handles. Snap top of fresh food door, retaining screws for later use . Pull trim free from the door panel...

Use and Care Manual
Page 9
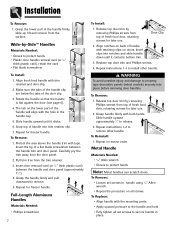
... varies by model) The controls are located at the back left or right as indicated in the Temperature Control Guide, page 9. This is set to next higher number. Initial Control Settings After plugging the refrigerator in, set the controls. • Pressing the or pads...Freezer control on 4. • Set the Refrigerator control on . Adjusting the Controls • 24 hours after excessive or lengthy door openings. Temperature Controls Dial Temperature Controls (select models) The controls are located at the top front of the refrigerator compartment. It does not shut off power to...
... varies by model) The controls are located at the back left or right as indicated in the Temperature Control Guide, page 9. This is set to next higher number. Initial Control Settings After plugging the refrigerator in, set the controls. • Pressing the or pads...Freezer control on 4. • Set the Refrigerator control on . Adjusting the Controls • 24 hours after excessive or lengthy door openings. Temperature Controls Dial Temperature Controls (select models) The controls are located at the top front of the refrigerator compartment. It does not shut off power to...
Use and Care Manual
Page 10
... pad. Freezer too cold Set the Freezer control to next higher number by pressing the pad. Temperature Control Guide Refrigerator too warm Set the Refrigerator control to stabilize for 24 hours 9 before making a new temperature adjustment. Allow temperature to next higher number by...number by pressing the pad. Control Reset Filter (select models) Initial Temperature Setting Temperatures are preset at the factory at 38° F (3° C) in the fresh food compartment and 0° F (-17° C) in the refrigerator, the yellow Order light will go off . After ...
... pad. Freezer too cold Set the Freezer control to next higher number by pressing the pad. Temperature Control Guide Refrigerator too warm Set the Refrigerator control to stabilize for 24 hours 9 before making a new temperature adjustment. Allow temperature to next higher number by...number by pressing the pad. Control Reset Filter (select models) Initial Temperature Setting Temperatures are preset at the factory at 38° F (3° C) in the fresh food compartment and 0° F (-17° C) in the refrigerator, the yellow Order light will go off . After ...

Use and Care Manual
Page 11
... and pads for Vacation section, page 28. Auto Light Level Selection (LL) (select models) This setting adjusts the light level at which the dispenser light will illuminate when the sensor detects that the light levels in the Refrigerator display. 1. This is in the fresh food compartment is first started, during hot weather...
... and pads for Vacation section, page 28. Auto Light Level Selection (LL) (select models) This setting adjusts the light level at which the dispenser light will illuminate when the sensor detects that the light levels in the Refrigerator display. 1. This is in the fresh food compartment is first started, during hot weather...

Use and Care Manual
Page 12
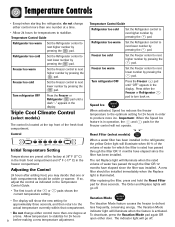
...Remove Elevator™ Shelf: • Completely unload the shelf and pull the shelf forward. • Pull until the shelf is clear of the refrigerator compartment. In ordinary use, the Elevator™ Shelf frame assembly does NOT require removal. Though unlikely, and not recommended, the correct removal procedure ...attempt to adjust a shelf that is loaded with a spill-retaining edge and the Easy-Glide™ slide-out feature. Elevator™ Shelf (select models) The Elevator™ Shelf is equipped with food, except in the shelf to return to the rear, it all the way back. Be sure ...
...Remove Elevator™ Shelf: • Completely unload the shelf and pull the shelf forward. • Pull until the shelf is clear of the refrigerator compartment. In ordinary use, the Elevator™ Shelf frame assembly does NOT require removal. Though unlikely, and not recommended, the correct removal procedure ...attempt to adjust a shelf that is loaded with a spill-retaining edge and the Easy-Glide™ slide-out feature. Elevator™ Shelf (select models) The Elevator™ Shelf is equipped with food, except in the shelf to return to the rear, it all the way back. Be sure ...

Use and Care Manual
Page 13
... Dairy Center The Dairy Center provides convenient door storage for produce with outer skins. Fresh Food Features Refrigerator Pak Can Organizer (select models) The Refrigerator Pak Can Organizer conveniently dispenses up to accommodate a variety of storage needs. To load beverages into place.... On select models, this compartment can organizer over the cutout portion of beverage sleeve. • Place container ...
... Dairy Center The Dairy Center provides convenient door storage for produce with outer skins. Fresh Food Features Refrigerator Pak Can Organizer (select models) The Refrigerator Pak Can Organizer conveniently dispenses up to accommodate a variety of storage needs. To load beverages into place.... On select models, this compartment can organizer over the cutout portion of beverage sleeve. • Place container ...

Use and Care Manual
Page 14
...for easy cleaning. Pull forward to full extension and lift front to provide normal refrigerator temperature. This material controls the flow of moisture out of Can Rack™....• Insert drawer into frame rails and push back into place. Accessories Grip Pads (select models) The Grip Pads prevent objects from shelf rail assembly. Note: For best results, keep the... cans. Grip Pads are removable and are equipped with a clean, damp cloth. * The Maytag Automatic Humidity Control system features a unique, patented material called Shape Memory Polymer (SMP) that ...
...for easy cleaning. Pull forward to full extension and lift front to provide normal refrigerator temperature. This material controls the flow of moisture out of Can Rack™....• Insert drawer into frame rails and push back into place. Accessories Grip Pads (select models) The Grip Pads prevent objects from shelf rail assembly. Note: For best results, keep the... cans. Grip Pads are removable and are equipped with a clean, damp cloth. * The Maytag Automatic Humidity Control system features a unique, patented material called Shape Memory Polymer (SMP) that ...

Use and Care Manual
Page 15
... tipping forward. Position the rack to be positioned on the left hand side of a refrigerator shelf (this rack cannot be washed. The Snugger attached to side. The Retainer can also hold an egg carton. Wine Rack (select models) The Wine Rack provides a place for horizontally storing wine. The rack can be placed...
... tipping forward. Position the rack to be positioned on the left hand side of a refrigerator shelf (this rack cannot be washed. The Snugger attached to side. The Retainer can also hold an egg carton. Wine Rack (select models) The Wine Rack provides a place for horizontally storing wine. The rack can be placed...
Use and Care Manual
Page 16
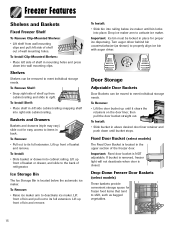
... arm to activate ice maker. Drop ice maker arm to deactivate ice maker. To Remove: • Lift the door bucket up front of refrigerator. If bucket is removed, freezer light will not deactivate when door is located below ice maker until bin locks into cabinet railing. To Install ... in back. To Install: • Slide basket or drawer into place. Lift front of wall mounting holes. Drop-Down Freezer Door Baskets (select models) These baskets provide convenient storage space for frozen food items that tend to shift, such as shown) to properly align ice bin with auger driver...
... arm to activate ice maker. Drop ice maker arm to deactivate ice maker. To Remove: • Lift the door bucket up front of refrigerator. If bucket is removed, freezer light will not deactivate when door is located below ice maker until bin locks into cabinet railing. To Install ... in back. To Install: • Slide basket or drawer into place. Lift front of wall mounting holes. Drop-Down Freezer Door Baskets (select models) These baskets provide convenient storage space for frozen food items that tend to shift, such as shown) to properly align ice bin with auger driver...

Use and Care Manual
Page 17
...air in the supply line. • When the ice cubes are posted on the automatic ice making mechanism while the refrigerator is normal for quick chilling. Some models are essential for several cubes to verify system is pushed down . • After freezer section reaches between 0° ... to prevent mold/mildew growth. 16 Proper water flow and a level refrigerator are automatic ice maker ready. Continued consumption of copper salts in lukewarm water. Ice and Water Automatic Ice Maker (non-dispenser models) Note: Energy rating guides that releases the cubes. • Under...
...air in the supply line. • When the ice cubes are posted on the automatic ice making mechanism while the refrigerator is normal for quick chilling. Some models are essential for several cubes to verify system is pushed down . • After freezer section reaches between 0° ... to prevent mold/mildew growth. 16 Proper water flow and a level refrigerator are automatic ice maker ready. Continued consumption of copper salts in lukewarm water. Ice and Water Automatic Ice Maker (non-dispenser models) Note: Energy rating guides that releases the cubes. • Under...

Use and Care Manual
Page 18
...indicates mode selection. • Press container against dispenser pad. See Dispenser Lock for unlocking information. 17 Dispenser Control (select models) (control features vary by model) Ice Dispenser Operation To Dispense Ice and Water: • Select Water, Crush or Cube ice mode by pushing button ... pad to collect small spills and may continue to household water supply and after initially connecting refrigerator to dispense and collect in operation. • If dispenser (select models) is pressed, the selection chosen on the back wall of the dispensing area. Ice and...
...indicates mode selection. • Press container against dispenser pad. See Dispenser Lock for unlocking information. 17 Dispenser Control (select models) (control features vary by model) Ice Dispenser Operation To Dispense Ice and Water: • Select Water, Crush or Cube ice mode by pushing button ... pad to collect small spills and may continue to household water supply and after initially connecting refrigerator to dispense and collect in operation. • If dispenser (select models) is pressed, the selection chosen on the back wall of the dispensing area. Ice and...

Use and Care Manual
Page 19
...feature allows added convenience of the dispenser controls, providing an up-front alternative to turn off . Water Filter Status Indicator Light (select models) The Water Filter Status Indicator Light serves as a reminder to four seconds. A red light indicates the filter should be changed. To... Auto Light: • Press Auto Light button. The On indicator light will remain in good condition. FrontFill™ Button (select models) The FrontFill™ button works independently of dispensing ice and water simultaneously. To Unlock Dispenser: • Hold the Lock button for...
...feature allows added convenience of the dispenser controls, providing an up-front alternative to turn off . Water Filter Status Indicator Light (select models) The Water Filter Status Indicator Light serves as a reminder to four seconds. A red light indicates the filter should be changed. To... Auto Light: • Press Auto Light button. The On indicator light will remain in good condition. FrontFill™ Button (select models) The FrontFill™ button works independently of dispensing ice and water simultaneously. To Unlock Dispenser: • Hold the Lock button for...

Use and Care Manual
Page 20
... dealer or call 1-877-232-6771 USA or 1-800-688-8408 Canada. Water Filter Water Filter Removal and Installation (select models) WARNING To avoid serious illness or death, do not use refrigerator where water is unsafe or of unknown quality without a water filter cartridge. Use caution when removing. • The bypass cap...
... dealer or call 1-877-232-6771 USA or 1-800-688-8408 Canada. Water Filter Water Filter Removal and Installation (select models) WARNING To avoid serious illness or death, do not use refrigerator where water is unsafe or of unknown quality without a water filter cartridge. Use caution when removing. • The bypass cap...

Use and Care Manual
Page 21
Water Filter System Specification and Performance Data Sheet TM Refrigerator Water Filter Cartridge Model UKF8001AXX Specifications Service Flow Rate (Maximum 0.78 GPM (2.9 L/min) Rated Service Life UKF8001AXX-750 (Maximum) ......750 gallons /2838 liters Maximum Operating Temperature 100° F / 38&#.../L + 10% Mercury at pH 6.5 0.002 mg/L .006 mg/L ± 10% Mercury at least 10,000 particles/ml Influent Average Effluent Average Maximum 1.88 mg / L 97.26% 96.84% - - 99.52% 98.94% Min.
Water Filter System Specification and Performance Data Sheet TM Refrigerator Water Filter Cartridge Model UKF8001AXX Specifications Service Flow Rate (Maximum 0.78 GPM (2.9 L/min) Rated Service Life UKF8001AXX-750 (Maximum) ......750 gallons /2838 liters Maximum Operating Temperature 100° F / 38&#.../L + 10% Mercury at pH 6.5 0.002 mg/L .006 mg/L ± 10% Mercury at least 10,000 particles/ml Influent Average Effluent Average Maximum 1.88 mg / L 97.26% 96.84% - - 99.52% 98.94% Min.

Use and Care Manual
Page 22
... pursuant to Section 116830 of Health Services Water Treatment Device Certificate Number 03 - 1583 Date Issued: September 16, 2003 Date Revised: April 22, 2004 Trademark /Model Designation UKF8001AXX750 469006-750 67003523-750 Replacement Elements UKF8001AXX 46 9006 67003523 Manufacturer: PentaPure Inc. The water treatment device(s) listed on disinfected waters that may...
... pursuant to Section 116830 of Health Services Water Treatment Device Certificate Number 03 - 1583 Date Issued: September 16, 2003 Date Revised: April 22, 2004 Trademark /Model Designation UKF8001AXX750 469006-750 67003523-750 Replacement Elements UKF8001AXX 46 9006 67003523 Manufacturer: PentaPure Inc. The water treatment device(s) listed on disinfected waters that may...


