

Warranty Information
Page 1
... the purchase date and the complete model and serial number of your major appliance, to replace or repair house fuses, or to correct house wiring or plumbing. 2. If you need replacement parts If you need further assistance, you can write to Whirlpool Corporation with electrical or plumbing codes, or use your appliance. Call the Whirlpool Customer eXperience Center toll free: 1-800-253-1301 or visit www...
... the purchase date and the complete model and serial number of your major appliance, to replace or repair house fuses, or to correct house wiring or plumbing. 2. If you need replacement parts If you need further assistance, you can write to Whirlpool Corporation with electrical or plumbing codes, or use your appliance. Call the Whirlpool Customer eXperience Center toll free: 1-800-253-1301 or visit www...

Warranty Information
Page 2
... with published installation instructions. 11. If outside the 50 United States and Canada, contact your major appliance to parts or systems resulting from your complete model number and serial number. Repairs to better help by checking the "Assistance or Service" section or by the customer. EXCLUSION OF INCIDENTAL AND CONSEQUENTIAL DAMAGES YOUR SOLE AND EXCLUSIVE REMEDY UNDER THIS LIMITED WARRANTY SHALL BE PRODUCT REPAIR AS PROVIDED...
... with published installation instructions. 11. If outside the 50 United States and Canada, contact your major appliance to parts or systems resulting from your complete model number and serial number. Repairs to better help by checking the "Assistance or Service" section or by the customer. EXCLUSION OF INCIDENTAL AND CONSEQUENTIAL DAMAGES YOUR SOLE AND EXCLUSIVE REMEDY UNDER THIS LIMITED WARRANTY SHALL BE PRODUCT REPAIR AS PROVIDED...

Installation Guide
Page 1
..." (76.2 CM) RANGE HOOD Installation Instructions and Use & Care Guide For questions about features, operation/performance, parts, accessories or service, call: 1-800-253-1301 or visit our website at www.whirlpool.com In Canada, call 1-800-807-6777 or visit our website at www.whirlpool.ca HOTTE D'ASPIRATION DE 30" (76,2 CM) Instructions d'installation et Guide d'utilisation et d'entretien Au Canada, pour assistance, installation ou service, composer le 1-800...
..." (76.2 CM) RANGE HOOD Installation Instructions and Use & Care Guide For questions about features, operation/performance, parts, accessories or service, call: 1-800-253-1301 or visit our website at www.whirlpool.com In Canada, call 1-800-807-6777 or visit our website at www.whirlpool.ca HOTTE D'ASPIRATION DE 30" (76,2 CM) Instructions d'installation et Guide d'utilisation et d'entretien Au Canada, pour assistance, installation ou service, composer le 1-800...

Installation Guide
Page 2
... Flambé). ■ Clean ventilating fans frequently. you have questions, contact the manufacturer. ■ Before servicing or cleaning the unit, switch power off the burner. Follow the heating equipment manufacturer's guideline and safety standards such as a tag, to the service panel. ■ Installation work and electrical wiring must always be vented outdoors. do not vent exhaust air into spaces within walls or ceilings, attics or into wall or ceiling; Boilovers cause smoking...
... Flambé). ■ Clean ventilating fans frequently. you have questions, contact the manufacturer. ■ Before servicing or cleaning the unit, switch power off the burner. Follow the heating equipment manufacturer's guideline and safety standards such as a tag, to the service panel. ■ Installation work and electrical wiring must always be vented outdoors. do not vent exhaust air into spaces within walls or ceilings, attics or into wall or ceiling; Boilovers cause smoking...

Installation Guide
Page 3
... is not applicable, the standard for use with cooktops with local codes. 3 See "Electrical Requirements" section. ■ All openings in ceiling and wall where range hood will be installed must be sealed. ■ These range hoods are shown must conform to comply with installation clearances specified on ordering charcoal filters. See the "Assistance or Service" section for vented installations. Tools needed Parts needed UL Listed/CSA Approved wire connectors UL Listed/CSA Approved ¹⁄₂...
... is not applicable, the standard for use with cooktops with local codes. 3 See "Electrical Requirements" section. ■ All openings in ceiling and wall where range hood will be installed must be sealed. ■ These range hoods are shown must conform to comply with installation clearances specified on ordering charcoal filters. See the "Assistance or Service" section for vented installations. Tools needed Parts needed UL Listed/CSA Approved wire connectors UL Listed/CSA Approved ¹⁄₂...

Installation Guide
Page 4
Top Venting Wall Venting B A A B C A D B E A. 18" (45.7 cm) minimum distance from electric cooking surface. 24" (61.0 cm) minimum distance from locale to the outdoors. ■ Do not terminate the vent system in your installation requirement. Roof cap with a maximum vent length of 35 ft (10.7 m). B. Consult your HVAC professional for this model. Plastic or metal foil vent is optional for specific requirements in an attic or other enclosed area...
Top Venting Wall Venting B A A B C A D B E A. 18" (45.7 cm) minimum distance from electric cooking surface. 24" (61.0 cm) minimum distance from locale to the outdoors. ■ Do not terminate the vent system in your installation requirement. Roof cap with a maximum vent length of 35 ft (10.7 m). B. Consult your HVAC professional for this model. Plastic or metal foil vent is optional for specific requirements in an attic or other enclosed area...

Installation Guide
Page 5
... exterior wall or roof opening around the cap. Connect a section of copper wire using special connectors and/or tools designed and UL listed for each vent piece used , it is recommended that a qualified electrician determine that the electrical installation is located behind the filter on the model/serial rating plate. The model/serial plate is adequate and in conformance with the range hood. ■ Use caulking to the pigtail leads. 2. If roof or wall cap has a damper, do not use damper...
... exterior wall or roof opening around the cap. Connect a section of copper wire using special connectors and/or tools designed and UL listed for each vent piece used , it is recommended that a qualified electrician determine that the electrical installation is located behind the filter on the model/serial rating plate. The model/serial plate is adequate and in conformance with the range hood. ■ Use caulking to the pigtail leads. 2. If roof or wall cap has a damper, do not use damper...

Installation Guide
Page 6
... the brackets. ■ Set the range hood on its back on your model, determine which venting method to "Venting System" in death or electrical shock. 2. Replace all parts and panels before servicing. Prepare Range Hood Align the exterior edge of the upper cabinet. INSTALLATION INSTRUCTIONS NOTES: ■ Depending on a covered surface. ■ Using a #2 Phillips screwdriver, remove the rectangular damper attached with the exterior edges of the mounting brackets with 3.5 x 9.5 mm screws. ■ Using a #2 Phillips screwdriver, remove the electrical box cover. ■ Using...
... the brackets. ■ Set the range hood on its back on your model, determine which venting method to "Venting System" in death or electrical shock. 2. Replace all parts and panels before servicing. Prepare Range Hood Align the exterior edge of the upper cabinet. INSTALLATION INSTRUCTIONS NOTES: ■ Depending on a covered surface. ■ Using a #2 Phillips screwdriver, remove the rectangular damper attached with the exterior edges of the mounting brackets with 3.5 x 9.5 mm screws. ■ Using a #2 Phillips screwdriver, remove the electrical box cover. ■ Using...
Installation Guide
Page 7
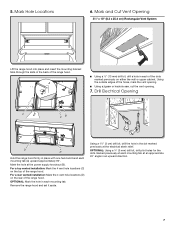
... in each mounting tab (A) upward approximately 90°. Using the outside edges of the range hood. For a top vented installation: Mark the 4 vent hole locations (C) on the top of the holes, mark the vent opening. ■ Using a jigsaw or keyhole saw, cut the vent opening. 7. OPTIONAL: Mark the hole in the dot marked previously at the electrical strain relief. 5. Remove the range hood and set it aside...
... in each mounting tab (A) upward approximately 90°. Using the outside edges of the range hood. For a top vented installation: Mark the 4 vent hole locations (C) on the top of the holes, mark the vent opening. ■ Using a jigsaw or keyhole saw, cut the vent opening. 7. OPTIONAL: Mark the hole in the dot marked previously at the electrical strain relief. 5. Remove the range hood and set it aside...

Installation Guide
Page 8
... the screws. ■ For direct wire installations, run the home power supply cable according to the cabinet side walls. NOTE: Do not reconnect power until the installation is complete. NOTE: If the wall cap used has a damper and it interferes with duct tape to make secure and airtight. ■ Check that are started into the mounting tab (D) on the screws that the back draft dampers work properly. Mount Range Hood C B A ■ Install Strain Relief Install a UL Listed...
... the screws. ■ For direct wire installations, run the home power supply cable according to the cabinet side walls. NOTE: Do not reconnect power until the installation is complete. NOTE: If the wall cap used has a damper and it interferes with duct tape to make secure and airtight. ■ Check that are started into the mounting tab (D) on the screws that the back draft dampers work properly. Mount Range Hood C B A ■ Install Strain Relief Install a UL Listed...

Installation Guide
Page 9
...Use" section. For vented installations: Install a metal filter. ■ Check the operation of the range hood fan and light. Direct Wire Installations ■ Use a UL Listed/CSA Approved wire connector and connect the 2 white wires (A) together. ■ Use a UL Listed/CSA Approved wire connector and connect the 2 black wires (B) together. See the "Assistance or Service" section for information on ordering. 13. Reinstall the electrical box cover. Fire Hazard Electrically ground the blower. 12. Power Cord Kit Installations For optional power cord kit installations, follow the instructions...
...Use" section. For vented installations: Install a metal filter. ■ Check the operation of the range hood fan and light. Direct Wire Installations ■ Use a UL Listed/CSA Approved wire connector and connect the 2 white wires (A) together. ■ Use a UL Listed/CSA Approved wire connector and connect the 2 black wires (B) together. See the "Assistance or Service" section for information on ordering. 13. Reinstall the electrical box cover. Fire Hazard Electrically ground the blower. 12. Power Cord Kit Installations For optional power cord kit installations, follow the instructions...

Installation Guide
Page 10
..., steel wool, gritty washcloths or paper towels. The hood controls are located on the front panel of the range hood. On/Off light switch B C A. Turn the grease filter retainer to the right for Low speed. A. Replace the grease filter before cooking and allow it to operate several minutes after the cooking is designed to the following instructions. Replace the screw in a dishwasher or hot detergent solution. For best results, start the hood before operating hood. RANGE HOOD USE The range hood...
..., steel wool, gritty washcloths or paper towels. The hood controls are located on the front panel of the range hood. On/Off light switch B C A. Turn the grease filter retainer to the right for Low speed. A. Replace the grease filter before cooking and allow it to operate several minutes after the cooking is designed to the following instructions. Replace the screw in a dishwasher or hot detergent solution. For best results, start the hood before operating hood. RANGE HOOD USE The range hood...

Installation Guide
Page 11
... Rating 50 ±10% Watts Motor Resistance White - Disconnect power. 2. Reconnect power. Black 13.4 ±10% Ohms N W W BK Ground Screw C19 L GND 11 Replace the lens cover by squeezing the cover and inserting the tabs into the socket. 4. Replacing the Incandescent Light Bulb Turn off the range hood and allow the light bulb to cool. 1. If the new light does not operate, make sure the light bulb is inserted correctly before calling service. Off Motor Switch...
... Rating 50 ±10% Watts Motor Resistance White - Disconnect power. 2. Reconnect power. Black 13.4 ±10% Ohms N W W BK Ground Screw C19 L GND 11 Replace the lens cover by squeezing the cover and inserting the tabs into the socket. 4. Replacing the Incandescent Light Bulb Turn off the range hood and allow the light bulb to cool. 1. If the new light does not operate, make sure the light bulb is inserted correctly before calling service. Off Motor Switch...
Installation Guide
Page 12
... due to repair or replace appliance light bulbs, air filters or water filters. Consumable parts are made with : ■ Features and specifications on our full line of the original unit. Factory specified parts will help us or your correspondence. Whirlpool designated service technicians are trained to your major appliance is used for assistance or service, please know the purchase date and the complete model and serial number of...
... due to repair or replace appliance light bulbs, air filters or water filters. Consumable parts are made with : ■ Features and specifications on our full line of the original unit. Factory specified parts will help us or your correspondence. Whirlpool designated service technicians are trained to your major appliance is used for assistance or service, please know the purchase date and the complete model and serial number of...

Installation Guide
Page 13
... servicer is not installed in -home service is void if the factory applied serial number has been altered or removed from your home of the Use & Care Guide. Costs associated with this major appliance other than the limited warranty that comes with the removal from unauthorized modifications made to know your major appliance if it . The removal and reinstallation of repair or replacement under these limitations...
... servicer is not installed in -home service is void if the factory applied serial number has been altered or removed from your home of the Use & Care Guide. Costs associated with this major appliance other than the limited warranty that comes with the removal from unauthorized modifications made to know your major appliance if it . The removal and reinstallation of repair or replacement under these limitations...

