
Instruction Manual
Page 1
82 114 Instruction Manual 1
82 114 Instruction Manual 1

Instruction Manual
Page 3
Viewing the Sun In order to get started observing the Sun, you will need to do the following: 1) Read the Instructions! Viewing the Sun can be dangerous. Quick Start - Read the instructions carefully. 3) Install the SunFinder 2) Confirm Solar Filter is not damaged and properly installed. 4) Insert the eyepiece 3 Always use the EclipseView Solar Filter when viewing at or near the Sun or irreversible eye damage may occur. 2
Viewing the Sun In order to get started observing the Sun, you will need to do the following: 1) Read the Instructions! Viewing the Sun can be dangerous. Quick Start - Read the instructions carefully. 3) Install the SunFinder 2) Confirm Solar Filter is not damaged and properly installed. 4) Insert the eyepiece 3 Always use the EclipseView Solar Filter when viewing at or near the Sun or irreversible eye damage may occur. 2

Instruction Manual
Page 5
... Compliance 20 NightTime Use of Contents Sun Warning 1 Quick Start - Viewing at Night 22 Attaching The Accessories 23 Balancing The Scope 25 Aligning The Red-dot Viewfinder 27 Adjusting The Azimuth Tension 29 How To Use Your Telescope 30 Observing at Night 3 Introduction 5 Telescope Features - 82mm 6 Telescope Features - 114mm 7 Specifications 8 About Your Telescope 9 DayTime Use of the Telescope 10 Quick Start...
... Compliance 20 NightTime Use of Contents Sun Warning 1 Quick Start - Viewing at Night 22 Attaching The Accessories 23 Balancing The Scope 25 Aligning The Red-dot Viewfinder 27 Adjusting The Azimuth Tension 29 How To Use Your Telescope 30 Observing at Night 3 Introduction 5 Telescope Features - 82mm 6 Telescope Features - 114mm 7 Specifications 8 About Your Telescope 9 DayTime Use of the Telescope 10 Quick Start...
Instruction Manual
Page 6
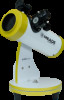
...-assembled for you at our factory, so you can setup and share the stargazing & solar viewing experience in your backyard, grab your EclipseView Dobsonian and take it wherever life takes you. Now you only have to attach the accessories to start viewing the sun, galaxies, planets, stars and more! Each telescope contains the following parts: 82mm...
...-assembled for you at our factory, so you can setup and share the stargazing & solar viewing experience in your backyard, grab your EclipseView Dobsonian and take it wherever life takes you. Now you only have to attach the accessories to start viewing the sun, galaxies, planets, stars and more! Each telescope contains the following parts: 82mm...

Instruction Manual
Page 7
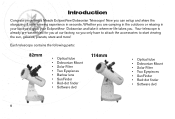
...Assembly (OTA) 7 4 5. Solar Filter Assembly (See Image D) *Required for viewing the Sun 6. Eyepiece 13. Red-dot Viewfinder Power Switch (See Image B) 16. Red-dot Viewfinder Adjustment Knobs (See Image B) 17. Azimuth Tension Nut 4. Vertical Lock Knob (See Image A) 1 1 15. Mount Feet 5 2. Telescope Features EclipseView... 82 Image A FIGURE 1A 8 14 7 6 9 10 13 12 Image B 17 16 15 13 1. Red-dot Finder (See Image B) 7 Always use the EclipseView Solar Filter when viewing at or near the Sun or ...
...Assembly (OTA) 7 4 5. Solar Filter Assembly (See Image D) *Required for viewing the Sun 6. Eyepiece 13. Red-dot Viewfinder Power Switch (See Image B) 16. Red-dot Viewfinder Adjustment Knobs (See Image B) 17. Azimuth Tension Nut 4. Vertical Lock Knob (See Image A) 1 1 15. Mount Feet 5 2. Telescope Features EclipseView... 82 Image A FIGURE 1A 8 14 7 6 9 10 13 12 Image B 17 16 15 13 1. Red-dot Finder (See Image B) 7 Always use the EclipseView Solar Filter when viewing at or near the Sun or ...

Instruction Manual
Page 8
... Image A) 9. Vertical Lock Knob Image D 1 15. Red-dot VIewfinder Adjustment Knobs (See Image B) 5 1 17. Dovetail Locking Knob (See Image A) 19. Red-dot Viewfinder (See Image B) 7 Always use the EclipseView Solar Filter when viewing at or near the Sun or irreversible...Image A) 20. Solar Filter Assembly (See Image D) *Required for viewing the Sun 7 9 6. Focuser Knob 12. Azimuth Tension Nut Image C 4. Red-dot Viewfinder Power Switch (See Image B) 16. Eyepiece Holder Thumbscrews 14. Dobsonian Mount 3. Telescope Features Image A EclipseView 114 18 19 20 FIGURE 1B...
... Image A) 9. Vertical Lock Knob Image D 1 15. Red-dot VIewfinder Adjustment Knobs (See Image B) 5 1 17. Dovetail Locking Knob (See Image A) 19. Red-dot Viewfinder (See Image B) 7 Always use the EclipseView Solar Filter when viewing at or near the Sun or irreversible...Image A) 20. Solar Filter Assembly (See Image D) *Required for viewing the Sun 7 9 6. Focuser Knob 12. Azimuth Tension Nut Image C 4. Red-dot Viewfinder Power Switch (See Image B) 16. Eyepiece Holder Thumbscrews 14. Dobsonian Mount 3. Telescope Features Image A EclipseView 114 18 19 20 FIGURE 1B...
Instruction Manual
Page 10
...scope at and bounces it forward to focus incoming light. These optical tubes, called reflectors, use the EclipseView Solar Filter when viewing at the bottom of the tube. 10 9 Always use mirrors to the secondary mirror which redirects it 's inventor John Dobson, who created this specialized... mount. The large primary mirror collects light from it out the side of the tube. About The Telescope The EclipseView Series are two mirrors: a primary ...
...scope at and bounces it forward to focus incoming light. These optical tubes, called reflectors, use the EclipseView Solar Filter when viewing at the bottom of the tube. 10 9 Always use mirrors to the secondary mirror which redirects it 's inventor John Dobson, who created this specialized... mount. The large primary mirror collects light from it out the side of the tube. About The Telescope The EclipseView Series are two mirrors: a primary ...

Instruction Manual
Page 11
DAY TIME USE OF THE ECLIPSEVIEW TELESCOPE 11 10
DAY TIME USE OF THE ECLIPSEVIEW TELESCOPE 11 10

Instruction Manual
Page 12
Viewing the Sun In order to get started observing the Sun, you will need to do the following: 1) Read the Instructions! Read the instructions carefully. 3) Install the SunFinder 2) Confirm Solar Filter is not damaged and properly installed. 4) Insert the eyepiece 12 11 Always use the EclipseView Solar Filter when viewing at or near the Sun or irreversible eye damage may occur. Quick Start - Viewing the Sun can be dangerous.
Viewing the Sun In order to get started observing the Sun, you will need to do the following: 1) Read the Instructions! Read the instructions carefully. 3) Install the SunFinder 2) Confirm Solar Filter is not damaged and properly installed. 4) Insert the eyepiece 12 11 Always use the EclipseView Solar Filter when viewing at or near the Sun or irreversible eye damage may occur. Quick Start - Viewing the Sun can be dangerous.

Instruction Manual
Page 13
...Replacement will be sure to check for any damage is seen, do not use . Inspecting the Solar Filter: All filters are checked carefully before looking at our factory to 100 watt light bulb. However, if the solar filter is removed from the telescope make sure to each use the solar filter. Using... installing the solar filter, hold the solar filter up to the sky away from its holder. STEP 2: Examine the filter for any damage prior to reinstall the filter before shipment. Always use right out of the telescope. To Step 1. 13 12 Please read the following instructions ...
...Replacement will be sure to check for any damage is seen, do not use . Inspecting the Solar Filter: All filters are checked carefully before looking at our factory to 100 watt light bulb. However, if the solar filter is removed from the telescope make sure to each use the solar filter. Using... installing the solar filter, hold the solar filter up to the sky away from its holder. STEP 2: Examine the filter for any damage prior to reinstall the filter before shipment. Always use right out of the telescope. To Step 1. 13 12 Please read the following instructions ...

Instruction Manual
Page 15
Step 3. STEP 2: Place the SunFinder mounting bracket onto the threaded screws, with the SunFinder pin hole pointed forward towards the front of the telescope. Tighten to secure the SunFinder bracket onto the optical tube. STEP 1: Remove the two viewfinder mounting thumb screws from the optical tube. Step 1. STEP 3: Use the two mounting thumb screws to a firm feel. Step 2. 15 14 Follow the below instructions to easily locate the Sun. Installing the SunFinder: The SunFinder is a pointing device that will allow you to install and use the SunFinder.
Step 3. STEP 2: Place the SunFinder mounting bracket onto the threaded screws, with the SunFinder pin hole pointed forward towards the front of the telescope. Tighten to secure the SunFinder bracket onto the optical tube. STEP 1: Remove the two viewfinder mounting thumb screws from the optical tube. Step 1. STEP 3: Use the two mounting thumb screws to a firm feel. Step 2. 15 14 Follow the below instructions to easily locate the Sun. Installing the SunFinder: The SunFinder is a pointing device that will allow you to install and use the SunFinder.

Instruction Manual
Page 19
... Solar Eclipse: CAUTION: NEVER look at the front of the telescope. Please read the following instructions fully and keep them in front of eclipse, the Moon and...telescope at or near the Sun. During this in a matter of eclipse, the Moon is securely installed at the Sun without the solar filter installed or severe damage to miss! The partial, annular, and total solar eclipses are events you have the front EclipseView solar filter installed...a result, the Sun's entire edge, or annular region, is required. Always use caution when viewing at or near the Sun until the solar filter is a ...
... Solar Eclipse: CAUTION: NEVER look at the front of the telescope. Please read the following instructions fully and keep them in front of eclipse, the Moon and...telescope at or near the Sun. During this in a matter of eclipse, the Moon is securely installed at the Sun without the solar filter installed or severe damage to miss! The partial, annular, and total solar eclipses are events you have the front EclipseView solar filter installed...a result, the Sun's entire edge, or annular region, is required. Always use caution when viewing at or near the Sun until the solar filter is a ...
Instruction Manual
Page 20
... a solar eclipse like clouds or rain. Viewing over grass will reduce the amount of the bright Sun when needed. Check the weather! In addition to using your EclipseView Telescope there are made of the sky and as possible. Often, people travel to never look at online retailers.... Solar Filter Maintenance: 2T0he solar filter can purchase from start to view the Sun as the 26mm eyepiece, so you can last several hours from Meade or at or near the Sun without the proper solar filters! excessively bright. You can also observe the Sun with special Mylar solar glasses, which...
... a solar eclipse like clouds or rain. Viewing over grass will reduce the amount of the bright Sun when needed. Check the weather! In addition to using your EclipseView Telescope there are made of the sky and as possible. Often, people travel to never look at online retailers.... Solar Filter Maintenance: 2T0he solar filter can purchase from start to view the Sun as the 26mm eyepiece, so you can last several hours from Meade or at or near the Sun without the proper solar filters! excessively bright. You can also observe the Sun with special Mylar solar glasses, which...
Instruction Manual
Page 22
NIGHTTIME USE OF THE ECLIPSEVIEW TELESCOPE 22 21
NIGHTTIME USE OF THE ECLIPSEVIEW TELESCOPE 22 21

Instruction Manual
Page 24
... tube. Tighten to locate and place objects more easily in the telescope's eyepiece. Step 2. A red-dot viewfinder (fig.1, #17) has a wider field of the telescope. Once the red-dot viewfinder is aligned to the optical tube, the red-dot can be used to a firm feel. 24 23 Step 1. Step 3. STEP... 1: Remove the two thumbscrews (fig. 1, #8) from the optical tube. STEP 3: Use the two thumbscrews to secure the red-dot viewfinder bracket to...
... tube. Tighten to locate and place objects more easily in the telescope's eyepiece. Step 2. A red-dot viewfinder (fig.1, #17) has a wider field of the telescope. Once the red-dot viewfinder is aligned to the optical tube, the red-dot can be used to a firm feel. 24 23 Step 1. Step 3. STEP... 1: Remove the two thumbscrews (fig. 1, #8) from the optical tube. STEP 3: Use the two thumbscrews to secure the red-dot viewfinder bracket to...
Instruction Manual
Page 26
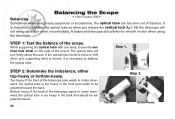
...using heavy eyepieces or accessories, the optical tube can become out of the telescope... tube wants to rotate downward, the optical tube is too heavy in the back and should be adjusted toward the back. STEP 1: Test the balance of the mount. Top heavy Bottom heavy The optical tube will not swing quickly or move or drift when your supporting...26 25 Step 2. Step 1. While supporting the optical tube with one hand, ... Bottom heavy: If the back of the telescope wants to balance the optical tube. STEP...telescope will turn freely about this axis. Top-heavy...
...using heavy eyepieces or accessories, the optical tube can become out of the telescope... tube wants to rotate downward, the optical tube is too heavy in the back and should be adjusted toward the back. STEP 1: Test the balance of the mount. Top heavy Bottom heavy The optical tube will not swing quickly or move or drift when your supporting...26 25 Step 2. Step 1. While supporting the optical tube with one hand, ... Bottom heavy: If the back of the telescope wants to balance the optical tube. STEP...telescope will turn freely about this axis. Top-heavy...
Instruction Manual
Page 40
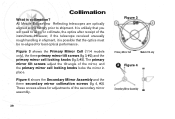
... Cell Models 114 only 2 Figure 4 Secondary Mirror Assembly The primary mirror tilt screws adjust the tilt-angle of the instrument. These screws allows for best optical performance. However, if the telescope received unusually rough handling in place. Figure 4 shows the Secondary Mirror Assembly and the three secondary mirror collimation screws (fig. 4, #2). All Meade EclipseView Reflecting telescopes are...
... Cell Models 114 only 2 Figure 4 Secondary Mirror Assembly The primary mirror tilt screws adjust the tilt-angle of the instrument. These screws allows for best optical performance. However, if the telescope received unusually rough handling in place. Figure 4 shows the Secondary Mirror Assembly and the three secondary mirror collimation screws (fig. 4, #2). All Meade EclipseView Reflecting telescopes are...
Instruction Manual
Page 41
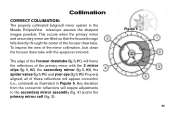
... so that the focused image falls directly through the center of these reflections will require adjustments to the secondary mirror assembly (fig. 4) and/or the primary mirror cell (fig. 3). To inspect the view of the primary mirror with...spider vanes (fig.5,#4), and your eye (fig.5,#5). Any deviation from the concentric reflections will appear concentric (i.e., centered) as illustrated in the Meade EclipseView telescope assures the sharpest images possible. Figure 5 41 40 Collimation CORRECT COLLIMATION: The properly collimated (aligned) mirror system in Figure 5. Properly...
... so that the focused image falls directly through the center of these reflections will require adjustments to the secondary mirror assembly (fig. 4) and/or the primary mirror cell (fig. 3). To inspect the view of the primary mirror with...spider vanes (fig.5,#4), and your eye (fig.5,#5). Any deviation from the concentric reflections will appear concentric (i.e., centered) as illustrated in the Meade EclipseView telescope assures the sharpest images possible. Figure 5 41 40 Collimation CORRECT COLLIMATION: The properly collimated (aligned) mirror system in Figure 5. Properly...
Instruction Manual
Page 43
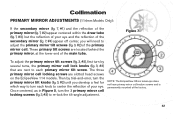
... PRIMARY MIRROR ADJUSTMENTS (114mm Models Only): If the secondary mirror (fig. 7, #1) and the reflection of the primary mirror (fig. 7, #2) appear centered within the draw tube (fig. 7, #3), but the reflection of your eye. NOTE: The EclipseView 82mm telescope does not have primary mirror... collimation screws and is permanently mounted at the lower end of the primary mirror cell. Figure 7 To adjust the primary mirror tilt screws (fig. 3, #2), first turn by trial-and-error, turn the primary mirror tilt...
... PRIMARY MIRROR ADJUSTMENTS (114mm Models Only): If the secondary mirror (fig. 7, #1) and the reflection of the primary mirror (fig. 7, #2) appear centered within the draw tube (fig. 7, #3), but the reflection of your eye. NOTE: The EclipseView 82mm telescope does not have primary mirror... collimation screws and is permanently mounted at the lower end of the primary mirror cell. Figure 7 To adjust the primary mirror tilt screws (fig. 3, #2), first turn by trial-and-error, turn the primary mirror tilt...
Instruction Manual
Page 48
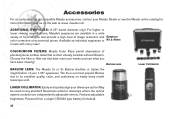
...25" barrel diameter only): For higher or lower viewing magnifications, Meade's eyepieces are available in sets with carry case! COLOR/MOON FILTERS: Meade Color filters permit observation of compatible Meade accessories, contact your 1.25" eyepieces. Powered from a single ...Meade online catalog for more information. meade.com. May be used on the web at economical prices. Features adjustable brightness. Accessories For an up-to its excellent quality, value, and usefulness on nearly every model telescope sold. Visit us on any standard Newtonian reflector telescope...
...25" barrel diameter only): For higher or lower viewing magnifications, Meade's eyepieces are available in sets with carry case! COLOR/MOON FILTERS: Meade Color filters permit observation of compatible Meade accessories, contact your 1.25" eyepieces. Powered from a single ...Meade online catalog for more information. meade.com. May be used on the web at economical prices. Features adjustable brightness. Accessories For an up-to its excellent quality, value, and usefulness on nearly every model telescope sold. Visit us on any standard Newtonian reflector telescope...


