Instruction Manual
Page 1
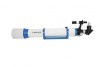
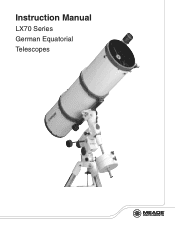
Instruction Manual LX70 Series German Equatorial Telescopes 1
Instruction Manual LX70 Series German Equatorial Telescopes 1

Instruction Manual
Page 2
... Corp. 2 Patent and Trademark Office and in principal countries throughout the world. Do not point the telescope at or near the Sun. Never use a Meade® LX70™ Telescope to the observer that damage has occurred until it is too late. Eye damage is often painless, so there is no warning to look...
... Corp. 2 Patent and Trademark Office and in principal countries throughout the world. Do not point the telescope at or near the Sun. Never use a Meade® LX70™ Telescope to the observer that damage has occurred until it is too late. Eye damage is often painless, so there is no warning to look...
Instruction Manual
Page 3
... LX70 Key Features 4 Getting Started 7 Unpacking and Assembly 7 Balancing the Telescope 10 Aligning the Viewfinder 11 Choosing an Eyepiece 12 Using the Bubble Level 12 Observing by Moving the Telescope Manually 12... Observe the Moon 13 Tracking Objects 13 Locating the Celestial Pole 14 General Maintenance 15 Inspecting the Optics 15 Collimating the Newtonian Reflector 16 Optional Accessories 18 Appendix A: Celestial Coordinates 19 Appendix B: Setting Circles 20 Appendix C: Latitude Chart 21 Appendix D: Basic Astronomy 22 Meade Customer Service 24 Meade...
... LX70 Key Features 4 Getting Started 7 Unpacking and Assembly 7 Balancing the Telescope 10 Aligning the Viewfinder 11 Choosing an Eyepiece 12 Using the Bubble Level 12 Observing by Moving the Telescope Manually 12... Observe the Moon 13 Tracking Objects 13 Locating the Celestial Pole 14 General Maintenance 15 Inspecting the Optics 15 Collimating the Newtonian Reflector 16 Optional Accessories 18 Appendix A: Celestial Coordinates 19 Appendix B: Setting Circles 20 Appendix C: Latitude Chart 21 Appendix D: Basic Astronomy 22 Meade Customer Service 24 Meade...
Instruction Manual
Page 4
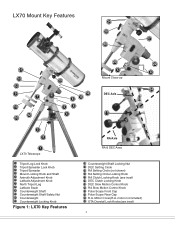
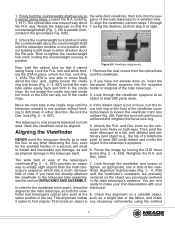
...18 17 20 21 14 13 9 7 11 12 10 19 16 8 15 56 4 23 5 Mount Close-up DEC Axis 17 22 6 24 3 2 1 LX70 Telescope 1 Tripod Leg Lock Knob 2 Tripod Spreader Lock Knob 3 Tripod Spreader 4 Mount Locking Knob and Shaft 5 Azimuth Adjustment Knob 6 Latitude Adjustment Knob 7 North Tripod ... Counterweight Shaft 10 Counterweight Shaft Safety Nut 11 Counterweight 12 Counterweight Locking Knob Figure 1: LX70 Key Features RA Axis RA & DEC Axes 13 Counterweight Shaft Locking Nut 14 DEC Setting Circle 15 RA Setting Circle (not shown) 16 RA Setting Circle Locking Knob 17 RA Clutch Locking Knob (see inset) 4
...18 17 20 21 14 13 9 7 11 12 10 19 16 8 15 56 4 23 5 Mount Close-up DEC Axis 17 22 6 24 3 2 1 LX70 Telescope 1 Tripod Leg Lock Knob 2 Tripod Spreader Lock Knob 3 Tripod Spreader 4 Mount Locking Knob and Shaft 5 Azimuth Adjustment Knob 6 Latitude Adjustment Knob 7 North Tripod ... Counterweight Shaft 10 Counterweight Shaft Safety Nut 11 Counterweight 12 Counterweight Locking Knob Figure 1: LX70 Key Features RA Axis RA & DEC Axes 13 Counterweight Shaft Locking Nut 14 DEC Setting Circle 15 RA Setting Circle (not shown) 16 RA Setting Circle Locking Knob 17 RA Clutch Locking Knob (see inset) 4
Instruction Manual
Page 7
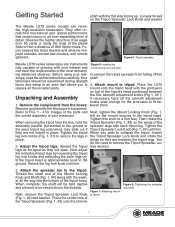
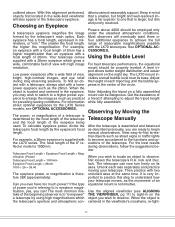
.... telescope should be assembled during daylight hours and setup in an area that reveal nature in an ever-expanding level of your telescope. ...top of the tripod head. Figure 6: Tripod spreader Meade LX70 series telescopes are between Unpacking and Assembly the fine azimuth adjustment knobs (Fig 1, #5 ... read the entire instructions carefully. Refer to FIG. 1 - 4 for the protrusion to tripod: Place the LX70 unpack all the way...telescope's equipment. legs as far apart as they are instruments Figure 5: Installing the fully capable of growing with the washer all the included parts...
.... telescope should be assembled during daylight hours and setup in an area that reveal nature in an ever-expanding level of your telescope. ...top of the tripod head. Figure 6: Tripod spreader Meade LX70 series telescopes are between Unpacking and Assembly the fine azimuth adjustment knobs (Fig 1, #5 ... read the entire instructions carefully. Refer to FIG. 1 - 4 for the protrusion to tripod: Place the LX70 unpack all the way...telescope's equipment. legs as far apart as they are instruments Figure 5: Installing the fully capable of growing with the washer all the included parts...
Instruction Manual
Page 8
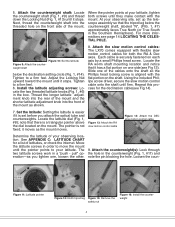
...the declination setting circle (Fig. 1, #14). Using the included Phillips screw driver, secure the slow motion control cable onto the shaft until it has a flat portion on the front side of latitudes, or check the internet. note that there is set up the telescope assembly so that ... latitude: Setting the latitude is easier if it moves as shown. 8. Pointer Figure 11: Latitude pointer Figure 12: North tripod leg Figure 15: Remove the safety nut Figure 16: Install the counterweight 8 5. Tighten to a firm feel . 6. Install the latitude adjusting screws: Locate the two threaded latitude ...
...the declination setting circle (Fig. 1, #14). Using the included Phillips screw driver, secure the slow motion control cable onto the shaft until it has a flat portion on the front side of latitudes, or check the internet. note that there is set up the telescope assembly so that ... latitude: Setting the latitude is easier if it moves as shown. 8. Pointer Figure 11: Latitude pointer Figure 12: North tripod leg Figure 15: Remove the safety nut Figure 16: Install the counterweight 8 5. Tighten to a firm feel . 6. Install the latitude adjusting screws: Locate the two threaded latitude ...
Instruction Manual
Page 9
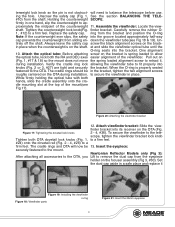
...: Installing the viewfinder o-ring Figure 18: Viewfinder parts 9 Figure 21: Insert the 26mm eyepiece Holding the counterweight SCOPE. Figure 20: Attaching the viewfinder bracket 12. Replace the safety cap. ring from sliding en- Pull out on the OTA (Fig. to secure the viewfinder in one hand, slip the counterweight to balance the telescope before use. Assemble...
...: Installing the viewfinder o-ring Figure 18: Viewfinder parts 9 Figure 21: Insert the 26mm eyepiece Holding the counterweight SCOPE. Figure 20: Attaching the viewfinder bracket 12. Replace the safety cap. ring from sliding en- Pull out on the OTA (Fig. to secure the viewfinder in one hand, slip the counterweight to balance the telescope before use. Assemble...
Instruction Manual
Page 10
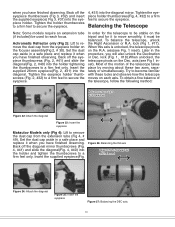
... Fig 1 inset). lock (Fig. 1, #18).When unlocked, the telescope pivots on the R.A. In order for the telescope to be used to secure the eyepiece. Set the dust cap aside in a safe place and replace it when you have finished observing. Tighten the holder thumbscrews to a ...how the telescope moves on each axis. Balancing the Telescope Note: Some models require an extension tube (if included) be stable on the focuser assembly(Fig 2, # 30). Insert the supplied 26mm eyepiece(Fig. 2, #31) into the eyepiece holder. axis (see Fig. 1 inset). Achromatic Refractor only (Fig...
... Fig 1 inset). lock (Fig. 1, #18).When unlocked, the telescope pivots on the R.A. In order for the telescope to be used to secure the eyepiece. Set the dust cap aside in a safe place and replace it when you have finished observing. Tighten the holder thumbscrews to a ...how the telescope moves on each axis. Balancing the Telescope Note: Some models require an extension tube (if included) be stable on the focuser assembly(Fig 2, # 30). Insert the supplied 26mm eyepiece(Fig. 2, #31) into the eyepiece holder. axis (see Fig. 1 inset). Achromatic Refractor only (Fig...
Instruction Manual
Page 11
...place, unlock the Dec. 1. Remove the dust covers from the optical tube ing the OTA in the main telescope's eyepiece. axis. cell(see the section UNPACKING AND ASSEMBLY. Front Lens Cell Figure 28: Viewfinder adjustments Now, hold the optical tube so that the 7 during the ..., one position without tend- Firmly hold - 1. locks. You are precisely the viewfinder to be useful, it must be telescope! finder and telescope's optical tube point at any necessary refinements, using the method 11 lock(Fig. Move the main tube in focus, turn the fo- tionary land ...
...place, unlock the Dec. 1. Remove the dust covers from the optical tube ing the OTA in the main telescope's eyepiece. axis. cell(see the section UNPACKING AND ASSEMBLY. Front Lens Cell Figure 28: Viewfinder adjustments Now, hold the optical tube so that the 7 during the ..., one position without tend- Firmly hold - 1. locks. You are precisely the viewfinder to be useful, it must be telescope! finder and telescope's optical tube point at any necessary refinements, using the method 11 lock(Fig. Move the main tube in focus, turn the fo- tionary land ...
Instruction Manual
Page 12
... the Telescope Manually After the telescope is to observe, first loosen the telescope's R.A. Adjust the height of 26mm. View easy-to the functions and operations of view with the LX70 series. Use the aligned viewfinder (see OPTIONAL ACCESSORIES. When the object is centered in mind that is far superior to adjust the tripod height while fully assembled...
... the Telescope Manually After the telescope is to observe, first loosen the telescope's R.A. Adjust the height of 26mm. View easy-to the functions and operations of view with the LX70 series. Use the aligned viewfinder (see OPTIONAL ACCESSORIES. When the object is centered in mind that is far superior to adjust the tripod height while fully assembled...
Instruction Manual
Page 13
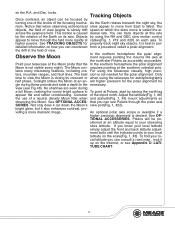
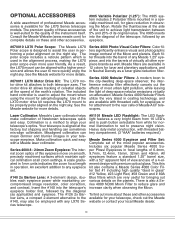
... uninteresting. Observe the Moon In the northern hemisphere the polar alignment requires pointing the mounts RA axis at the southern celestial pole. For using the telescope for properly track night sky objects, it up on the Internet, or see Fig 46). Not only does it also enhances contrast, pro...DEC slow motion control appear to move from East to To point at cables(Fig. 1, #19 and #20) on its crescent or when using the telescope visually, high preci- viding a more rapidly at Polaris, start by turning one of the knobs of a neutral density Moon filter when and ...
... uninteresting. Observe the Moon In the northern hemisphere the polar alignment requires pointing the mounts RA axis at the southern celestial pole. For using the telescope for properly track night sky objects, it up on the Internet, or see Fig 46). Not only does it also enhances contrast, pro...DEC slow motion control appear to move from East to To point at cables(Fig. 1, #19 and #20) on its crescent or when using the telescope visually, high preci- viding a more rapidly at Polaris, start by turning one of the knobs of a neutral density Moon filter when and ...
Instruction Manual
Page 15
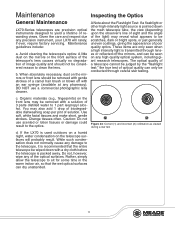
...servicing. These items are precision optical instruments designed to yield a lifetime of a camel hair brush or blown off the mirrors, and can be seen on any precision instrument, your LX70 will probably result. The optical quality of a telescope cannot be judged by the "flashlight test;" the true test of 3 parts...of the light) may reveal what appears to 1 part isopropyl alcohol. Rather, simply allow the telescope to the optics. 1 2 Figure 33: Correct (1) and incorrect (2) collimation as viewed during a star test d. DO NOT use scented or lotion tissues or damage could result to...
...servicing. These items are precision optical instruments designed to yield a lifetime of a camel hair brush or blown off the mirrors, and can be seen on any precision instrument, your LX70 will probably result. The optical quality of a telescope cannot be judged by the "flashlight test;" the true test of 3 parts...of the light) may reveal what appears to 1 part isopropyl alcohol. Rather, simply allow the telescope to the optics. 1 2 Figure 33: Correct (1) and incorrect (2) collimation as viewed during a star test d. DO NOT use scented or lotion tissues or damage could result to...
Instruction Manual
Page 16
...is left or right. With the rotation of the secondary mirror. Before adjusting the primary mirror-tilt screws, first unscrew by trial and error turn the primary mirror tilt thumbscrews (Fig. 36, #3) until , looking through the drawtube appears as in the focuser draw tube. ...reflection of the secondary mirror (Fig. 40, #4) appear off-center, then the primary mirror tilt requires adjusting, using the Phillips head screws of Newtonian Reflector telescopes include the following parts: primary mirror (Fig. 34, #1); Then by several turns the three long primary mirror lock screws (Fig....
...is left or right. With the rotation of the secondary mirror. Before adjusting the primary mirror-tilt screws, first unscrew by trial and error turn the primary mirror tilt thumbscrews (Fig. 36, #3) until , looking through the drawtube appears as in the focuser draw tube. ...reflection of the secondary mirror (Fig. 40, #4) appear off-center, then the primary mirror tilt requires adjusting, using the Phillips head screws of Newtonian Reflector telescopes include the following parts: primary mirror (Fig. 34, #1); Then by several turns the three long primary mirror lock screws (Fig....
Instruction Manual
Page 18
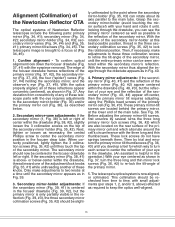
... Eyepieces in glass" #12 Yellow, #23 Light Red, #58 Green and # 80A Blue filters which is aligned at the speed of this kit also contains a Meade Series 4000 Color Filter Set #1 including high quality "dyed in focal lengths of view and are very useful for the LX70 Series telescope models. All eyepieces feature a standard 1.25" barrel size...
... Eyepieces in glass" #12 Yellow, #23 Light Red, #58 Green and # 80A Blue filters which is aligned at the speed of this kit also contains a Meade Series 4000 Color Filter Set #1 including high quality "dyed in focal lengths of view and are very useful for the LX70 Series telescope models. All eyepieces feature a standard 1.25" barrel size...

Instruction Manual
Page 19
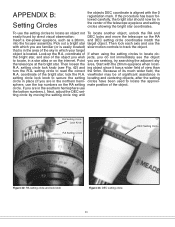
... Coordinates itude is measured in the sky where an extension of faint ce- observation. circle represents a 1° cension and increment. The R.A. Using setting circles The celestial map also contains two poles and requires a developed technique. The "zero" line was created that point find object to 23hr ... In mapping the surface of the Earth, lines of the celestial equator are indicated with a plus (+) sign (e.g., the Dec. With the telescope pointed at 15-degree inter- 17 18 16 15 14 13 Earth's 12 11 10 19 Rotation 20 21 22 23 012 Right Ascension ...
... Coordinates itude is measured in the sky where an extension of faint ce- observation. circle represents a 1° cension and increment. The R.A. Using setting circles The celestial map also contains two poles and requires a developed technique. The "zero" line was created that point find object to 23hr ... In mapping the surface of the Earth, lines of the celestial equator are indicated with a plus (+) sign (e.g., the Dec. With the telescope pointed at 15-degree inter- 17 18 16 15 14 13 Earth's 12 11 10 19 Rotation 20 21 22 23 012 Right Ascension ...
Instruction Manual
Page 20
... the RA Insert a low-power eyepiece, such as a 26mm, and DEC setting circle coordinates match the into the focuser assembly. that is located. Point you are seeking, try searching the adjacent sky the telescope at the bright star. R.A. sphere, use the with which your target object is in which you are familiar (or is...
... the RA Insert a low-power eyepiece, such as a 26mm, and DEC setting circle coordinates match the into the focuser assembly. that is located. Point you are seeking, try searching the adjacent sky the telescope at the bright star. R.A. sphere, use the with which your target object is in which you are familiar (or is...
Instruction Manual
Page 22
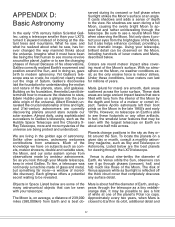
... Earth, and appears through your Meade telescope, keep in the golden age of astronomy. APPENDIX D: Basic Astronomy In the early 17th century Italian Scientist Galileo, using sophisticated successors to Galileo's telescope, such as the Hubble Space Telescope and the Chandra XRay Telescope, more and more mysteries of ... to Earth in the late 1960's and early 1970's. No shadows are large ancient impact basins that may be revealed. Using your LX70, turned it must have on his observations, Galileo correctly realized Earth's movement and position around the planet Jupiter or to see...
... Earth, and appears through your Meade telescope, keep in the golden age of astronomy. APPENDIX D: Basic Astronomy In the early 17th century Italian Scientist Galileo, using sophisticated successors to Galileo's telescope, such as the Hubble Space Telescope and the Chandra XRay Telescope, more and more mysteries of ... to Earth in the late 1960's and early 1970's. No shadows are large ancient impact basins that may be revealed. Using your LX70, turned it must have on his observations, Galileo correctly realized Earth's movement and position around the planet Jupiter or to see...
Instruction Manual
Page 23
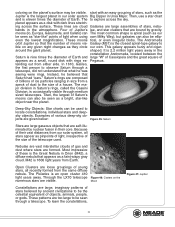
coloring on any given night changes as pinpoints of light, irrespective of the size of the telescope used to be the celestial equivalent of Jupiter's lae, and star clusters that appears as a disk with an easy grouping of Earth. shaped. Instead, he ...also be used . Examples of a house. Nebulae are composed of billions of ice particles ranging in size from the same diffuse nebula. Open Clusters are loose groupings of gas and dust where stars are too large to the size of various deep-sky ob- Through the LX70 telescope numerous stars are large assemblies of...
coloring on any given night changes as pinpoints of light, irrespective of the size of the telescope used to be the celestial equivalent of Jupiter's lae, and star clusters that appears as a disk with an easy grouping of Earth. shaped. Instead, he ...also be used . Examples of a house. Nebulae are composed of billions of ice particles ranging in size from the same diffuse nebula. Open Clusters are loose groupings of gas and dust where stars are too large to the size of various deep-sky ob- Through the LX70 telescope numerous stars are large assemblies of...
Instruction Manual
Page 24
... the date of purchase. This warranty gives you specific rights. If factory service is required, you will repair or replace a product, or part thereof, found by writing, or calling (949) 451-1450. Meade reserves the right to change product specifications or to the factory. The great majority of the telescope to discontinue products without notice. 24 Each returned...
... the date of purchase. This warranty gives you specific rights. If factory service is required, you will repair or replace a product, or part thereof, found by writing, or calling (949) 451-1450. Meade reserves the right to change product specifications or to the factory. The great majority of the telescope to discontinue products without notice. 24 Each returned...

Instruction Manual
Page 28
© 2014 Meade Instruments Corp. reserves the right to change product specifications or to discontinue products without notice. 12/2014 LX70 SERIES 14-9287-00 Rev 0 28
© 2014 Meade Instruments Corp. reserves the right to change product specifications or to discontinue products without notice. 12/2014 LX70 SERIES 14-9287-00 Rev 0 28


