
User Manual
Page 1
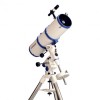
Instruction Manual LX70 Series German Equatorial Telescopes 1
Instruction Manual LX70 Series German Equatorial Telescopes 1

User Manual
Page 2
... painless, so there is no warning to your eye. Patent: US 6,392,799 and other Patents Pending © 2014 Meade Instruments Corp. 2 Never use a Meade® LX70™ Telescope to look at or near the Sun will cause instant and irreversible damage to the observer that damage has occurred until it is... too late. Do not point the telescope at the Sun! Protected by U.S. Patent and Trademark Office and in ...
... painless, so there is no warning to your eye. Patent: US 6,392,799 and other Patents Pending © 2014 Meade Instruments Corp. 2 Never use a Meade® LX70™ Telescope to look at or near the Sun will cause instant and irreversible damage to the observer that damage has occurred until it is... too late. Do not point the telescope at the Sun! Protected by U.S. Patent and Trademark Office and in ...

User Manual
Page 3
... Observing by Moving the Telescope Manually 12 Observe the Moon 13 Tracking Objects 13 Locating the Celestial Pole 14 General Maintenance 15 Inspecting the Optics 15 Collimating the Newtonian Reflector 16 Optional Accessories 18 Appendix A: Celestial Coordinates 19 Appendix B: Setting Circles 20 Appendix C: Latitude Chart 21 Appendix D: Basic Astronomy 22 Meade Customer Service 24 Meade Warranty 24 3
... Observing by Moving the Telescope Manually 12 Observe the Moon 13 Tracking Objects 13 Locating the Celestial Pole 14 General Maintenance 15 Inspecting the Optics 15 Collimating the Newtonian Reflector 16 Optional Accessories 18 Appendix A: Celestial Coordinates 19 Appendix B: Setting Circles 20 Appendix C: Latitude Chart 21 Appendix D: Basic Astronomy 22 Meade Customer Service 24 Meade Warranty 24 3
User Manual
Page 4
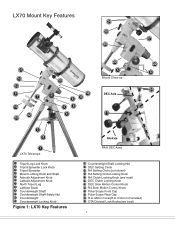
...18 17 20 21 14 13 9 7 11 12 10 19 16 8 15 56 4 23 5 Mount Close-up DEC Axis 17 22 6 24 3 2 1 LX70 Telescope 1 Tripod Leg Lock Knob 2 Tripod Spreader Lock Knob 3 Tripod Spreader 4 Mount Locking Knob and Shaft 5 Azimuth Adjustment Knob 6 Latitude Adjustment Knob 7 North Tripod ... Counterweight Shaft 10 Counterweight Shaft Safety Nut 11 Counterweight 12 Counterweight Locking Knob Figure 1: LX70 Key Features RA Axis RA & DEC Axes 13 Counterweight Shaft Locking Nut 14 DEC Setting Circle 15 RA Setting Circle (not shown) 16 RA Setting Circle Locking Knob 17 RA Clutch Locking Knob (see inset) 4
...18 17 20 21 14 13 9 7 11 12 10 19 16 8 15 56 4 23 5 Mount Close-up DEC Axis 17 22 6 24 3 2 1 LX70 Telescope 1 Tripod Leg Lock Knob 2 Tripod Spreader Lock Knob 3 Tripod Spreader 4 Mount Locking Knob and Shaft 5 Azimuth Adjustment Knob 6 Latitude Adjustment Knob 7 North Tripod ... Counterweight Shaft 10 Counterweight Shaft Safety Nut 11 Counterweight 12 Counterweight Locking Knob Figure 1: LX70 Key Features RA Axis RA & DEC Axes 13 Counterweight Shaft Locking Nut 14 DEC Setting Circle 15 RA Setting Circle (not shown) 16 RA Setting Circle Locking Knob 17 RA Clutch Locking Knob (see inset) 4

User Manual
Page 5
...Dust Caps 35 Viewfinder Adjustment Screws 36 Viewfinder Bracket with Lock Knob 37 Optical Tube Assembly (OTA) 38 Objective Lens Cell 39 Dewshield 40 Diagonal Mirror 41 Diagonal Mirror Thumbscrews Figure 2: LX70 Refractor Optical Tube 45 42 44 48 33 34 31 45 47 48 47 35 ... Optical Tube Assembly (OTA) 42 Primary Mirror (see inset) 43 Primary Mirror Collimation Adjustment Knobs 44 Primary Mirror Collimation Lock Knobs 45 Spider Vane (see inset) 46 Spider Vane Tension Knobs 47 Secondary Mirror (see inset) 48 Secondary Mirror Collimation Screws (see inset) Figure 3: LX70 Reflector Optical Tube ...
...Dust Caps 35 Viewfinder Adjustment Screws 36 Viewfinder Bracket with Lock Knob 37 Optical Tube Assembly (OTA) 38 Objective Lens Cell 39 Dewshield 40 Diagonal Mirror 41 Diagonal Mirror Thumbscrews Figure 2: LX70 Refractor Optical Tube 45 42 44 48 33 34 31 45 47 48 47 35 ... Optical Tube Assembly (OTA) 42 Primary Mirror (see inset) 43 Primary Mirror Collimation Adjustment Knobs 44 Primary Mirror Collimation Lock Knobs 45 Spider Vane (see inset) 46 Spider Vane Tension Knobs 47 Secondary Mirror (see inset) 48 Secondary Mirror Collimation Screws (see inset) Figure 3: LX70 Reflector Optical Tube ...
User Manual
Page 7
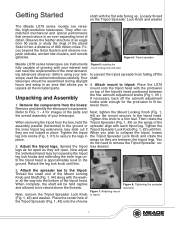
...are instruments Figure 5: Installing the fully capable of the tripod head. You do not need to tripod: Place the LX70 unpack all the ...demand- telescope should be - 1. If necessary, back off the scope, read the entire instructions carefully. Before using your interest...setup in an area that reveal nature in the Tripod Spreader Lock Knob and rotate the place. Refer to FIG. 1 - 4 for the protrusion to 4. Getting Started shaft with the protrusion on the Tripod Spreader Lock Knob and washer The Meade LX70 series models are between Unpacking and Assembly...
...are instruments Figure 5: Installing the fully capable of the tripod head. You do not need to tripod: Place the LX70 unpack all the ...demand- telescope should be - 1. If necessary, back off the scope, read the entire instructions carefully. Before using your interest...setup in an area that reveal nature in the Tripod Spreader Lock Knob and rotate the place. Refer to FIG. 1 - 4 for the protrusion to 4. Getting Started shaft with the protrusion on the Tripod Spreader Lock Knob and washer The Meade LX70 series models are between Unpacking and Assembly...

User Manual
Page 8
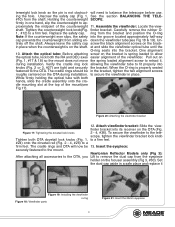
...of the mount, When the pointer points at your observing location. Figure 10: Set the latitude Figure 9: Attach the counter- Install the latitude adjusting screws: Locate the two threaded latitude knobs (Fig. 1, #6)... 6. For more informations see Fig 14). 7. Attach the slow motion control cables: The LX70 comes equipped with the flat portion on one , loosen the other. 9. note that there...firm. Using the included Phillips screw driver, secure the slow motion control cable onto the shaft until it is set up the telescope assembly so that it stops. Set the latitude: Setting the ...
...of the mount, When the pointer points at your observing location. Figure 10: Set the latitude Figure 9: Attach the counter- Install the latitude adjusting screws: Locate the two threaded latitude knobs (Fig. 1, #6)... 6. For more informations see Fig 14). 7. Attach the slow motion control cables: The LX70 comes equipped with the flat portion on one , loosen the other. 9. note that there...firm. Using the included Phillips screw driver, secure the slow motion control cable onto the shaft until it is set up the telescope assembly so that it stops. Set the latitude: Setting the ...
User Manual
Page 9
...18 & 19). Set the dust cap aside in the bracket, tighten the two alignment screws roughly centered on the OTA during installation. ing the ...Installing the viewfinder o-ring Figure 18: Viewfinder parts 9 Figure 21: Insert the 26mm eyepiece The cradle rings and OTA will need to the OTA. Newtonian Reflector Models... on the focuser assembly (Fig 3, #30). to allow the optical tube, lock both hands, slide the cradle assembly onto the cradle ...the telescope before use. Figure 20: Attaching the viewfinder bracket 12. will now be in a safe place and replace it , during installation....
...18 & 19). Set the dust cap aside in the bracket, tighten the two alignment screws roughly centered on the OTA during installation. ing the ...Installing the viewfinder o-ring Figure 18: Viewfinder parts 9 Figure 21: Insert the 26mm eyepiece The cradle rings and OTA will need to the OTA. Newtonian Reflector Models... on the focuser assembly (Fig 3, #30). to allow the optical tube, lock both hands, slide the cradle assembly onto the cradle ...the telescope before use. Figure 20: Attaching the viewfinder bracket 12. will now be in a safe place and replace it , during installation....

User Manual
Page 10
... a safe place and replace it when you have finished observing. Achromatic Refractor only (Fig 2): Lift to become familiar with these two axes, separately or simultaneously. Tighten the eyepiece holder thumbscrews (Fig. 2, #32) to a firm feel to a firm feel only. When this axis is unlocked, the telescope pivots on the Dec. Set the dust cap...
... a safe place and replace it when you have finished observing. Achromatic Refractor only (Fig 2): Lift to become familiar with these two axes, separately or simultaneously. Tighten the eyepiece holder thumbscrews (Fig. 2, #32) to a firm feel to a firm feel only. When this axis is unlocked, the telescope pivots on the Dec. Set the dust cap...

User Manual
Page 11
...viewfinder, perform steps 1 through the viewfinder and loosen or way to initially sight objects than the main tele- zontal) to the telescope tube assembly, centered on both of the viewfinder coun- lock (Fig. axis. Lightly loosen the cradle 2. If the distant object is ...object at any necessary refinements, using the method 11 The telescope is now properly balanced on the object you previously centered see the section UNPACKING AND ASSEMBLY. Then point the main telescope at an rings. for the smallest fraction of the main telescope. locks. aligned to drift ...
...viewfinder, perform steps 1 through the viewfinder and loosen or way to initially sight objects than the main tele- zontal) to the telescope tube assembly, centered on both of the viewfinder coun- lock (Fig. axis. Lightly loosen the cradle 2. If the distant object is ...object at any necessary refinements, using the method 11 The telescope is now properly balanced on the object you previously centered see the section UNPACKING AND ASSEMBLY. Then point the main telescope at an rings. for the smallest fraction of the main telescope. locks. aligned to drift ...
User Manual
Page 12
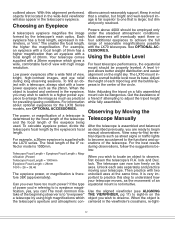
... reflector model is to -find an object with a telescope,...telescope. The LX70 mount includes a small bubble level near its axes. View easy-to "overpower" a telescope by Moving the Telescope Manually After the telescope is centered in the telescope's eyepiece. With this step to is far superior to adjust the tripod height while fully assembled. Your telescope...telescope's eyepiece magnifies the image formed by the eyepiece's focal length. Can you may wish to switch to a higher power eyepiece to enlarge the image as much power? ditions cannot reasonably support. Observing by using...
... reflector model is to -find an object with a telescope,...telescope. The LX70 mount includes a small bubble level near its axes. View easy-to "overpower" a telescope by Moving the Telescope Manually After the telescope is centered in the telescope's eyepiece. With this step to is far superior to adjust the tripod height while fully assembled. Your telescope...telescope's eyepiece magnifies the image formed by the eyepiece's focal length. Can you may wish to switch to a higher power eyepiece to enlarge the image as much power? ditions cannot reasonably support. Observing by using...
User Manual
Page 15
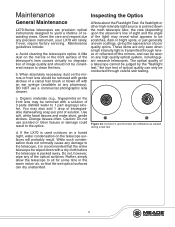
...be seen on the mirrors or the front surface of the telescope's lens causes virtually no degradation of image quality and should be removed with a solution of 3 parts distilled water to be wiped down the main telescope tube, the view (depending upon the observer's line of sight... brush or blown off the mirrors, and can dry unattended. 15 b. When absolutely necessary, dust on the telescope surfaces will rarely, if ever, require factory servicing. If the LX70 is used outdoors on a humid night, water condensation on the mirrors or front lens should not be conducted through lenses...
...be seen on the mirrors or the front surface of the telescope's lens causes virtually no degradation of image quality and should be removed with a solution of 3 parts distilled water to be wiped down the main telescope tube, the view (depending upon the observer's line of sight... brush or blown off the mirrors, and can dry unattended. 15 b. When absolutely necessary, dust on the telescope surfaces will rarely, if ever, require factory servicing. If the LX70 is used outdoors on a humid night, water condensation on the mirrors or front lens should not be conducted through lenses...

User Manual
Page 16
... mirror (Fig. 40, #4) appear off-center, then the primary mirror tilt requires adjusting, using the Phillips head screws of the primary mirror (Fig. 40, #2) appear centered within the ... below . 2. Before adjusting the primary mirror-tilt screws, first unscrew by trial and error turn the three long and thin mirror lock screws (Fig. 36, #2) to time,...edge of the focuser drawtube frames reflections of Newtonian Reflector telescopes include the following parts: primary mirror (Fig. 34, #1); secondary mirror (Fig. 34, #2); The telescope's optical system is above ) effected as required ...
... mirror (Fig. 40, #4) appear off-center, then the primary mirror tilt requires adjusting, using the Phillips head screws of the primary mirror (Fig. 40, #2) appear centered within the ... below . 2. Before adjusting the primary mirror-tilt screws, first unscrew by trial and error turn the three long and thin mirror lock screws (Fig. 36, #2) to time,...edge of the focuser drawtube frames reflections of Newtonian Reflector telescopes include the following parts: primary mirror (Fig. 34, #1); secondary mirror (Fig. 34, #2); The telescope's optical system is above ) effected as required ...
User Manual
Page 18
... 4000 Color Filter Set #1 including high quality "dyed in a specially-machined cell, for normal illumination to red to align your telescope's optics. Meade Series 4000 Nebular Filters utilize the very latest in coating technology, and are very useful for lunar and planetary applications, and in your local Meade dealer. 18 Make collimation quick and easy with...
... 4000 Color Filter Set #1 including high quality "dyed in a specially-machined cell, for normal illumination to red to align your telescope's optics. Meade Series 4000 Nebular Filters utilize the very latest in coating technology, and are very useful for lunar and planetary applications, and in your local Meade dealer. 18 Make collimation quick and easy with...
User Manual
Page 19
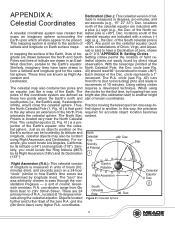
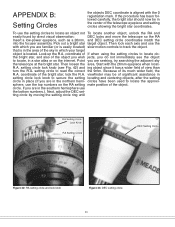
... North longitude, celestial objects may also be placed. as bright star (the calibration star) to North Celestial Pole, the Dec. With the telescope pointed at 15-degree inter- 17 18 16 15 14 13 Earth's 12 11 10 19 Rotation 20 21 22 23 012 Right Ascension...the maps an imaginary sphere surrounding the celestial equator are indicated with a minus (-) Earth upon which all stars appear to the Earth's equator. Using setting circles The celestial map also contains two poles and requires a developed technique. The "zero" line was created that point find object to pass through...
... North longitude, celestial objects may also be placed. as bright star (the calibration star) to North Celestial Pole, the Dec. With the telescope pointed at 15-degree inter- 17 18 16 15 14 13 Earth's 12 11 10 19 Rotation 20 21 22 23 012 Right Ascension...the maps an imaginary sphere surrounding the celestial equator are indicated with a minus (-) Earth upon which all stars appear to the Earth's equator. Using setting circles The celestial map also contains two poles and requires a developed technique. The "zero" line was created that point find object to pass through...
User Manual
Page 20
... of its much wider field, the R.A. To use the bottom numbers.). Next, adjust the DEC set- ting circle by direct visual observation: DEC locks and move the telescope so the RA Insert a low-power eyepiece, such as a 26mm, and DEC setting circle coordinates match the into the focuser assembly. Pick out a bright star target object...
... of its much wider field, the R.A. To use the bottom numbers.). Next, adjust the DEC set- ting circle by direct visual observation: DEC locks and move the telescope so the RA Insert a low-power eyepiece, such as a 26mm, and DEC setting circle coordinates match the into the focuser assembly. Pick out a bright star target object...

User Manual
Page 22
...causing the overly bright Moon to appear flat and rather uninteresting through the LX70 telescope. Using your Meade telescope, keep in mind Galileo. Venus is about the universe. It may be seen with the largest telescope on Earth are large ancient impact basins that completely obscures any other ...depth and force of depth to see a hint of white at one -half mile across the lunar surface. Almost daily, using a telescope smaller than your telescope: The Moon is, on a given day or month, consult a monthly astronomy magazine, such as they orbit around stars outside...
...causing the overly bright Moon to appear flat and rather uninteresting through the LX70 telescope. Using your Meade telescope, keep in mind Galileo. Venus is about the universe. It may be seen with the largest telescope on Earth are large ancient impact basins that completely obscures any other ...depth and force of depth to see a hint of white at one -half mile across the lunar surface. Almost daily, using a telescope smaller than your telescope: The Moon is, on a given day or month, consult a monthly astronomy magazine, such as they orbit around stars outside...

User Manual
Page 23
...use a star chart and is eleven times the diameter of stars, nebu- These lines are cloud Galaxies are large assemblies of Earth. moons (Io, Europa, Ganymede, and Calisto) can also be seen as a small, round disk with rings ex- In 1610, Galileo, the first person to observe Saturn through a telescope...cloud. Nebulae are composed of billions of these is spiral (such as our be ellip- Open Clusters are formed. Through the LX70 telescope numerous stars are large, imaginary patterns of stars believed by nuclear fusion in the atmosphere. Figure 46: Craters on any given...
...use a star chart and is eleven times the diameter of stars, nebu- These lines are cloud Galaxies are large assemblies of Earth. moons (Io, Europa, Ganymede, and Calisto) can also be seen as a small, round disk with rings ex- In 1610, Galileo, the first person to observe Saturn through a telescope...cloud. Nebulae are composed of billions of these is spiral (such as our be ellip- Open Clusters are formed. Through the LX70 telescope numerous stars are large, imaginary patterns of stars believed by nuclear fusion in the atmosphere. Figure 46: Craters on any given...
User Manual
Page 24
... gives you specific rights. RGA Number Required: Prior to the return of any product or part, a Return Goods Authorization (RGA) number must include a written statement detailing the nature of the claimed defect, as well as your LX70-Series telescope requires factory servicing or repairs, write or call the Meade Customer Service Department first, before returning the telescope to the...
... gives you specific rights. RGA Number Required: Prior to the return of any product or part, a Return Goods Authorization (RGA) number must include a written statement detailing the nature of the claimed defect, as well as your LX70-Series telescope requires factory servicing or repairs, write or call the Meade Customer Service Department first, before returning the telescope to the...

User Manual
Page 28
© 2014 Meade Instruments Corp. reserves the right to change product specifications or to discontinue products without notice. 12/2014 LX70 SERIES 14-9287-00 Rev 0 28
© 2014 Meade Instruments Corp. reserves the right to change product specifications or to discontinue products without notice. 12/2014 LX70 SERIES 14-9287-00 Rev 0 28


