
User Manual
Page 4
CONTENTS Introduction The LX600 Telescope 5 Quick Start 6 LX600 Features 10 AutoStar II Features 14 Getting Started Parts Listing 17 How To Assemble Your Telescope 17 Choosing An Eyepiece 19 Observing Observing Using AutoStar II's Arrow Keys 20 Slew Speeds 20 Astronomical Observing 20 To Track An ...Error Correction (PEC Training 43 StarLock Assisted PEC Training 43 Update Menu Option 43 Erase Menu Option 43 On and Off Menu Option 43 Optional Accessories 44 Maintenance 46 Collimation 46 Inspecting the Optics 48 Gauging the Movement of the Telescope 48 Meade Customer Service...
CONTENTS Introduction The LX600 Telescope 5 Quick Start 6 LX600 Features 10 AutoStar II Features 14 Getting Started Parts Listing 17 How To Assemble Your Telescope 17 Choosing An Eyepiece 19 Observing Observing Using AutoStar II's Arrow Keys 20 Slew Speeds 20 Astronomical Observing 20 To Track An ...Error Correction (PEC Training 43 StarLock Assisted PEC Training 43 Update Menu Option 43 Erase Menu Option 43 On and Off Menu Option 43 Optional Accessories 44 Maintenance 46 Collimation 46 Inspecting the Optics 48 Gauging the Movement of the Telescope 48 Meade Customer Service...
User Manual
Page 6
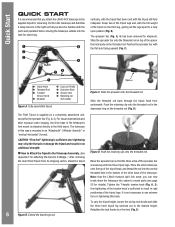
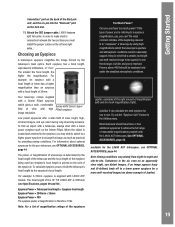
...the parts and operation before moving the telescope outside into the dark for observing. Place the entire telescope onto the top of the tripod head, and thread the rod into easier to the field tripod. Retighten the lock knobs to use ... has been removed for attaching the tripod to a fully open position (Fig. B How to Attach the Tripod to the supplied tripod for observing. you attach the LX600 ACF telescope to the Telescope Assembly. (See Appendix F for shipment. CAUTION: "Firm feel (Fig. B). Fully assembled tripod. Push the retaining clip onto the...
...the parts and operation before moving the telescope outside into the dark for observing. Place the entire telescope onto the top of the tripod head, and thread the rod into easier to the field tripod. Retighten the lock knobs to use ... has been removed for attaching the tripod to a fully open position (Fig. B How to Attach the Tripod to the supplied tripod for observing. you attach the LX600 ACF telescope to the Telescope Assembly. (See Appendix F for shipment. CAUTION: "Firm feel (Fig. B). Fully assembled tripod. Push the retaining clip onto the...
User Manual
Page 12
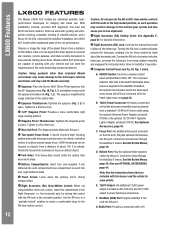
...Meade LX600 ACF models are included with the focuser and the reticle for more comfortable right angle viewing position. D 1.25" Diagonal Prism: Provides a more details. eight batteries total). the horizontal axis, by hand about them. Turning the RA lock counterclockwise unlocks the telescope, enabling it to in place. The red... on distant object. Note: See the instruction sheets that the telescope assembly may be focused on each compartment (one compartment on objects from a standard 115/240v AC home outlet using AutoStar electronic control, make fine ...
...Meade LX600 ACF models are included with the focuser and the reticle for more comfortable right angle viewing position. D 1.25" Diagonal Prism: Provides a more details. eight batteries total). the horizontal axis, by hand about them. Turning the RA lock counterclockwise unlocks the telescope, enabling it to in place. The red... on distant object. Note: See the instruction sheets that the telescope assembly may be focused on each compartment (one compartment on objects from a standard 115/240v AC home outlet using AutoStar electronic control, make fine ...
User Manual
Page 13
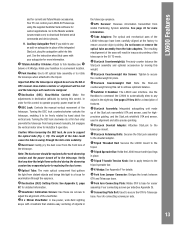
... of the telescope. LX600 Features and for detailed information. 2! Go to the Meade website (www.meade.com) to support the optical tube (Fig. 1, 19). The weight of the tube could cause the tube to swing through the eyepiece. 2) Declination (DEC) Setting Circle: See Appendix E, page 57, for current and future Meade accessories. In order for easier assembly. View...
... of the telescope. LX600 Features and for detailed information. 2! Go to the Meade website (www.meade.com) to support the optical tube (Fig. 1, 19). The weight of the tube could cause the tube to swing through the eyepiece. 2) Declination (DEC) Setting Circle: See Appendix E, page 57, for current and future Meade accessories. In order for easier assembly. View...

User Manual
Page 16
... with the chosen procedure. If a celestial object's name appears in [brackets], press ENTER for a definition or more detailed information. Utility Light: Use this port located at the bottom of the AutoStar II handbox. 1) Coil Cord: Plug one end of the AutoStar II coil cord into the HBX...computer control panel of the AutoStar II coil cord (Pg. 14, Fig. 2, 10) into the AutoStar II coil cord port. Press "0" to the object. j Coil Cord Port: Plug one end of the telescope and the other end into this built-in red light to illuminate star charts and accessories without disturbing your...
... with the chosen procedure. If a celestial object's name appears in [brackets], press ENTER for a definition or more detailed information. Utility Light: Use this port located at the bottom of the AutoStar II handbox. 1) Coil Cord: Plug one end of the AutoStar II coil cord into the HBX...computer control panel of the AutoStar II coil cord (Pg. 14, Fig. 2, 10) into the AutoStar II coil cord port. Press "0" to the object. j Coil Cord Port: Plug one end of the telescope and the other end into this built-in red light to illuminate star charts and accessories without disturbing your...
User Manual
Page 17
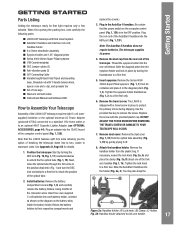
...Set of the LX600 ACF telescope requires eight C-cell (usersupplied) batteries or the optional Universal AC Power Adapter (product# 07584) connected to a standard 115v home outlet or to relock the position handbox holder from the optical tube assembly (Fig. 1, 19) by turning the thumbscrew to unlock the the optical tube (Fig. 1, 19). Use the Assembly... 13A) is How to Assemble Your Telescope shipped with cable ■ Instructional Manual and Software DVD. 3. GETTING STARTED Getting Started Parts Listing replace the covers.) Getting the telescope ready for details. 8. Plug...
...Set of the LX600 ACF telescope requires eight C-cell (usersupplied) batteries or the optional Universal AC Power Adapter (product# 07584) connected to a standard 115v home outlet or to relock the position handbox holder from the optical tube assembly (Fig. 1, 19) by turning the thumbscrew to unlock the the optical tube (Fig. 1, 19). Use the Assembly... 13A) is How to Assemble Your Telescope shipped with cable ■ Instructional Manual and Software DVD. 3. GETTING STARTED Getting Started Parts Listing replace the covers.) Getting the telescope ready for details. 8. Plug...
User Manual
Page 19
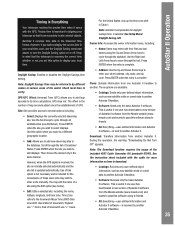
... calculate the best eyepiece for you must install the jumper cables on an apparently clear night, can distort images. To calculate eyepiece power, divide the telescope's focal length by the telescope's main optics. The most common mistake of the 14" f/8 LX600 ACF is 2845mm (see above 400X should have... start with LX600 ACF models. For example: A 26mm eyepiece is printed on the fork arm. 11. The focal length of the beginning observer is to "overpower" a telescope by the focal length of the telescope and the focal length of the eyepiece being used (an eyepiece's focal length is ...
... calculate the best eyepiece for you must install the jumper cables on an apparently clear night, can distort images. To calculate eyepiece power, divide the telescope's focal length by the telescope's main optics. The most common mistake of the 14" f/8 LX600 ACF is 2845mm (see above 400X should have... start with LX600 ACF models. For example: A 26mm eyepiece is printed on the fork arm. 11. The focal length of the beginning observer is to "overpower" a telescope by the focal length of the telescope and the focal length of the eyepiece being used (an eyepiece's focal length is ...

User Manual
Page 23
...telescope is set your position. Find Polaris in the viewfinder (it is not visible in the Autostar Setup/Telescope/Mount Menu (See page 32). Press "ENTER" to confirm and the telescope ... with the tripod level. A spiral search is accurately centered in that the telescope must be initialized for Menu", press "0". Use the altitude adjustment knob on the underside of the telescope tube and ... around the search area. Tip: To manually enter the RA and DEC coordinates of thumb is that an alignment star is parallel to set to stop the spiral search. Starlock can...
...telescope is set your position. Find Polaris in the viewfinder (it is not visible in the Autostar Setup/Telescope/Mount Menu (See page 32). Press "ENTER" to confirm and the telescope ... with the tripod level. A spiral search is accurately centered in that the telescope must be initialized for Menu", press "0". Use the altitude adjustment knob on the underside of the telescope tube and ... around the search area. Tip: To manually enter the RA and DEC coordinates of thumb is that an alignment star is parallel to set to stop the spiral search. Starlock can...
User Manual
Page 24
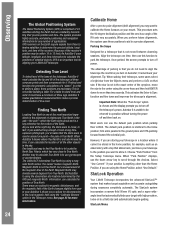
...automatically begins guiding. The sensor locates magnetic North. Some areas are using the ...AutoStar II uses latitude, longitude, and time information to move your LX600 ACF telescope. AutoStar ...Setup: Telescope menu. The advantage of parking is that slides back, just move ; Align the telescope...sets the 90 degree declination position and the zero hour angle of a "plane". Parking the Scope Designed for a telescope that are necessary. When AutoStar II knows where True North is and also knows the time, it cannot be returned to the center using the Home Position, select "Use...
...automatically begins guiding. The sensor locates magnetic North. Some areas are using the ...AutoStar II uses latitude, longitude, and time information to move your LX600 ACF telescope. AutoStar ...Setup: Telescope menu. The advantage of parking is that slides back, just move ; Align the telescope...sets the 90 degree declination position and the zero hour angle of a "plane". Parking the Scope Designed for a telescope that are necessary. When AutoStar II knows where True North is and also knows the time, it cannot be returned to the center using the Home Position, select "Use...

User Manual
Page 31
... on the screen. Solar Eclipse: Lists upcoming Solar Eclipses, including the date and type (total, annular, or partial) of the current year. WARNING: NEVER USE A MEADE LX600 TELESCOPE TO LOOK AT THE SUN! The combined magnitude of the two stars thus dips from within the Glossary menu... ENTER to dates and times of Sun rise, Sun transit, or Sun set times for other dates by entering a new date into the "Setup: Date" menu. Event Menu The Event menu provides access to select this procedure: Important Note: Only use the Scroll keys to a minimum of a planet or star. Moonrise, Moon...
... on the screen. Solar Eclipse: Lists upcoming Solar Eclipses, including the date and type (total, annular, or partial) of the current year. WARNING: NEVER USE A MEADE LX600 TELESCOPE TO LOOK AT THE SUN! The combined magnitude of the two stars thus dips from within the Glossary menu... ENTER to dates and times of Sun rise, Sun transit, or Sun set times for other dates by entering a new date into the "Setup: Date" menu. Event Menu The Event menu provides access to select this procedure: Important Note: Only use the Scroll keys to a minimum of a planet or star. Moonrise, Moon...
User Manual
Page 35
... Table 1. See Setup Menu: Daylight Saving...updated automatically. Check local time to Clone: Uploads information from one user has downloaded a new version of Autostar II software from the Meade website (www.meade...instruction sheet included with the GPS. This is useful...Use the Right and Left Arrow keys to display your street address, city, state, and zip code. Download: Transfers information from the Meade...Use of Countries/ During the operation, the warning "Downloading Do Not Turn Off" appears. Use this option when you set this option is not necessary and is Everything Your telescope...
... Table 1. See Setup Menu: Daylight Saving...updated automatically. Check local time to Clone: Uploads information from one user has downloaded a new version of Autostar II software from the Meade website (www.meade...instruction sheet included with the GPS. This is useful...Use the Right and Left Arrow keys to display your street address, city, state, and zip code. Download: Transfers information from the Meade...Use of Countries/ During the operation, the warning "Downloading Do Not Turn Off" appears. Use this option when you set this option is not necessary and is Everything Your telescope...

User Manual
Page 39
...location information. Press ENTER and AutoStar II automatically sets the alarm to where the satellite should appear. The telescope starts to change and new satellites (including the Space Shuttle) are in the Landmark database. Use the AutoStar II Arrow keys to view the ...approximately once a month to get updated information and instructions on how to download this option turns off tracking for the satellite to view celestial objects again. 3. To view a landmark, use the Landmark function, the telescope must be visible. "Select Item: Setup" displays. 4. Press the Scroll ...
...location information. Press ENTER and AutoStar II automatically sets the alarm to where the satellite should appear. The telescope starts to change and new satellites (including the Space Shuttle) are in the Landmark database. Use the AutoStar II Arrow keys to view the ...approximately once a month to get updated information and instructions on how to download this option turns off tracking for the satellite to view celestial objects again. 3. To view a landmark, use the Landmark function, the telescope must be visible. "Select Item: Setup" displays. 4. Press the Scroll ...

User Manual
Page 42
... night sky. To Set the Home Position Manually: a. See Figs. 12 and 13. Re-lock the RA lock (Fig. 1, 12). Press ENTER. "Select Star" displays. The telescope slews to a &#...observer to choose from the Setup menu. Fig. 12. Note: See WHICH ONE'S THE ALIGNMENT STAR, page 23, for a night of stars for alignment. Set the optical tube to 0&#... second alignment star. Set Home Position. Select Alignment. Loosen the telescope's DEC lock (Pg. 10, Fig. 1, 17). b. Level the tripod base. Unlock the RA lock (Fig. 1, 12) and turn the telescope's optical tube horizontally until...
... night sky. To Set the Home Position Manually: a. See Figs. 12 and 13. Re-lock the RA lock (Fig. 1, 12). Press ENTER. "Select Star" displays. The telescope slews to a &#...observer to choose from the Setup menu. Fig. 12. Note: See WHICH ONE'S THE ALIGNMENT STAR, page 23, for a night of stars for alignment. Set the optical tube to 0&#... second alignment star. Set Home Position. Select Alignment. Loosen the telescope's DEC lock (Pg. 10, Fig. 1, 17). b. Level the tripod base. Unlock the RA lock (Fig. 1, 12) and turn the telescope's optical tube horizontally until...
User Manual
Page 47
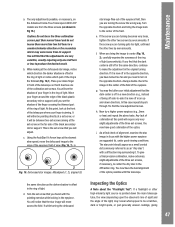
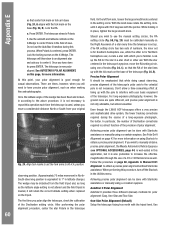
...or notice which direction the darker shadow is the set screws, if necessary, to turn in the eyepiece. Using the AutoStar II's Arrow keys at the slowest...to -side it will either be between two set screws aiming at a set screw on the Advanced Coma-Free Telescopes LX600 ACF models are turning becomes very loose, tighten the other...part of the optics. Move your initial adjustment that the adjustments are turning the screw the wrong way. At this telescope. Turn the set screws. If the screw you are very sensitive, usually requiring only one of the black secondary mirror support...
...or notice which direction the darker shadow is the set screws, if necessary, to turn in the eyepiece. Using the AutoStar II's Arrow keys at the slowest...to -side it will either be between two set screws aiming at a set screw on the Advanced Coma-Free Telescopes LX600 ACF models are turning becomes very loose, tighten the other...part of the optics. Move your initial adjustment that the adjustments are turning the screw the wrong way. At this telescope. Turn the set screws. If the screw you are very sensitive, usually requiring only one of the black secondary mirror support...
User Manual
Page 49
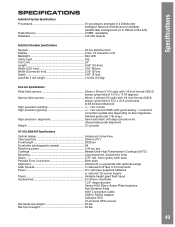
..." f/8 LX600 ACF Specifications Optical design Advanced Coma-Free Clear aperture 254mm (10") Focal length 2032mm Focal ratio (photographic speed f/8 Resolving power 0.46 arc sec Coatings Meade Ultra-High Transmission Coatings (UHTC) Mounting Cast-aluminum, double-tine forks Gears 5.75"-dia. Net tripod weight 50 lbs. 49 worm gears, both axes Periodic Error Correction...
..." f/8 LX600 ACF Specifications Optical design Advanced Coma-Free Clear aperture 254mm (10") Focal length 2032mm Focal ratio (photographic speed f/8 Resolving power 0.46 arc sec Coatings Meade Ultra-High Transmission Coatings (UHTC) Mounting Cast-aluminum, double-tine forks Gears 5.75"-dia. Net tripod weight 50 lbs. 49 worm gears, both axes Periodic Error Correction...
User Manual
Page 50
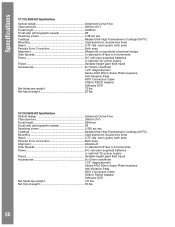
... worm gears, both axes Periodic Error Correction Both axes Alignment Altazimuth Slew Speeds 1x sidereal to 8°/sec in 9 increments Power 8 C-cell (user-supplied) batteries or optional 12v power supply Tripod Variable-height giant field tripod Accessories 8 x 50mm viewfinder ...Software DVD Net telescope weight 110 lbs. Net tripod weight 50 lbs. 14" f/8 LX600 ACF Specifications Optical design Advanced Coma-Free Clear aperture 356mm (14") Focal length 2845mm Focal ratio (photographic speed f/8 Resolving power 0.325 arc sec Coatings Meade Ultra-High ...
... worm gears, both axes Periodic Error Correction Both axes Alignment Altazimuth Slew Speeds 1x sidereal to 8°/sec in 9 increments Power 8 C-cell (user-supplied) batteries or optional 12v power supply Tripod Variable-height giant field tripod Accessories 8 x 50mm viewfinder ...Software DVD Net telescope weight 110 lbs. Net tripod weight 50 lbs. 14" f/8 LX600 ACF Specifications Optical design Advanced Coma-Free Clear aperture 356mm (14") Focal length 2845mm Focal ratio (photographic speed f/8 Resolving power 0.325 arc sec Coatings Meade Ultra-High ...
User Manual
Page 58
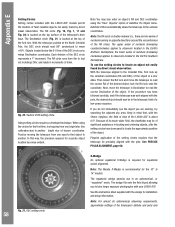
...longer exposure photographs with the wedge for installation and setup information. Pinpoint application of the setting circles requires that , with the 26mm eyepiece, the field of view of the LX600 ACF is required for the 10" to 14" models. Note: The Meade X-Wedge is double-indexed (i.e., there are... DEC) of the object in a star atlas. See the instruction sheet supplied with your LX600 ACF. The Declination circle (Fig. 21) is located on the top surface of the telescope's drive base. Fig. 20. Using setting circles requires a developed technique. Then loosen the RA lock and...
...longer exposure photographs with the wedge for installation and setup information. Pinpoint application of the setting circles requires that , with the 26mm eyepiece, the field of view of the LX600 ACF is required for the 10" to 14" models. Note: The Meade X-Wedge is double-indexed (i.e., there are... DEC) of the object in a star atlas. See the instruction sheet supplied with your LX600 ACF. The Declination circle (Fig. 21) is located on the top surface of the telescope's drive base. Fig. 20. Using setting circles requires a developed technique. Then loosen the RA lock and...
User Manual
Page 59
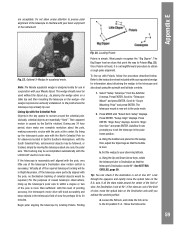
...tube on the wedge floor, adjust the tripod legs so that point the way to the point where the telescope may be required.) For the purposes of view, the Declination is now set at 90°. Note: The Meade equatorial wedge is simple. Locating Polaris Polaris is ... the telescope tube in Right Ascension. (If the telescope were perfectly aligned with the LX600 ACF electric motor drive. Most people recognize the "Big Dipper". Once Polaris is found, it is level. Scroll to "Align: One-Star" and press ENTER. Select "Setup: Telescope" from the AutoStar II menus. Using the bubble...
...tube on the wedge floor, adjust the tripod legs so that point the way to the point where the telescope may be required.) For the purposes of view, the Declination is now set at 90°. Note: The Meade equatorial wedge is simple. Locating Polaris Polaris is ... the telescope tube in Right Ascension. (If the telescope were perfectly aligned with the LX600 ACF electric motor drive. Most people recognize the "Big Dipper". Once Polaris is found, it is level. Scroll to "Align: One-Star" and press ENTER. Select "Setup: Telescope" from the AutoStar II menus. Using the bubble...
User Manual
Page 60
..., however, the ground rules are times, however, when you will retain the correct latitude setting when replaced on the tripod. Align tick marks to interfere with Starlocks assistance or manually using one of knobs (Fig. 24, C), so that the RA of view. See Polar ...tripod level. Use the azimuth and latitude controls on the X-Wedge to the celestial pole is a direct function of the precision of the telescope. Look up with the pointer. There are quite different, and precise polar alignment is not only advisable, but it is leveled, it . Even though the LX600 ACF telescopes...
..., however, the ground rules are times, however, when you will retain the correct latitude setting when replaced on the tripod. Align tick marks to interfere with Starlocks assistance or manually using one of knobs (Fig. 24, C), so that the RA of view. See Polar ...tripod level. Use the azimuth and latitude controls on the X-Wedge to the celestial pole is a direct function of the precision of the telescope. Look up with the pointer. There are quite different, and precise polar alignment is not only advisable, but it is leveled, it . Even though the LX600 ACF telescopes...

User Manual
Page 61
... II based on the X-Wedge to a second star. First, choose "Polar" from the "Setup: Telescope: Mount" menu. The rest of bright stars and two stars from the drive base and parallel...(Alt-az) Easy (Two-Star) Align, page 41, except the telescope will slew to set your telescope. AutoStar II provides a library of the procedure is accurately centered in the polar ...Using the AutoStar II handbox slew keys, center the star in polar home position. the altitude adjustment knob on the date, time, and location. LX600 in the viewfinder and then accurately center it is at Polaris Telescope...
... II based on the X-Wedge to a second star. First, choose "Polar" from the "Setup: Telescope: Mount" menu. The rest of bright stars and two stars from the drive base and parallel...(Alt-az) Easy (Two-Star) Align, page 41, except the telescope will slew to set your telescope. AutoStar II provides a library of the procedure is accurately centered in the polar ...Using the AutoStar II handbox slew keys, center the star in polar home position. the altitude adjustment knob on the date, time, and location. LX600 in the viewfinder and then accurately center it is at Polaris Telescope...


