

User Guide
Page 1
... to this equipment if an unauthorized change or modification is intended to alert the user to persons. DANGEROUS VOLTAGE: The lightning flash with arrowhead symbol within an equilateral triangle is intended to alert the user to the presence of important operating and maintenance (servicing) instructions in the instruction manual. ATTENTION: POUR ÉVITER LES CHOC...
... to this equipment if an unauthorized change or modification is intended to alert the user to persons. DANGEROUS VOLTAGE: The lightning flash with arrowhead symbol within an equilateral triangle is intended to alert the user to the presence of important operating and maintenance (servicing) instructions in the instruction manual. ATTENTION: POUR ÉVITER LES CHOC...

User Guide
Page 2
... Connect the equipment into an outlet on , the user is connected. • Consult the dealer or an experienced radio/TV technician for help. Lightning and power surges ARE NOT covered under warranty for AC connection....installation. Cet appareil numérique de la classe B est conforme à la norme NMB-003 du Canada. 2 This Class B digital apparatus complies with Class B digital device regulations. This equipment generates, uses and can be determined by turning the equipment off and on a circuit different from that interference will not occur in accordance with the instructions...
... Connect the equipment into an outlet on , the user is connected. • Consult the dealer or an experienced radio/TV technician for help. Lightning and power surges ARE NOT covered under warranty for AC connection....installation. Cet appareil numérique de la classe B est conforme à la norme NMB-003 du Canada. 2 This Class B digital apparatus complies with Class B digital device regulations. This equipment generates, uses and can be determined by turning the equipment off and on a circuit different from that interference will not occur in accordance with the instructions...

User Guide
Page 3
...: Selecting fine audio and video equipment such as the unit you've just purchased is only the start of sound. Over time your protection. Taking a minute to do this now will provide a lifetime of sound levels is too late, this by playing it 's time to your sensitive hearing. Since hearing damage from traffic 50 Light traffic, normal...
...: Selecting fine audio and video equipment such as the unit you've just purchased is only the start of sound. Over time your protection. Taking a minute to do this now will provide a lifetime of sound levels is too late, this by playing it 's time to your sensitive hearing. Since hearing damage from traffic 50 Light traffic, normal...

User Guide
Page 4
... Unit) 4. Screen 2. Remote Sensor 3. SD/MMC/MS/xD Card Slot (Side of Unit) 17. Wall Mount Hole 9. Navigation ®/ VOLUME + Button 12. Stand 10. EXIT/CANCEL Button 16. USB Jack (Side of Unit) 14. LOCATION OF CONTROLS MAIN UNIT 3 1 4 2 5 6 11 12 7 13 8 9 14 15 16 10 17 18 1. Navigation √/ VOLUME - Navigation † Button 6. Button 13. Power Button (Side of Unit) (USB CABLE PART NO...
... Unit) 4. Screen 2. Remote Sensor 3. SD/MMC/MS/xD Card Slot (Side of Unit) 17. Wall Mount Hole 9. Navigation ®/ VOLUME + Button 12. Stand 10. EXIT/CANCEL Button 16. USB Jack (Side of Unit) 14. LOCATION OF CONTROLS MAIN UNIT 3 1 4 2 5 6 11 12 7 13 8 9 14 15 16 10 17 18 1. Navigation √/ VOLUME - Navigation † Button 6. Button 13. Power Button (Side of Unit) (USB CABLE PART NO...

User Guide
Page 6
...). Replace the Battery Compartment. Warning-Danger of batteries specified. 3. Use only the size and type of explosion if batteries are incorrectly replaced. Replace only with the same or equivalent type. 2. If the device is not to prevent damage or injury from possible battery leakage. 5. Remove the Battery Compartment by pressing in use the supplied AC adapter which has the following specs: DC 12V Z REMOTE BATTERY INSTALLATION 1. Do...
...). Replace the Battery Compartment. Warning-Danger of batteries specified. 3. Use only the size and type of explosion if batteries are incorrectly replaced. Replace only with the same or equivalent type. 2. If the device is not to prevent damage or injury from possible battery leakage. 5. Remove the Battery Compartment by pressing in use the supplied AC adapter which has the following specs: DC 12V Z REMOTE BATTERY INSTALLATION 1. Do...

User Guide
Page 7
... desired, the digital frame can be disconnected when a plug is inserted into this jack. Simply hang using the Wall Mount holes, as you gently pull the stand back a little further to ensure that the frame is in position. When viewing photos vertically, it is stable. 7 STAND (REAR OF UNIT) To use the stand, lift the stand up and then rotate counterclockwise until...
... desired, the digital frame can be disconnected when a plug is inserted into this jack. Simply hang using the Wall Mount holes, as you gently pull the stand back a little further to ensure that the frame is in position. When viewing photos vertically, it is stable. 7 STAND (REAR OF UNIT) To use the stand, lift the stand up and then rotate counterclockwise until...

User Guide
Page 8
... unit (as described below. GETTING STARTED USING A MEMORY CARD You can support SD (Secure Digital), MMC (MultiMedia Card), MS (Memory Stick), xD or CF (CompactFlash) memory cards. You may not appear in the same manner, but using the bottom Card Slot. 2 TO REMOVE A MEMORY CARD: Press the Power button to the Off (out) position to turn it off , remove the memory card by pulling it from an external memory card as shown). With the...
... unit (as described below. GETTING STARTED USING A MEMORY CARD You can support SD (Secure Digital), MMC (MultiMedia Card), MS (Memory Stick), xD or CF (CompactFlash) memory cards. You may not appear in the same manner, but using the bottom Card Slot. 2 TO REMOVE A MEMORY CARD: Press the Power button to the Off (out) position to turn it off , remove the memory card by pulling it from an external memory card as shown). With the...
User Guide
Page 9
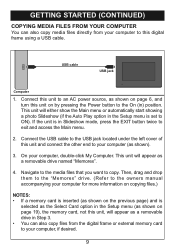
... as a removable drive in Step 3. • You can also copy files from the digital frame or external memory card to your computer, if desired. 9 On your computer (as shown on page 19), the memory card, not this digital frame using a USB cable. This unit will appear as a removable drive named "Memorex". 4. This unit will either show the Main menu or automatically start showing a photo Slideshow (if the Auto Play option in Slideshow mode, press the EXIT button twice...
... as a removable drive in Step 3. • You can also copy files from the digital frame or external memory card to your computer, if desired. 9 On your computer (as shown on page 19), the memory card, not this digital frame using a USB cable. This unit will appear as a removable drive named "Memorex". 4. This unit will either show the Main menu or automatically start showing a photo Slideshow (if the Auto Play option in Slideshow mode, press the EXIT button twice...

User Guide
Page 10
.../PLAY button 1 to ON). Repeat to set to start (if the Auto Play option in the Setup menu is set the month, day and year. Press the Navigation ® button 2 to the Main menu, press the EXIT button. 11 10 This unit will automatically appear after one minute of inactivity. To save your setting press ENTER/ PLAY button 1, then press EXIT button 3 return to turn the unit on. OPERATION SETTING THE TIME...
.../PLAY button 1 to ON). Repeat to set to start (if the Auto Play option in the Setup menu is set the month, day and year. Press the Navigation ® button 2 to the Main menu, press the EXIT button. 11 10 This unit will automatically appear after one minute of inactivity. To save your setting press ENTER/ PLAY button 1, then press EXIT button 3 return to turn the unit on. OPERATION SETTING THE TIME...

User Guide
Page 11
OPERATION (Continued) BASIC PHOTO PLAYBACK (Supported format: JPEG) 1 21 2 3 Press the Power button to the On (in Slideshow mode, press the EXIT button twice to view using the Navigation buttons 1; Select the desired photo, or page of all photos from the selected media source. then press the ENTER/PLAY button 2 again to turn the unit on. This unit will ei1ther sh1ow the Main menu or automatically start showing a photo Slideshow (if the Auto Play option...
OPERATION (Continued) BASIC PHOTO PLAYBACK (Supported format: JPEG) 1 21 2 3 Press the Power button to the On (in Slideshow mode, press the EXIT button twice to view using the Navigation buttons 1; Select the desired photo, or page of all photos from the selected media source. then press the ENTER/PLAY button 2 again to turn the unit on. This unit will ei1ther sh1ow the Main menu or automatically start showing a photo Slideshow (if the Auto Play option...

User Guide
Page 12
... x2. To exit Zoom mode and return to x13. Use the Navigation buttons 2 to zoom back out of the photo. Repeat to continue to rotate as desired. 11 While viewing a photo (see the previous page), press the ROTATE button to the previous or next picture. 12 Press the ZOOM OUT button 3 to move the photo on the screen. ZOOM 1 OPERATION (Continued) ROTATE 2 2 1 4 3 While viewing a photo (see the previous...
... x2. To exit Zoom mode and return to x13. Use the Navigation buttons 2 to zoom back out of the photo. Repeat to continue to rotate as desired. 11 While viewing a photo (see the previous page), press the ROTATE button to the previous or next picture. 12 Press the ZOOM OUT button 3 to move the photo on the screen. ZOOM 1 OPERATION (Continued) ROTATE 2 2 1 4 3 While viewing a photo (see the previous...

User Guide
Page 13
...; OPERATION (Continued) PHOTO "FAVORITES" PLAYBACK 1 1 2 2 3 2 While in Photo Thumbnail view (see page 11), select a photo to add to your Favorites in Landscape or Portrait mode. To change the favorite's view (Single photo or Double photos) on the screen, select Play Mode using the Navigation buttons 2; then press the OK button 3 again to view your Favorites using the Navigation √, ® buttons; Then, press the Navigation buttons 2 to exit the Favorites menu. Select...
...; OPERATION (Continued) PHOTO "FAVORITES" PLAYBACK 1 1 2 2 3 2 While in Photo Thumbnail view (see page 11), select a photo to add to your Favorites in Landscape or Portrait mode. To change the favorite's view (Single photo or Double photos) on the screen, select Play Mode using the Navigation buttons 2; then press the OK button 3 again to view your Favorites using the Navigation √, ® buttons; Then, press the Navigation buttons 2 to exit the Favorites menu. Select...
User Guide
Page 14
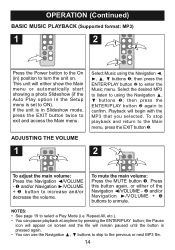
..., or either show the Main menu or au1tomat1ically start showing a photo Slideshow (if the Auto Play option in the Setup menu is in ) position to turn the unit on screen and the file will begin with the MP3 that you selected. Select the desired MP3 to listen to using the Navigation buttons 1; Select Music using the Navigation π, † buttons 1; ADJUSTING THE VOLUME 1 1 2 2 1 2 3 To adjust the...
..., or either show the Main menu or au1tomat1ically start showing a photo Slideshow (if the Auto Play option in the Setup menu is in ) position to turn the unit on screen and the file will begin with the MP3 that you selected. Select the desired MP3 to listen to using the Navigation buttons 1; Select Music using the Navigation π, † buttons 1; ADJUSTING THE VOLUME 1 1 2 2 1 2 3 To adjust the...
User Guide
Page 15
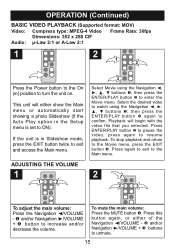
... stop playback and return to watch using the Navigation buttons 1; Select the desired video to the Movie menu, press the EXIT button 3. To mute the main volume: Press the MUTE button 1. OPERATION (Continued) BASIC VIDEO PLAYBACK (Supported format: MOV) Video: Compress type: MPEG-4 Video Frame Rate: 30fps Dimensions: 352 x 288 CIF Audio: µ-Law 2:1 or A-Law 2:1 1 2 1 2 Press the Power button to the On (in Slideshow mode, press the EXIT button...
... stop playback and return to watch using the Navigation buttons 1; Select the desired video to the Movie menu, press the EXIT button 3. To mute the main volume: Press the MUTE button 1. OPERATION (Continued) BASIC VIDEO PLAYBACK (Supported format: MOV) Video: Compress type: MPEG-4 Video Frame Rate: 30fps Dimensions: 352 x 288 CIF Audio: µ-Law 2:1 or A-Law 2:1 1 2 1 2 Press the Power button to the On (in Slideshow mode, press the EXIT button...
User Guide
Page 16
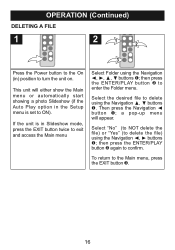
... menu or automatically start showing a photo Slideshow (if the Auto Play option in ) position to turn the unit on. OPERATION (Continued) DELETING A FILE 1 2 1 2 3 Press the Power button to the On (in the Setup menu is in Slideshow mode, press the EXIT button twice to the Main menu, press the EXIT button 3. 16 To return to exit and access the Main menu Select Folder using the Navigation √, ® buttons 1; If the unit is set...
... menu or automatically start showing a photo Slideshow (if the Auto Play option in ) position to turn the unit on. OPERATION (Continued) DELETING A FILE 1 2 1 2 3 Press the Power button to the On (in the Setup menu is in Slideshow mode, press the EXIT button twice to the Main menu, press the EXIT button 3. 16 To return to exit and access the Main menu Select Folder using the Navigation √, ® buttons 1; If the unit is set...

User Guide
Page 17
... to replace the existing file?" This unit will ei1ther sh1ow the Main menu or automatically start showing a photo Slideshow (if the Auto Play option in the Setup menu is in ) position to turn the unit on the target media, a "Would you have selected a folder, pressing the Navigation ® button will enter the directory and pressing the Navigation √ button will exit the directory. • Copying or deleting a file...
... to replace the existing file?" This unit will ei1ther sh1ow the Main menu or automatically start showing a photo Slideshow (if the Auto Play option in the Setup menu is in ) position to turn the unit on the target media, a "Would you have selected a folder, pressing the Navigation ® button will enter the directory and pressing the Navigation √ button will exit the directory. • Copying or deleting a file...
User Guide
Page 18
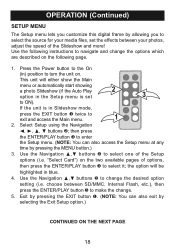
... MENU button.) 3. Select Setup using the Navigation buttons 2; choose between SD/MMC, Internal Flash, etc.), then press the ENTER/PLAY button 3 to select the source for your photos, adjust the speed of the Setup options (i.e. the option will either show the Main menu or automatically start showing a photo Slideshow (if the Auto Play 2 option in blue. 4. OPERATION (Continued) SETUP MENU The Setup menu lets you customize this digital frame by allowing you to make the change. 5. Use...
... MENU button.) 3. Select Setup using the Navigation buttons 2; choose between SD/MMC, Internal Flash, etc.), then press the ENTER/PLAY button 3 to select the source for your photos, adjust the speed of the Setup options (i.e. the option will either show the Main menu or automatically start showing a photo Slideshow (if the Auto Play 2 option in blue. 4. OPERATION (Continued) SETUP MENU The Setup menu lets you customize this digital frame by allowing you to make the change. 5. Use...

User Guide
Page 19
... which the photos will be displayed. Time Mode: Use this Setup option to set Background Music to ON or OFF. OPERATION (Continued) SETUP OPTIONS Select Card: Use this Setup option to choose whether your frame will automatically start showing a photo Slideshow after being turned on this unit. Choose from Internal Flash, as well as normal music playback (see page 14). Auto Play: Use this Setup option to select the source for your frame will display the photo with...
... which the photos will be displayed. Time Mode: Use this Setup option to set Background Music to ON or OFF. OPERATION (Continued) SETUP OPTIONS Select Card: Use this Setup option to choose whether your frame will automatically start showing a photo Slideshow after being turned on this unit. Choose from Internal Flash, as well as normal music playback (see page 14). Auto Play: Use this Setup option to select the source for your frame will display the photo with...
User Guide
Page 20
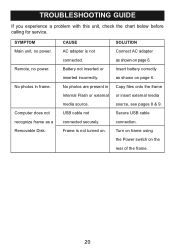
... photos in Internal Flash or external media source. Frame is not connected. Turn on frame using the Power switch on page 6. No photos are present in frame. Remote, no power. Copy files onto the frame or insert external media source, see pages 8 & 9. Computer does not recognize frame as shown on . SYMPTOM Main unit, no power. SOLUTION Connect AC adapter as a Removable Disk. Secure USB cable connection. Insert battery correctly as shown on the rear of the frame. 20 USB cable not connected securely. Battery...
... photos in Internal Flash or external media source. Frame is not connected. Turn on frame using the Power switch on page 6. No photos are present in frame. Remote, no power. Copy files onto the frame or insert external media source, see pages 8 & 9. Computer does not recognize frame as shown on . SYMPTOM Main unit, no power. SOLUTION Connect AC adapter as a Removable Disk. Secure USB cable connection. Insert battery correctly as shown on the rear of the frame. 20 USB cable not connected securely. Battery...

User Guide
Page 21
.... FOR CONSUMER REPLACEABLE PART(S), SEE PART NUMBER(S) ON PAGES 4 AND 5 AND THEN CONTACT FOX INTERNATIONAL AT 1-800-321-6993. 21 Resolution 800 x 480 Internal Memory 128MB Speaker 2 x 0.6 W Specifications are approximate. PLEASE KEEP ALL PACKAGING MATERIAL FOR AT LEAST 90 DAYS IN CASE YOU NEED TO RETURN THIS PRODUCT TO YOUR PLACE OF PURCHASE OR MEMOREX. SPECIFICATIONS GENERAL: Power Source AC Adapter, DC 12V...
.... FOR CONSUMER REPLACEABLE PART(S), SEE PART NUMBER(S) ON PAGES 4 AND 5 AND THEN CONTACT FOX INTERNATIONAL AT 1-800-321-6993. 21 Resolution 800 x 480 Internal Memory 128MB Speaker 2 x 0.6 W Specifications are approximate. PLEASE KEEP ALL PACKAGING MATERIAL FOR AT LEAST 90 DAYS IN CASE YOU NEED TO RETURN THIS PRODUCT TO YOUR PLACE OF PURCHASE OR MEMOREX. SPECIFICATIONS GENERAL: Power Source AC Adapter, DC 12V...


