User Manual
Page 1
MVDP1083 User's Guide 8.4'' TFT DISPLAY PORTABLE DVD PLAYER WITH REMOTE CONTROL Before operating this product, please read these instructions completely.
MVDP1083 User's Guide 8.4'' TFT DISPLAY PORTABLE DVD PLAYER WITH REMOTE CONTROL Before operating this product, please read these instructions completely.

User Manual
Page 2
...• Screen Mode Button 27 • LCD Mode Button 27 • Display Button 28 • I/P (Interlace/Progressive Scan) Button 28 DVD Operation 29 • Playback of a DVD 29 • Skip 31 • Search 31 • Slow Motion 31 • Pause/Step 31 • Title/Chapter Search 32 &#...• Chapter/Time Search 32 • Repeat Playback 33 • Repeat A-B Playback 33 • Audio Menu 34 • Subtitle Menu 34 • DVD Menu 34 • Title Menu 34 • Zoom In 35 • Angle 35 • Resume 35 • Programmed Playback 36 CD Operation 37 &#...
...• Screen Mode Button 27 • LCD Mode Button 27 • Display Button 28 • I/P (Interlace/Progressive Scan) Button 28 DVD Operation 29 • Playback of a DVD 29 • Skip 31 • Search 31 • Slow Motion 31 • Pause/Step 31 • Title/Chapter Search 32 &#...• Chapter/Time Search 32 • Repeat Playback 33 • Repeat A-B Playback 33 • Audio Menu 34 • Subtitle Menu 34 • DVD Menu 34 • Title Menu 34 • Zoom In 35 • Angle 35 • Resume 35 • Programmed Playback 36 CD Operation 37 &#...
User Manual
Page 6
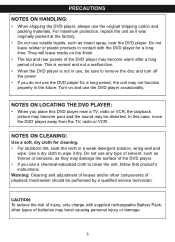
...: Use a soft, dry cloth for cleaning. • For stubborn dirt, soak the cloth in the future. This is normal and not a malfunction. • When the DVD player is not in use, be sure to remove the disc and turn off the power. • If you do not use any type of... warm after a long period of injury, only charge with supplied rechargeable Battery Pack; Turn on the finish. • The top and rear panels of the DVD player may not function properly in a weak detergent solution, wring well and wipe. Use a dry cloth to clean the unit, follow that product's instructions. Warning...
...: Use a soft, dry cloth for cleaning. • For stubborn dirt, soak the cloth in the future. This is normal and not a malfunction. • When the DVD player is not in use, be sure to remove the disc and turn off the power. • If you do not use any type of... warm after a long period of injury, only charge with supplied rechargeable Battery Pack; Turn on the finish. • The top and rear panels of the DVD player may not function properly in a weak detergent solution, wring well and wipe. Use a dry cloth to clean the unit, follow that product's instructions. Warning...

User Manual
Page 7
... heater, or a place where the cold wind from the air conditioner directly hits the unit. • In summer, when you use the DVD player in a hot and humid place just after you moved the unit from a cold place to the wall outlet and moisture condensation will have... a room where you just turned on the operating environment. For details, contact your nearest dealer. PRECAUTIONS (CONTINUED) TO OBTAIN A CLEAR PICTURE: The DVD player is a high technology, precision device. If the optical pick-up and evaporated any moisture. To obtain a clear picture, we recommend regular inspection...
... heater, or a place where the cold wind from the air conditioner directly hits the unit. • In summer, when you use the DVD player in a hot and humid place just after you moved the unit from a cold place to the wall outlet and moisture condensation will have... a room where you just turned on the operating environment. For details, contact your nearest dealer. PRECAUTIONS (CONTINUED) TO OBTAIN A CLEAR PICTURE: The DVD player is a high technology, precision device. If the optical pick-up and evaporated any moisture. To obtain a clear picture, we recommend regular inspection...

User Manual
Page 12
BATTERY PRECAUTIONS Follow these precautions when using a battery in on the Remote Sensor of the DVD, the remote operation may cause damage to the battery compartment. Use only the size and type of time, remove the battery to be unstable.... from possible battery leakage. 4. REMOTE CONTROL BATTERY INSTALLATION 1. Install a CR2025 battery, paying attention to be recharged; If the device is an obstacle between the DVD and the transmitter, the transmitter may not operate. • When direct sunlight, an incandescent lamp, fluorescent lamp or any other strong light shines on...
BATTERY PRECAUTIONS Follow these precautions when using a battery in on the Remote Sensor of the DVD, the remote operation may cause damage to the battery compartment. Use only the size and type of time, remove the battery to be unstable.... from possible battery leakage. 4. REMOTE CONTROL BATTERY INSTALLATION 1. Install a CR2025 battery, paying attention to be recharged; If the device is an obstacle between the DVD and the transmitter, the transmitter may not operate. • When direct sunlight, an incandescent lamp, fluorescent lamp or any other strong light shines on...

User Manual
Page 13
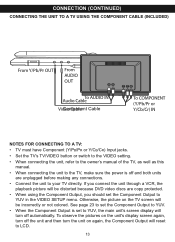
... (INCLUDED) NOTES FOR CONNECTING TO A TV: • If your TV directly. If you connect the unit through a VCR, the playback picture will be distorted because DVD video discs are unplugged before making any connections. • Connect the unit to your TV has Component (Y, Pb, Pr) inputs, connect the unit with them...
... (INCLUDED) NOTES FOR CONNECTING TO A TV: • If your TV directly. If you connect the unit through a VCR, the playback picture will be distorted because DVD video discs are unplugged before making any connections. • Connect the unit to your TV has Component (Y, Pb, Pr) inputs, connect the unit with them...
User Manual
Page 14
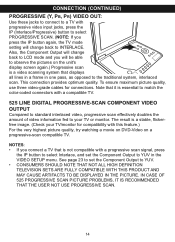
If you connect the unit through a VCR, the playback picture will be distorted because DVD video discs are unplugged before making any connections. • Connect the unit to your TV directly. See page 23 to set the Component Output to ...
If you connect the unit through a VCR, the playback picture will be distorted because DVD video discs are unplugged before making any connections. • Connect the unit to your TV directly. See page 23 to set the Component Output to ...
User Manual
Page 15
... the pictures on a progressive-scan compatible TV. Note that is not compatible with this feature.) For the very highest picture quality, try watching a movie on DVD-Video on the unit's display screen again.) Progressive scan is essential to match the color-coded connectors with progressive video input jacks, press the IP...
... the pictures on a progressive-scan compatible TV. Note that is not compatible with this feature.) For the very highest picture quality, try watching a movie on DVD-Video on the unit's display screen again.) Progressive scan is essential to match the color-coded connectors with progressive video input jacks, press the IP...

User Manual
Page 16
...Included) Video Cable (Included) To Audio Inputs To Video 9 Input 3 1 2 5 4 NOTE: The rear speakers can be distorted because DVD video discs are unplugged before making any connections. • Connect the unit to your TV directly. AV Amplifier w/Dolby Digital Decoder NOTES FOR ... set the optimal levels. Center Speaker-can also be located anywhere in the room. 5. Rear Right Speaker 9. CONNECTION (CONTINUED) CONNECTING THE DVD TO A HOME THEATRE SYSTEM (AUDIO JACK) From Audio Out Place the subwoofer, front, rear and center speakers in locations as this manual...
...Included) Video Cable (Included) To Audio Inputs To Video 9 Input 3 1 2 5 4 NOTE: The rear speakers can be distorted because DVD video discs are unplugged before making any connections. • Connect the unit to your TV directly. AV Amplifier w/Dolby Digital Decoder NOTES FOR ... set the optimal levels. Center Speaker-can also be located anywhere in the room. 5. Rear Right Speaker 9. CONNECTION (CONTINUED) CONNECTING THE DVD TO A HOME THEATRE SYSTEM (AUDIO JACK) From Audio Out Place the subwoofer, front, rear and center speakers in locations as this manual...

User Manual
Page 17
...connect the unit through a VCR, the playback picture will enable you ; Television 3. in the room. 5. Center Speaker-can also be distorted because DVD video discs are unplugged before making any connections. • Connect the unit to find 7 6 8 optimal position. 1. this case. Rear Left ...copy protected. • Set the SPDIF option to set the optimal levels. Experiment to your TV directly. CONNECTION (CONTINUED) CONNECTING THE DVD TO A HOME THEATRE SYSTEM (COAXIAL JACK) Place the subwoofer, front, rear and center speakers in locations as this manual. •...
...connect the unit through a VCR, the playback picture will enable you ; Television 3. in the room. 5. Center Speaker-can also be distorted because DVD video discs are unplugged before making any connections. • Connect the unit to find 7 6 8 optimal position. 1. this case. Rear Left ...copy protected. • Set the SPDIF option to set the optimal levels. Experiment to your TV directly. CONNECTION (CONTINUED) CONNECTING THE DVD TO A HOME THEATRE SYSTEM (COAXIAL JACK) Place the subwoofer, front, rear and center speakers in locations as this manual. •...

User Manual
Page 18
... which is given a title or chapter number. IMPORTANT: It is important that you selected does not run as they are also extra features on the DVD player that are different for information regarding region numbers. 1 PLAYABLE DISCS: The following discs can be used with some... in this owner's manual. 17 ABOUT DISCS The region number for this DVD Player is: See the following page for each DVD disc, so they are preset. Some features of which is given a track number. AUDIO CD Data on most DVDs is divided into sections called "titles" and then into sections called "chapters...
... which is given a title or chapter number. IMPORTANT: It is important that you selected does not run as they are also extra features on the DVD player that are different for information regarding region numbers. 1 PLAYABLE DISCS: The following discs can be used with some... in this owner's manual. 17 ABOUT DISCS The region number for this DVD Player is: See the following page for each DVD disc, so they are preset. Some features of which is given a track number. AUDIO CD Data on most DVDs is divided into sections called "titles" and then into sections called "chapters...

User Manual
Page 19
..."Wrong Region" appears on the TV screen. 18 When you try to the Region Management Information that is intended for business purposes. DVD video discs are copy protected, and any recordings made from outside your geographic area or made for home and other limited viewing uses ...only, unless otherwise authorized by Macrovision Corporation. Region Management Information: This DVD Player is designed and manufactured to respond to play that is forbidden by Macrovision Corporation and other intellectual property rights owned by law...
..."Wrong Region" appears on the TV screen. 18 When you try to the Region Management Information that is intended for business purposes. DVD video discs are copy protected, and any recordings made from outside your geographic area or made for home and other limited viewing uses ...only, unless otherwise authorized by Macrovision Corporation. Region Management Information: This DVD Player is designed and manufactured to respond to play that is forbidden by Macrovision Corporation and other intellectual property rights owned by law...
User Manual
Page 20
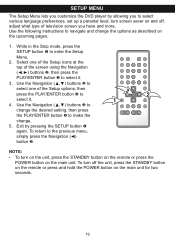
... the POWER button on the main unit. Use the following instructions to enter the Setup Menu. 2. SETUP MENU The Setup Menu lets you customize the DVD player by pressing the SETUP button 1 again.
... the POWER button on the main unit. Use the following instructions to enter the Setup Menu. 2. SETUP MENU The Setup Menu lets you customize the DVD player by pressing the SETUP button 1 again.
User Manual
Page 21
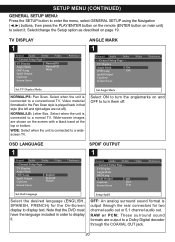
... ith a black band at the top oSrpdbiof tOtoumtpu. Set Osd Language General Audio Dolby Video - - General Setup Page - - have the language included in that the DVD must cha-n-nGeenl earauldSieotuop uPatgoer- -5.1 channel audio out. TV Display Angle Mark OSD Lang GSepnderiafl OutpAuutdio On Off Dolby - TV Display GAennegrlael MarAkudio Dolby Video...
... ith a black band at the top oSrpdbiof tOtoumtpu. Set Osd Language General Audio Dolby Video - - General Setup Page - - have the language included in that the DVD must cha-n-nGeenl earauldSieotuop uPatgoer- -5.1 channel audio out. TV Display Angle Mark OSD Lang GSepnderiafl OutpAuutdio On Off Dolby - TV Display GAennegrlael MarAkudio Dolby Video...

User Manual
Page 22
... Captions On Screen Saver Off Video Preference General Audio Dolby - - General Setup Page - - When this option is OFF, the screen saver will appear on the DVD). GtheenerSalESTetUupPPabguet-t-on to ON, Closed Captions will not come on when the unit stops or the image is set to enter the menu, select AUDIO...
... Captions On Screen Saver Off Video Preference General Audio Dolby - - General Setup Page - - When this option is OFF, the screen saver will appear on the DVD). GtheenerSalESTetUupPPabguet-t-on to ON, Closed Captions will not come on when the unit stops or the image is set to enter the menu, select AUDIO...

User Manual
Page 25
... JKtahopraeenaenSseubtitle (OSD) will be Select this and the followDinegfaupltage using thJKeaopraNenaeansve igation buttons and the PLAY/ENTER button. The DVD must be made in the selected language, otherwise the default language of the DVD will be played backPDaeisnfsawu(oltErdNGLISH, GCJahpEianRneesMsee AN, FRENCH, SPANISH, CHINEKSorEean, JAPANESE, KOREAN, RUSSIAN,RuTssHiaAn I or OTHERS). Preference Page...
... JKtahopraeenaenSseubtitle (OSD) will be Select this and the followDinegfaupltage using thJKeaopraNenaeansve igation buttons and the PLAY/ENTER button. The DVD must be made in the selected language, otherwise the default language of the DVD will be played backPDaeisnfsawu(oltErdNGLISH, GCJahpEianRneesMsee AN, FRENCH, SPANISH, CHINEKSorEean, JAPANESE, KOREAN, RUSSIAN,RuTssHiaAn I or OTHERS). Preference Page...
User Manual
Page 26
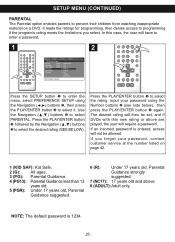
... using the Number buttons 2 (see note below), then press the PLAY/ENTER button 1 again. Input your password, contact customer service at the number listed on a DVD. Preference Page - - Audio ENG 2 to select Dolby Video it. Press the PLAY/ENTER button 1 to enter a password. 1 2 2 General Audio Dolby Video Preference - - General ...Audio Dolby Video Preference NOTE: The default password Old Password New Password is entered, access will not be set, and if DVDs with this case, the user will require a password.
... using the Number buttons 2 (see note below), then press the PLAY/ENTER button 1 again. Input your password, contact customer service at the number listed on a DVD. Preference Page - - Audio ENG 2 to select Dolby Video it. Press the PLAY/ENTER button 1 to enter a password. 1 2 2 General Audio Dolby Video Preference - - General ...Audio Dolby Video Preference NOTE: The default password Old Password New Password is entered, access will not be set, and if DVDs with this case, the user will require a password.

User Manual
Page 29
BASIC OPERATION (CONTINUED) DISPLAY BUTTON 1 2 While playing a DVD, press the DISPLAY button to cycle as follows: 1st press: Title elapsed time 2nd press: Title remaining time 3rd press: Chapter elapsed time 4th press: ...
BASIC OPERATION (CONTINUED) DISPLAY BUTTON 1 2 While playing a DVD, press the DISPLAY button to cycle as follows: 1st press: Title elapsed time 2nd press: Title remaining time 3rd press: Chapter elapsed time 4th press: ...
User Manual
Page 30
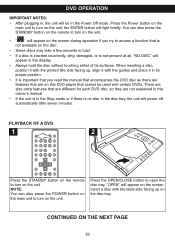
... on the disc tray. 2 CONTINUED ON THE NEXT PAGE 29 When inserting a disc, position it with the printed title side facing up on the screen. DVD OPERATION IMPORTANT NOTES: • After plugging in, the unit will be used with the label side facing up , align it with the guides and place... main unit to turn on the disc. • Some discs may take a few seconds to open the disc tray, "OPEN" will light briefly. PLAYBACK OF A DVD 1 2 Press the STANDBY button on the remote to turn on the unit. 2 1 Press the OPEN/CLOSE button to load. • If a disc is inserted incorrectly...
... on the disc tray. 2 CONTINUED ON THE NEXT PAGE 29 When inserting a disc, position it with the printed title side facing up on the screen. DVD OPERATION IMPORTANT NOTES: • After plugging in, the unit will be used with the label side facing up , align it with the guides and place... main unit to turn on the disc. • Some discs may take a few seconds to open the disc tray, "OPEN" will light briefly. PLAYBACK OF A DVD 1 2 Press the STANDBY button on the remote to turn on the unit. 2 1 Press the OPEN/CLOSE button to load. • If a disc is inserted incorrectly...

User Manual
Page 31
... button 2 or the RESUME button 3 to select the desired option/item, then press the PLAY/ENTER button. Please make sure to refer to access it . 3 2 1 DVD OPERATION (CONTINUED) 4 2 3 3 1 Close the disc tray. NOTE: If the menu screen does not appear, press the MENU button to the disc's jacket or case for...). Use the Navigation buttons 1 to select the desired option and press the PLAY/ENTER button 2 to select it . After loading, the menu screen of the DVD should appear.
... button 2 or the RESUME button 3 to select the desired option/item, then press the PLAY/ENTER button. Please make sure to refer to access it . 3 2 1 DVD OPERATION (CONTINUED) 4 2 3 3 1 Close the disc tray. NOTE: If the menu screen does not appear, press the MENU button to the disc's jacket or case for...). Use the Navigation buttons 1 to select the desired option and press the PLAY/ENTER button 2 to select it . After loading, the menu screen of the DVD should appear.

