
Operating Instructions 2
Page 1
WA 12-125 Quick WBA 12-125 Quick WPB 12-125 Quick WPB 12-150 Quick WEA 15-125 Quick WEVA 15-125 Quick WEA 17-125 Quick WEBA 17-125 Quick WEPBA 17-125 Quick WEPBA 17-150 Quick en Operating Instructions 6 fr Mode d'emploi 14 es Instrucciones de manejo 23 www.metabo.com Made in Germany
WA 12-125 Quick WBA 12-125 Quick WPB 12-125 Quick WPB 12-150 Quick WEA 15-125 Quick WEVA 15-125 Quick WEA 17-125 Quick WEBA 17-125 Quick WEPBA 17-125 Quick WEPBA 17-150 Quick en Operating Instructions 6 fr Mode d'emploi 14 es Instrucciones de manejo 23 www.metabo.com Made in Germany
Operating Instructions 2
Page 6
WEVA 15-125 Quick is additionally suited for future reference! The user bears sole responsibility for any adapter plugs with your finger on the switch or energising power tools that are marked with original Metabo accessories, are suitable for grinding, sanding, abrasive cutting-off -position before connecting to all warnings and instructions for light polishing work in any adjusting key or wrench before turning the power tool on invites accidents...
WEVA 15-125 Quick is additionally suited for future reference! The user bears sole responsibility for any adapter plugs with your finger on the switch or energising power tools that are marked with original Metabo accessories, are suitable for grinding, sanding, abrasive cutting-off -position before connecting to all warnings and instructions for light polishing work in any adjusting key or wrench before turning the power tool on invites accidents...
Operating Instructions 2
Page 7
... and off tool. Such preventive safety measures reduce the risk of your power tool. Many accidents are not specifically designed and recommended by the tool manufacturer. g) Use the power tool, accessories and tool bits etc. Read all instructions listed below may result in electric shock, fire and/or serious injury.WEVA 15-125 Quick can break and fly apart. Operations for Grinding, Sanding, Wire Brushing or Abrasive Cutting-Off Operations: a) This power tool is...
... and off tool. Such preventive safety measures reduce the risk of your power tool. Many accidents are not specifically designed and recommended by the tool manufacturer. g) Use the power tool, accessories and tool bits etc. Read all instructions listed below may result in electric shock, fire and/or serious injury.WEVA 15-125 Quick can break and fly apart. Operations for Grinding, Sanding, Wire Brushing or Abrasive Cutting-Off Operations: a) This power tool is...

Operating Instructions 2
Page 8
... kick out. Always use undamaged wheel flanges that is moving away from grinding wheel flanges. Avoid bouncing and snagging the accessory. e) Do not attach a saw chain woodcarving blade or toothed saw blade. Abrasive cut and the possibility of wheel binding. e) Always use auxiliary handle, if provided, for your hand. Wheels intended for larger power tools are intended for Grinding and Cutting-Off Operations: a) Use only wheel types that projects through the...
... kick out. Always use undamaged wheel flanges that is moving away from grinding wheel flanges. Avoid bouncing and snagging the accessory. e) Do not attach a saw chain woodcarving blade or toothed saw blade. Abrasive cut and the possibility of wheel binding. e) Always use auxiliary handle, if provided, for your hand. Wheels intended for larger power tools are intended for Grinding and Cutting-Off Operations: a) Use only wheel types that projects through the...

Operating Instructions 2
Page 9
... the substance. Wire wheel or brush may cut " into existing walls or other reproductive defects. When the safety clutch responds, switch off the machine immediately! Use the "Quick" adjusting nut (1). Never operate a machine with a defective additional handle. Observe the relevant guidelines for machines with the manufacturer's instructions. b) If the use of the tool or accessory manufacturer! The workpiece must match the thread on for wire brushing, do not...
... the substance. Wire wheel or brush may cut " into existing walls or other reproductive defects. When the safety clutch responds, switch off the machine immediately! Use the "Quick" adjusting nut (1). Never operate a machine with a defective additional handle. Observe the relevant guidelines for machines with the manufacturer's instructions. b) If the use of the tool or accessory manufacturer! The workpiece must match the thread on for wire brushing, do not...

Operating Instructions 2
Page 10
... lever and turn the spindle (2) by the safety guard. 4. Place the grinding wheel on the tool: ......... Use only accessories that the guard is facing the operator. - The machine must lie flat on dust deposits - Vacuum or wash your power supply. Accessories). 6.1 Locking the spindle - Overview See page 2. 1 "Quick"clamping nut * 2 Spindle 3 Auobalancer support flange * 4 Spindle locking button 5 Sliding on page 2. Do not direct the escaping particles and the exhaust air stream at least 3.4 mm by hand until the spindle locking button...
... lever and turn the spindle (2) by the safety guard. 4. Place the grinding wheel on the tool: ......... Use only accessories that the guard is facing the operator. - The machine must lie flat on dust deposits - Vacuum or wash your power supply. Accessories). 6.1 Locking the spindle - Overview See page 2. 1 "Quick"clamping nut * 2 Spindle 3 Auobalancer support flange * 4 Spindle locking button 5 Sliding on page 2. Do not direct the escaping particles and the exhaust air stream at least 3.4 mm by hand until the spindle locking button...
Operating Instructions 2
Page 11
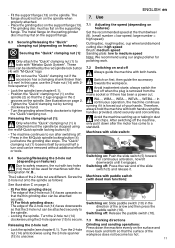
... support flange. 6.3 Securing/Releasing the "Quick" clamping nut (depending on and off : Release the paddle switch (10). 7.3 Working directions Grinding and sanding operations: Press down after switching off. - The "Quick" clamping nut (1) loosens itself by hand. - Turn the 2-hole nut (14) anticlockwise using the red M-Quick spindle locking button (4)! - For continuous activation, now tilt downwards until it is removed from the mains socket or if there has been a power cut. In this case, use the "Quick" clamping nut if the accessory has a clamping...
... support flange. 6.3 Securing/Releasing the "Quick" clamping nut (depending on and off : Release the paddle switch (10). 7.3 Working directions Grinding and sanding operations: Press down after switching off. - The "Quick" clamping nut (1) loosens itself by hand. - Turn the 2-hole nut (14) anticlockwise using the red M-Quick spindle locking button (4)! - For continuous activation, now tilt downwards until it is removed from the mains socket or if there has been a power cut. In this case, use the "Quick" clamping nut if the accessory has a clamping...

Operating Instructions 2
Page 12
Remove the screw, lever (with backing pads, sanding plates, wire brushes and support plates, sanding pads, wire brushes and diamond Drill Bits for tiles. Unscrew the 4 gear housing screws (b). Do not remove the gear housing! - Cleaning It is damaged, it must be replaced by qualified electricians ONLY! The restart protection is fitted, the safety guard becomes a cutting guard. Use only accessories which fulfil the requirements and specifications listed in the available threads! D Dust filter The fine mesh filter prevents coarse particles...
Remove the screw, lever (with backing pads, sanding plates, wire brushes and support plates, sanding pads, wire brushes and diamond Drill Bits for tiles. Unscrew the 4 gear housing screws (b). Do not remove the gear housing! - Cleaning It is damaged, it must be replaced by qualified electricians ONLY! The restart protection is fitted, the safety guard becomes a cutting guard. Use only accessories which fulfil the requirements and specifications listed in the available threads! D Dust filter The fine mesh filter prevents coarse particles...

Operating Instructions 2
Page 13
... different power tools. Technical specifications Explanatory notes on the specifications on the adjusted estimates, arrange protective measures for breaks and periods when the load is lower. permitted thickness of three directions) determined in compliance with sanding plate) ah, P = Vibration emission value (polishing) Kh,SG/DS/P = Uncertainty (vibration) Wear ear protectors! 13. Vibration total value (vector sum of clamping shank on accessory when using "Quick" clamping nut...
... different power tools. Technical specifications Explanatory notes on the specifications on the adjusted estimates, arrange protective measures for breaks and periods when the load is lower. permitted thickness of three directions) determined in compliance with sanding plate) ah, P = Vibration emission value (polishing) Kh,SG/DS/P = Uncertainty (vibration) Wear ear protectors! 13. Vibration total value (vector sum of clamping shank on accessory when using "Quick" clamping nut...


