Specs
Page 6
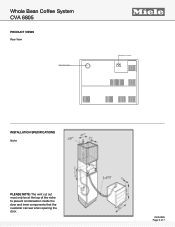
CVA 6805 Page 6 of the niche to prevent condensation inside the door and inner components that the customer can see when opening the door. Whole Bean Coffee System CVA 6805 PRODUCT VIEWS Rear View FOREVER BETTER INSTALLATION SPECIFICATIONS Niche PLEASE NOTE: The vent cut out must only be at the top of 7
CVA 6805 Page 6 of the niche to prevent condensation inside the door and inner components that the customer can see when opening the door. Whole Bean Coffee System CVA 6805 PRODUCT VIEWS Rear View FOREVER BETTER INSTALLATION SPECIFICATIONS Niche PLEASE NOTE: The vent cut out must only be at the top of 7
Specs
Page 7
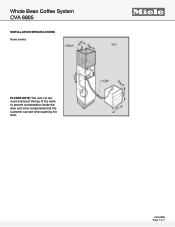
FOREVER BETTER CVA 6805 Page 7 of the niche to prevent condensation inside the door and inner components that the customer can see when opening the door. Whole Bean Coffee System CVA 6805 INSTALLATION SPECIFICATIONS Niche (metric) PLEASE NOTE: The vent cut out must only be at the top of 7
FOREVER BETTER CVA 6805 Page 7 of the niche to prevent condensation inside the door and inner components that the customer can see when opening the door. Whole Bean Coffee System CVA 6805 INSTALLATION SPECIFICATIONS Niche (metric) PLEASE NOTE: The vent cut out must only be at the top of 7

Product Manual
Page 1
US, CA M.-Nr. 09 741 680 Operating and Installation Instructions Coffee System To prevent accidents and appliance damage read these instructions before installation or use. en -
US, CA M.-Nr. 09 741 680 Operating and Installation Instructions Coffee System To prevent accidents and appliance damage read these instructions before installation or use. en -

Product Manual
Page 4
... 62 Descaling 63 Frequently asked questions 65 Cleaning clogged milk pipework 75 After sales service 78 Installation instructions 79 Caring for the environment 80 Plumbing 81 Lead free certificate 83 Electrical connection 84 Installation 85 Ventilation 87 Installation 87 Adjusting the door hinges 89 RemoteVision (optional accessory 90 Copyright and licenses 91 Adresses...
... 62 Descaling 63 Frequently asked questions 65 Cleaning clogged milk pipework 75 After sales service 78 Installation instructions 79 Caring for the environment 80 Plumbing 81 Lead free certificate 83 Electrical connection 84 Installation 85 Ventilation 87 Installation 87 Adjusting the door hinges 89 RemoteVision (optional accessory 90 Copyright and licenses 91 Adresses...

Product Manual
Page 5
... permitted. ~ Persons which lack physical, sensory or mental abilities or experience with the machine should always be followed, including the following: Read all instructions before installation or use of the coffee system. Children in packaging (e.g. Keep the packaging away from touching the hot parts of the coffee machine or exposing parts...
... permitted. ~ Persons which lack physical, sensory or mental abilities or experience with the machine should always be followed, including the following: Read all instructions before installation or use of the coffee system. Children in packaging (e.g. Keep the packaging away from touching the hot parts of the coffee machine or exposing parts...

Product Manual
Page 6
...safety requirement be performed by a trained technician in accordance with the cabinet door open . Repairs and other appliances, a protective base should be installed between the appliance and the unit. ~ The coffee machine must exist between +50°F/10°C and +100°F/38 °C. ...not operate a damaged unit. ~ Be certain your appliance is imperative that there is sufficient ventilation around the coffee machine. It is properly installed and grounded by a qualified electrician. If in doubt, contact a qualified electrician. ~ Do not use an extension cord to connect the ...
...safety requirement be performed by a trained technician in accordance with the cabinet door open . Repairs and other appliances, a protective base should be installed between the appliance and the unit. ~ The coffee machine must exist between +50°F/10°C and +100°F/38 °C. ...not operate a damaged unit. ~ Be certain your appliance is imperative that there is sufficient ventilation around the coffee machine. It is properly installed and grounded by a qualified electrician. If in doubt, contact a qualified electrician. ~ Do not use an extension cord to connect the ...

Product Manual
Page 7
... when beverages or steam are extremely hot. IMPORTANT SAFETY INSTRUCTIONS ~ The water supply must be accessible after installation. ~ Only use ,The coffee and hot water dispensers present a danger of burning or scalding! Proper use Miele original spare parts. Only then can spray hot liquid or steam. The coffee machine is immediately repaired...
... when beverages or steam are extremely hot. IMPORTANT SAFETY INSTRUCTIONS ~ The water supply must be accessible after installation. ~ Only use ,The coffee and hot water dispensers present a danger of burning or scalding! Proper use Miele original spare parts. Only then can spray hot liquid or steam. The coffee machine is immediately repaired...

Product Manual
Page 17
... is set. ^ Touch "OK". Time of day) ^ Touch the On/Off button K. The display briefly shows the "Miele Welcome" message. The setting is set. ^ Touch "OK". See the "Installation instructions". ^ Remove any protective coverings. Date - Setting the date ^ Swipe the "Day" field in the display until the... appears. ^ Repeat this for "Minutes" until the current day appears. ^ Repeat this for the first time, you will be correctly installed and connected before filling it with water and coffee beans. The setting is now saved. Language - First steps to use Before the first use...
... is set. ^ Touch "OK". Time of day) ^ Touch the On/Off button K. The display briefly shows the "Miele Welcome" message. The setting is set. ^ Touch "OK". See the "Installation instructions". ^ Remove any protective coverings. Date - Setting the date ^ Swipe the "Day" field in the display until the... appears. ^ Repeat this for "Minutes" until the current day appears. ^ Repeat this for the first time, you will be correctly installed and connected before filling it with water and coffee beans. The setting is now saved. Language - First steps to use Before the first use...
Product Manual
Page 71
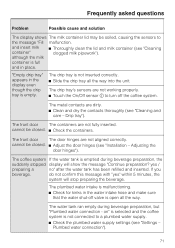
... tray is not connected to the message "Fill malfunction. Drip tray"). The front door The containers are dirty. ^ Clean and dry the contacts thoroughly (see "Installation - "Empty drip tray" appears in place. on" is selected and the coffee system is not inserted correctly. ^ Slide the drip tray all the way. cannot...
... tray is not connected to the message "Fill malfunction. Drip tray"). The front door The containers are dirty. ^ Clean and dry the contacts thoroughly (see "Installation - "Empty drip tray" appears in place. on" is selected and the coffee system is not inserted correctly. ^ Slide the drip tray all the way. cannot...

Product Manual
Page 78
Only genuine Miele parts installed by a Miele Authorized Service Provider using genuine Miele parts. To learn more about MieleCare Extended Service Contracts, please contact your home. MieleCare is the only Extended Service Contract in writing by Miele's Service department, Extended Service Contracts offered by other providers for Miele products will not ... of this booklet. When contacting the Technical Service Department, please quote the model and serial number of your Miele appliance. After sales service In the event of a fault which you cannot easily fix yourself, please contact the...
Only genuine Miele parts installed by a Miele Authorized Service Provider using genuine Miele parts. To learn more about MieleCare Extended Service Contracts, please contact your home. MieleCare is the only Extended Service Contract in writing by Miele's Service department, Extended Service Contracts offered by other providers for Miele products will not ... of this booklet. When contacting the Technical Service Department, please quote the model and serial number of your Miele appliance. After sales service In the event of a fault which you cannot easily fix yourself, please contact the...

Product Manual
Page 79
Leave these instructions with the appliance for the consumer/user. Installation instructions Information is subject to change . The installation steps are described in the enclosed "Installation Diagram". Please refer to our website to obtain the most current product specification, technical & warranty information. 79 Please refer to our website to obtain the most current product specification, technical & warranty information. Information is subject to change .
Leave these instructions with the appliance for the consumer/user. Installation instructions Information is subject to change . The installation steps are described in the enclosed "Installation Diagram". Please refer to our website to obtain the most current product specification, technical & warranty information. 79 Please refer to our website to obtain the most current product specification, technical & warranty information. Information is subject to change .
Product Manual
Page 81
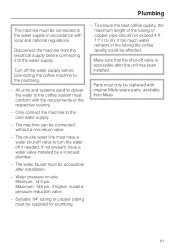
... the tubing the coffee quality could be connected without a non-return valve. - Plumbing The machine must have a water valve installed by a licensed plumber. - If too much water remains in accordance with original Miele spare parts, available from the electrical supply before connecting the coffee machine to the cold water supply. - To ensure...
... the tubing the coffee quality could be connected without a non-return valve. - Plumbing The machine must have a water valve installed by a licensed plumber. - If too much water remains in accordance with original Miele spare parts, available from the electrical supply before connecting the coffee machine to the cold water supply. - To ensure...
Product Manual
Page 82
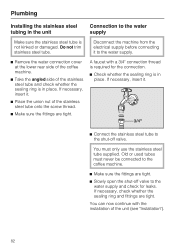
... the shut-off valve. If necessary, insert it to the water supply Make sure the stainless steel tube is in place. A faucet with the installation of the stainless steel tube onto the screw thread. ^ Make sure the fittings are tight. If necessary, insert it. ^ Connect the stainless steel...coffee machine. ^ Take the angled side of the stainless steel tube and check whether the sealing ring is not kinked or damaged. Plumbing Installing the stainless steel tubing in place. Disconnect the machine from the electrical supply before connecting it . ^ Place the union nut of the unit (...
... the shut-off valve. If necessary, insert it to the water supply Make sure the stainless steel tube is in place. A faucet with the installation of the stainless steel tube onto the screw thread. ^ Make sure the fittings are tight. If necessary, insert it. ^ Connect the stainless steel...coffee machine. ^ Take the angled side of the stainless steel tube and check whether the sealing ring is not kinked or damaged. Plumbing Installing the stainless steel tubing in place. Disconnect the machine from the electrical supply before connecting it . ^ Place the union nut of the unit (...

Product Manual
Page 84
...your power supply, please consult a licensed electrician or contact Miele's Technical Service Department. Do not connect the appliance to a power inverter or directly to power produced outside of this appliance to the machine is OFF before installing the coffee system. Direct connection to a 120 V, ...the appliance to energy saving plugs or outlets. If there is turned on the data plate match the household electrical supply before installing or performing maintenance or repairs. Electrical connection Make sure that the voltage, load and circuit rating information found on , and ...
...your power supply, please consult a licensed electrician or contact Miele's Technical Service Department. Do not connect the appliance to a power inverter or directly to power produced outside of this appliance to the machine is OFF before installing the coffee system. Direct connection to a 120 V, ...the appliance to energy saving plugs or outlets. If there is turned on the data plate match the household electrical supply before installing or performing maintenance or repairs. Electrical connection Make sure that the voltage, load and circuit rating information found on , and ...

Product Manual
Page 85
Installation 85 Installation and combination options The system is designed to be built into cabinetry.
Installation 85 Installation and combination options The system is designed to be built into cabinetry.

Product Manual
Page 86
Installation It is to combine it with a built-in Miele appliances. If the coffee system is also possible to be built in above another appliance, there must be a full-width, closed shelf between them (exception: installation with other built-in warming drawer). 86
Installation It is to combine it with a built-in Miele appliances. If the coffee system is also possible to be built in above another appliance, there must be a full-width, closed shelf between them (exception: installation with other built-in warming drawer). 86

Product Manual
Page 87
... no sealing strip around the installation recess, stick the Miele sealing strip onto the unit from Miele. 87 Installation Ventilation When installing the coffee system, make sure that it into cabinetry, only use the coffee machine in the event of disassembly! To align .... The sealing strip is no power is sufficiently ventilated at least 78 3/4"² (200 cm²). The ventilation openings in place around the installation recess; Otherwise condensation can escape. When built into the recess. The same applies in ambient temperatures between +50°F/10°C and +100...
... no sealing strip around the installation recess, stick the Miele sealing strip onto the unit from Miele. 87 Installation Ventilation When installing the coffee system, make sure that it into cabinetry, only use the coffee machine in the event of disassembly! To align .... The sealing strip is no power is sufficiently ventilated at least 78 3/4"² (200 cm²). The ventilation openings in place around the installation recess; Otherwise condensation can escape. When built into the recess. The same applies in ambient temperatures between +50°F/10°C and +100...

Product Manual
Page 88
... (10 mm). ^ Connect the unit to the water supply (see "Plumbing"). ^ Connect the unit to set down the coffee machine at the level of the installation recess is helpful. This makes it easier for you can be unscrewed by about 1/16" (2 mm) using the four feet. 88 If not, align the... unit using the larger Allen wrench. Installation Tip: A place to the electrical supply. ^ Insert the coffee machine all the way into the recess, make sure the electrical and water supply connections are...
... (10 mm). ^ Connect the unit to the water supply (see "Plumbing"). ^ Connect the unit to set down the coffee machine at the level of the installation recess is helpful. This makes it easier for you can be unscrewed by about 1/16" (2 mm) using the four feet. 88 If not, align the... unit using the larger Allen wrench. Installation Tip: A place to the electrical supply. ^ Insert the coffee machine all the way into the recess, make sure the electrical and water supply connections are...

Product Manual
Page 89
Adjusting the door hinges If the door cannot be opened or closed easily after installation, you will have to align the door (TX 20): Installation ^ To adjust the door flush with the front of the cabinet, turn the screw a. ^ To adjust the door horizontally and vertically, turn the screw b. 89
Adjusting the door hinges If the door cannot be opened or closed easily after installation, you will have to align the door (TX 20): Installation ^ To adjust the door flush with the front of the cabinet, turn the screw a. ^ To adjust the door horizontally and vertically, turn the screw b. 89

Product Manual
Page 90
If a fault occurs, Miele's client service center will be notified and contact you, or another trusted individual identified on set-up and installation of the RemoteVision module see the "Installation" section of this manual. Be sure your appliance and our monitoring center. Cable or DSL ... 2.0 or higher, Firefox 1.5 or higher * Please note that supports an IEEE 802.11b/g protocol - RemoteVision (optional accessory) Miele's RemoteVision Wi-Fi technology creates a 'virtual link' between your wireless system meets the following requirements - Wording and instructions may vary. 90
If a fault occurs, Miele's client service center will be notified and contact you, or another trusted individual identified on set-up and installation of the RemoteVision module see the "Installation" section of this manual. Be sure your appliance and our monitoring center. Cable or DSL ... 2.0 or higher, Firefox 1.5 or higher * Please note that supports an IEEE 802.11b/g protocol - RemoteVision (optional accessory) Miele's RemoteVision Wi-Fi technology creates a 'virtual link' between your wireless system meets the following requirements - Wording and instructions may vary. 90