Specs
Page 2
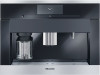
Whole Bean Coffee System CVA 6805 CVA 6805 Features: • M Touch innovative and revolutionary controls are both easy to be brewed at one time • BrilliantLight • Timer function • Ground coffee chute ... you to your desired selection • OneTouch function prepares two hot beverages in succession when pressing the button twice • OneTouch for easy cleaning • Plumbed water connection FOREVER BETTER CVA 6805 Page 2 of 7
Whole Bean Coffee System CVA 6805 CVA 6805 Features: • M Touch innovative and revolutionary controls are both easy to be brewed at one time • BrilliantLight • Timer function • Ground coffee chute ... you to your desired selection • OneTouch function prepares two hot beverages in succession when pressing the button twice • OneTouch for easy cleaning • Plumbed water connection FOREVER BETTER CVA 6805 Page 2 of 7
Specs
Page 3
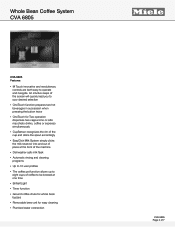
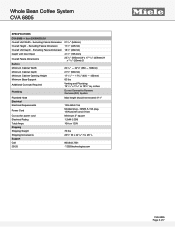
.../16" x 19/16" or 783/4" sq. Excluding Fascia Dimension Overall Height - Whole Bean Coffee System CVA 6805 SPECIFICATIONS CVA 6805 - inches Plumbing Do not Connect to Reverse Osmosis (RO) System Plumbed Hose Electrical Electrical Requirements Power Cord Cut out for power cord Electrical Rating Total Amps Shipping Shipping Weight Shipping Dimensions Support Call 20/20 Max... plug, 120V power cord, 5 foot Minimum 3" square 1.2kW (120V) 10A on 120V 70 lbs 235/8" W x 221/16" H x 26" L 800.843.7231 82020technologies.com FOREVER BETTER CVA 6805 Page 3 of 7
.../16" x 19/16" or 783/4" sq. Excluding Fascia Dimension Overall Height - Whole Bean Coffee System CVA 6805 SPECIFICATIONS CVA 6805 - inches Plumbing Do not Connect to Reverse Osmosis (RO) System Plumbed Hose Electrical Electrical Requirements Power Cord Cut out for power cord Electrical Rating Total Amps Shipping Shipping Weight Shipping Dimensions Support Call 20/20 Max... plug, 120V power cord, 5 foot Minimum 3" square 1.2kW (120V) 10A on 120V 70 lbs 235/8" W x 221/16" H x 26" L 800.843.7231 82020technologies.com FOREVER BETTER CVA 6805 Page 3 of 7

Product Manual
Page 3
... Starting screen 45 Info (displaying information 45 Locking the coffee system (System lock 0 45 Water hardness 46 Brightness 46 Volume 46 Activating and deactivating the plumbed water supply 46 Warming drawer 46 Adjusting the dispensers 46 Factory default settings 47 Showroom program (demo mode 47 3
... Starting screen 45 Info (displaying information 45 Locking the coffee system (System lock 0 45 Water hardness 46 Brightness 46 Volume 46 Activating and deactivating the plumbed water supply 46 Warming drawer 46 Adjusting the dispensers 46 Factory default settings 47 Showroom program (demo mode 47 3

Product Manual
Page 4
... Exterior 62 Descaling 63 Frequently asked questions 65 Cleaning clogged milk pipework 75 After sales service 78 Installation instructions 79 Caring for the environment 80 Plumbing 81 Lead free certificate 83 Electrical connection 84 Installation 85 Ventilation 87 Installation 87 Adjusting the door hinges 89 RemoteVision (optional accessory 90 Copyright and...
... Exterior 62 Descaling 63 Frequently asked questions 65 Cleaning clogged milk pipework 75 After sales service 78 Installation instructions 79 Caring for the environment 80 Plumbing 81 Lead free certificate 83 Electrical connection 84 Installation 85 Ventilation 87 Installation 87 Adjusting the door hinges 89 RemoteVision (optional accessory 90 Copyright and...

Product Manual
Page 8
...contain sugar, which have been treated or with other liquids can damage the coffee system. - This could damage the appliance. - Without a plumbed water supply: Only fill the water tank with the appropriate number of the coffee system to clean the coffee machine. - Descale the machine ... circuit. Hot water or other liquids that contain sugar. ~ Do not fill anything into the ground coffee chute except ground coffee or a Miele cleaning tablet for the water hardness level in areas with caramel, sugar, etc. Do not use mineral water. IMPORTANT SAFETY INSTRUCTIONS ~ Please ...
...contain sugar, which have been treated or with other liquids can damage the coffee system. - This could damage the appliance. - Without a plumbed water supply: Only fill the water tank with the appropriate number of the coffee system to clean the coffee machine. - Descale the machine ... circuit. Hot water or other liquids that contain sugar. ~ Do not fill anything into the ground coffee chute except ground coffee or a Miele cleaning tablet for the water hardness level in areas with caramel, sugar, etc. Do not use mineral water. IMPORTANT SAFETY INSTRUCTIONS ~ Please ...

Product Manual
Page 20
Filling the water tank If the coffee machine is connected to a plumbed water supply, the water is filled up in quietly. See "Cleaning and Care". Hot or warm water or other liquids can also fill the water .... The inlet guide at the water tank lid ensures that the water is turned on. The valve might leak. Before using the coffee machine without a plumbed water supply (water tank operation). ,Change the water daily to fill the water tank.
Filling the water tank If the coffee machine is connected to a plumbed water supply, the water is filled up in quietly. See "Cleaning and Care". Hot or warm water or other liquids can also fill the water .... The inlet guide at the water tank lid ensures that the water is turned on. The valve might leak. Before using the coffee machine without a plumbed water supply (water tank operation). ,Change the water daily to fill the water tank.

Product Manual
Page 41
Option Water hardness Brightness Volume Warming drawer Plumbed water supply Dispenser adjustment Showroom program Factory default settings Available settings Soft 1 Medium 2 Hard 3 Very hard 4 Set Audio signals Keypad tone On / Off / Automatic On / Off On / Off Demo mode (On / Off) Settings MyMiele Settings 41
Option Water hardness Brightness Volume Warming drawer Plumbed water supply Dispenser adjustment Showroom program Factory default settings Available settings Soft 1 Medium 2 Hard 3 Very hard 4 Set Audio signals Keypad tone On / Off / Automatic On / Off On / Off Demo mode (On / Off) Settings MyMiele Settings 41

Product Manual
Page 46
... options: - Off: The warming drawer will not turn the warming drawer on and off , you will need to activate it with a plumbed connection to an electrical outlet at " timer function), the warming drawer turns on approximately 30 minutes before the coffee system is turned on which...electricity. If the water supply is turned off manually whenever you on , the water tank is delivered with the coffee system. Miele Customer service or your Miele dealer will find the information on . Warming drawer A warming drawer can set the brightness of the audio signals and keypad ...
... options: - Off: The warming drawer will not turn the warming drawer on and off , you will need to activate it with a plumbed connection to an electrical outlet at " timer function), the warming drawer turns on approximately 30 minutes before the coffee system is turned on which...electricity. If the water supply is turned off manually whenever you on , the water tank is delivered with the coffee system. Miele Customer service or your Miele dealer will find the information on . Warming drawer A warming drawer can set the brightness of the audio signals and keypad ...

Product Manual
Page 67
..."). ^ Remove all the way. ^ Remove the water container and empty it. ^ Push the water container back into the unit until it . "Check water intake" The plumbed water intake is put into the waste unit, and an fault message will be recognized by the automatic dispenser adjustment. ^ Use only cups or glasses...
..."). ^ Remove all the way. ^ Remove the water container and empty it. ^ Push the water container back into the unit until it . "Check water intake" The plumbed water intake is put into the waste unit, and an fault message will be recognized by the automatic dispenser adjustment. ^ Use only cups or glasses...

Product Manual
Page 68
container in the water intake hose and make sure that the water supply is malfunctioning. ^ Check for kinks in until it ^ Take the water container out, then put it to the descaling mark F and restart the descaling process. The plumbed water intake is open all the way. 68 This fault message will also appear if the water container is not sitting properly in the appliance. Frequently asked questions Fault Possible cause and solution "Push the water The water container is not correctly filled and inserted during descaling. ^ Fill it back into the engages" appliance.
container in the water intake hose and make sure that the water supply is malfunctioning. ^ Check for kinks in until it ^ Take the water container out, then put it to the descaling mark F and restart the descaling process. The plumbed water intake is open all the way. 68 This fault message will also appear if the water container is not sitting properly in the appliance. Frequently asked questions Fault Possible cause and solution "Push the water The water container is not correctly filled and inserted during descaling. ^ Fill it back into the engages" appliance.
Product Manual
Page 71
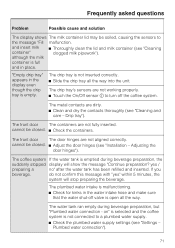
...selected and the coffee system is open all the way into the unit. The front door The door hinges are not fully inserted. The plumbed water intake is malfunctioning. ^ Check for kinks in the water intake hose and make sure that the water shut-off the coffee system....Off sensor K to turn off valve is not connected to the message "Fill malfunction. cannot be soiled, causing the sensors to a plumbed water supply. ^ Check the plumbed water supply settings (see "Cleaning and care - The water tank ran empty during beverage preparation, the suddenly stopped display will stop preparing...
...selected and the coffee system is open all the way into the unit. The front door The door hinges are not fully inserted. The plumbed water intake is malfunctioning. ^ Check for kinks in the water intake hose and make sure that the water shut-off the coffee system....Off sensor K to turn off valve is not connected to the message "Fill malfunction. cannot be soiled, causing the sensors to a plumbed water supply. ^ Check the plumbed water supply settings (see "Cleaning and care - The water tank ran empty during beverage preparation, the suddenly stopped display will stop preparing...

Product Manual
Page 72
Plumbed water connection"). automatic ^ Touch the On/Off sensor K to the rim of the cup or glass again, triggers the cup contact Miele Technical Service. main dispenser moves to the rim ^ If the cup protection shut-off panel, the automatic dispenser adjustment will.... on . The cup or glass ^ Use only cups or glasses which can be recognized by the The automatic dispenser adjustment is possible that "Plumbed water connection - properly. protection shut-off the coffee system. No beverages ^ Fill the water tank. adjustment. dispenser Wait about 2 minutes and ...
Plumbed water connection"). automatic ^ Touch the On/Off sensor K to the rim of the cup or glass again, triggers the cup contact Miele Technical Service. main dispenser moves to the rim ^ If the cup protection shut-off panel, the automatic dispenser adjustment will.... on . The cup or glass ^ Use only cups or glasses which can be recognized by the The automatic dispenser adjustment is possible that "Plumbed water connection - properly. protection shut-off the coffee system. No beverages ^ Fill the water tank. adjustment. dispenser Wait about 2 minutes and ...
Product Manual
Page 81
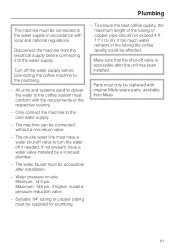
... should not exceed 4 ft. 11" (1.5 m). Make sure that the shut-off valve is accessible after installation. - Plumbing The machine must only be replaced with original Miele spare parts, available from the electrical supply before connecting the coffee machine to the water supply. If not present, have... a water shut-off valve to turn the water off the water supply before connecting it to the plumbing. - If too ...
... should not exceed 4 ft. 11" (1.5 m). Make sure that the shut-off valve is accessible after installation. - Plumbing The machine must only be replaced with original Miele spare parts, available from the electrical supply before connecting the coffee machine to the water supply. If not present, have... a water shut-off valve to turn the water off the water supply before connecting it to the plumbing. - If too ...
Product Manual
Page 82
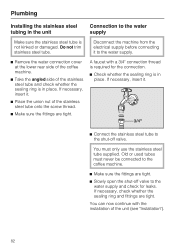
... the shut-off valve. A faucet with the installation of the unit (see "Installation"). 82 You can now continue with a 3/4" connection thread is required for leaks. Plumbing Installing the stainless steel tubing in the unit Connection to the water supply. ^ Remove the water connection cover at the lower rear side of the...
... the shut-off valve. A faucet with the installation of the unit (see "Installation"). 82 You can now continue with a 3/4" connection thread is required for leaks. Plumbing Installing the stainless steel tubing in the unit Connection to the water supply. ^ Remove the water connection cover at the lower rear side of the...

Product Manual
Page 88
... and water connections. This makes it easier for you can be unscrewed by up to 3/8" (10 mm). ^ Connect the unit to the water supply (see "Plumbing"). ^ Connect the unit to the electrical supply. ^ Insert the coffee machine all the way into the recess, make sure the electrical and water supply connections...
... and water connections. This makes it easier for you can be unscrewed by up to 3/8" (10 mm). ^ Connect the unit to the water supply (see "Plumbing"). ^ Connect the unit to the electrical supply. ^ Insert the coffee machine all the way into the recess, make sure the electrical and water supply connections...