Specs
Page 2
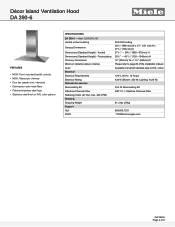
... the installation manual Available in brushed stainless steel or RAL colors 120 V, 60 Hz, 15 Amps 430 W (Blower: 350 W; Décor Island Ventilation Hood DA 390-6 FOREVER BETTER FEATURES • NEW: Front mounted backlit controls • NEW: Telescopic chimney • Four fan speeds (incl. Vented Dimensions (Standard Height) - Recirculating Chimney Dimensions Minimum distance above cooktop Color Electrical Electrical Requirements Electrical Rating Optional Accessories Recirculating Kit OdorFree Charcoal Filter Reducing Collar (air flow max. 400 CFM) Shipping Shipping Weight Support...
... the installation manual Available in brushed stainless steel or RAL colors 120 V, 60 Hz, 15 Amps 430 W (Blower: 350 W; Décor Island Ventilation Hood DA 390-6 FOREVER BETTER FEATURES • NEW: Front mounted backlit controls • NEW: Telescopic chimney • Four fan speeds (incl. Vented Dimensions (Standard Height) - Recirculating Chimney Dimensions Minimum distance above cooktop Color Electrical Electrical Requirements Electrical Rating Optional Accessories Recirculating Kit OdorFree Charcoal Filter Reducing Collar (air flow max. 400 CFM) Shipping Shipping Weight Support...

Product Manual
Page 2
...the fan 17 Turning cooktop lighting On/Off 17 Automatic safety shut-down 17 Cleaning and care 18 Stainless steel housing 18 Grease filters ...19 OdorFree Charcoal Filter 21 Disposing of the OdorFree Charcoal Filter 21 Changing a halogen lamp 22 Installation ...23 Before installation 23 Installation parts...23 Appliance dimensions 24 Distance between cooktop and ventilation hood (S 25 Installation recommendations 26 Structural support 26 Removing the protective film 26 Exhaust duct...38 Condensate trap ...39 Electrical connection 40 Grounding Instructions 40 Service and warranty...
...the fan 17 Turning cooktop lighting On/Off 17 Automatic safety shut-down 17 Cleaning and care 18 Stainless steel housing 18 Grease filters ...19 OdorFree Charcoal Filter 21 Disposing of the OdorFree Charcoal Filter 21 Changing a halogen lamp 22 Installation ...23 Before installation 23 Installation parts...23 Appliance dimensions 24 Distance between cooktop and ventilation hood (S 25 Installation recommendations 26 Structural support 26 Removing the protective film 26 Exhaust duct...38 Condensate trap ...39 Electrical connection 40 Grounding Instructions 40 Service and warranty...
Product Manual
Page 3
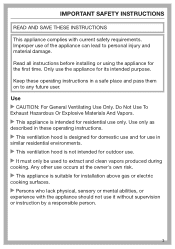
... on to any future user. Any other use occurs at the owner's own risk. This appliance is designed for domestic use and for outdoor use. It must only be used to personal injury and material damage. Keep these operating instructions. This ventilation hood is suitable for its intended purpose. Only use the appliance for installation above gas or electric cooking surfaces. Persons...
... on to any future user. Any other use occurs at the owner's own risk. This appliance is designed for domestic use and for outdoor use. It must only be used to personal injury and material damage. Keep these operating instructions. This ventilation hood is suitable for its intended purpose. Only use the appliance for installation above gas or electric cooking surfaces. Persons...
Product Manual
Page 4
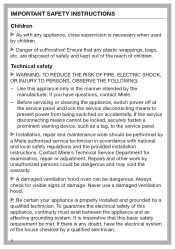
... could be dangerous and may void the warranty. A damaged ventilation hood oven can be locked, securely fasten a prominent warning device, such as a tag, to prevent power from being switched on accidentally. Before servicing or cleaning the appliance, switch power off at the service panel and lock the service disconnecting means to the service panel. Installation, repair and maintenance work by a qualified technician. are disposed of safely...
... could be dangerous and may void the warranty. A damaged ventilation hood oven can be locked, securely fasten a prominent warning device, such as a tag, to prevent power from being switched on accidentally. Before servicing or cleaning the appliance, switch power off at the service panel and lock the service disconnecting means to the service panel. Installation, repair and maintenance work by a qualified technician. are disposed of safely...
Product Manual
Page 5
... the "Cleaning and care" section of appliance safety. To ensure safe operation, only use the ventilation hood after it has been properly installed. This ventilation hood may not be used in doubt, consult a qualified electrician. Do not use a power bar or extension cord to connect the ventilation hood to electricity. Under no circumstances should be replaced by Miele original parts only. on the electrical service panel have been removed. - It is highly dangerous...
... the "Cleaning and care" section of appliance safety. To ensure safe operation, only use the ventilation hood after it has been properly installed. This ventilation hood may not be used in doubt, consult a qualified electrician. Do not use a power bar or extension cord to connect the ventilation hood to electricity. Under no circumstances should be replaced by Miele original parts only. on the electrical service panel have been removed. - It is highly dangerous...
Product Manual
Page 6
... smoking and greasy spillovers may ignite. 6 c) Clean the ventilation hood frequently. Grease should not be allowed to accumulate on when cooking at high settings. To avoid the risk of the cooking area. Never use WARNING: TO REDUCE THE RISK OF A COOKTOP GREASE FIRE: - b) Always turn the hood on the fan or filter. - Always use cookware appropriate for the size of fire, do not flambé...
... smoking and greasy spillovers may ignite. 6 c) Clean the ventilation hood frequently. Grease should not be allowed to accumulate on when cooking at high settings. To avoid the risk of the cooking area. Never use WARNING: TO REDUCE THE RISK OF A COOKTOP GREASE FIRE: - b) Always turn the hood on the fan or filter. - Always use cookware appropriate for the size of fire, do not flambé...
Product Manual
Page 9
... regulations prohibit the installation of the ventilation hood specified in the "Installation" section must be operated above solid fuel stoves. Insufficient distance between the cooking appliance and the ventilation hood can result in accordance with all applicable codes and standards, including fire-rated construction. - a) Installation work and electrical wiring must be vented to prevent back drafting. e) Do not use the greater distance. 9 IMPORTANT SAFETY INSTRUCTIONS Proper installation WARNING...
... regulations prohibit the installation of the ventilation hood specified in the "Installation" section must be operated above solid fuel stoves. Insufficient distance between the cooking appliance and the ventilation hood can result in accordance with all applicable codes and standards, including fire-rated construction. - a) Installation work and electrical wiring must be vented to prevent back drafting. e) Do not use the greater distance. 9 IMPORTANT SAFETY INSTRUCTIONS Proper installation WARNING...
Product Manual
Page 10
... REDUCE THE RISK OF FIRE USE ONLY METAL DUCTWORK. 10 IMPORTANT SAFETY INSTRUCTIONS Be sure to observe the information contained in the "Installation" section when mounting the ventilation hood. Metal parts can be obtained from your hands from Miele Technical Service. Exhaust air should not be vented into a chimney or vent flue which is otherwise in use pipes or tubes made of non...
... REDUCE THE RISK OF FIRE USE ONLY METAL DUCTWORK. 10 IMPORTANT SAFETY INSTRUCTIONS Be sure to observe the information contained in the "Installation" section when mounting the ventilation hood. Metal parts can be obtained from your hands from Miele Technical Service. Exhaust air should not be vented into a chimney or vent flue which is otherwise in use pipes or tubes made of non...
Product Manual
Page 13
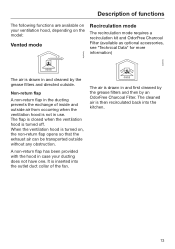
... the ventilation hood is inserted into the kitchen. 13 The air is drawn in and cleaned by an OdorFree Charcoal Filter. When the ventilation hood is turned on the model: Vented mode Recirculation mode The recirculation mode requires a recirculation kit and OdorFree Charcoal Filter (available as optional accessories, see "Technical Data" for more information) The air is drawn in the ducting prevents the exchange of inside and outside without any obstruction. It is turned off...
... the ventilation hood is inserted into the kitchen. 13 The air is drawn in and cleaned by an OdorFree Charcoal Filter. When the ventilation hood is turned on the model: Vented mode Recirculation mode The recirculation mode requires a recirculation kit and OdorFree Charcoal Filter (available as optional accessories, see "Technical Data" for more information) The air is drawn in the ducting prevents the exchange of inside and outside without any obstruction. It is turned off...
Product Manual
Page 15
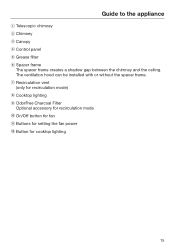
The ventilation hood can be installed with or without the spacer frame. Guide to the appliance a Telescopic chimney b Chimney c Canopy d Control panel e Grease filter f Spacer frame The spacer frame creates a shadow gap between the chimney and the ceiling. g Recirculation vent (only for recirculation mode) h Cooktop lighting i OdorFree Charcoal Filter Optional accessory for recirculation mode j On/Off button for fan k Buttons for setting the fan power l Button for cooktop lighting 15
The ventilation hood can be installed with or without the spacer frame. Guide to the appliance a Telescopic chimney b Chimney c Canopy d Control panel e Grease filter f Spacer frame The spacer frame creates a shadow gap between the chimney and the ceiling. g Recirculation vent (only for recirculation mode) h Cooktop lighting i OdorFree Charcoal Filter Optional accessory for recirculation mode j On/Off button for fan k Buttons for setting the fan power l Button for cooktop lighting 15
Product Manual
Page 16
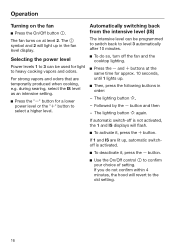
... the power level Power levels 1 to 3 can be used for a lower power level or the "" button to the old setting. 16 Automatically switching back from the intensive level (IS) The intensive level can be programmed to switch back to level 3 automatically after 10 minutes. To do not confirm within 4 minutes, the hood will revert to select a higher level. If automatic switch-off the fan and the cooktop lighting...
... the power level Power levels 1 to 3 can be used for a lower power level or the "" button to the old setting. 16 Automatically switching back from the intensive level (IS) The intensive level can be programmed to switch back to level 3 automatically after 10 minutes. To do not confirm within 4 minutes, the hood will revert to select a higher level. If automatic switch-off the fan and the cooktop lighting...
Product Manual
Page 18
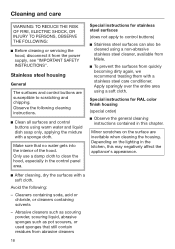
... interior of the hood. Make sure that still contain residues from the power supply, see "IMPORTANT SAFETY INSTRUCTIONS". Apply sparingly over the entire area using warm water and liquid dish soap only, applying the mixture with a stainless steel care conditioner. Special instructions for stainless steel surfaces (does not apply to clean the hood, especially in the control panel area. Minor scratches on the lighting in this...
... interior of the hood. Make sure that still contain residues from the power supply, see "IMPORTANT SAFETY INSTRUCTIONS". Apply sparingly over the entire area using warm water and liquid dish soap only, applying the mixture with a stainless steel care conditioner. Special instructions for stainless steel surfaces (does not apply to clean the hood, especially in the control panel area. Minor scratches on the lighting in this...
Product Manual
Page 19
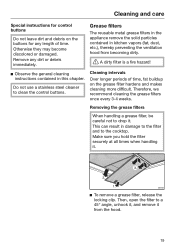
... to the filter and to clean the control buttons. Removing the grease filters When handling a grease filter, be careful not to a 45° angle, unhook it, and remove it from becoming dirty. A dirty filter is a fire hazard! Observe the general cleaning instructions contained in kitchen vapors (fat, dust, etc.), thereby preventing the ventilation hood from the hood. 19 Therefore, we recommend cleaning the grease filters once every 3-4 weeks. Make sure...
... to the filter and to clean the control buttons. Removing the grease filters When handling a grease filter, be careful not to a 45° angle, unhook it, and remove it from becoming dirty. A dirty filter is a fire hazard! Observe the general cleaning instructions contained in kitchen vapors (fat, dust, etc.), thereby preventing the ventilation hood from the hood. 19 Therefore, we recommend cleaning the grease filters once every 3-4 weeks. Make sure...
Product Manual
Page 21
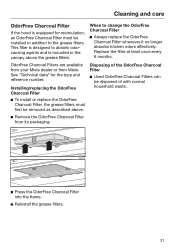
... every 6 months. Cleaning and care OdorFree Charcoal Filter If the hood is mounted in addition to the grease filters. See "Technical data" for recirculation, an OdorFree Charcoal Filter must first be removed as described above the grease filters. Disposing of the OdorFree Charcoal Filter Used OdorFree Charcoal Filters can be installed in the canopy above . Remove the OdorFree Charcoal Filter from Miele. This filter is designed to change the OdorFree Charcoal Filter Always replace the OdorFree Charcoal Filter whenever it...
... every 6 months. Cleaning and care OdorFree Charcoal Filter If the hood is mounted in addition to the grease filters. See "Technical data" for recirculation, an OdorFree Charcoal Filter must first be removed as described above the grease filters. Disposing of the OdorFree Charcoal Filter Used OdorFree Charcoal Filters can be installed in the canopy above . Remove the OdorFree Charcoal Filter from Miele. This filter is designed to change the OdorFree Charcoal Filter Always replace the OdorFree Charcoal Filter whenever it...
Product Manual
Page 23
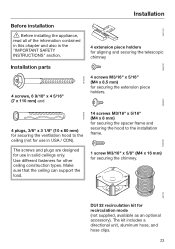
... ceiling can support the load. 14 screws M3/16" x 5/16" (M4 x 8 mm) for securing the spacer frame and securing the hood to the ceiling (not for use in solid ceilings only. Use different fasteners for securing the chimney. DUI 32 recirculation kit for use in the "IMPORTANT SAFETY INSTRUCTIONS" section. The kit includes a directional unit, aluminum hose, and hose clips. 23 Installation parts 4 screws, 6 9/16" x 4 5/16" (7 x 110 mm) and Installation 4 extension...
... ceiling can support the load. 14 screws M3/16" x 5/16" (M4 x 8 mm) for securing the spacer frame and securing the hood to the ceiling (not for use in solid ceilings only. Use different fasteners for securing the chimney. DUI 32 recirculation kit for use in the "IMPORTANT SAFETY INSTRUCTIONS" section. The kit includes a directional unit, aluminum hose, and hose clips. 23 Installation parts 4 screws, 6 9/16" x 4 5/16" (7 x 110 mm) and Installation 4 extension...
Product Manual
Page 25
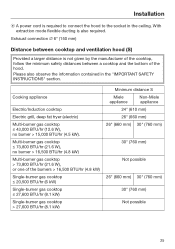
... flexible ducting is not given by the manufacturer of the hood. Please also observe the information contained in the ceiling. Exhaust connection 6" (150 mm) Distance between a cooktop and the bottom of the cooktop, follow the minimum safety distances between cooktop and ventilation hood (S) Provided a larger distance is also required. Installation f A power cord is required to connect the hood to the socket in the "IMPORTANT SAFETY INSTRUCTIONS" section...
... flexible ducting is not given by the manufacturer of the hood. Please also observe the information contained in the ceiling. Exhaust connection 6" (150 mm) Distance between a cooktop and the bottom of the cooktop, follow the minimum safety distances between cooktop and ventilation hood (S) Provided a larger distance is also required. Installation f A power cord is required to connect the hood to the socket in the "IMPORTANT SAFETY INSTRUCTIONS" section...
Product Manual
Page 26
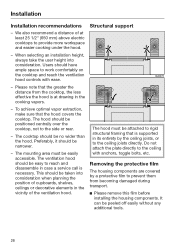
... any additional tools. 26 The hood should have ample space to the ceiling with ease. - Users should be attached to rigid structural framing that is necessary. Do not attach the plate directly to work comfortably on the cooktop and reach the ventilation hood controls with anchors, toggle bolts, etc. Please note that the hood covers the cooktop. The mounting area must be positioned centrally...
... any additional tools. 26 The hood should have ample space to the ceiling with ease. - Users should be attached to rigid structural framing that is necessary. Do not attach the plate directly to work comfortably on the cooktop and reach the ventilation hood controls with anchors, toggle bolts, etc. Please note that the hood covers the cooktop. The mounting area must be positioned centrally...
Product Manual
Page 35
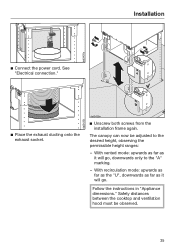
... power cord. With vented mode: upwards as far as it will go , downwards only to the desired height, observing the permissible height ranges: - The canopy can now be observed. 35 Safety distances between the cooktop and ventilation hood must be adjusted to the "A" marking. - See "Electrical connection." Place the exhaust ducting onto the exhaust socket. Unscrew both screws from the installation frame again. Follow the instructions...
... power cord. With vented mode: upwards as far as it will go , downwards only to the desired height, observing the permissible height ranges: - The canopy can now be observed. 35 Safety distances between the cooktop and ventilation hood must be adjusted to the "A" marking. - See "Electrical connection." Place the exhaust ducting onto the exhaust socket. Unscrew both screws from the installation frame again. Follow the instructions...

Product Manual
Page 38
... ventilation hood. If the exhaust duct is to be conducted into spaces within walls or ceilings or in these different areas may differ greatly, which means that all local building codes when installing the hood. Only use metal ductwork. Follow all connections are needed, make sure they have a large radius. - Make sure that the problem of condensation will reduce extraction performance and increase operating noise...
... ventilation hood. If the exhaust duct is to be conducted into spaces within walls or ceilings or in these different areas may differ greatly, which means that all local building codes when installing the hood. Only use metal ductwork. Follow all connections are needed, make sure they have a large radius. - Make sure that the problem of condensation will reduce extraction performance and increase operating noise...

Product Manual
Page 40
... 40 Installation, repairs and other work is any question concerning the electrical connection of this model hood. This appliance must be hard wired accordingly: Black/Red wire: connect to L1 (live) White wire: connect to N (neutral) Green wire: connect to your power supply, please consult a licensed electrician or call Miele's Technical Service Department. Ensure that the voltage, load and circuit rating information found on the data plate (located behind the baffle filters...
... 40 Installation, repairs and other work is any question concerning the electrical connection of this model hood. This appliance must be hard wired accordingly: Black/Red wire: connect to L1 (live) White wire: connect to N (neutral) Green wire: connect to your power supply, please consult a licensed electrician or call Miele's Technical Service Department. Ensure that the voltage, load and circuit rating information found on the data plate (located behind the baffle filters...


