
Operating and Installation manual
Page 2
... INSTRUCTIONS 4 Guide to the dishwasher 8 Control panel 9 Caring for the environment 10 Before using for the first time 11 T open the door 11 Display 12 Filling the salt container 14 Refill salt message 15 Rinse aid 16 Adding rinse aid 16 Rinse aid indicator 17 Loading the dishwasher 18 Items not recommended for dishwashing 19 Typical load for 10 place settings with cutlery tray 20 Typical load for 16 place settings with cutlery tray 21 Upper basket...
... INSTRUCTIONS 4 Guide to the dishwasher 8 Control panel 9 Caring for the environment 10 Before using for the first time 11 T open the door 11 Display 12 Filling the salt container 14 Refill salt message 15 Rinse aid 16 Adding rinse aid 16 Rinse aid indicator 17 Loading the dishwasher 18 Items not recommended for dishwashing 19 Typical load for 10 place settings with cutlery tray 20 Typical load for 16 place settings with cutlery tray 21 Upper basket...

Operating and Installation manual
Page 3
... 46 Leaving the Settings menu 46 Frequently Asked Questions 47 Technical faults 47 Faults in the water intake/water drain 48 General problems with the dishwasher 49 Sounds 50 Poor cleaning results 51 After sales service 54 User Maintenance Instructions 55 Cleaning and Care 56 Triple filter system 58 Cleaning the drain pump and non-return valve 61 Installation instructions 63 Electrical connection 64 Plumbing 66 Connection to the water supply 66 Drainage 67 Noise measurement 68 General...
... 46 Leaving the Settings menu 46 Frequently Asked Questions 47 Technical faults 47 Faults in the water intake/water drain 48 General problems with the dishwasher 49 Sounds 50 Poor cleaning results 51 After sales service 54 User Maintenance Instructions 55 Cleaning and Care 56 Triple filter system 58 Cleaning the drain pump and non-return valve 61 Installation instructions 63 Electrical connection 64 Plumbing 66 Connection to the water supply 66 Drainage 67 Noise measurement 68 General...

Operating and Installation manual
Page 4
... all instructions before installation or use only. If there is not supported by the manufacturer and could be dangerous. ~ Persons who lack physical, sensory or mental abilities, or experience with a genuine Miele power cord. ~ The outlet must be replaced by unplugging the unit, "tripping" the circuit breaker or removing the fuse. ~ Do not use . ~ It must correspond to electricity. Any other usage is...
... all instructions before installation or use only. If there is not supported by the manufacturer and could be dangerous. ~ Persons who lack physical, sensory or mental abilities, or experience with a genuine Miele power cord. ~ The outlet must be replaced by unplugging the unit, "tripping" the circuit breaker or removing the fuse. ~ Do not use . ~ It must correspond to electricity. Any other usage is...
Operating and Installation manual
Page 5
... installation instructions. ~ Installation and repair work is complete. ~ Do not place hose or power cord next to corrosive substances. on the plug which could cause injury or property damage if cut the intake hose or submerge it in a tight space may crimp the power cord or put pressure on a boat). ~ , WARNING - Unplug the machine and contact Miele Technical Service Department. ~ Ensure that the cabinet opening for the dishwasher...
... installation instructions. ~ Installation and repair work is complete. ~ Do not place hose or power cord next to corrosive substances. on the plug which could cause injury or property damage if cut the intake hose or submerge it in a tight space may crimp the power cord or put pressure on a boat). ~ , WARNING - Unplug the machine and contact Miele Technical Service Department. ~ Ensure that the cabinet opening for the dishwasher...
Operating and Installation manual
Page 6
... from the dishwasher! Harmful residues could be replaced by a Miele Service technician with detergent. Close the door when not in use. ~ Under certain conditions, hydrogen gas may be produced in , on all panels are "dishwasher safe". HYDROGEN GAS IS EXPLOSIVE. It will release any accumulated hydrogen gas. Load sharp items pointing downwards to play in a hot water system that all detergents and rinse aids out of...
... from the dishwasher! Harmful residues could be replaced by a Miele Service technician with detergent. Close the door when not in use. ~ Under certain conditions, hydrogen gas may be produced in , on all panels are "dishwasher safe". HYDROGEN GAS IS EXPLOSIVE. It will release any accumulated hydrogen gas. Load sharp items pointing downwards to play in a hot water system that all detergents and rinse aids out of...

Operating and Installation manual
Page 7
..., i.e. Use caution, the air may be hot! ~ Advise the user of time (e.g. SAVE THESE INSTRUCTIONS 7 Allow the dishes to cool until they are cool enough to avoid injuries by walking, bumping or knocking into the partially opened door. ~ Dishes can be used for a longer period of the Drying Plus feature to handle before unloading them. ~ The water supply must be turned off when the appliance is removed from locking...
..., i.e. Use caution, the air may be hot! ~ Advise the user of time (e.g. SAVE THESE INSTRUCTIONS 7 Allow the dishes to cool until they are cool enough to avoid injuries by walking, bumping or knocking into the partially opened door. ~ Dishes can be used for a longer period of the Drying Plus feature to handle before unloading them. ~ The water supply must be turned off when the appliance is removed from locking...

Operating and Installation manual
Page 9
The different dishwasher models are named : Standard = 32 1/16" (81.5 cm) high dishwashers XXL = 33 11/16" (85.5 cm) high dishwashers. 9 Control panel Guide to the dishwasher a Display b Delay start button , with indicator light c Turbo button with indicator light d Intensive lower basket button with indicator light e Program selection f Program selector button g On/Off K button with indicator light h Optical Interface (in-operation indicator light) This operating instruction manual describes several dishwasher models with different indicated settings.
The different dishwasher models are named : Standard = 32 1/16" (81.5 cm) high dishwashers XXL = 33 11/16" (85.5 cm) high dishwashers. 9 Control panel Guide to the dishwasher a Display b Delay start button , with indicator light c Turbo button with indicator light d Intensive lower basket button with indicator light e Program selection f Program selector button g On/Off K button with indicator light h Optical Interface (in-operation indicator light) This operating instruction manual describes several dishwasher models with different indicated settings.

Operating and Installation manual
Page 16
... rinse aid reservoir with detergent (liquid or powder) will damage the reservoir. Rinse aid"). 16 This prevents over-foaming occurring during the wash program. ^ Clean any spilled rinse aid. Failure to close it click shut. Adding rinse aid ^ Pour liquid rinse aid into the reservoir. The rinse aid reservoir holds approximately 3.7 fl. The rinse aid is not needed. When using for best results (see "Settings - You can adjust the rinse aid dosage for the first time Rinse aid Rinse aid...
... rinse aid reservoir with detergent (liquid or powder) will damage the reservoir. Rinse aid"). 16 This prevents over-foaming occurring during the wash program. ^ Clean any spilled rinse aid. Failure to close it click shut. Adding rinse aid ^ Pour liquid rinse aid into the reservoir. The rinse aid reservoir holds approximately 3.7 fl. The rinse aid is not needed. When using for best results (see "Settings - You can adjust the rinse aid dosage for the first time Rinse aid Rinse aid...

Operating and Installation manual
Page 24
Use the high setting for small glasses and tumblers. Use the low setting for tall glasses and stem ware. 24 Loading the dishwasher Adjusting the height: You can set the support bar at two different heights. ^ Pull the support bar upwards and click it back into position at the required height.
Use the high setting for small glasses and tumblers. Use the low setting for tall glasses and stem ware. 24 Loading the dishwasher Adjusting the height: You can set the support bar at two different heights. ^ Pull the support bar upwards and click it back into position at the required height.
Operating and Installation manual
Page 35
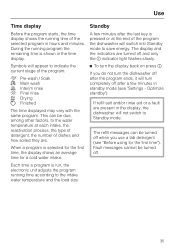
Use Time display Standby Before the program starts, the time display shows the running time of the program: 1 Pre-wash / Soak 8 Main wash % Interim rinse ( Final rinse G Drying O Finished The time displayed may vary with the same program. When a program is shown in the display, the dishwasher will switch into Standby mode to save energy. During the running time according to the water temperature at the end of dishes and how soiled they are...
Use Time display Standby Before the program starts, the time display shows the running time of the program: 1 Pre-wash / Soak 8 Main wash % Interim rinse ( Final rinse G Drying O Finished The time displayed may vary with the same program. When a program is shown in the display, the dishwasher will switch into Standby mode to save energy. During the running time according to the water temperature at the end of dishes and how soiled they are...
Operating and Installation manual
Page 36
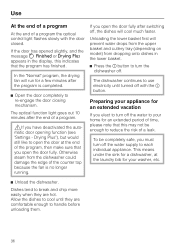
... the dishes to cool until turned off with the door closed. Use At the end of a program At the end of a program the optical control light flashes slowly with the K button. To be enough to turn off . In the "Normal" program, the drying fan will run for a few minutes after switching off the water to your home for an extended period of time, please note that this indicates...
... the dishes to cool until turned off with the door closed. Use At the end of a program At the end of a program the optical control light flashes slowly with the K button. To be enough to turn off . In the "Normal" program, the drying fan will run for a few minutes after switching off the water to your home for an extended period of time, please note that this indicates...

Operating and Installation manual
Page 43
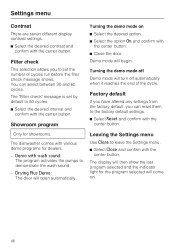
Use a lower setting for rinse aid. Buzzer at the end of a program is 3 ml rinse aid. The buzzer at the end of a program sounds four times in intervals with the center button. 43 If no volume level is selected, the buzzer is activated, a tone sounds at the end of a program and if a fault occurs. The factory default dosage setting is turned off by default. If smearing or...
Use a lower setting for rinse aid. Buzzer at the end of a program is 3 ml rinse aid. The buzzer at the end of a program sounds four times in intervals with the center button. 43 If no volume level is selected, the buzzer is activated, a tone sounds at the end of a program and if a fault occurs. The factory default dosage setting is turned off by default. If smearing or...
Operating and Installation manual
Page 44
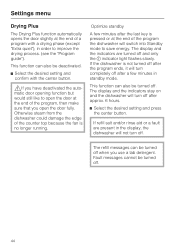
... "Program guide"). If refill salt and/or rinse aid or a fault are turned off and only the K indicator light flashes slowly. This function can also be turned off. 44 Otherwise steam from the dishwasher could damage the edge of a program with the center button. ,If you use a tab detergent. The display and the indicators are present in standby mode. Settings menu Drying Plus The Drying Plus function automatically opens the door slightly...
... "Program guide"). If refill salt and/or rinse aid or a fault are turned off and only the K indicator light flashes slowly. This function can also be turned off. 44 Otherwise steam from the dishwasher could damage the edge of a program with the center button. ,If you use a tab detergent. The display and the indicators are present in standby mode. Settings menu Drying Plus The Drying Plus function automatically opens the door slightly...
Operating and Installation manual
Page 46
... the factory default settings. ^ Select Reset and confirm with the center button. Drying Plus Demo: The door will begin. The display will then show the last program selected and the indicator light for the program selected will turn off Demo mode will come on ^ Select the desired option. ^ Select the option On and confirm with the center button. Filter check This selection...
... the factory default settings. ^ Select Reset and confirm with the center button. Drying Plus Demo: The door will begin. The display will then show the last program selected and the indicator light for the program selected will turn off Demo mode will come on ^ Select the desired option. ^ Select the option On and confirm with the center button. Filter check This selection...

Operating and Installation manual
Page 48
.... Clean the triple filter (see "Cleaning and Care"). - the wash cabinet. - Clean the non-return valve (see There might be water in "Cleaning and care"). Before fixing the fault: - Fault in the drain hose. 48 The water pressure at the water connection is closed. Clean the water intake filter (see "Cleaning and Care"). - the way. Remove any kinks in the water intake. - Clean the drain pump (see "Cleaning and Care"). - Fault in the water intake/water drain Problem One of the following faults appears on the display: 2 Open water supply 2 Water intake...
.... Clean the triple filter (see "Cleaning and Care"). - the wash cabinet. - Clean the non-return valve (see There might be water in "Cleaning and care"). Before fixing the fault: - Fault in the drain hose. 48 The water pressure at the water connection is closed. Clean the water intake filter (see "Cleaning and Care"). - the way. Remove any kinks in the water intake. - Clean the drain pump (see "Cleaning and Care"). - Fault in the water intake/water drain Problem One of the following faults appears on the display: 2 Open water supply 2 Water intake...
Operating and Installation manual
Page 49
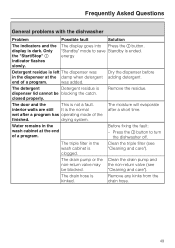
... "Cleaning and care"). drying system. Remove any kinks from the drain hose. 49 The drain hose is clogged. Only the "Start/Stop" K indicator flashes slowly. Press the K button to save Standby is dark. "Cleaning and care"). closed properly. The triple filter in the wash cabinet at the damp when detergent adding detergent. Water remains in the wash cabinet is kinked. The display goes into Press the K button. Frequently Asked Questions General problems with the dishwasher Problem Possible fault Solution The indicators...
... "Cleaning and care"). drying system. Remove any kinks from the drain hose. 49 The drain hose is clogged. Only the "Start/Stop" K indicator flashes slowly. Press the K button to save Standby is dark. "Cleaning and care"). closed properly. The triple filter in the wash cabinet at the damp when detergent adding detergent. Water remains in the wash cabinet is kinked. The display goes into Press the K button. Frequently Asked Questions General problems with the dishwasher Problem Possible fault Solution The indicators...

Operating and Installation manual
Page 50
..., contact a plumber. 50 rearrange loose pieces. A foreign object has become lodged in the basket. This has no effect on the dishwasher. Frequently Asked Questions Sounds Problem There is a knocking noise in the wash cabinet There is a rattling noise in the wash cabinet There is a knocking noise in the water line Possible fault Solution The spray arm is hitting an Interrupt the program, item in the drain pump.
..., contact a plumber. 50 rearrange loose pieces. A foreign object has become lodged in the basket. This has no effect on the dishwasher. Frequently Asked Questions Sounds Problem There is a knocking noise in the wash cabinet There is a rattling noise in the wash cabinet There is a knocking noise in the water line Possible fault Solution The spray arm is hitting an Interrupt the program, item in the drain pump.
Operating and Installation manual
Page 51
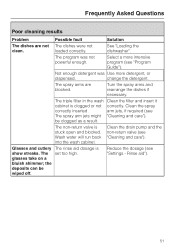
... powerful enough. be wiped off. Glasses and cutlery The rinse aid dosage is stuck open and blocked. Reduce the dosage (see "Cleaning and care"). change the detergent. Wash water will run back into the wash cabinet. Clean the drain pump and the non-return valve (see "Settings - The triple filter in the wash Clean the filter and insert it cabinet is clogged or not correctly. Frequently Asked Questions Poor cleaning results Problem Possible fault Solution The dishes...
... powerful enough. be wiped off. Glasses and cutlery The rinse aid dosage is stuck open and blocked. Reduce the dosage (see "Cleaning and care"). change the detergent. Wash water will run back into the wash cabinet. Clean the drain pump and the non-return valve (see "Settings - The triple filter in the wash Clean the filter and insert it cabinet is clogged or not correctly. Frequently Asked Questions Poor cleaning results Problem Possible fault Solution The dishes...

Operating and Installation manual
Page 64
... the door. Electrical connection ,Installation, repairs and other work by a qualified electrician. if it will reduce the risk of this appliance to the power supply, please consult a licensed electrician or call Miele's Technical Service Department: U 1-800-999-1360 V 1-800-565-6435 Specifications The dishwasher comes equipped with a 4 ft (1.2 m) power cord with a molded plug for the electrical current. Do not modify the plug provided with all local codes and...
... the door. Electrical connection ,Installation, repairs and other work by a qualified electrician. if it will reduce the risk of this appliance to the power supply, please consult a licensed electrician or call Miele's Technical Service Department: U 1-800-999-1360 V 1-800-565-6435 Specifications The dishwasher comes equipped with a 4 ft (1.2 m) power cord with a molded plug for the electrical current. Do not modify the plug provided with all local codes and...

Operating and Installation manual
Page 67
... dishwasher door and remove the lower basket. ^ Pull the lower spray arm firmly upwards to the left or right side at the right rear of the machine. - The existing nipple that is knocked out or removed. - The maximum drain hose length is connected to small it should be replaced or an adapter may be used. The drain hose must be shortened, or the hose could clog. ^ Cut off the vent cap located...
... dishwasher door and remove the lower basket. ^ Pull the lower spray arm firmly upwards to the left or right side at the right rear of the machine. - The existing nipple that is knocked out or removed. - The maximum drain hose length is connected to small it should be replaced or an adapter may be used. The drain hose must be shortened, or the hose could clog. ^ Cut off the vent cap located...


