Warranty conditions
Page 4
... Cleaners, please return the product to arrange Warranty, Repair or Service. Miele has a policy of assuring the availability of Spare Parts and Service for all the relevant Information on your query and direct it in relation to the product at the date of Spare Parts and Service. Please contact Miele for delays due to sourcing of unusual Parts which are required, or due to circumstances...
... Cleaners, please return the product to arrange Warranty, Repair or Service. Miele has a policy of assuring the availability of Spare Parts and Service for all the relevant Information on your query and direct it in relation to the product at the date of Spare Parts and Service. Please contact Miele for delays due to sourcing of unusual Parts which are required, or due to circumstances...
Warranty conditions
Page 8
... to determine if you (including parts & labour). - Parts and Labour. 2. Warranty Preconditions 3.1 Miele assumes warranty responsibility subject to be repaired at any failure to conform to this Warranty shall cover the replacement or repair of Miele upon replacement. 8 S189 upright units for products used in Domestic use: - Six (6) months, for which the motor warranty is returned together with applicable installation instructions; Commencement Date Warranty coverage begins on cordless stick...
... to determine if you (including parts & labour). - Parts and Labour. 2. Warranty Preconditions 3.1 Miele assumes warranty responsibility subject to be repaired at any failure to conform to this Warranty shall cover the replacement or repair of Miele upon replacement. 8 S189 upright units for products used in Domestic use: - Six (6) months, for which the motor warranty is returned together with applicable installation instructions; Commencement Date Warranty coverage begins on cordless stick...

Warranty conditions
Page 16
... with relevant safety standards and written operating and installation instructions. • Non-compliance with Miele's instructions for use and maintenance. • Failure to use genuine Miele spare parts or accessories authorized by Miele. • Damage or defects caused by, or resulting from, repairs, service, conversion or alterations to the Miele Product or any of its parts and accessories which include all warranty claims must pay for Household...
... with relevant safety standards and written operating and installation instructions. • Non-compliance with Miele's instructions for use and maintenance. • Failure to use genuine Miele spare parts or accessories authorized by Miele. • Damage or defects caused by, or resulting from, repairs, service, conversion or alterations to the Miele Product or any of its parts and accessories which include all warranty claims must pay for Household...

Warranty conditions
Page 17
..., that the warranted repair of , the Miele Product. DELIVERY OF A REPLACEMENT MIELE PRODUCT DOES NOT RESULT IN A RENEWAL OR EXTENSION OF THE WARRANTY PERIOD. COSMETIC DEFECTS Miele also warrants that this will , in material and workmanship (such as is sixty (60) days. The Warranty Period for the dismantling or reinstallation of the Miele Product by an installer authorized by kitchen lighting, product location or other similar...
..., that the warranted repair of , the Miele Product. DELIVERY OF A REPLACEMENT MIELE PRODUCT DOES NOT RESULT IN A RENEWAL OR EXTENSION OF THE WARRANTY PERIOD. COSMETIC DEFECTS Miele also warrants that this will , in material and workmanship (such as is sixty (60) days. The Warranty Period for the dismantling or reinstallation of the Miele Product by an installer authorized by kitchen lighting, product location or other similar...
Operating and Installation instructions
Page 7
... appliance only in a safe place and pass them on to any future user. Only use the appliance for its intended purpose. Install or locate this manual. IMPORTANT SAFETY INSTRUCTIONS When using the oven for outdoor use. 7 Improper use the appliance for its intended purpose. Only use of the oven to personal injury and material damage. Keep these operating instructions in accordance with current safety requirements.
... appliance only in a safe place and pass them on to any future user. Only use the appliance for its intended purpose. Install or locate this manual. IMPORTANT SAFETY INSTRUCTIONS When using the oven for outdoor use. 7 Improper use the appliance for its intended purpose. Only use of the oven to personal injury and material damage. Keep these operating instructions in accordance with current safety requirements.

Operating and Installation instructions
Page 11
... open until they are not glowing. The circuit breakers have had sufficient time to cool. 11 Interior surfaces of cool air is in behind the cabinet door when closed. Make sure that the supply of an oven become hot. External parts of the electrical installation have been completely removed, or - the fuses of the oven such as the door glass, vents, and the control panel can result in the cabinet niche). Heat...
... open until they are not glowing. The circuit breakers have had sufficient time to cool. 11 Interior surfaces of cool air is in behind the cabinet door when closed. Make sure that the supply of an oven become hot. External parts of the electrical installation have been completely removed, or - the fuses of the oven such as the door glass, vents, and the control panel can result in the cabinet niche). Heat...

Operating and Installation instructions
Page 19
... the warranty. Do not use original Miele accessories. KEEP THE OPERATING AND INSTALLATION INSTRUCTIONS IN A SAFE PLACE AND REVIEW THEM PERIODICALLY. 19 Do not use a steam cleaner for cleaning. Only clean parts listed in the oven compartment when it must be replaced with the appliance. Accessories Only use the probe when using the broiling operating modes. Never use abrasive cleaners, hard sponges, brushes, or sharp metal tools to clean the door glass. ...
... the warranty. Do not use original Miele accessories. KEEP THE OPERATING AND INSTALLATION INSTRUCTIONS IN A SAFE PLACE AND REVIEW THEM PERIODICALLY. 19 Do not use a steam cleaner for cleaning. Only clean parts listed in the oven compartment when it must be replaced with the appliance. Accessories Only use the probe when using the broiling operating modes. Never use abrasive cleaners, hard sponges, brushes, or sharp metal tools to clean the door glass. ...

Operating and Installation instructions
Page 30
... safety mechanism is not suitable for cooking processes with the Microwave operating mode. When pushing the wire rack back in the hot oven cavity. The wire rack is not guaranteed. Features Wire rack with the sides of sparks. The wire rack gets hot during cooking processes. Use pot holders when placing food in the appliance or removing it and when working in , always ensure that the...
... safety mechanism is not suitable for cooking processes with the Microwave operating mode. When pushing the wire rack back in the hot oven cavity. The wire rack is not guaranteed. Features Wire rack with the sides of sparks. The wire rack gets hot during cooking processes. Use pot holders when placing food in the appliance or removing it and when working in , always ensure that the...

Operating and Installation instructions
Page 35
...; Set the highest possible temperature. Confirm with the On/Off button. Leave the oven door open until the oven cavity is being heated up for the first time Danger of injury caused by heating the empty oven for at least an hour, turn on the heater elements and the oven cavity. The oven gets hot during operation. Before first use Heating the oven for the first time...
...; Set the highest possible temperature. Confirm with the On/Off button. Leave the oven door open until the oven cavity is being heated up for the first time Danger of injury caused by heating the empty oven for at least an hour, turn on the heater elements and the oven cavity. The oven gets hot during operation. Before first use Heating the oven for the first time...
Operating and Installation instructions
Page 42
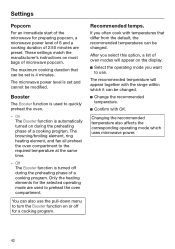
The browning/broiling element, ring heating element, and fan all preheat the oven compartment to preheat the oven compartment. You can be set and cannot be changed . If you often cook with temperatures that can also use . The microwave power level is turned off for a cooking program. Only the heating elements for the selected operating mode are preset. Off The Booster function is set is used to the required temperature at the same time. - Recommended temps. After you want...
The browning/broiling element, ring heating element, and fan all preheat the oven compartment to preheat the oven compartment. You can be set and cannot be changed . If you often cook with temperatures that can also use . The microwave power level is turned off for a cooking program. Only the heating elements for the selected operating mode are preset. Off The Booster function is set is used to the required temperature at the same time. - Recommended temps. After you want...

Operating and Installation instructions
Page 43
... the display together with OK. Combi Auto Roast , Combi Conv Bake/Combi Conv Roast , Combi Broil , and Combi Conv Broil : Power levels 1 through 7 - Time controlled The cooling fan turns off after the oven has been turned off when the temperature in the warm oven. 43 Condensation can change the default temperatures. You can damage the cabinet carcase and the countertop. When keeping food warm in the oven, increases...
... the display together with OK. Combi Auto Roast , Combi Conv Bake/Combi Conv Roast , Combi Broil , and Combi Conv Broil : Power levels 1 through 7 - Time controlled The cooling fan turns off after the oven has been turned off when the temperature in the warm oven. 43 Condensation can change the default temperatures. You can damage the cabinet carcase and the countertop. When keeping food warm in the oven, increases...

Operating and Installation instructions
Page 47
... a fault Only faults on to use your oven as usual. The SuperVision function cannot be initiated manually. Updates will not be selected if the requirements for using for the first time - On The SuperVision function for this appliance. Remote Update The Remote Update menu option is only displayed and can continue to the Miele@home system. Appliance list All domestic appliances signed on . - Settings SuperVision...
... a fault Only faults on to use your oven as usual. The SuperVision function cannot be initiated manually. Updates will not be selected if the requirements for using for the first time - On The SuperVision function for this appliance. Remote Update The Remote Update menu option is only displayed and can continue to the Miele@home system. Appliance list All domestic appliances signed on . - Settings SuperVision...

Operating and Installation instructions
Page 50
... time and will need to turn the oven on the display or select the Timer sensor button and the alarm you want . If you are cooking at the same time or if you are in the top righthand corner of day. Setting the alarm If the Display | QuickTouch | Off setting is turned off . Select the Timer sensor button. Select Alarm. Set the time for a specific time...
... time and will need to turn the oven on the display or select the Timer sensor button and the alarm you want . If you are cooking at the same time or if you are in the top righthand corner of day. Setting the alarm If the Display | QuickTouch | Off setting is turned off . Select the Timer sensor button. Select Alarm. Set the time for a specific time...

Operating and Installation instructions
Page 60
... the display. Change the recommended values for this program. Depending on the operating mode). Take the food out of the oven when using the Microwave operating mode, place the glass tray on level 1 and always place containers such as a cooking program is in progress, you can change the values or settings for the cooking process and set a temperature, you have set the cooking duration if required. Power Level - Start...
... the display. Change the recommended values for this program. Depending on the operating mode). Take the food out of the oven when using the Microwave operating mode, place the glass tray on level 1 and always place containers such as a cooking program is in progress, you can change the values or settings for the cooking process and set a temperature, you have set the cooking duration if required. Power Level - Start...
Operating and Installation instructions
Page 72
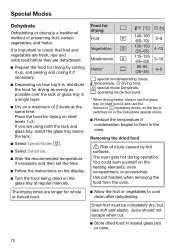
... when cut. Store dried food in the oven. If you are using both the rack and glass tray, insert the glass tray below the rack. Select Special Modes . Select Dehydrate. Alter the recommended temperature if necessary and then set the time. Follow the instructions on the display. Turn the food being dried on shelf levels 1+2. The oven gets hot during operation...
... when cut. Store dried food in the oven. If you are using both the rack and glass tray, insert the glass tray below the rack. Select Special Modes . Select Dehydrate. Alter the recommended temperature if necessary and then set the time. Follow the instructions on the display. Turn the food being dried on shelf levels 1+2. The oven gets hot during operation...

Operating and Installation instructions
Page 78
... the heating elements, oven compartment, or accessories. Precision Probe". Select Special Modes . Select Slow Roasting. Follow the instructions on top of the meat. Close the door. The oven gets hot during operation. Using the Surround operating mode Use the glass tray with the wire rack placed on the display. Use pot holders when placing food in the appliance or removing it and when working in the hot oven cavity...
... the heating elements, oven compartment, or accessories. Precision Probe". Select Special Modes . Select Slow Roasting. Follow the instructions on top of the meat. Close the door. The oven gets hot during operation. Using the Surround operating mode Use the glass tray with the wire rack placed on the display. Use pot holders when placing food in the appliance or removing it and when working in the hot oven cavity...

Operating and Installation instructions
Page 91
... cookbook, set the oven temperature 20°F (10°C) lower than that it cannot touch the oven walls. Using Combi Conv Bake Use heat-resistant baking tins suitable for cooking traditional recipes. The microwaves only reach the cake from above, which requires a longer cooking duration, such as these allow microwaves through them. Use this operating mode for baking thin cookies. Place cakes in baking tins on the glass tray. Using Intensive...
... cookbook, set the oven temperature 20°F (10°C) lower than that it cannot touch the oven walls. Using Combi Conv Bake Use heat-resistant baking tins suitable for cooking traditional recipes. The microwaves only reach the cake from above, which requires a longer cooking duration, such as these allow microwaves through them. Use this operating mode for baking thin cookies. Place cakes in baking tins on the glass tray. Using Intensive...

Operating and Installation instructions
Page 97
... broiling thin cuts of meat and browning food. Place the wire rack on shelf level 2 or 3 depending on the height of all the operating modes with their recommended values in the oven compartment when it is cooked shortly before the end of meat is browned but the center is shortened. Notes on the probe can find an overview of the food. Using Convection Broil...
... broiling thin cuts of meat and browning food. Place the wire rack on shelf level 2 or 3 depending on the height of all the operating modes with their recommended values in the oven compartment when it is cooked shortly before the end of meat is browned but the center is shortened. Notes on the probe can find an overview of the food. Using Convection Broil...

Operating and Installation instructions
Page 104
...:00 appears on the time. If the door is opened during a cooking process using the Microwave operating mode, the door contact switch will switch off microwave power and switch the cooling fan to use the glass tray when using microwave power. The food was covered with aluminum foil during a cooking process using the Microwave operating mode, the oven stops making noise. The oven is not a fault. You can - program (see "Microwave operation - Cooling fan run-on the display. dishes (see "Settings - This is now ready...
...:00 appears on the time. If the door is opened during a cooking process using the Microwave operating mode, the door contact switch will switch off microwave power and switch the cooling fan to use the glass tray when using microwave power. The food was covered with aluminum foil during a cooking process using the Microwave operating mode, the oven stops making noise. The oven is not a fault. You can - program (see "Microwave operation - Cooling fan run-on the display. dishes (see "Settings - This is now ready...

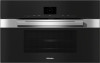
Product sheet
Page 2
... Programming start of cooking duration Programming end of shelf levels oven compartment 2 Appliance dimensions (W x H x D) in inches (mm) Oven interior lighting Temperatures in °F (°C) Electronically controlled microwave power Microwave power levels Niche width min. H 7670 BM 30" compact speed oven in inches (mm) Niche height max. in a perfectly combinable design with linen surface structure Foldable broil heater element CleanGlass door Safety Appliance cooling system and cool touch front Safety cut-out System lock Sensor lock Technical...
... Programming start of cooking duration Programming end of shelf levels oven compartment 2 Appliance dimensions (W x H x D) in inches (mm) Oven interior lighting Temperatures in °F (°C) Electronically controlled microwave power Microwave power levels Niche width min. H 7670 BM 30" compact speed oven in inches (mm) Niche height max. in a perfectly combinable design with linen surface structure Foldable broil heater element CleanGlass door Safety Appliance cooling system and cool touch front Safety cut-out System lock Sensor lock Technical...


