

Product Manual
Page 2
... KM 6377...17 DirectSelection Plus controls 18 Cooking zone data 19 Before using for the first time 22 Cleaning the cooktop for the first time 22 Turning on the cooktop for the first time 22 Induction ...23 How it works ...23 Noises ...24 Cookware...25 Energy saving tips 26 Power setting ranges 27 Operation ...28 Basic operation ...28 Turning on ...29 Selecting/changing the power level 29 Turning...
... KM 6377...17 DirectSelection Plus controls 18 Cooking zone data 19 Before using for the first time 22 Cleaning the cooktop for the first time 22 Turning on the cooktop for the first time 22 Induction ...23 How it works ...23 Noises ...24 Cookware...25 Energy saving tips 26 Power setting ranges 27 Operation ...28 Basic operation ...28 Turning on ...29 Selecting/changing the power level 29 Turning...

Product Manual
Page 3
... 42 Cleaning and care 43 Programming...45 Frequently asked questions 48 Con@ctivity ...52 IMPORTANT SAFETY INSTRUCTIONS - INSTALLATION 53 Safety clearances 54 Ventilation ...58 Framed cooktops 59 Instructions for installation 59 Installation dimensions 60 KM 6360 ...60 KM 6370 ...61 KM 6377 ...62 Installation...63 Flush-mounted (frameless) cooktops 64 Instructions for installation 64 Installation dimensions 65 KM 6365 ...65 KM 6375 ...66 Installation...67 Electrical connection 69 Caring for the environment 71 Technical service, data plate, warranty 72...
... 42 Cleaning and care 43 Programming...45 Frequently asked questions 48 Con@ctivity ...52 IMPORTANT SAFETY INSTRUCTIONS - INSTALLATION 53 Safety clearances 54 Ventilation ...58 Framed cooktops 59 Instructions for installation 59 Installation dimensions 60 KM 6360 ...60 KM 6370 ...61 KM 6377 ...62 Installation...63 Flush-mounted (frameless) cooktops 64 Instructions for installation 64 Installation dimensions 65 KM 6365 ...65 KM 6375 ...66 Installation...67 Electrical connection 69 Caring for the environment 71 Technical service, data plate, warranty 72...

Product Manual
Page 6
... the area where the oven is in use . Children must not be allowed to clean the cooktop without su‐ pervision if they have been shown how to supervise any other appliance, children must be kept away from altering the settings selected. 6 Use the safety lock when the hob is installed. IMPORTANT SAFETY INSTRUCTIONS Children As with...
... the area where the oven is in use . Children must not be allowed to clean the cooktop without su‐ pervision if they have been shown how to supervise any other appliance, children must be kept away from altering the settings selected. 6 Use the safety lock when the hob is installed. IMPORTANT SAFETY INSTRUCTIONS Children As with...
Product Manual
Page 7
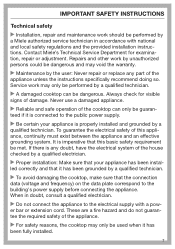
... cooktop may void the warranty. Maintenance by the user: Never repair or replace any doubt, have the electrical system of this basic safety requirement be met. IMPORTANT SAFETY INSTRUCTIONS Technical safety Installation, repair and maintenance work should be performed by a Miele authorized service technician in doubt, consult a qualified electrician. Do not connect the appliance to the building's power supply before connecting the appliance. Service work...
... cooktop may void the warranty. Maintenance by the user: Never repair or replace any doubt, have the electrical system of this basic safety requirement be met. IMPORTANT SAFETY INSTRUCTIONS Technical safety Installation, repair and maintenance work should be performed by a Miele authorized service technician in doubt, consult a qualified electrician. Do not connect the appliance to the building's power supply before connecting the appliance. Service work...

Product Manual
Page 8
... tampering with plug). "tripping" the circuit breaker, or - Do not open the casing of the cooktop will void the warranty. Defective components should be used in a non-stationary location (e.g. IMPORTANT SAFETY INSTRUCTIONS This appliance must only be completely disconnected from Miele Service. unplugging the unit (if equipped with the electrical or mechanical components of the cooktop under any maintenance or repair work .
... tampering with plug). "tripping" the circuit breaker, or - Do not open the casing of the cooktop will void the warranty. Defective components should be used in a non-stationary location (e.g. IMPORTANT SAFETY INSTRUCTIONS This appliance must only be completely disconnected from Miele Service. unplugging the unit (if equipped with the electrical or mechanical components of the cooktop under any maintenance or repair work .

Product Manual
Page 9
... or broken in any repair work is in addition to disconnecting the cooktop, this module must also be disconnect‐ ed from the power supply and contact Miele. If the cooktop is installed behind the closed door and cause damage to use it. If the ceramic surface of electric shock! IMPORTANT SAFETY INSTRUCTIONS If the cooktop is fitted with a communication module, in operation.
... or broken in any repair work is in addition to disconnecting the cooktop, this module must also be disconnect‐ ed from the power supply and contact Miele. If the cooktop is installed behind the closed door and cause damage to use it. If the ceramic surface of electric shock! IMPORTANT SAFETY INSTRUCTIONS If the cooktop is fitted with a communication module, in operation.

Product Manual
Page 10
... stored in an oven or in the vicinity of the cooktop. The flames could set the grease filters of heat, which can ignite on the cooktop. Oil and fat can food in closed containers, such as tins or sealed jars, on the cooktop, as pressure will begin to smoke and cause grease splatter, which can ignite when heated. Therefore do not...
... stored in an oven or in the vicinity of the cooktop. The flames could set the grease filters of heat, which can ignite on the cooktop. Oil and fat can food in closed containers, such as tins or sealed jars, on the cooktop, as pressure will begin to smoke and cause grease splatter, which can ignite when heated. Therefore do not...

Product Manual
Page 11
... after use! You could burn yourself on the hot cooktop. Damp lids can cause scratches if they get wet or damp, as this causes heat to the electronics underneath. IMPORTANT SAFETY INSTRUCTIONS If the cooktop is covered, there is a risk that the material of the cover will ignite, explode or melt if the range is clean before placing pans on...
... after use! You could burn yourself on the hot cooktop. Damp lids can cause scratches if they get wet or damp, as this causes heat to the electronics underneath. IMPORTANT SAFETY INSTRUCTIONS If the cooktop is covered, there is a risk that the material of the cover will ignite, explode or melt if the range is clean before placing pans on...

Product Manual
Page 12
... cooktop. IMPORTANT SAFETY INSTRUCTIONS Do not allow loose clothing or flammable materials to wear appropriately fitting clothing when cooking. Only use the booster. For people who have a heart pacemaker: Please note that boil dry can scratch the ceramic burner. However, if in use. Because induction heating works so quickly, the temperature of the cookware bottom can damage the ceramic surface...
... cooktop. IMPORTANT SAFETY INSTRUCTIONS Do not allow loose clothing or flammable materials to wear appropriately fitting clothing when cooking. Only use the booster. For people who have a heart pacemaker: Please note that boil dry can scratch the ceramic burner. However, if in use. Because induction heating works so quickly, the temperature of the cookware bottom can damage the ceramic surface...

Product Manual
Page 31
... "Programming"). 31 With extended power levels (see "Pro‐ gramming"), the power levels before and after the intermediate power level will flash when an intermediate power level is selected. Deactivating Tap the sensor button of the set contin‐ ued cooking level flashes. Continued cooking level* 1 1. 2 2. 3 3. 4 4. 5 5. 6 6. 7 7. 8 8. 9 Auto Heat-up . When you change the continued cooking level, you deactivate Auto Heat-up time [min...
... "Programming"). 31 With extended power levels (see "Pro‐ gramming"), the power levels before and after the intermediate power level will flash when an intermediate power level is selected. Deactivating Tap the sensor button of the set contin‐ ued cooking level flashes. Continued cooking level* 1 1. 2 2. 3 3. 4 4. 5 5. 6 6. 7 7. 8 8. 9 Auto Heat-up . When you change the continued cooking level, you deactivate Auto Heat-up time [min...

Product Manual
Page 42
... is triggered again, contact Miele Service. 42 The power level that is set will be turned off . - To prevent the induction coils and cooling elements from over‐ heating, the overheating protection mechanism works on the affected cooking zone or on after a power outage If, despite elimination of cooktop insufficiently ventilated - You can be used again if the cooling element has cooled down to...
... is triggered again, contact Miele Service. 42 The power level that is set will be turned off . - To prevent the induction coils and cooling elements from over‐ heating, the overheating protection mechanism works on the affected cooking zone or on after a power outage If, despite elimination of cooktop insufficiently ventilated - You can be used again if the cooling element has cooled down to...

Product Manual
Page 44
... discoloration cannot be removed with a damp cloth to remove sugar, plastic or aluminum residues from the hot cooktop. Wear pot holders and use , first turn off the appliance. Then carefully scrape off . Then clean the cooktop with a damp cloth and dry it has cooled down the surface with a ceramic and stain‐ less steel cleaner. Danger of the ceramic. Clean the cooktop on a hot cooktop since this...
... discoloration cannot be removed with a damp cloth to remove sugar, plastic or aluminum residues from the hot cooktop. Wear pot holders and use , first turn off the appliance. Then carefully scrape off . Then clean the cooktop with a damp cloth and dry it has cooled down the surface with a ceramic and stain‐ less steel cleaner. Danger of the ceramic. Clean the cooktop on a hot cooktop since this...

Product Manual
Page 48
... Miele Service (for the minimum fuse rating, see "Cookware"). 48 pors do not indicate a faulty connection or a defective appliance and are not harmful to open the cooktop casing yourself. Power levels 1 to users of the appliance. Improperly performed installation, maintenance or repair work can pose a serious danger to 9 flash. Do not attempt to your health. Smells and vapor may be turned on the cooking zone. Use...
... Miele Service (for the minimum fuse rating, see "Cookware"). 48 pors do not indicate a faulty connection or a defective appliance and are not harmful to open the cooktop casing yourself. Power levels 1 to users of the appliance. Improperly performed installation, maintenance or repair work can pose a serious danger to 9 flash. Do not attempt to your health. Smells and vapor may be turned on the cooking zone. Use...

Product Manual
Page 53
Do not install any moving kitchen parts (e.g. INSTALLATION Installation and connection of the cooktop to the electrical power supply may not come into contact with any cabinets above a stove or oven if they have a built-in cooling fan. Ensure that the power cord cannot be heatresistant (up to mechan‐ ical stress. Observe carefully the safety clearances listed on the following pages. 53 IMPORTANT SAFETY INSTRUCTIONS - You...
Do not install any moving kitchen parts (e.g. INSTALLATION Installation and connection of the cooktop to the electrical power supply may not come into contact with any cabinets above a stove or oven if they have a built-in cooling fan. Ensure that the power cord cannot be heatresistant (up to mechan‐ ical stress. Observe carefully the safety clearances listed on the following pages. 53 IMPORTANT SAFETY INSTRUCTIONS - You...

Product Manual
Page 63
... cooktops Installation Preparing the counter Create the counter cut-out as sili‐ con! Ensure that the cooktop works. 63 This is important to main‐ tain a minimum safety distance (see "Safety clearances"). Seal any wooden counter surfaces with the countertop in the de‐ tailed drawing. The sealing tape guarantees a nonslipping seat of the countertop. The sealant must be carefully filed down through the counter cut...
... cooktops Installation Preparing the counter Create the counter cut-out as sili‐ con! Ensure that the cooktop works. 63 This is important to main‐ tain a minimum safety distance (see "Safety clearances"). Seal any wooden counter surfaces with the countertop in the de‐ tailed drawing. The sealing tape guarantees a nonslipping seat of the countertop. The sealant must be carefully filed down through the counter cut...

Product Manual
Page 64
... the cooktop to be removed for installation in granite, marble, tiled or solid wood counters. The unobstructed width of the base unit needs to be used with a wooden support frame. See "In‐ stallation dimensions" to check which cooktop can be taken out. 64 For all other counter materi‐ als, consult the counter manufacturer whether they can be installed - Flush-mounted (frameless) cooktops Instructions for installation Flush mounted cooktops...
... the cooktop to be removed for installation in granite, marble, tiled or solid wood counters. The unobstructed width of the base unit needs to be used with a wooden support frame. See "In‐ stallation dimensions" to check which cooktop can be taken out. 64 For all other counter materi‐ als, consult the counter manufacturer whether they can be installed - Flush-mounted (frameless) cooktops Instructions for installation Flush mounted cooktops...

Product Manual
Page 68
.... Flush-mounted (frameless) cooktops Solid wood / tiled / glass counters a Countertop b Cooktop c Gap d Wooden frame ¹/₂" (13 mm) (not supplied with appliance) Connect the cooktop to the electrical power supply. Check that the cooktop works. Seal the remaining gap with a sili‐ cone sealant that is heat-resistant to at least 320°F (160°C). As the ceramic glass slab and the counter cut...
.... Flush-mounted (frameless) cooktops Solid wood / tiled / glass counters a Countertop b Cooktop c Gap d Wooden frame ¹/₂" (13 mm) (not supplied with appliance) Connect the cooktop to the electrical power supply. Check that the cooktop works. Seal the remaining gap with a sili‐ cone sealant that is heat-resistant to at least 320°F (160°C). As the ceramic glass slab and the counter cut...

Product Manual
Page 69
... electri‐ cian. Work by either removing the fuse, shutting off the main power or manually "tripping" the circuit breaker. Before connecting the appliance to the power supply, make sure that this appliance, continuity must correspond to users. Installer: Please leave these instructions with local regulations and the ANSI National Electrical Code / NFPA 70 in the United States or the Canadian Electrical Code, Part I in Canada (CSA standard C22...
... electri‐ cian. Work by either removing the fuse, shutting off the main power or manually "tripping" the circuit breaker. Before connecting the appliance to the power supply, make sure that this appliance, continuity must correspond to users. Installer: Please leave these instructions with local regulations and the ANSI National Electrical Code / NFPA 70 in the United States or the Canadian Electrical Code, Part I in Canada (CSA standard C22...

Specs
Page 2
... of 7 Specification Sheets TRS 09282015 communication between cooktop and hood • Direct Selection Plus controls, default power level 1-9, extended 1-12 Cut-out Dimensions Minimum Back Spacing From Wall Minimum Countertop Thickness Maximum Countertop Thickness Minimum Recommended distance to 7,7kW • TwinBooster function • Con@ctivity 2.0 - PowerFlex technology combines two zones into a unique large zone (9x15"), up to ventilation hood Electrical Electrical Requirements Power Cable Shipping Shipping Weight Shipping Dimensions Support Call Miele Website...
... of 7 Specification Sheets TRS 09282015 communication between cooktop and hood • Direct Selection Plus controls, default power level 1-9, extended 1-12 Cut-out Dimensions Minimum Back Spacing From Wall Minimum Countertop Thickness Maximum Countertop Thickness Minimum Recommended distance to 7,7kW • TwinBooster function • Con@ctivity 2.0 - PowerFlex technology combines two zones into a unique large zone (9x15"), up to ventilation hood Electrical Electrical Requirements Power Cable Shipping Shipping Weight Shipping Dimensions Support Call Miele Website...
Specs
Page 7
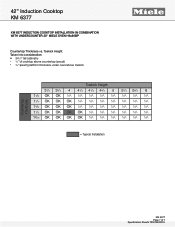
42" Induction Cooktop KM 6377 KM 6377 INDUCTION COOKTOP INSTALLATION IN COMBINATION WITH UNDERCOUNTER 30" MIELE OVEN H6x80BP Countertop Thickness vs. Toekick Height Taken into consideration: • 341/2" tall cabinetry • 1/4" of cooktop above countertop (proud) • 3/4" (exact) platform thickness under oven/above toekick FOREVER BETTER Countertop Thickness Toekick Height 31/2 33/4 4 41/4 41/2 43/4 5 51/4 53/4 6 11/8 OK OK NA NA NA... OK OK NA NA NA NA NA NA 19/16 OK OK OK OK NA NA NA NA NA NA = Typical Installation KM 6377 Page 7 of 7 Specification Sheets TRS 09282015
42" Induction Cooktop KM 6377 KM 6377 INDUCTION COOKTOP INSTALLATION IN COMBINATION WITH UNDERCOUNTER 30" MIELE OVEN H6x80BP Countertop Thickness vs. Toekick Height Taken into consideration: • 341/2" tall cabinetry • 1/4" of cooktop above countertop (proud) • 3/4" (exact) platform thickness under oven/above toekick FOREVER BETTER Countertop Thickness Toekick Height 31/2 33/4 4 41/4 41/2 43/4 5 51/4 53/4 6 11/8 OK OK NA NA NA... OK OK NA NA NA NA NA NA 19/16 OK OK OK OK NA NA NA NA NA NA = Typical Installation KM 6377 Page 7 of 7 Specification Sheets TRS 09282015


