
T8000 Tumble Dryers
Page 1
V- SPECIFICATION SHEETS 08262011 Venting location may be done in accordance with local codes • See "Cut-out Dimensions" sheet for undercounter or built-in space requirements NOTE: Drawing is not to lower right or left side or lower left rear (see separate sheet). Notes • All installations must be adjusted to scale. Product Dimensions Large Capacity Vented Dryer Angled control T8003 / T8005 E 23 1/2" 22 1/2" 21 1/2" 33 3/8" - 34 1/8" V 3 3/4" - 4 1/2" 2" Location Codes E - 208...
V- SPECIFICATION SHEETS 08262011 Venting location may be done in accordance with local codes • See "Cut-out Dimensions" sheet for undercounter or built-in space requirements NOTE: Drawing is not to lower right or left side or lower left rear (see separate sheet). Notes • All installations must be adjusted to scale. Product Dimensions Large Capacity Vented Dryer Angled control T8003 / T8005 E 23 1/2" 22 1/2" 21 1/2" 33 3/8" - 34 1/8" V 3 3/4" - 4 1/2" 2" Location Codes E - 208...

T8000 Tumble Dryers
Page 2
SPECIFICATION SHEETS 08262011 Product Dimensions Large Capacity Condeser Dryer Angled control T8013C E 23 1/2" D 22 1/2" 21 1/2" CD 33 3/8" - 34 1/8" 3 3/4" - 4 1/2" 2" Location Codes E - 208/240 Volt, 30 Amp 5 foot molded plug power supply connects upper right rear (NEMA 14-30 Configuration). Notes • All installations must be done in accordance with local codes • See "Cut-out Dimensions" sheet for undercounter or built-in space requirements NOTE: Drawing is not to scale.
SPECIFICATION SHEETS 08262011 Product Dimensions Large Capacity Condeser Dryer Angled control T8013C E 23 1/2" D 22 1/2" 21 1/2" CD 33 3/8" - 34 1/8" 3 3/4" - 4 1/2" 2" Location Codes E - 208/240 Volt, 30 Amp 5 foot molded plug power supply connects upper right rear (NEMA 14-30 Configuration). Notes • All installations must be done in accordance with local codes • See "Cut-out Dimensions" sheet for undercounter or built-in space requirements NOTE: Drawing is not to scale.

T8000 Tumble Dryers
Page 3
Decor unit T8019Ci E 23 1/2" D 22 1/2" CD 5 7/8" 1 1/2" 2" 33 3/8" - 34 1/8" 3 3/4" - 4 1/2" Location Codes E - 208/240 Volt, 30 Amp 5 foot molded plug power supply connects upper right rear (NEMA 14-30 Configuration). SPECIFICATION SHEETS 08262011 Product Dimensions Large Capacity Condenser Dryers Flat Controls - Notes • All installations must be done in accordance with local codes • See "Cut-out Dimensions" sheet for undercounter or built-in space requirements NOTE: Drawing is not to scale.
Decor unit T8019Ci E 23 1/2" D 22 1/2" CD 5 7/8" 1 1/2" 2" 33 3/8" - 34 1/8" 3 3/4" - 4 1/2" Location Codes E - 208/240 Volt, 30 Amp 5 foot molded plug power supply connects upper right rear (NEMA 14-30 Configuration). SPECIFICATION SHEETS 08262011 Product Dimensions Large Capacity Condenser Dryers Flat Controls - Notes • All installations must be done in accordance with local codes • See "Cut-out Dimensions" sheet for undercounter or built-in space requirements NOTE: Drawing is not to scale.

T8000 Tumble Dryers
Page 4
Cutout for Electric and Vent/Drain pass-through. Notes • Needed depth will vary by model number: T8003-T8013C: 24" minimum T8019Ci 25" minimum • Typically requires removal of box unit height dimension without lid is not to duct or drain location. Out of unit's lid. SPECIFICATION SHEETS 08262011 Cut-out Dimensions Built-in Installations Large Capacity Laundry Products See Notes C 24" 32 3/8" - 35 1/4" WatCeroL&noncEealcetitcoiotnrnical Location Codes C - NOTE: Drawing is 32 5/16" - 32 11/16". Adjust according to scale.
Cutout for Electric and Vent/Drain pass-through. Notes • Needed depth will vary by model number: T8003-T8013C: 24" minimum T8019Ci 25" minimum • Typically requires removal of box unit height dimension without lid is not to duct or drain location. Out of unit's lid. SPECIFICATION SHEETS 08262011 Cut-out Dimensions Built-in Installations Large Capacity Laundry Products See Notes C 24" 32 3/8" - 35 1/4" WatCeroL&noncEealcetitcoiotnrnical Location Codes C - NOTE: Drawing is 32 5/16" - 32 11/16". Adjust according to scale.

T8000 Tumble Dryers
Page 6
... Stacking kit for W3039i / T8019Ci • WTV 419 Stacking kit for W3035 / T8005 3 3/4" - 4 1/2" NOTE: Drawing is not to scale. SPECIFICATION SHEETS 08262011 Product Dimensions Stacked Washer & Dryer Example Combination W3033 + T8003 E2 23 1/2" 22 1/2" E1 V W D 66 3/8" - 67 1/8" Location Codes D - 5 foot flexible drain hose connects upper left rear. 2" E1 - 120 Volt, 15 Amp 5 foot molded plug power supply connects upper left rear. W - 5 foot separate flexible hot and cold water intake hoses connect upper left rear...
... Stacking kit for W3039i / T8019Ci • WTV 419 Stacking kit for W3035 / T8005 3 3/4" - 4 1/2" NOTE: Drawing is not to scale. SPECIFICATION SHEETS 08262011 Product Dimensions Stacked Washer & Dryer Example Combination W3033 + T8003 E2 23 1/2" 22 1/2" E1 V W D 66 3/8" - 67 1/8" Location Codes D - 5 foot flexible drain hose connects upper left rear. 2" E1 - 120 Volt, 15 Amp 5 foot molded plug power supply connects upper left rear. W - 5 foot separate flexible hot and cold water intake hoses connect upper left rear...

T8000 Tumble Dryers
Page 7
... new custom panel Hinge Notches In certain installations, notches will be exposed after installation Version 2 - SPECIFICATION SHEETS 08262011 Panel Information Integrated Laundry T8019Ci Decor Unit These units come equipped with a full size white front panel. Thin insert Width: Thickness: Height: 23 1/4" for all machines up to scale. Control Panel Miele Decor Laundry 3 7/8" C 16 3/4" C To center lines Note: To insure access to customer servicable features, a minimum...
... new custom panel Hinge Notches In certain installations, notches will be exposed after installation Version 2 - SPECIFICATION SHEETS 08262011 Panel Information Integrated Laundry T8019Ci Decor Unit These units come equipped with a full size white front panel. Thin insert Width: Thickness: Height: 23 1/4" for all machines up to scale. Control Panel Miele Decor Laundry 3 7/8" C 16 3/4" C To center lines Note: To insure access to customer servicable features, a minimum...

Operating and installation manual
Page 2
... 12 Child lock 13 Dryer care 14 Cleaning the lint filter 14 Cleaning the exterior and the control panel 15 Cleaning the drum 15 Emptying the condensed water container 16 Cleaning the condenser 17 Quick Guide 19 Dryer Care 19 Changing the light bulb 19 Frequently asked questions 20 After sales service 22 Installation instructions 23 IMPORTANT SAFETY INSTRUCTIONS 24 Washer / Dryer Stack 25 Electrical connection 26 Installation 27 Installation site 28 Installation beneath a counter 29 Installation tips 30 Level the dryer 30 Caring for...
... 12 Child lock 13 Dryer care 14 Cleaning the lint filter 14 Cleaning the exterior and the control panel 15 Cleaning the drum 15 Emptying the condensed water container 16 Cleaning the condenser 17 Quick Guide 19 Dryer Care 19 Changing the light bulb 19 Frequently asked questions 20 After sales service 22 Installation instructions 23 IMPORTANT SAFETY INSTRUCTIONS 24 Washer / Dryer Stack 25 Electrical connection 26 Installation 27 Installation site 28 Installation beneath a counter 29 Installation tips 30 Level the dryer 30 Caring for...
Operating and installation manual
Page 3
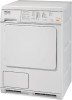
... operating instructions. items which have been previously cleaned, washed, soaked or spotted with gasoline, dry-cleaning solvents or other deposits (such as work-wear, exposed to the weather. ~ Do not tamper with the controls. ~ Do not repair or replace any servicing unless specifically recommended in the washer....the item several times. - items treated with hair spray, nail polish remover, etc. They may pose a considerable risk to the user. ~ Do not use to prevent child hazards. ~ Before this appliance is removed for service or discarded, remove the door to eliminate ...
... operating instructions. items which have been previously cleaned, washed, soaked or spotted with gasoline, dry-cleaning solvents or other deposits (such as work-wear, exposed to the weather. ~ Do not tamper with the controls. ~ Do not repair or replace any servicing unless specifically recommended in the washer....the item several times. - items treated with hair spray, nail polish remover, etc. They may pose a considerable risk to the user. ~ Do not use to prevent child hazards. ~ Before this appliance is removed for service or discarded, remove the door to eliminate ...
Operating and installation manual
Page 4
... the dryer to handle ~ Clean the lint filter before or after each stage of electric shock. This will not fit the outlet, have a proper outlet installed by a qualified electrician. In the event of malfunction or breakdown, grounding will reduce the risk of electric shock by qualified personnel. SAVE THESE INSTRUCTIONS 4 The plug must be plugged into an appropriate outlet that the items being removed...
... the dryer to handle ~ Clean the lint filter before or after each stage of electric shock. This will not fit the outlet, have a proper outlet installed by a qualified electrician. In the event of malfunction or breakdown, grounding will reduce the risk of electric shock by qualified personnel. SAVE THESE INSTRUCTIONS 4 The plug must be plugged into an appropriate outlet that the items being removed...
Operating and installation manual
Page 6
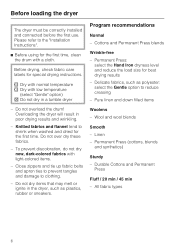
... belts and apron ties to prevent tangles and damage to shrink when washed and dried for the first time, clean the drum with light-colored items. - Before loading the dryer The dryer must be correctly installed and connected before the first use. Do not dry items that may melt or ignite in the dryer, such as polyester: select the Gentle option to the "Installation Instructions". ^ Before using...
... belts and apron ties to prevent tangles and damage to shrink when washed and dried for the first time, clean the drum with light-colored items. - Before loading the dryer The dryer must be correctly installed and connected before the first use. Do not dry items that may melt or ignite in the dryer, such as polyester: select the Gentle option to the "Installation Instructions". ^ Before using...
Operating and installation manual
Page 7
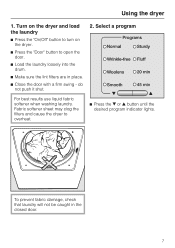
... the dryer and load the laundry ^ Press the "On/Off" button to turn on the dryer. ^ Press the "Door" button to overheat. ^ Press the e or - do not push it shut. 2. Fabric softener sheet may clog the filters and cause the dryer to open the door. ^ Load the laundry loosely into the drum. ^ Make sure the lint filters are in the closed door. 7 button until the desired program indicator lights. Using the dryer 1.
... the dryer and load the laundry ^ Press the "On/Off" button to turn on the dryer. ^ Press the "Door" button to overheat. ^ Press the e or - do not push it shut. 2. Fabric softener sheet may clog the filters and cause the dryer to open the door. ^ Load the laundry loosely into the drum. ^ Make sure the lint filters are in the closed door. 7 button until the desired program indicator lights. Using the dryer 1.
Operating and installation manual
Page 11
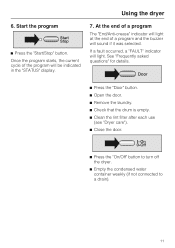
... "Frequently asked questions" for details. ^ Press the "Door" button. ^ Open the door. ^ Remove the laundry. ^ Check that the drum is empty. ^ Clean the lint filter after each use (see "Dryer care"). ^ Close the door. ^ Press the "On/Off" button to turn off the dryer. ^ Empty the condensed water container weekly (if not connected to a drain). 11 Once the program starts, the current cycle of a program and the buzzer will sound if...
... "Frequently asked questions" for details. ^ Press the "Door" button. ^ Open the door. ^ Remove the laundry. ^ Check that the drum is empty. ^ Clean the lint filter after each use (see "Dryer care"). ^ Close the door. ^ Press the "On/Off" button to turn off the dryer. ^ Empty the condensed water container weekly (if not connected to a drain). 11 Once the program starts, the current cycle of a program and the buzzer will sound if...
Operating and installation manual
Page 15
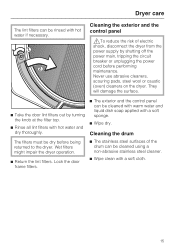
... all lint filters with hot water and dry thoroughly. ^ The exterior and the control panel can be cleaned with warm water and liquid dish soap applied with a soft cloth. 15 Lock the door frame filters. ^ Wipe clean with a soft sponge. ^ Wipe dry. They will damage the surface. ^ Take the door lint filters out by shutting off the power main, tripping the circuit breaker or unplugging the power cord before being returned to the dryer. Dryer care The lint filters...
... all lint filters with hot water and dry thoroughly. ^ The exterior and the control panel can be cleaned with warm water and liquid dish soap applied with a soft cloth. 15 Lock the door frame filters. ^ Wipe clean with a soft sponge. ^ Wipe dry. They will damage the surface. ^ Take the door lint filters out by shutting off the power main, tripping the circuit breaker or unplugging the power cord before being returned to the dryer. Dryer care The lint filters...
Operating and installation manual
Page 17
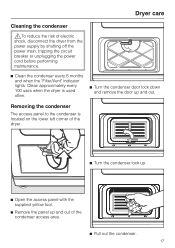
... of the dryer. ^ Turn the condenser lock up. ^ Open the access panel with the supplied yellow tool. ^ Remove the panel up and out. Removing the condenser The access panel to the condenser is used often. ^ Turn the condenser door lock down and remove the door up and out of electric shock, disconnect the dryer from the power supply by shutting off the power main, tripping the circuit breaker or unplugging the power cord before performing maintenance. ^ Clean the...
... of the dryer. ^ Turn the condenser lock up. ^ Open the access panel with the supplied yellow tool. ^ Remove the panel up and out. Removing the condenser The access panel to the condenser is used often. ^ Turn the condenser door lock down and remove the door up and out of electric shock, disconnect the dryer from the power supply by shutting off the power main, tripping the circuit breaker or unplugging the power cord before performing maintenance. ^ Clean the...

Operating and installation manual
Page 20
... a firm swing - Select a drying option (if needed) To prevent fabric damage, check that there is enough space in the closed door. ^ Close the door with each press of the button. Quick Guide 1.Turn on the dryer. ^ Press the "Door" button to open the door. ^ Load the laundry into the drum. do not push it shut. ^ A drying option can be caught in the drum for clothes to tumble freely. ^ Press...
... a firm swing - Select a drying option (if needed) To prevent fabric damage, check that there is enough space in the closed door. ^ Close the door with each press of the button. Quick Guide 1.Turn on the dryer. ^ Press the "Door" button to open the door. ^ Load the laundry into the drum. do not push it shut. ^ A drying option can be caught in the drum for clothes to tumble freely. ^ Press...
Operating and installation manual
Page 24
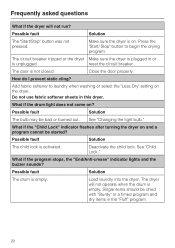
... sounds? Load laundry into the dryer. reset the circuit breaker. Add fabric softener to begin the drying program. Possible fault Solution The child lock is not closed. Possible fault Solution The drum is on and a program cannot be dried with "Sturdy" or a timed program and dry items in the "Fluff" program. 20 See "Changing the light bulb." Deactivate the child lock. See "Child Lock." Do not use fabric softener sheets in...
... sounds? Load laundry into the dryer. reset the circuit breaker. Add fabric softener to begin the drying program. Possible fault Solution The child lock is not closed. Possible fault Solution The drum is on and a program cannot be dried with "Sturdy" or a timed program and dry items in the "Fluff" program. 20 See "Changing the light bulb." Deactivate the child lock. See "Child Lock." Do not use fabric softener sheets in...
Operating and installation manual
Page 25
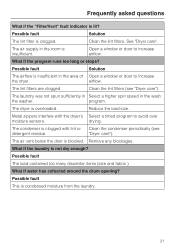
Clean the lint filters (see detergent residue. Remove any blockages. What if the program runs too long or stops? program. Reduce the load size. drying. Possible fault Solution The lint filter is insufficient. See "Dryer care". The air supply in the room is clogged. Open a window or door to increase the dryer. The condenser is clogged with the dryer's Select a timed program to avoid over moisture sensors. What if the laundry...
Clean the lint filters (see detergent residue. Remove any blockages. What if the program runs too long or stops? program. Reduce the load size. drying. Possible fault Solution The lint filter is insufficient. See "Dryer care". The air supply in the room is clogged. Open a window or door to increase the dryer. The condenser is clogged with the dryer's Select a timed program to avoid over moisture sensors. What if the laundry...
Operating and installation manual
Page 26
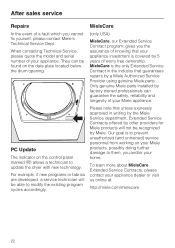
... untrained) service personnel from working on your Miele products, possibly doing further damage to update the dryer with new technology. Our goal is covered by factory trained professionals can be recognized by a Miele Authorized Service Provider using genuine Miele parts. After sales service Repairs MieleCare In the event of a fault which you and/or your home. When contacting Technical Service, please quote the model and serial number of...
... untrained) service personnel from working on your Miele products, possibly doing further damage to update the dryer with new technology. Our goal is covered by factory trained professionals can be recognized by a Miele Authorized Service Provider using genuine Miele parts. After sales service Repairs MieleCare In the event of a fault which you and/or your home. When contacting Technical Service, please quote the model and serial number of...
Operating and installation manual
Page 28
... persons could void the warranty. ~ Before installation, disconnect the tumble dryer from the electrical supply by shutting off the power main, unplugging the power cord or tripping the circuit breaker. This appliance is complete. ~ GROUNDING INSTRUCTIONS This appliance must be performed by a qualified installer. ~ Install the clothes dryer according to the manufacturer's instructions and local codes. ~ Repair and maintenance work should be performed by providing a path of severe injury or...
... persons could void the warranty. ~ Before installation, disconnect the tumble dryer from the electrical supply by shutting off the power main, unplugging the power cord or tripping the circuit breaker. This appliance is complete. ~ GROUNDING INSTRUCTIONS This appliance must be performed by a qualified installer. ~ Install the clothes dryer according to the manufacturer's instructions and local codes. ~ Repair and maintenance work should be performed by providing a path of severe injury or...

Operating and installation manual
Page 30
... long, 12/4 AWG cord and a NEMA 14-30 P plug. A 3 pole-4 wire grounding power outlet (NEMA type 14-30 R) is necessary. Check with a qualified electrician or service representative or personnel if you are in accordance with the appliance! In the event of malfunction or breakdown, grounding will not fit the outlet, have a proper outlet installed by providing a path of electric shock. The dryer comes with a cord having...
... long, 12/4 AWG cord and a NEMA 14-30 P plug. A 3 pole-4 wire grounding power outlet (NEMA type 14-30 R) is necessary. Check with a qualified electrician or service representative or personnel if you are in accordance with the appliance! In the event of malfunction or breakdown, grounding will not fit the outlet, have a proper outlet installed by providing a path of electric shock. The dryer comes with a cord having...


