Miele T 8013 C Support Question
Miele T 8013 C Support Question
Find answers below for this question about Miele T 8013 C.Need a Miele T 8013 C manual? We have 2 online manuals for this item!
Question posted by JOE69631 on February 21st, 2013
Part # For Ac Cover Plate Dlec855w
Need The Part # Please
for Plate That Covers Ac Jack On Back
thanks
Current Answers
Related Miele T 8013 C Manual Pages
T8000 Tumble Dryers - Page 1

... right or left side or lower left rear (see separate sheet).
Notes
• All installations must be adjusted to scale.
Product Dimensions
Large Capacity Vented Dryer Angled control T8003 / T8005
E 23 1/2"
22 1/2"
21 1/2"
33 3/8" - 34 1/8"
V
3 3/4" - 4 1/2"
2"
Location Codes
E - 208/240 Volt, 30 Amp 5 foot molded plug power supply connects upper right rear...
T8000 Tumble Dryers - Page 2

Product Dimensions
Large Capacity Condeser Dryer Angled control T8013C
E 23 1/2" D 22 1/2"
21 1/2" CD
33 3/8" - 34 1/8"
3 3/4" - 4 1/2" 2"
Location Codes
E - 208/240 Volt, 30 Amp 5 foot molded plug power supply connects upper right rear (...
T8000 Tumble Dryers - Page 5

White Only
11"
22"
23 3/8"
Notes
• For use with both large and super capacity washers or tumble dryers.
• All installations must be done in accordnace with local codes
NOTE: Drawing is not to scale. SPECIFICATION SHEETS 08262011 Product Dimensions
Laundry Stand WTS410 -
Operating and installation manual - Page 1

Operating and Installation Instructions Condenser Dryer T 8012 C T 8013 C
To prevent accidents and machine damage read these instructions before installation or use. US, CA
M.-Nr. 06 881 320 en -
Operating and installation manual - Page 2

... INSTRUCTIONS 3 Control panel 5 Before loading the dryer 6 Using the dryer 7 1. Turn on the dryer and load the laundry 7 2. Select a program 7 3. Select a drying option (if needed 9 4. Start the program 11 7. At the end of a program 11 Canceling or changing a program 12 Adding or removing laundry during a program 12 Child lock 13 Dryer care 14 Cleaning the lint filter...
Operating and installation manual - Page 3
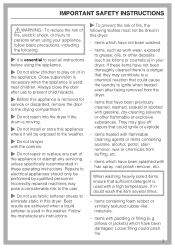
...cleaning agents or items containing acetone, alcohol, petrol, stain remover, wax or chemicals from the dryer.
- Loose filling could ignite or explode.
- To reduce the risk of
fire, electric ...
eliminate static in the washer. When washing heavily soiled items ensure that could cause the laundry to grease, oils, or other flammable or explosive substances. Always close the door after ...
Operating and installation manual - Page 5
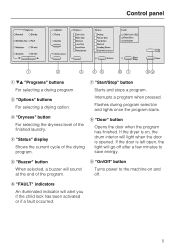
... finished. Control panel
a e- "Programs" buttons For selecting a drying program. d "Status" display Shows the current cycle of the finished laundry.
c "Dryness" button For selecting the dryness level of the drying program. If the dryer is on, the drum interior will light when the door is left open, the light will go off after...
Operating and installation manual - Page 7
... the e or - Fabric softener sheet may clog the filters and cause the dryer to open the door.
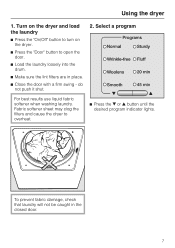
^ Load the laundry loosely into the drum.
^ Make sure the lint filters are in the closed door.
7 To prevent fabric damage, check that laundry will not be caught in place.
^ Close the door with a firm swing...
Operating and installation manual - Page 8
...pants and shirts. Remove items immediately after the end of cotton, e.g.
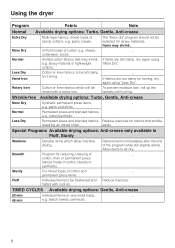
Using the dryer
Program
Fabric
Note
Normal Available drying options: Turbo, Gentle, Anti-crease
Extra Dry
Multi...towels. Sturdy
For mixed loads of sturdy cottons, e.g. To prevent moisture loss, roll up the laundry until ironing.
cotton, linen or permanent press
fabrics made of
- beach towels, swimsuits.
8...
Operating and installation manual - Page 9

Anti-crease Prevents wrinkles if laundry is not removed immediately after the end of the button. Select a drying option (if needed)
^ A drying option can be selected or deselected with increased temperature and a reduced program length.
Gentle For drying delicate fabrics slowly at a lower temperature. Using the dryer
OPTIONS
Turbo Fast drying for about 1 hour...
Operating and installation manual - Page 11
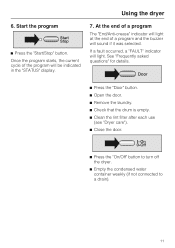
Using the dryer
6. Once the program starts, the current cycle of a program and the buzzer will sound if it was ...Door" button. ^ Open the door. ^ Remove the laundry. ^ Check that the drum is empty. ^ Clean the lint filter after each use
(see "Dryer care"). ^ Close the door.
^ Press the "On/Off" button to turn off the dryer.
^ Empty the condensed water container weekly (if not connected...
Operating and installation manual - Page 12
...to high temperatures in the drum.
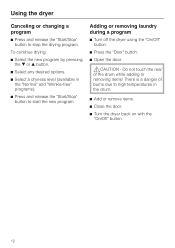
^ Add or remove items.
^ Close the door.
^ Turn the dryer back on with the "On/Off" button.
12 To continue drying:
^ Select the new program by pressing... program. Adding or removing laundry during a program
^ Turn off the dryer using the "On/Off" button.
^ Press the "Door" button.
^ Open the door.
,CAUTION -
Using the dryer
Canceling or changing a program...
Operating and installation manual - Page 20

... a firm swing - do not push it shut.
^ A drying option can be caught in the drum for clothes to turn on the dryer and load the laundry
2. Select a drying option (if needed)
To prevent fabric damage, check that there is enough space in the closed door.
^ Close the door with each press of the...
Operating and installation manual - Page 21

Select the buzzer (if desired) 6. Select the dryness level
Quick Guide
5. 4. At the end of a program The "Anti-crease / End" indicator will light. ^ Press "Door" and remove the laundry. ^ Clean the lint filter. ^ Press the "On/Off" button to turn off
the dryer. Start the program
^ Press the selection button until the desired indicator illuminates.
^ Press the "Start/Stop" button.
7.
Operating and installation manual - Page 23
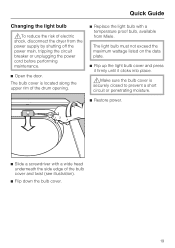
...Replace the light bulb with a wide head underneath the side edge of the bulb cover and twist (see illustration).
^ Flip down the bulb cover.
19 The bulb cover is
securely closed to prevent a short circuit or penetrating moisture.
^ Restore power... exceed the maximum wattage listed on the data plate.
^ Flip up the light bulb cover and press it firmly until it clicks into place.
,Make sure the bulb...
Operating and installation manual - Page 24
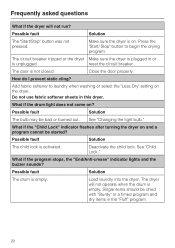
... fabric softener to begin the drying program.
The dryer will not run? Press the "Start/ Stop" button to laundry when washing or select the "Less Dry" setting ...if the "Child Lock" indicator flashes after turning the dryer on ?
Possible fault
Solution
The drum is not closed. Close the door properly. Load laundry into the dryer. Single items should be bad or burned out.
How...
Operating and installation manual - Page 25
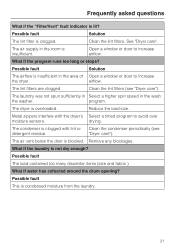
...with lint or Clean the condenser periodically (see "Dryer care"). drying. "Dryer care").
Possible fault
The load contained too many ...dissimilar items (size and fabric.)
What if water has collected around the drum opening?
Clean the lint filters (see
detergent residue.
The condenser is overloaded. What if the laundry...
Operating and installation manual - Page 26
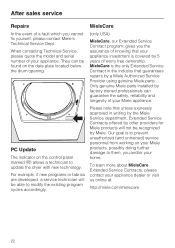
... technician to modify the existing program cycles accordingly. PC Update
The indicator on the data plate located below the drum opening.
(only USA)
MieleCare, our Extended Service Contract program;
... Contracts, please contact your appliance. Our goal is covered by factory trained professionals can be able to update the dryer with new technology. gives you the assurance of your...
Operating and installation manual - Page 30

...electric shock by a qualified electrician.
26 Electrical connection
GROUNDING INSTRUCTIONS This appliance must be grounded. The dryer comes with the appliance! A 3 pole-4 wire grounding power outlet (NEMA type 14-30 R)...or personnel if you are in doubt as to a 120/208-240 V, 30 A, 60 Hz AC power supply.
In the event of malfunction or breakdown, grounding will not fit the outlet, have ...
Operating and installation manual - Page 33

...a niche height of 34 1/4" / 34 13/16" to reduce the height of the dryer.
29
Installation
Installation beneath a counter
,When the machine lid needs to
be removed to 36" / 36 5/8" (870/885 - 915/930 mm).
...a built-under kit replaces the appliance lid and ensures electrical safety. The cover plate of 1 9/16" (40 mm).
Reinstallation of the machine lid
When reinstalling the appliance lid, check ...
Similar Questions

Main Dispenser Cover Issue
Model 6805Keeps warning me that the main dispenser cover needs to be attended to, I press "ok" and i...
Model 6805Keeps warning me that the main dispenser cover needs to be attended to, I press "ok" and i...
(Posted by rtotino1 1 year ago)

I Get Nothing, No Lights And Does Not Start
I have power to plug but dryer does not light up or start, could it be the thermal fus
I have power to plug but dryer does not light up or start, could it be the thermal fus
(Posted by michaelcamp21 2 years ago)

Hi My Dryer Is Not Heating Up. What Can The Problem Be ?
Hi my dryer is not heating up. What can the problem be ?
Hi my dryer is not heating up. What can the problem be ?
(Posted by Payalkedia 6 years ago)
