Operating and installation manual
Page 2
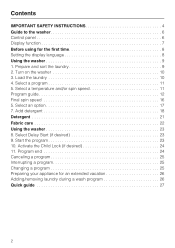
... INSTRUCTIONS 4 Guide to the washer 6 Control panel 6 Display function 7 Before using for an extended vacation 26 Adding/removing laundry during a wash program 26 Quick guide 27 2 Prepare and sort the laundry 9 2. Select a temperature and/or spin speed 11 Program guide 12 Final spin speed 16 5. Program end 24 Canceling a program 25 Interrupting a program 25 Changing a program 25 Preparing your appliance for the first time 8 Setting the display language 8 Using the washer 9 1. Select Delay Start...
... INSTRUCTIONS 4 Guide to the washer 6 Control panel 6 Display function 7 Before using for an extended vacation 26 Adding/removing laundry during a wash program 26 Quick guide 27 2 Prepare and sort the laundry 9 2. Select a temperature and/or spin speed 11 Program guide 12 Final spin speed 16 5. Program end 24 Canceling a program 25 Interrupting a program 25 Changing a program 25 Preparing your appliance for the first time 8 Setting the display language 8 Using the washer 9 1. Select Delay Start...
Operating and installation manual
Page 3
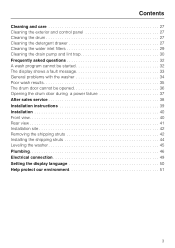
Contents Cleaning and care 27 Cleaning the exterior and control panel 27 Cleaning the drum 27 Cleaning the detergent drawer 27 Cleaning the water inlet filters 29 Cleaning the drain pump and lint trap 30 Frequently asked questions 32 A wash program cannot be started 32 The display shows a fault message 33 General problems with the washer 34 Poor wash results 35 The drum door cannot be opened 36 Opening the drum door during a power failure 37 After sales service 38 Installation instructions 39 Installation 40 Front view...
Contents Cleaning and care 27 Cleaning the exterior and control panel 27 Cleaning the drum 27 Cleaning the detergent drawer 27 Cleaning the water inlet filters 29 Cleaning the drain pump and lint trap 30 Frequently asked questions 32 A wash program cannot be started 32 The display shows a fault message 33 General problems with the washer 34 Poor wash results 35 The drum door cannot be opened 36 Opening the drum door during a power failure 37 After sales service 38 Installation instructions 39 Installation 40 Front view...
Operating and installation manual
Page 4
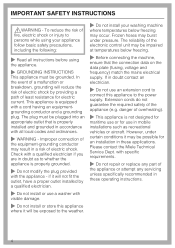
... any servicing unless specifically recommended in mobile installations such as to the power supply. Please contact the Miele Technical Service Dept. danger of overheating). ~ This appliance is properly installed and grounded in accordance with specific requirements. ~ Do not repair or replace any part of the electronic control unit may result in doubt as recreational vehicles or aircraft. with all instructions before using your washing machine where temperatures below...
... any servicing unless specifically recommended in mobile installations such as to the power supply. Please contact the Miele Technical Service Dept. danger of overheating). ~ This appliance is properly installed and grounded in accordance with specific requirements. ~ Do not repair or replace any part of the electronic control unit may result in doubt as recreational vehicles or aircraft. with all instructions before using your washing machine where temperatures below...

Operating and installation manual
Page 5
... previously cleaned, washed, soaked or spotted with a genuine Miele power cord. ~ Under certain conditions, hydrogen gas may be produced in the appliance. IMPORTANT SAFETY INSTRUCTIONS ~ If the power cord is damaged it must only be replaced by the manufacturer to be machine washable on the fabric care label. This will release any built-up hydrogen gas. If the hot water system has not been used near the machine...
... previously cleaned, washed, soaked or spotted with a genuine Miele power cord. ~ Under certain conditions, hydrogen gas may be produced in the appliance. IMPORTANT SAFETY INSTRUCTIONS ~ If the power cord is damaged it must only be replaced by the manufacturer to be machine washable on the fabric care label. This will release any built-up hydrogen gas. If the hot water system has not been used near the machine...

Operating and installation manual
Page 7
.... Display of the washer. Outerwear - Delicates - The "High spin" button allows you can select from the following programs: - Guide to the washer Display function The display allows you to operate and select various functions of an approximate program running time Program selection using the display By pressing the "MasterCare" button, you to adjust the temperature. Denim / Jeans - Pillows - Beach towels - Delay start - Express - Selection and display of program settings...
.... Display of the washer. Outerwear - Delicates - The "High spin" button allows you can select from the following programs: - Guide to the washer Display function The display allows you to operate and select various functions of an approximate program running time Program selection using the display By pressing the "MasterCare" button, you to adjust the temperature. Denim / Jeans - Pillows - Beach towels - Delay start - Express - Selection and display of program settings...
Operating and installation manual
Page 8
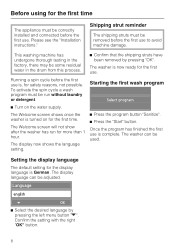
... may be removed before the first use is German. This washing machine has undergone thorough testing in the drum from this process. ^ Confirm that the shipping struts have been removed by pressing the left menu button "+". The Welcome screen shows once the washer is turned on the water supply. The display now shows the language setting. ^ Press the program button "Sanitize". ^ Press the "Start" button. Once the...
... may be removed before the first use is German. This washing machine has undergone thorough testing in the drum from this process. ^ Confirm that the shipping struts have been removed by pressing the left menu button "+". The Welcome screen shows once the washer is turned on the water supply. The display now shows the language setting. ^ Press the program button "Sanitize". ^ Press the "Start" button. Once the...
Operating and installation manual
Page 16
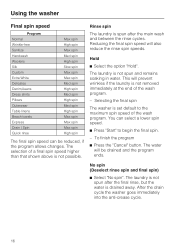
..." button. The water will also reduce the rinse spin speeds. No spin (Deselect rinse spin and final spin) ^ Select "No spin". Using the washer Final spin speed Program Normal Wrinkle-free Sanitize Handwash Woolens Silk Custom Extra White Delicates Denim/Jeans Dress shirts Pillows Outerwear Table linens Beach towels Express Drain / Spin Quick rinse Max spin High spin Max spin Med spin High spin Slow spin Max spin Max spin Med spin High spin Med spin High spin Med spin High spin Max spin Max spin Max spin High spin The final spin speed...
..." button. The water will also reduce the rinse spin speeds. No spin (Deselect rinse spin and final spin) ^ Select "No spin". Using the washer Final spin speed Program Normal Wrinkle-free Sanitize Handwash Woolens Silk Custom Extra White Delicates Denim/Jeans Dress shirts Pillows Outerwear Table linens Beach towels Express Drain / Spin Quick rinse Max spin High spin Max spin Med spin High spin Slow spin Max spin Max spin Med spin High spin Med spin High spin Med spin High spin Max spin Max spin Max spin High spin The final spin speed...
Operating and installation manual
Page 18
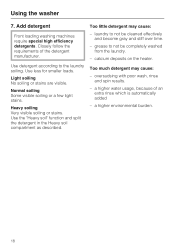
... extra rinse which is automatically added - Use detergent according to not be completely washed from the laundry. - Light soiling No soiling or stains are visible. laundry to the laundry soiling. oversudsing with poor wash, rinse and spin results. - Normal soiling Some visible soiling or a few light stains. Use less for smaller loads. a higher water usage, because of the detergent manufacturer. Too little detergent may cause: - Add detergent Front loading washing machines require special high efficiency detergents. Using the washer 7.
... extra rinse which is automatically added - Use detergent according to not be completely washed from the laundry. - Light soiling No soiling or stains are visible. laundry to the laundry soiling. oversudsing with poor wash, rinse and spin results. - Normal soiling Some visible soiling or a few light stains. Use less for smaller loads. a higher water usage, because of the detergent manufacturer. Too little detergent may cause: - Add detergent Front loading washing machines require special high efficiency detergents. Using the washer 7.
Operating and installation manual
Page 26
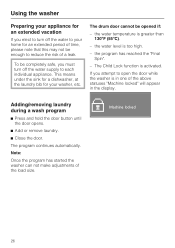
... to turn off the water to your washer, etc. Adding/removing laundry during a wash program ^ Press and hold the door button until the door opens. ^ Add or remove laundry. ^ Close the door. The program continues automatically. The drum door cannot be enough to reduce the risk of the load size. the program has reached the "Final Spin". - Note: Once the program has started the washer can not make adjustments of a leak. Using the washer...
... to turn off the water to your washer, etc. Adding/removing laundry during a wash program ^ Press and hold the door button until the door opens. ^ Add or remove laundry. ^ Close the door. The program continues automatically. The drum door cannot be enough to reduce the risk of the load size. the program has reached the "Final Spin". - Note: Once the program has started the washer can not make adjustments of a leak. Using the washer...

Operating and installation manual
Page 31
... power supply by unplugging the unit or manually "tripping" the circuit breaker. ,Do not use in a washing machine, available from Miele. Cleaning the drum Miele suggests running a "maintenance cycle" approx. They will damage the surface. Cleaning the exterior and control panel ^ Clean the exterior of the washer with a stainless steel cleaner specially formulated for use a hose to completion. Descaling the washer If the correct amount of non-abrasive detergent or soap and water...
... power supply by unplugging the unit or manually "tripping" the circuit breaker. ,Do not use in a washing machine, available from Miele. Cleaning the drum Miele suggests running a "maintenance cycle" approx. They will damage the surface. Cleaning the exterior and control panel ^ Clean the exterior of the washer with a stainless steel cleaner specially formulated for use a hose to completion. Descaling the washer If the correct amount of non-abrasive detergent or soap and water...
Operating and installation manual
Page 33
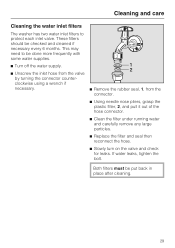
... inlet hose from the valve by turning the connector counterclockwise using a wrench if necessary. ^ Remove the rubber seal, 1, from the connector. ^ Using needle nose pliers, grasp the plastic filter, 2, and pull it out of the hose connector. ^ Clean the filter under running water and carefully remove any large particles. ^ Replace the filter and seal then reconnect the hose. ^ Slowly turn on the valve and check for leaks. If water leaks, tighten the bolt. Cleaning and care Cleaning the water inlet filters The washer has two water inlet filters...
... inlet hose from the valve by turning the connector counterclockwise using a wrench if necessary. ^ Remove the rubber seal, 1, from the connector. ^ Using needle nose pliers, grasp the plastic filter, 2, and pull it out of the hose connector. ^ Clean the filter under running water and carefully remove any large particles. ^ Replace the filter and seal then reconnect the hose. ^ Slowly turn on the valve and check for leaks. If water leaks, tighten the bolt. Cleaning and care Cleaning the water inlet filters The washer has two water inlet filters...

Operating and installation manual
Page 34
... is clogged, water will still be retained in the machine (a maximum amount of 6.5 gal [25 l]). Repeat this procedure as often as necessary. ^ Open the access panel. 30 If additional water remains in the lint trap. If the main drain hose is free of foreign objects. ^ Turn off the appliance with the "On / Off" button. ,Caution: If laundry has been washed at a high temperature, the water draining out...
... is clogged, water will still be retained in the machine (a maximum amount of 6.5 gal [25 l]). Repeat this procedure as often as necessary. ^ Open the access panel. 30 If additional water remains in the lint trap. If the main drain hose is free of foreign objects. ^ Turn off the appliance with the "On / Off" button. ,Caution: If laundry has been washed at a high temperature, the water draining out...

Operating and installation manual
Page 38
... the washer Issue The washer shakes during the spin cycle. There are not resting Level the machine (see "Cleaning and care - Clean the siphon tube, see evenly on the floor. The siphon tube is not completely dispensed or too much water remains in the dispenser drawer. "Leveling the washer"). Clean the water intake hose filter under running water and carefully remove any large particles. In the future add the detergent first then the water softener. Cleaning the detergent drawer". Lapping sounds...
... the washer Issue The washer shakes during the spin cycle. There are not resting Level the machine (see "Cleaning and care - Clean the siphon tube, see evenly on the floor. The siphon tube is not completely dispensed or too much water remains in the dispenser drawer. "Leveling the washer"). Clean the water intake hose filter under running water and carefully remove any large particles. In the future add the detergent first then the water softener. Cleaning the detergent drawer". Lapping sounds...

Operating and installation manual
Page 44
g Drain hose (drain options shown i.e adjustable and removable elbows). Installation Front view a Hot water intake hose b Cold water intake hose c Power cord d - h Control panel i Detergent dispenser drawer j Drum door k Access panel to lint trap and drain pump l Recessed grip m Four height-adjustable feet 40
g Drain hose (drain options shown i.e adjustable and removable elbows). Installation Front view a Hot water intake hose b Cold water intake hose c Power cord d - h Control panel i Detergent dispenser drawer j Drum door k Access panel to lint trap and drain pump l Recessed grip m Four height-adjustable feet 40
Operating and installation manual
Page 46
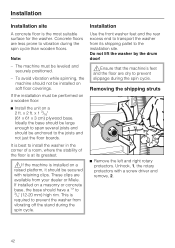
Concrete floors are available from vibrating off the stand during the spin cycle. If the installation must be leveled and securely positioned. - These clips are less prone to 3/4" (12-20 mm) high rim. Do not lift the washer by the drum door! ,Ensure that the machine's feet and the floor are dry to the joists and not just the floor boards. Unhook...
Concrete floors are available from vibrating off the stand during the spin cycle. If the installation must be leveled and securely positioned. - These clips are less prone to 3/4" (12-20 mm) high rim. Do not lift the washer by the drum door! ,Ensure that the machine's feet and the floor are dry to the joists and not just the floor boards. Unhook...

Operating and installation manual
Page 50
... from Miele. 46 Open the water supply slowly to install a connection. Adjust the rubber seal and the bolted connection if necessary. Hose extension (optional accessory) Hose extensions with a hose able to withstand up to withstand 145 psi (10 bar). ,The bolted connection is no water hookup, contact a plumber to check for leaks. Make sure that the sealing ring is not needed unless required by building code. The water valve...
... from Miele. 46 Open the water supply slowly to install a connection. Adjust the rubber seal and the bolted connection if necessary. Hose extension (optional accessory) Hose extensions with a hose able to withstand up to withstand 145 psi (10 bar). ,The bolted connection is no water hookup, contact a plumber to check for leaks. Make sure that the sealing ring is not needed unless required by building code. The water valve...

Operating and installation manual
Page 51
... hot water temperature from the hot water valve must be attached to hot water only. ^ Turn on the valve(s) and check for leaks. The water intake hoses are equipped with screen filters. the ideal temperature is below 15 psi (1 bar) there will not function properly. If the water pressure is 130°F (55°C). Do not remove these filters except for a complete fill. Both hoses must be enough water available for cleaning...
... hot water temperature from the hot water valve must be attached to hot water only. ^ Turn on the valve(s) and check for leaks. The water intake hoses are equipped with screen filters. the ideal temperature is below 15 psi (1 bar) there will not function properly. If the water pressure is 130°F (55°C). Do not remove these filters except for a complete fill. Both hoses must be enough water available for cleaning...

W3000 Washers
Page 1
Product Dimensions Large Capacity Washing Machine Angled control W3033 / W3035 E 23 1/2" W D 22 1/2" 21 1/2" 33 3/8" - 34 1/8" 3 3/4" - 4 1/2" 2" Location Codes D - 5 foot flexible drain hose connects upper left rear. W - 5 foot separate flexible hot and cold water intake hoses connect upper left rear. Notes • All installations must be done in accordance with local codes • See "Cut-out Dimensions" sheet for undercounter or built-in space requirements • Remove transport struts in rear of...
Product Dimensions Large Capacity Washing Machine Angled control W3033 / W3035 E 23 1/2" W D 22 1/2" 21 1/2" 33 3/8" - 34 1/8" 3 3/4" - 4 1/2" 2" Location Codes D - 5 foot flexible drain hose connects upper left rear. W - 5 foot separate flexible hot and cold water intake hoses connect upper left rear. Notes • All installations must be done in accordance with local codes • See "Cut-out Dimensions" sheet for undercounter or built-in space requirements • Remove transport struts in rear of...
W3000 Washers
Page 2
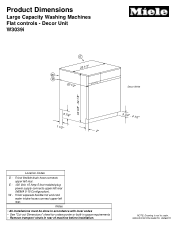
SPECIFICATION SHEETS 08262011 Notes • All installations must be done in accordance with local codes • See "Cut-out Dimensions" sheet for undercounter or built-in space requirements • Remove transport struts in rear of machine before installation. Product Dimensions Large Capacity Washing Machines Flat controls - E - 120 Volt, 15 Amp 5 foot molded plug power supply connects upper left rear. W - 5 foot separate flexible hot and cold water intake hoses connect upper left rear...
SPECIFICATION SHEETS 08262011 Notes • All installations must be done in accordance with local codes • See "Cut-out Dimensions" sheet for undercounter or built-in space requirements • Remove transport struts in rear of machine before installation. Product Dimensions Large Capacity Washing Machines Flat controls - E - 120 Volt, 15 Amp 5 foot molded plug power supply connects upper left rear. W - 5 foot separate flexible hot and cold water intake hoses connect upper left rear...

W3000 Washers
Page 5
... is not to scale. SPECIFICATION SHEETS 08262011 E2 - 208/240 Volt, 30 Amp 5 foot molded plug power supply connects upper right rear (NEMA 14-30 Configuration). W - 5 foot separate flexible hot and cold water intake hoses connect upper left rear (NEMA 5-15 Configuration). Product Dimensions Stacked Washer & Dryer Example Combination W3033 + T8003 E2 23 1/2" 22 1/2" E1 V W D 66 3/8" - 67 1/8" Location Codes D - 5 foot flexible drain hose connects upper left rear...
... is not to scale. SPECIFICATION SHEETS 08262011 E2 - 208/240 Volt, 30 Amp 5 foot molded plug power supply connects upper right rear (NEMA 14-30 Configuration). W - 5 foot separate flexible hot and cold water intake hoses connect upper left rear (NEMA 5-15 Configuration). Product Dimensions Stacked Washer & Dryer Example Combination W3033 + T8003 E2 23 1/2" 22 1/2" E1 V W D 66 3/8" - 67 1/8" Location Codes D - 5 foot flexible drain hose connects upper left rear...


