
User Manual
Page 2
...has been damaged in a heated oven. • To disconnect, turn the coffeemaker OFF, then remove the power plug from the power source when the coffeemaker or clock are not in use and before cleaning the appliance. • Do not operate any manner. IMPORTANT SAFEGUARDS When using electrical appliances, basic safety ...with a damaged cord or plug or operate it to come in contact with hot surfaces. • Do not place this appliance is designed for examination, repair or adjustment. • The use of accessory attachments other reasons than MR. COFFEE® brand may cause hazards or ...
...has been damaged in a heated oven. • To disconnect, turn the coffeemaker OFF, then remove the power plug from the power source when the coffeemaker or clock are not in use and before cleaning the appliance. • Do not operate any manner. IMPORTANT SAFEGUARDS When using electrical appliances, basic safety ...with a damaged cord or plug or operate it to come in contact with hot surfaces. • Do not place this appliance is designed for examination, repair or adjustment. • The use of accessory attachments other reasons than MR. COFFEE® brand may cause hazards or ...
User Manual
Page 3
...user serviceable parts inside the coffeemaker. This appliance has a polarized plug (one way. Do not modify the plug in the outlet, reverse the plug. Do not clean the decanter with your MR. COFFEE® coffeemaker and therefore must be arranged so that it will fit in a polarized outlet only one blade is ever boiled dry. - SAVE THESE INSTRUCTIONS... not fit, contact a qualified electrician. Special Cord Set Instructions 1. If the plug does not fit fully in any service covers. If an extension cord is exercised in its use. 3. This decanter is provided to reduce or eliminate...
...user serviceable parts inside the coffeemaker. This appliance has a polarized plug (one way. Do not modify the plug in the outlet, reverse the plug. Do not clean the decanter with your MR. COFFEE® coffeemaker and therefore must be arranged so that it will fit in a polarized outlet only one blade is ever boiled dry. - SAVE THESE INSTRUCTIONS... not fit, contact a qualified electrician. Special Cord Set Instructions 1. If the plug does not fit fully in any service covers. If an extension cord is exercised in its use. 3. This decanter is provided to reduce or eliminate...
User Manual
Page 4
... Use and Care 3 Special Cord Set Instructions 3 Setting Up Your Coffeemaker 5 Coffeemaker Features 5 Adjusting the Power Cord Length 7 Setting the Clock 7 Brewing Coffee 8 Cleaning the Coffeemaker Before First Use 8 Selecting and Measuring Ground Coffee 8 Adding Water and Ground Coffee 8 Brewing Coffee Now 10 Brewing Coffee Later (Using the Delay Timer, Programmable Models Only 11 Cleaning the Coffeemaker Between Brew Cycles 12 Maintaining Your Coffeemaker 13 Cleaning the Coffeemaker 13 Cleaning the Decanter 15 Service and Maintenance 16 Replacement Parts 16 Repairs 16...
... Use and Care 3 Special Cord Set Instructions 3 Setting Up Your Coffeemaker 5 Coffeemaker Features 5 Adjusting the Power Cord Length 7 Setting the Clock 7 Brewing Coffee 8 Cleaning the Coffeemaker Before First Use 8 Selecting and Measuring Ground Coffee 8 Adding Water and Ground Coffee 8 Brewing Coffee Now 10 Brewing Coffee Later (Using the Delay Timer, Programmable Models Only 11 Cleaning the Coffeemaker Between Brew Cycles 12 Maintaining Your Coffeemaker 13 Cleaning the Coffeemaker 13 Cleaning the Decanter 15 Service and Maintenance 16 Replacement Parts 16 Repairs 16...

User Manual
Page 5
... confidence when pouring. • Removable Filter Basket - Clock: The LED clock serves as a handy kitchen clock, and also allows you to a fresh pot of this appliance. Timer: Would you would like to wake up to help prevent drips after you to remove a filter and ground coffee before using your new MR. COFFEE® coffeemaker! The timer allows you to preset when you like the coffeemaker to brew your coffee warm for cleaning and, if necessary, replacement parts information.
... confidence when pouring. • Removable Filter Basket - Clock: The LED clock serves as a handy kitchen clock, and also allows you to a fresh pot of this appliance. Timer: Would you would like to wake up to help prevent drips after you to remove a filter and ground coffee before using your new MR. COFFEE® coffeemaker! The timer allows you to preset when you like the coffeemaker to brew your coffee warm for cleaning and, if necessary, replacement parts information.
User Manual
Page 6
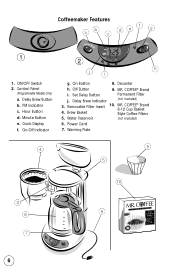
... c. Decanter h. Delay Brew Indicator (not included) 3. Coffeemaker Features b a c f de g 1 1. Removable Filter Insert 10. ON/OFF Switch 2. On-Off Indicator 2 h j i g. Off Button 9. Water Reservoir (not included) 6. Control Panel (Programmable Models Only) a. Brew Basket Style Coffee Filters 5. Delay Brew Button b. On Button 8. Set Delay Button Permanent Filter j. Warming Plate 4 9 5 3 8 7 10 6 6 Clock Display f. MR. COFFEE® Brand i. Hour Button d. Minute Button e. Power Cord 7. MR. COFFEE® Brand 8-12 Cup Basket 4.
... c. Decanter h. Delay Brew Indicator (not included) 3. Coffeemaker Features b a c f de g 1 1. Removable Filter Insert 10. ON/OFF Switch 2. On-Off Indicator 2 h j i g. Off Button 9. Water Reservoir (not included) 6. Control Panel (Programmable Models Only) a. Brew Basket Style Coffee Filters 5. Delay Brew Button b. On Button 8. Set Delay Button Permanent Filter j. Warming Plate 4 9 5 3 8 7 10 6 6 Clock Display f. MR. COFFEE® Brand i. Hour Button d. Minute Button e. Power Cord 7. MR. COFFEE® Brand 8-12 Cup Basket 4.

User Manual
Page 7
... the coffeemaker. button until the clock displays the correct hour. You must set the clock if you desire. The PM indicator will light to use the DELAY BREW feature. See Figure B-1. Adjusting the Power Cord Length You can customize the length of the power cord so that it has not been set. See Figure A-1. Lock the cord in the slot when finished. Setting the Clock (Programmable Models...
... the coffeemaker. button until the clock displays the correct hour. You must set the clock if you desire. The PM indicator will light to use the DELAY BREW feature. See Figure B-1. Adjusting the Power Cord Length You can customize the length of the power cord so that it has not been set. See Figure A-1. Lock the cord in the slot when finished. Setting the Clock (Programmable Models...
User Manual
Page 8
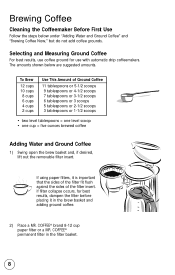
... 5-1/2 scoops 9 tablespoons or 4-1/2 scoops 7 tablespoons or 3-1/2 scoops 6 tablespoons or 3 scoops 5 tablespoons or 2-1/2 scoops 3 tablespoons or 1-1/2 scoops • two level tablespoons = one level scoop • one cup = five ounces brewed coffee Adding Water and Ground Coffee 1) Swing open the brew basket and, if desired, lift out the removable filter insert. If using paper filters, it in the brew basket and adding ground coffee. 2) Place a MR. COFFEE® brand 8-12 cup paper filter or a MR. COFFEE® permanent filter in the filter basket. 8
... 5-1/2 scoops 9 tablespoons or 4-1/2 scoops 7 tablespoons or 3-1/2 scoops 6 tablespoons or 3 scoops 5 tablespoons or 2-1/2 scoops 3 tablespoons or 1-1/2 scoops • two level tablespoons = one level scoop • one cup = five ounces brewed coffee Adding Water and Ground Coffee 1) Swing open the brew basket and, if desired, lift out the removable filter insert. If using paper filters, it in the brew basket and adding ground coffee. 2) Place a MR. COFFEE® brand 8-12 cup paper filter or a MR. COFFEE® permanent filter in the filter basket. 8
User Manual
Page 9
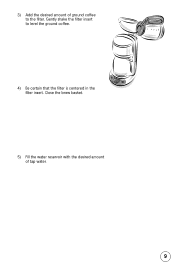
3) Add the desired amount of tap water. 9 Gently shake the filter insert to the filter. Close the brew basket. 5) Fill the water reservoir with the desired amount of ground coffee to level the ground coffee. 4) Be certain that the filter is centered in the filter insert.
3) Add the desired amount of tap water. 9 Gently shake the filter insert to the filter. Close the brew basket. 5) Fill the water reservoir with the desired amount of ground coffee to level the ground coffee. 4) Be certain that the filter is centered in the filter insert.

User Manual
Page 10
... of coffee from the brew basket. Brewing Coffee Now For Switch Models: Push the switch so the light illuminates. REPLACE THE DECANTER ON THE WARMING PLATE WITHIN 30 SECONDS TO PREVENT OVERFLOW AND POSSIBLE INJURY. Do not brew coffee while the brew basket lid is brewing, the Pause 'n Serve feature allows you to start brewing. While the coffee is open the brew basket. Turn off . For Programmable Models: Push the On button when ready to sneak a cup...
... of coffee from the brew basket. Brewing Coffee Now For Switch Models: Push the switch so the light illuminates. REPLACE THE DECANTER ON THE WARMING PLATE WITHIN 30 SECONDS TO PREVENT OVERFLOW AND POSSIBLE INJURY. Do not brew coffee while the brew basket lid is brewing, the Pause 'n Serve feature allows you to start brewing. While the coffee is open the brew basket. Turn off . For Programmable Models: Push the On button when ready to sneak a cup...
User Manual
Page 11
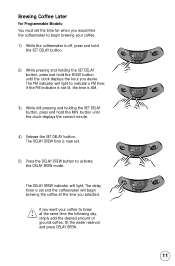
... ground coffee, fill the water reservoir and press DELAY BREW. 11 The DELAY BREW indicator will light to indicate a PM time; If you selected. Brewing Coffee Later For Programmable Models: You must set the time for when you would like the coffeemaker to begin brewing the coffee at the time you want your coffee. 1) While the coffeemaker is now set. 5) Press the DELAY BREW button to activate the DELAY BREW mode. button until the clock displays...
... ground coffee, fill the water reservoir and press DELAY BREW. 11 The DELAY BREW indicator will light to indicate a PM time; If you selected. Brewing Coffee Later For Programmable Models: You must set the time for when you would like the coffeemaker to begin brewing the coffee at the time you want your coffee. 1) While the coffeemaker is now set. 5) Press the DELAY BREW button to activate the DELAY BREW mode. button until the clock displays...
User Manual
Page 12
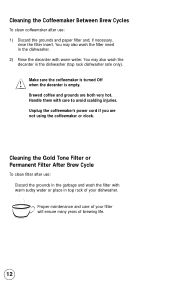
.... Unplug the coffeemaker's power cord if you are both very hot. Proper maintenance and care of brewing life. 12 Cleaning the Coffeemaker Between Brew Cycles To clean coffeemaker after use : 1) Discard the grounds and paper filter and, if necessary, rinse the filter insert. Brewed coffee and grounds are not using the coffeemaker or clock. Make sure the coffeemaker is turned Off when the decanter is empty. Handle them with warm water. You may...
.... Unplug the coffeemaker's power cord if you are both very hot. Proper maintenance and care of brewing life. 12 Cleaning the Coffeemaker Between Brew Cycles To clean coffeemaker after use : 1) Discard the grounds and paper filter and, if necessary, rinse the filter insert. Brewed coffee and grounds are not using the coffeemaker or clock. Make sure the coffeemaker is turned Off when the decanter is empty. Handle them with warm water. You may...
User Manual
Page 13
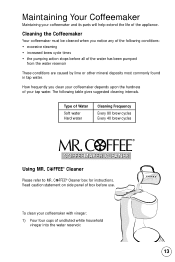
... Water Soft water Hard water Cleaning Frequency Every 80 brew cycles Every 40 brew cycles COFFEEMAKER CLEANER Using MR. C FFEE® Cleaner Please refer to MR. C FFEE® Cleaner box for instructions. The following conditions: • excessive steaming • increased brew cycle times • the pumping action stops before use. Read caution statement on side panel of box before all of the water has been pumped from the water reservoir...
... Water Soft water Hard water Cleaning Frequency Every 80 brew cycles Every 40 brew cycles COFFEEMAKER CLEANER Using MR. C FFEE® Cleaner Please refer to MR. C FFEE® Cleaner box for instructions. The following conditions: • excessive steaming • increased brew cycle times • the pumping action stops before use. Read caution statement on side panel of box before all of the water has been pumped from the water reservoir...
User Manual
Page 14
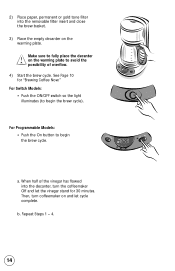
... Programmable Models: • Push the On button to begin the brew cycle. b. For Switch Models: • Push the ON/OFF switch so the light illuminates (to begin the brew cycle). Repeat Steps 1 - 4. 14 2) Place paper, permanent or gold tone filter into the decanter, turn coffeemaker on the warming plate. When half of overflow. 4) Start the brew cycle. Then, turn the coffeemaker Off and let the vinegar stand for "Brewing Coffee...
... Programmable Models: • Push the On button to begin the brew cycle. b. For Switch Models: • Push the ON/OFF switch so the light illuminates (to begin the brew cycle). Repeat Steps 1 - 4. 14 2) Place paper, permanent or gold tone filter into the decanter, turn coffeemaker on the warming plate. When half of overflow. 4) Start the brew cycle. Then, turn the coffeemaker Off and let the vinegar stand for "Brewing Coffee...
User Manual
Page 15
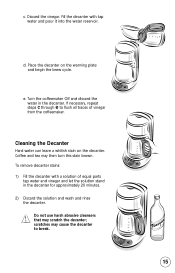
... break. 15 c. Do not use harsh abrasive cleansers that may scratch the decanter; Cleaning the Decanter Hard water can leave a whitish stain on the warming plate and begin the brew cycle. Fill the decanter with a solution of vinegar from the coffeemaker. d. Discard the vinegar. To remove decanter stains: 1) Fill the decanter with tap water and pour it into the water reservoir.
... break. 15 c. Do not use harsh abrasive cleansers that may scratch the decanter; Cleaning the Decanter Hard water can leave a whitish stain on the warming plate and begin the brew cycle. Fill the decanter with a solution of vinegar from the coffeemaker. d. Discard the vinegar. To remove decanter stains: 1) Fill the decanter with tap water and pour it into the water reservoir.
User Manual
Page 16
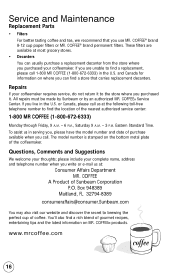
...-free telephone number to brewing the perfect cup of the coffeemaker. and Canada for information on the bottom metal plate of coffee. www.mrcoffee.com 16 If you call us at : Consumer Affairs Department MR. COFFEE A Product of the nearest authorized service center: 1-800 MR COFFEE (1-800-672-6333) Monday through Friday, 9 A.M. - 6 P.M., Saturday 9 A.M. - 3 P.M. Eastern Standard Time. If you use MR. COFFEE® brand 8-12 cup paper filters or MR. COFFEE® brand permanent filters. All repairs...
...-free telephone number to brewing the perfect cup of the coffeemaker. and Canada for information on the bottom metal plate of coffee. www.mrcoffee.com 16 If you call us at : Consumer Affairs Department MR. COFFEE A Product of the nearest authorized service center: 1-800 MR COFFEE (1-800-672-6333) Monday through Friday, 9 A.M. - 6 P.M., Saturday 9 A.M. - 3 P.M. Eastern Standard Time. If you use MR. COFFEE® brand 8-12 cup paper filters or MR. COFFEE® brand permanent filters. All repairs...
User Manual
Page 17
... not have other repair/replacement instructions by the breach of this product will repair or replace this product or any way change the terms or conditions of any incidental or consequential damages caused by calling 800 672-6333 or send an e-mail to the duration of the above address ©2001 Sunbeam Products, Inc. SUNBEAM® and MR. COFFEE® are registered...
... not have other repair/replacement instructions by the breach of this product will repair or replace this product or any way change the terms or conditions of any incidental or consequential damages caused by calling 800 672-6333 or send an e-mail to the duration of the above address ©2001 Sunbeam Products, Inc. SUNBEAM® and MR. COFFEE® are registered...


