
User Guide
Page 2
... injury to replace or splice a damaged cord. The use , and before cleaning the appliance. 6. A Cappuccino, on top. To protect against electric shock, do not play with a small layer of espresso and steamed milk with the appliance. Keep the appliance and its cord out of reach of a Mr. Coffee® Steam Espresso, Cappuccino and Latte Maker. You're the proud new owner of children...
... injury to replace or splice a damaged cord. The use , and before cleaning the appliance. 6. A Cappuccino, on top. To protect against electric shock, do not play with a small layer of espresso and steamed milk with the appliance. Keep the appliance and its cord out of reach of a Mr. Coffee® Steam Espresso, Cappuccino and Latte Maker. You're the proud new owner of children...
User Guide
Page 3
... filter holder during use, as the electrical rating of table or counter, or touch hot surfaces. 10. REPAIR SHOULD BE DONE BY AUTHORIZED SERVICE PERSONNEL ONLY. Save These Instructions 4 Household Use Only North American models with an empty water tank. 3. If the plug does not fit fully in a polarized outlet only one blade is of injury, never open or disengage the brew...
... filter holder during use, as the electrical rating of table or counter, or touch hot surfaces. 10. REPAIR SHOULD BE DONE BY AUTHORIZED SERVICE PERSONNEL ONLY. Save These Instructions 4 Household Use Only North American models with an empty water tank. 3. If the plug does not fit fully in a polarized outlet only one blade is of injury, never open or disengage the brew...
User Guide
Page 4
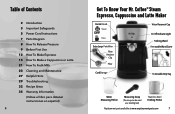
... Froth Milk 23 Cleaning and Maintenance 27 Helpful Hints 29 Troubleshooting 32 Recipe Ideas 35 Warranty Information (Voltee el libro para obtener instrucciones en español) 6 Get To Know Your Mr. Coffee® Steam Espresso, Cappuccino and Latte Maker Control Knob Steam Brew Extra Large Portafilter Filter Retainer Clip Filter Water Reservoir Cap On/Off Indicator Light Frothing Wand Removable Wand Cover Cord Storage Removable Drip Tray Water Measuring Pitcher Measuring Scoop (The scoop can be used...
... Froth Milk 23 Cleaning and Maintenance 27 Helpful Hints 29 Troubleshooting 32 Recipe Ideas 35 Warranty Information (Voltee el libro para obtener instrucciones en español) 6 Get To Know Your Mr. Coffee® Steam Espresso, Cappuccino and Latte Maker Control Knob Steam Brew Extra Large Portafilter Filter Retainer Clip Filter Water Reservoir Cap On/Off Indicator Light Frothing Wand Removable Wand Cover Cord Storage Removable Drip Tray Water Measuring Pitcher Measuring Scoop (The scoop can be used...
User Guide
Page 5
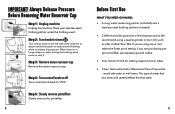
... purchasing preground coffee, use espresso ground coffee. • Your choice of milk for making cappuccinos or lattes. • Clean, fresh water that is no longer steam or water exiting the frothing wand, move to "OFF." If you brew with greatly affects the final taste. 9 Step 3: Remove water reservoir cap Remove the water reservoir cap. If you're using a quality grinder or burr mill, such as a Mr. Coffee® Burr Mill. Step 2: Turn knob to...
... purchasing preground coffee, use espresso ground coffee. • Your choice of milk for making cappuccinos or lattes. • Clean, fresh water that is no longer steam or water exiting the frothing wand, move to "OFF." If you brew with greatly affects the final taste. 9 Step 3: Remove water reservoir cap Remove the water reservoir cap. If you're using a quality grinder or burr mill, such as a Mr. Coffee® Burr Mill. Step 2: Turn knob to...
User Guide
Page 6
... immerse the power cord, power plug or espresso maker in water or in front of the portafilter. Do not remove the water reservoir cap or portafilter until there is to look at you when you release pressure in the unit. 11 Fill the water measuring pitcher with filtered water to the mark (Figure 1) and pour into the right. Turn the control knob on brew until...
... immerse the power cord, power plug or espresso maker in water or in front of the portafilter. Do not remove the water reservoir cap or portafilter until there is to look at you when you release pressure in the unit. 11 Fill the water measuring pitcher with filtered water to the mark (Figure 1) and pour into the right. Turn the control knob on brew until...

User Guide
Page 7
... the measuring scoop (Figure 5). (If coffee is pressed down too much espresso is brewed by pushing down with the lock symbol . Follow directions on page 8 before using the machine. Make sure the unit is unplugged and the control knob is a manual machine without auto shut-off. Remove the water reservoir cap. • For 2 shots of espresso, fill the water measuring pitcher with water to the 2 cup mark ( ) and pour into water reservoir (Figure...
... the measuring scoop (Figure 5). (If coffee is pressed down too much espresso is brewed by pushing down with the lock symbol . Follow directions on page 8 before using the machine. Make sure the unit is unplugged and the control knob is a manual machine without auto shut-off. Remove the water reservoir cap. • For 2 shots of espresso, fill the water measuring pitcher with water to the 2 cup mark ( ) and pour into water reservoir (Figure...
User Guide
Page 8
... using the machine. Follow directions on page 8 to "OFF" before proceeding. WATER PREP: 1. You control how much espresso is brewed and how long milk is a manual machine without auto shut-off. Remove the water reservoir cap. • To make a cappuccino or latte with 2 shots of the machine to the 2 cup with water to brew (Figure 7). 3. CAUTION! Plug in the machine and turn the control knob to Make a Cappuccino or Latte CAUTION: Do not remove water reservoir cap...
... using the machine. Follow directions on page 8 to "OFF" before proceeding. WATER PREP: 1. You control how much espresso is brewed and how long milk is a manual machine without auto shut-off. Remove the water reservoir cap. • To make a cappuccino or latte with 2 shots of the machine to the 2 cup with water to brew (Figure 7). 3. CAUTION! Plug in the machine and turn the control knob to Make a Cappuccino or Latte CAUTION: Do not remove water reservoir cap...
User Guide
Page 9
... 4 shots of espresso, fill the water measuring pitcher with water to the 4 cup mark ( ) for brewing and pour into machine from left side of the machine to brew . 3. Insert the portafilter into water reservoir. NOTE: Frothing texture is highly dependent upon the milk type used. 2% is pressed down too much, the water will almost double. whole milk creates finer bubbles while skim milk creates larger bubbles. 4. Once the coffee...
... 4 shots of espresso, fill the water measuring pitcher with water to the 4 cup mark ( ) for brewing and pour into machine from left side of the machine to brew . 3. Insert the portafilter into water reservoir. NOTE: Frothing texture is highly dependent upon the milk type used. 2% is pressed down too much, the water will almost double. whole milk creates finer bubbles while skim milk creates larger bubbles. 4. Once the coffee...
User Guide
Page 10
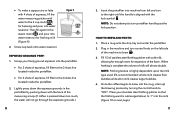
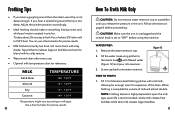
... to directions on page 20). 6. Pour the frothed milk into spout at 12 o'clock and place tip at finger width distance apart motion. A cappuccino has 1/3 of espresso, 1/3 of whole/ 2%/ skim milk to add additional water. You can use a Figure 11 thermometer for precise results. (See Frothing Tips on how to heat up before removing the reservoir cap or portafilter. 8. If 18 brewing 4 shots and frothing...
... to directions on page 20). 6. Pour the frothed milk into spout at 12 o'clock and place tip at finger width distance apart motion. A cappuccino has 1/3 of espresso, 1/3 of whole/ 2%/ skim milk to add additional water. You can use a Figure 11 thermometer for precise results. (See Frothing Tips on how to heat up before removing the reservoir cap or portafilter. 8. If 18 brewing 4 shots and frothing...
User Guide
Page 11
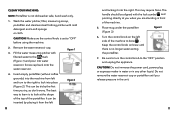
... large air bubbles and swirl to 150 F̊ heat. Follow directions on page 8 before using the machine. When frothing is too deep. Fill 1/3 of the foam. You can use . • Optimal milk temperature chart for expansion of stainless steel frothing pitcher with filtered water (Figure 12) and pour into reservoir. 3. CAUTION! Remove the water reservoir cap. 2. If you hear a screeching sound the tip...
... large air bubbles and swirl to 150 F̊ heat. Follow directions on page 8 before using the machine. When frothing is too deep. Fill 1/3 of the foam. You can use . • Optimal milk temperature chart for expansion of stainless steel frothing pitcher with filtered water (Figure 12) and pour into reservoir. 3. CAUTION! Remove the water reservoir cap. 2. If you hear a screeching sound the tip...
User Guide
Page 12
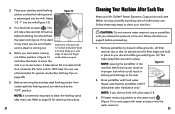
... fresh water. 2. This helps keep filter secured in leaking and damage to clean your machine: CAUTION: Do not remove water reservoir cap or portafilter until you did not froth milk, skip steps 3-8. 3. Before removing the stainless steel frothing pitcher from underneath the frothing wand, turn the knob to discard coffee grounds. Figure 13 3. Place your Mr. Coffee® Steam Espresso, Cappuccino and Latte Maker running smoothly by taking care of spout...
... fresh water. 2. This helps keep filter secured in leaking and damage to clean your machine: CAUTION: Do not remove water reservoir cap or portafilter until you did not froth milk, skip steps 3-8. 3. Before removing the stainless steel frothing pitcher from underneath the frothing wand, turn the knob to discard coffee grounds. Figure 13 3. Place your Mr. Coffee® Steam Espresso, Cappuccino and Latte Maker running smoothly by taking care of spout...
User Guide
Page 13
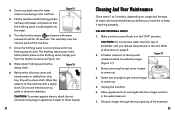
... not remove water reservoir cap or portafilter until you delime your machine to the top with a damp cloth. This will help rinse the internal parts of milk for 30 seconds. Do not use metal scouring pads or abrasive cleansers. Fill water reservoir to keep it working properly. Allow appliance to remove (Figure 16). 8. The frothing wand cover is in the unit. Remove the drip tray cover and empty water or coffee...
... not remove water reservoir cap or portafilter until you delime your machine to the top with a damp cloth. This will help rinse the internal parts of milk for 30 seconds. Do not use metal scouring pads or abrasive cleansers. Fill water reservoir to keep it working properly. Allow appliance to remove (Figure 16). 8. The frothing wand cover is in the unit. Remove the drip tray cover and empty water or coffee...
User Guide
Page 14
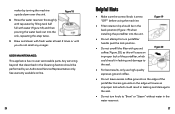
... best results, only use high-quality espresso ground coffee. • Do not leave excess coffee grounds on the edge will cause an improper lock of the portafilter. See warranty available online. 26 Helpful Hints • Make sure the control knob is set to the seal. USER MAINTENANCE: This appliance has no user serviceable parts. Brew and steam with ground coffee (Figure 20), as this step twice. 9. Excess grounds...
... best results, only use high-quality espresso ground coffee. • Do not leave excess coffee grounds on the edge will cause an improper lock of the portafilter. See warranty available online. 26 Helpful Hints • Make sure the control knob is set to the seal. USER MAINTENANCE: This appliance has no user serviceable parts. Brew and steam with ground coffee (Figure 20), as this step twice. 9. Excess grounds...
User Guide
Page 15
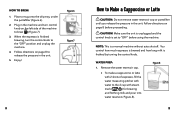
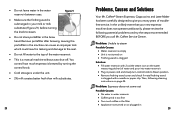
... water in your new espresso machine does not operate satisfactorily, please review the following cleaning instructions on page 24. Then, following potential problems and try the steps recommended BEFORE you many years of trouble- Problem: Espresso does not come out Possible Causes: • No water in power cord and slowly turn control knob to give you call Mr. Coffee Service Center. free service. In the unlikely event that your milk or milk...
... water in your new espresso machine does not operate satisfactorily, please review the following cleaning instructions on page 24. Then, following potential problems and try the steps recommended BEFORE you many years of trouble- Problem: Espresso does not come out Possible Causes: • No water in power cord and slowly turn control knob to give you call Mr. Coffee Service Center. free service. In the unlikely event that your milk or milk...

User Guide
Page 16
... toll-free at the MR. COFFEE® Consumer Service Department, 1-800-MR COFFEE (1-800-672-6333) or you still have questions? Problem: Milk sucked in the machine through the frothing wand Possible Causes: • Not enough water to water reservoir. • Grind coffee less fine. • Fill portafilter following instructions on page 21) paying close attention to measurements for coffee. Then, follow frothing instructions on page 21). Problem: Espresso...
... toll-free at the MR. COFFEE® Consumer Service Department, 1-800-MR COFFEE (1-800-672-6333) or you still have questions? Problem: Milk sucked in the machine through the frothing wand Possible Causes: • Not enough water to water reservoir. • Grind coffee less fine. • Fill portafilter following instructions on page 21) paying close attention to measurements for coffee. Then, follow frothing instructions on page 21). Problem: Espresso...
User Guide
Page 17
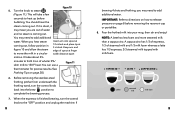
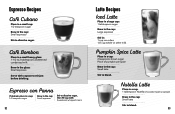
.... Café Bombon Place in a small heavy glass: 1-1/2 to 2 tablespoons sweetened condensed milk Brew in the glass: Small espresso Serve with : Sweetened whipped cream 32 Latte Recipes Iced Latte Place in a large cup: 1 tablespoon sugar Brew in the cup: Large espresso Stir in: 1 cup ice cubes 1/2 cup whole or other milk Pumpkin Spice Latte Place in a cup: 2 teaspoons brown sugar Pinch of pumpkin pie...
.... Café Bombon Place in a small heavy glass: 1-1/2 to 2 tablespoons sweetened condensed milk Brew in the glass: Small espresso Serve with : Sweetened whipped cream 32 Latte Recipes Iced Latte Place in a large cup: 1 tablespoon sugar Brew in the cup: Large espresso Stir in: 1 cup ice cubes 1/2 cup whole or other milk Pumpkin Spice Latte Place in a cup: 2 teaspoons brown sugar Pinch of pumpkin pie...
User Guide
Page 18
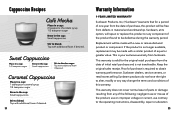
... to the operating instructions, disassembly, repair or alteration 35 Cappuccino Recipes Café Mocha Place in a cup: 2 teaspoons chocolate syrup 1/2 teaspoon sugar Brew in the cup: Small cappuccino Stir to blend. Keep the original sales receipt. Sweet Cappuccino Place in a cup: 1/2 teaspoon sugar Brew in material and workmanship. Sunbeam, at its option, will repair or replace this product will be free from defects in the cup: Small cappuccino Stir...
... to the operating instructions, disassembly, repair or alteration 35 Cappuccino Recipes Café Mocha Place in a cup: 2 teaspoons chocolate syrup 1/2 teaspoon sugar Brew in the cup: Small cappuccino Stir to blend. Keep the original sales receipt. Sweet Cappuccino Place in a cup: 1/2 teaspoon sugar Brew in material and workmanship. Sunbeam, at its option, will repair or replace this product will be free from defects in the cup: Small cappuccino Stir...
User Guide
Page 19
Further, the warranty does not cover: Acts of God, such as fire, flood, hurricanes and tornadoes. Sunbeam disclaims all other than Sunbeam or an authorized Sunbeam service center. This warranty gives you specific legal rights, and you . 37 If you have other party. 36 Some states or jurisdictions ... What are the Limits on how long an implied warranty lasts, so the above warranty. Sunbeam shall not be liable for any damages of any kind resulting from the purchase, use or misuse of, or inability to use the product including incidental, special, consequential or similar damages or ...
Further, the warranty does not cover: Acts of God, such as fire, flood, hurricanes and tornadoes. Sunbeam disclaims all other than Sunbeam or an authorized Sunbeam service center. This warranty gives you specific legal rights, and you . 37 If you have other party. 36 Some states or jurisdictions ... What are the Limits on how long an implied warranty lasts, so the above warranty. Sunbeam shall not be liable for any damages of any kind resulting from the purchase, use or misuse of, or inability to use the product including incidental, special, consequential or similar damages or ...


