User Manual
Page 2
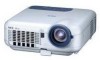
... wireless networking. You can use the projector on a tabletop or cart, you can use the projector to project images from your PC or Macintosh computer (desktop or notebook), VCR, DVD player, document camera, a laser disc player or Viewer. Please consult your new LT260/LT240/LT220 Projector and describes the features and controls. When using as a wireless LAN projector, no physical signal cable connection to mount the projector on a ceiling*1.The remote control can be used wirelessly...
... wireless networking. You can use the projector on a tabletop or cart, you can use the projector to project images from your PC or Macintosh computer (desktop or notebook), VCR, DVD player, document camera, a laser disc player or Viewer. Please consult your new LT260/LT240/LT220 Projector and describes the features and controls. When using as a wireless LAN projector, no physical signal cable connection to mount the projector on a ceiling*1.The remote control can be used wirelessly...
User Manual
Page 3
.../LT220. An XGA image (1024ן768) is not available at the site. • A high-bright 220 watt DC lamp. • The Standby mode reduces standby power consumption significantly. • The supplied wireless remote control that the projector will not project a signal without insertion of 50 to 120 Hz. nology - Password prevents unauthorized individuals from being used by using your PC card as a protect key so that operates the projector...
.../LT220. An XGA image (1024ן768) is not available at the site. • A high-bright 220 watt DC lamp. • The Standby mode reduces standby power consumption significantly. • The supplied wireless remote control that the projector will not project a signal without insertion of 50 to 120 Hz. nology - Password prevents unauthorized individuals from being used by using your PC card as a protect key so that operates the projector...

User Manual
Page 8
... lamp cover is not attached properly or the projector has overheated. See the Status Indicator section on page E-123 for more details. POWER Indicator ( ) When this indicator is green, the projector is enabled. when this indicator is orange, it indicates that you have pressed a cabinet key while the Control Panel Key Lock is on or off when the main power is supplied and the projector is in standby mode. NOTE: To turn the power...
... lamp cover is not attached properly or the projector has overheated. See the Status Indicator section on page E-123 for more details. POWER Indicator ( ) When this indicator is green, the projector is enabled. when this indicator is orange, it indicates that you have pressed a cabinet key while the Control Panel Key Lock is on or off when the main power is supplied and the projector is in standby mode. NOTE: To turn the power...

User Manual
Page 12
R : This is your right channel audio input for stereo sound coming from your PC. The NEC optional serial cable (CA03D) is put on your computer, Video or S- If you must first have Dynamic Image Utility 2.0 installed on the port at the factory. E-12 NOTE: S-Video provides more vivid color and higher resolution than the traditional composite video format. 7. VIDEO IN Connector (RCA) Connect a VCR, DVD player, laser disc...
R : This is your right channel audio input for stereo sound coming from your PC. The NEC optional serial cable (CA03D) is put on your computer, Video or S- If you must first have Dynamic Image Utility 2.0 installed on the port at the factory. E-12 NOTE: S-Video provides more vivid color and higher resolution than the traditional composite video format. 7. VIDEO IN Connector (RCA) Connect a VCR, DVD player, laser disc...

User Manual
Page 14
VIDEO 1. MENU LASER 11 4. LED 7 POWER VIDEO S-VIDEO RGB1 RGB2 8 Flashes when any button is pressed. 5 OFF ON 4 3. Infrared Transmitter Direct the remote control toward the remote sensor on . POWER OFF Button 22 You can click either the right-click or left-click button to turn on the projector, press 21 and hold the POWER OFF button for a minimum of two seconds. 17 20 5. ON 2 1 POWER RGB1 OFF S-VIDEO 2. POWER ON Button 12...
VIDEO 1. MENU LASER 11 4. LED 7 POWER VIDEO S-VIDEO RGB1 RGB2 8 Flashes when any button is pressed. 5 OFF ON 4 3. Infrared Transmitter Direct the remote control toward the remote sensor on . POWER OFF Button 22 You can click either the right-click or left-click button to turn on the projector, press 21 and hold the POWER OFF button for a minimum of two seconds. 17 20 5. ON 2 1 POWER RGB1 OFF S-VIDEO 2. POWER ON Button 12...

User Manual
Page 28
... Player Document Camera Monitor To video, S-video, and audio inputs on the projector. It is turned on after connecting with the projector. * If the screen goes blank while using with component output) NOTE: When using your remote control, it may be sure to connect between the projector and the notebook PC before turning on the remote control, wait 90 seconds and then press the POWER button again to -RCA (female...
... Player Document Camera Monitor To video, S-video, and audio inputs on the projector. It is turned on after connecting with the projector. * If the screen goes blank while using with component output) NOTE: When using your remote control, it may be sure to connect between the projector and the notebook PC before turning on the remote control, wait 90 seconds and then press the POWER button again to -RCA (female...

User Manual
Page 39
... not turn on the projector, screen flicker may occur. MENU SELECT NTER CANCE L E To close the menu, press the CANCEL button. This is stabilized. If this happens, replace the lamp. * If the lamp fails to light, and if the STATUS indicator flashes on and off in a cycle of six times, wait a full minute and then turn on the Main Power switch to ON and use the menu and enable the "Auto Start...
... not turn on the projector, screen flicker may occur. MENU SELECT NTER CANCE L E To close the menu, press the CANCEL button. This is stabilized. If this happens, replace the lamp. * If the lamp fails to light, and if the STATUS indicator flashes on and off in a cycle of six times, wait a full minute and then turn on the Main Power switch to ON and use the menu and enable the "Auto Start...

User Manual
Page 51
... time). Second, turn off , the cooling fans keep operating for 90 seconds after the projector is turned off. • While the cooling fans are running. (The cooling fans continue to the projector: • While the Hour Glass icon appears. • While the message "Please wait a moment." The power indicator will go out. The power indicator will glow orange. This message will be displayed after the projector is turned off the Main Power switch...
... time). Second, turn off , the cooling fans keep operating for 90 seconds after the projector is turned off. • While the cooling fans are running. (The cooling fans continue to the projector: • While the Hour Glass icon appears. • While the message "Please wait a moment." The power indicator will go out. The power indicator will glow orange. This message will be displayed after the projector is turned off the Main Power switch...
User Manual
Page 66
.... NOTE: If no signal, and a black, blue or logo background is inserted in Auto Play mode. button on the remote control or ̇̈ button on the cabinet is pressed in the PC CARD slot, there is no memory card is displayed, depending on the setting. This allows you are playing back. Jump .......... Playback is only displayed when images have been captured...
.... NOTE: If no signal, and a black, blue or logo background is inserted in Auto Play mode. button on the remote control or ̇̈ button on the cabinet is pressed in the PC CARD slot, there is no memory card is displayed, depending on the setting. This allows you are playing back. Jump .......... Playback is only displayed when images have been captured...
User Manual
Page 77
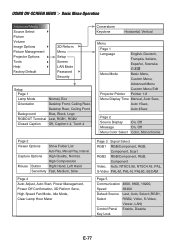
... Help Factory Default 3D Reform Menu Setup Screen LAN Mode Password Security Setup Page 1 Lamp Mode Normal, Eco Orientation Desktop Front, Ceiling Rear, Desktop Rear, Ceiling Front Background Blue, Black, Logo RGBOUT Terminal Last, RGB1, RGB2 Closed Caption Off, Caption1-4, Text1-4 Cornerstone Keystone Horizontal, Vertical Menu Page 1 Language English, Deutsch, Français, Italiano, Español, Svenska Menu Mode Basic Menu, Custom Menu, Advanced Menu Custom Menu Edit Projector Pointer Pointer 1-8 Menu Display Time Manual, Auto 5sec, Auto 15sec, Auto...
... Help Factory Default 3D Reform Menu Setup Screen LAN Mode Password Security Setup Page 1 Lamp Mode Normal, Eco Orientation Desktop Front, Ceiling Rear, Desktop Rear, Ceiling Front Background Blue, Black, Logo RGBOUT Terminal Last, RGB1, RGB2 Closed Caption Off, Caption1-4, Text1-4 Cornerstone Keystone Horizontal, Vertical Menu Page 1 Language English, Deutsch, Français, Italiano, Español, Svenska Menu Mode Basic Menu, Custom Menu, Advanced Menu Custom Menu Edit Projector Pointer Pointer 1-8 Menu Display Time Manual, Auto 5sec, Auto 15sec, Auto...
User Manual
Page 82
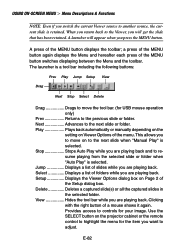
... bar including the following buttons: Prev Play Jump Setup View Drag Next Stop Select Delete Drag Drags to move on the projector cabinet or the remote control to highlight the menu for your image. Next Advances to the previous slide or folder. Provides access to the Viewer, you are playing back and to adjust. Setup Displays the Viewer Options dialog box...
... bar including the following buttons: Prev Play Jump Setup View Drag Next Stop Select Delete Drag Drags to move on the projector cabinet or the remote control to highlight the menu for your image. Next Advances to the previous slide or folder. Provides access to the Viewer, you are playing back and to adjust. Setup Displays the Viewer Options dialog box...
User Manual
Page 95
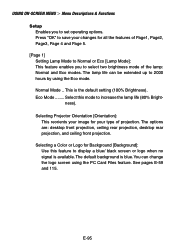
... Page 5. [Page 1] Setting Lamp Mode to Normal or Eco [Lamp Mode]: This feature enables you to set operating options. USING ON-SCREEN MENU Ͼ Menu Descriptions & Functions Setup Enables you to select two brightness mode of the lamp: Normal and Eco modes. The lamp life can change the logo screen using the Eco mode. Selecting Projector Orientation [Orientation]: This reorients your image for your changes for Background [Background]: Use this mode to increase the lamp life (80% Brightness).
... Page 5. [Page 1] Setting Lamp Mode to Normal or Eco [Lamp Mode]: This feature enables you to set operating options. USING ON-SCREEN MENU Ͼ Menu Descriptions & Functions Setup Enables you to select two brightness mode of the lamp: Normal and Eco modes. The lamp life can change the logo screen using the Eco mode. Selecting Projector Orientation [Orientation]: This reorients your image for your changes for Background [Background]: Use this mode to increase the lamp life (80% Brightness).

User Manual
Page 99
... change your projector using the remote control. The button lights to select two modes for consecutive days. This eliminates the need to use the "Power" button on . Enabling High Speed Fan Mode [High Speed Fan Mode]: This option allows you to indicate that you are saved when you continue to always use the projector for fan speed:high-speed mode and normal speed mode. USING ON-SCREEN MENU Ͼ Menu Descriptions & Functions Enabling Auto Start [Auto Start]: Turns the projector on automatically when the power cable...
... change your projector using the remote control. The button lights to select two modes for consecutive days. This eliminates the need to use the "Power" button on . Enabling High Speed Fan Mode [High Speed Fan Mode]: This option allows you to indicate that you are saved when you continue to always use the projector for fan speed:high-speed mode and normal speed mode. USING ON-SCREEN MENU Ͼ Menu Descriptions & Functions Enabling Auto Start [Auto Start]: Turns the projector on automatically when the power cable...

User Manual
Page 100
... Control port (Mini DIN 8 Pin). Standby is turned on the remote control for long cable runs). Clearing Lamp Hour Meter [Clear Lamp Hour Meter]: Resets the lamp clock back to zero. If this only after 1600 hours (up to 38400 bps. In this button appears a confirmation dialog box. It supports data rates from your PC using Dynamic Image Utility 2.0 during Standby mode. E-100 USING ON-SCREEN MENU Ͼ Menu Descriptions & Functions Enabling Idle Mode [Idle Mode]: The projector...
... Control port (Mini DIN 8 Pin). Standby is turned on the remote control for long cable runs). Clearing Lamp Hour Meter [Clear Lamp Hour Meter]: Resets the lamp clock back to zero. If this only after 1600 hours (up to 38400 bps. In this button appears a confirmation dialog box. It supports data rates from your PC using Dynamic Image Utility 2.0 during Standby mode. E-100 USING ON-SCREEN MENU Ͼ Menu Descriptions & Functions Enabling Idle Mode [Idle Mode]: The projector...

User Manual
Page 102
... your network does not automatically assign IP address, ask your network. NOTE: A LAN card is available. CAUTION: Do not use CompactFlash type cards except for LAN connection; E-102 USING ON-SCREEN MENU Ͼ Menu Descriptions & Functions Setting LAN Mode This feature allows you to set various setting items when the projector is used on your network administrator for an address, and then register it manually. NEC's optional wireless LAN card is required for flash memory...
... your network does not automatically assign IP address, ask your network. NOTE: A LAN card is available. CAUTION: Do not use CompactFlash type cards except for LAN connection; E-102 USING ON-SCREEN MENU Ͼ Menu Descriptions & Functions Setting LAN Mode This feature allows you to set various setting items when the projector is used on your network administrator for an address, and then register it manually. NEC's optional wireless LAN card is required for flash memory...
User Manual
Page 107
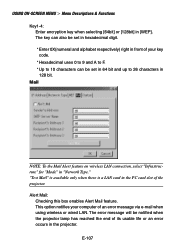
... feature on wireless LAN connection, select "Infrastructure" for "Mode" in the projector. This option notifies your key code. * Hexadecimal uses 0 to 9 and A to F. * Up to 10 characters can also be set in 64 bit and up to 26 characters in front of your computer of an error message via e-mail when using wireless or wired LAN. The error message will be set in hexadecimal digit. * Enter 0X...
... feature on wireless LAN connection, select "Infrastructure" for "Mode" in the projector. This option notifies your key code. * Hexadecimal uses 0 to 9 and A to F. * Up to 10 characters can also be set in 64 bit and up to 26 characters in front of your computer of an error message via e-mail when using wireless or wired LAN. The error message will be set in hexadecimal digit. * Enter 0X...

User Manual
Page 123
... in Standby or - TROUBLESHOOTING This section helps you resolve problems you may encounter while setting up or using the projector. The projector is getting ready Wait for a moment. The projector is enabled. - Power unit will not work correctly. Wait a full minute and then turn on . - Replace the lamp cover correctly. Lamp fails to a cooler location. You have pressed control panel key when Control Key Lock is overheated. Idle. The projector is in Sleep mode. - Fans...
... in Standby or - TROUBLESHOOTING This section helps you resolve problems you may encounter while setting up or using the projector. The projector is getting ready Wait for a moment. The projector is enabled. - Power unit will not work correctly. Wait a full minute and then turn on . - Replace the lamp cover correctly. Lamp fails to a cooler location. You have pressed control panel key when Control Key Lock is overheated. Idle. The projector is in Sleep mode. - Fans...
User Manual
Page 125
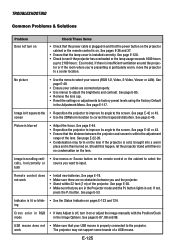
.... • Ensure that the power button on the projector cabinet or the remote control is particularly warm, move the projector to factory preset levels using the Factory Default in the Adjustment Menu. TROUBLESHOOTING Common Problems & Solutions Problem Does not turn it on or adjust the image manually with the Position/Clock mode in the Image Options. See page E-85. • Remove the lens cap. • Reset the settings or adjustments to a cooler location. See page E-44. •...
.... • Ensure that the power button on the projector cabinet or the remote control is particularly warm, move the projector to factory preset levels using the Factory Default in the Adjustment Menu. TROUBLESHOOTING Common Problems & Solutions Problem Does not turn it on or adjust the image manually with the Position/Clock mode in the Image Options. See page E-85. • Remove the lens cap. • Reset the settings or adjustments to a cooler location. See page E-44. •...

User Manual
Page 146
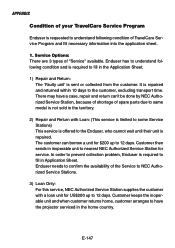
... apply your TravelCare Service Program based on cabinet : Problem of units per User : Required Service : (1) Repair and Return (2) Loan unit Requested period of Loan unit : Payment method : (1) Credit Card (2) Travelers Cheque (3) Cash In Case of Purchase : Serial No. Application Sheet for TravelCare Service Program Country, product purchased : User's Company Name : User's Company Address : Phone No., Fax No. : User's Name : User's Address : Phone No...
... apply your TravelCare Service Program based on cabinet : Problem of units per User : Required Service : (1) Repair and Return (2) Loan unit Requested period of Loan unit : Payment method : (1) Credit Card (2) Travelers Cheque (3) Cash In Case of Purchase : Serial No. Application Sheet for TravelCare Service Program Country, product purchased : User's Company Name : User's Company Address : Phone No., Fax No. : User's Name : User's Address : Phone No...
User Manual
Page 147
...problem, Enduser is required to nearest NEC Authorized Service Station for service. Customer keeps the inoperable unit and when customer returns home, customer arranges to the customer, excluding transport time. It is repaired and returned within 10 days to have a case, repair and return can borrow a unit for US$200 up to 12 days. There may have the projector serviced... in the home country. The customer can 't be done by NEC Authorized Service Station, because of shortage of spare parts due to same model is not sold in the territory. 2) Repair and Return ...
...problem, Enduser is required to nearest NEC Authorized Service Station for service. Customer keeps the inoperable unit and when customer returns home, customer arranges to the customer, excluding transport time. It is repaired and returned within 10 days to have a case, repair and return can borrow a unit for US$200 up to 12 days. There may have the projector serviced... in the home country. The customer can 't be done by NEC Authorized Service Station, because of shortage of spare parts due to same model is not sold in the territory. 2) Repair and Return ...


