
User Manual
Page 3
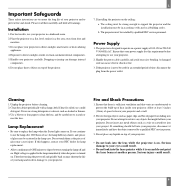
... components. 5. Ensure that vents are to ensure the long life of your projector. High voltage is applied to the lamp immediately when the power is designed to operate on a flat, level surface in the lamp case. If something should fall into the laser pointer while it immediately and ...have the object removed by qualified NEC service personnel. Place the projector on a power supply of 100-120 or 220-240 V 50/60 ...
... components. 5. Ensure that vents are to ensure the long life of your projector. High voltage is applied to the lamp immediately when the power is designed to operate on a flat, level surface in the lamp case. If something should fall into the laser pointer while it immediately and ...have the object removed by qualified NEC service personnel. Place the projector on a power supply of 100-120 or 220-240 V 50/60 ...
User Manual
Page 6
... to a product defect. 4. Accident, misuse, abuse, neglect, fire, water, lightning or other acts of warranty coverage. The lamp is not purchased in the U.S.A., Canada or Mexico from an authorized NECTECH dealer. WHAT IS COVERED AND WHAT IS NOT COVERED Except...1. To get approval, call NECTECH at 800-836-0655. 2. FOR MORE INFORMATION, TELEPHONE 800-366-5213 NEC TECHNOLOGIES, INC. 1250 N. L I M I T E D WA R RA NT Y 9 NEC MultiSync® Projector Products NEC Technologies, Inc. (hereafter NECTECH) warrants this product. HOW YOU CAN GET WARRANTY SERVICE 1.
... to a product defect. 4. Accident, misuse, abuse, neglect, fire, water, lightning or other acts of warranty coverage. The lamp is not purchased in the U.S.A., Canada or Mexico from an authorized NECTECH dealer. WHAT IS COVERED AND WHAT IS NOT COVERED Except...1. To get approval, call NECTECH at 800-836-0655. 2. FOR MORE INFORMATION, TELEPHONE 800-366-5213 NEC TECHNOLOGIES, INC. 1250 N. L I M I T E D WA R RA NT Y 9 NEC MultiSync® Projector Products NEC Technologies, Inc. (hereafter NECTECH) warrants this product. HOW YOU CAN GET WARRANTY SERVICE 1.
User Manual
Page 7
...46 Connecting Your Remote Mouse Receiver 47 3. Introduction Introduction To The MultiSync LT80 Projector 13 How Do You Get Started 15 What's In The Box? ...15 Getting To Know Your MultiSync LT80 Projector 17 Front Features ...17 Rear/ Left Side Features 18 Top Features ...19...53 Source Menu (Source Icons 53 Image Adjust Menu(Sound And Picture Control Icons 55 Power Menu(Projector Control Icons 59 Settings Menu(Maintenance Icons 61 4. Maintenance Replacing The Lamp ...63 Remote Control Battery Installation 65 Operating Range ...66 5. Specifications Optical ...75 Electrical ...76 ...
...46 Connecting Your Remote Mouse Receiver 47 3. Introduction Introduction To The MultiSync LT80 Projector 13 How Do You Get Started 15 What's In The Box? ...15 Getting To Know Your MultiSync LT80 Projector 17 Front Features ...17 Rear/ Left Side Features 18 Top Features ...19...53 Source Menu (Source Icons 53 Image Adjust Menu(Sound And Picture Control Icons 55 Power Menu(Projector Control Icons 59 Settings Menu(Maintenance Icons 61 4. Maintenance Replacing The Lamp ...63 Remote Control Battery Installation 65 Operating Range ...66 5. Specifications Optical ...75 Electrical ...76 ...
User Manual
Page 11
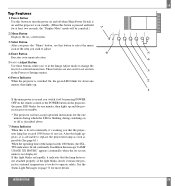
... is blinking during switching on or off when Main Power Switch is on and the projector is on standby. (When this is lit red continually, it means the projector's internal temperature is too hot to replace the projection lamp as soon as possible.(See page 63.) When the operating time of service. screen... Use these buttons while you' re in the Image Adjust mode to set an item in the Power or Settings menus. 6 Power Indicator When the projector is switched On, the green LED blinks for about one minute, then lights up. 7 6 If the main power is on and you that the...
... is blinking during switching on or off when Main Power Switch is on and the projector is on standby. (When this is lit red continually, it means the projector's internal temperature is too hot to replace the projection lamp as soon as possible.(See page 63.) When the operating time of service. screen... Use these buttons while you' re in the Image Adjust mode to set an item in the Power or Settings menus. 6 Power Indicator When the projector is switched On, the green LED blinks for about one minute, then lights up. 7 6 If the main power is on and you that the...
User Manual
Page 17
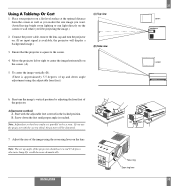
...The set up and down the feet until proper angle is parallel to the screen. 4. Using A Tabletop Or Cart 1. Adjustment method A. Place your projector on a flat level surface at the optimal distance from the screen or wall so you realize the size image you want. (Avoid having bright room...-AUDIO PC CONTROL RGB OUTPUT RGB AUDIO ENTER ADJUST Focus ring Zoom ring lever INSTALLATION 32 Adjust the size of the projector should not exceed 15 degrees, otherwise lamp life could decrease dramatically. Fine tune the image's vertical position by adjusting the front feet of up angle of the ...
...The set up and down the feet until proper angle is parallel to the screen. 4. Using A Tabletop Or Cart 1. Adjustment method A. Place your projector on a flat level surface at the optimal distance from the screen or wall so you realize the size image you want. (Avoid having bright room...-AUDIO PC CONTROL RGB OUTPUT RGB AUDIO ENTER ADJUST Focus ring Zoom ring lever INSTALLATION 32 Adjust the size of the projector should not exceed 15 degrees, otherwise lamp life could decrease dramatically. Fine tune the image's vertical position by adjusting the front feet of up angle of the ...

User Manual
Page 31
Use the "Select" button on the projector cabinet or (v) (w) buttons on your remote control to Lamp Usage information and the Auto Start and Power Management features. NOTE: The projector will automatically turn off . Press (+) to turn this feature on the remote control for ten seconds to reset the lamp clock back to turn it off...
Use the "Select" button on the projector cabinet or (v) (w) buttons on your remote control to Lamp Usage information and the Auto Start and Power Management features. NOTE: The projector will automatically turn off . Press (+) to turn this feature on the remote control for ten seconds to reset the lamp clock back to turn it off...
User Manual
Page 33
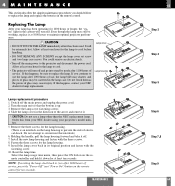
...least one hour for ten seconds . Slide the lamp cover in the lamp case. Install the new lamp housing and fasten with the fastening screw. 10. Reset the lamp time. NOTE: If resetting the lamp clock back to the projector and disconnect the power cord. 4 MAINTENANCE This section... it down for the lamp housing. 9. Do not attempt to circumvent this from your NEC dealer using your NEC dealer for the lamp to replace the lamp and replace the batteries in the remote control. Even though the lamp may cause injury. Lamp cover Lamp housing Lamp replacement procedure 1. Remove ...
...least one hour for ten seconds . Slide the lamp cover in the lamp case. Install the new lamp housing and fasten with the fastening screw. 10. Reset the lamp time. NOTE: If resetting the lamp clock back to the projector and disconnect the power cord. 4 MAINTENANCE This section... it down for the lamp housing. 9. Do not attempt to circumvent this from your NEC dealer using your NEC dealer for the lamp to replace the lamp and replace the batteries in the remote control. Even though the lamp may cause injury. Lamp cover Lamp housing Lamp replacement procedure 1. Remove ...

User Manual
Page 37
...off in a cycle of operation and should be replaced. Or the lamp is high, move the projector to a cooler location. TROUBLE SHOOTING 72 Status Light Messages Condition Status OFF Ⅵ Normal On Continually Ⅵ The projector lamp has exceeded 1000 hours of 4 sec.) • The temperature ...not come on . If you may encounter while setting up or using your NEC dealer for service. If the room temperature is burnt out. If any of the projector. Contact your MultiSync LT80 Projector. 5 TROUBLESHOOTING 71 This section helps you resolve problems you switch the main...
...off in a cycle of operation and should be replaced. Or the lamp is high, move the projector to a cooler location. TROUBLE SHOOTING 72 Status Light Messages Condition Status OFF Ⅵ Normal On Continually Ⅵ The projector lamp has exceeded 1000 hours of 4 sec.) • The temperature ...not come on . If you may encounter while setting up or using your NEC dealer for service. If the room temperature is burnt out. If any of the projector. Contact your MultiSync LT80 Projector. 5 TROUBLESHOOTING 71 This section helps you resolve problems you switch the main...

User Manual
Page 38
...the RESET icon on the Settings Menu. Image isn't square to the screen • Reposition the projector to improve its angle to the screen. • Ensure that the lamp cover and lamp housing are installed correctly. (See page 63.) • Check the status light to select the ...source you and the projector. • Stand within the adjustment range of the projector. To Contact Your NEC Service Representative, Call 1-800-836-0655 TROUBLE...
...the RESET icon on the Settings Menu. Image isn't square to the screen • Reposition the projector to improve its angle to the screen. • Ensure that the lamp cover and lamp housing are installed correctly. (See page 63.) • Check the status light to select the ...source you and the projector. • Stand within the adjustment range of the projector. To Contact Your NEC Service Representative, Call 1-800-836-0655 TROUBLE...
User Manual
Page 39
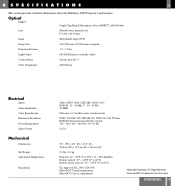
... FCC Class A requirements Digital Light Proccessing, DLP, Digital Micromirror Device and DMD are trademarks of Texas Instruments. SPECIFICATIONS 76 6 SPECIFICATIONS 75 This section provides technical information about the MultiSync LT80 Projector's performance. Optical DMDTM Single Chip Digital Micromirror... Device(DMDTM), 800×600 dots Lens Manual zoom, manual focus F 2.44 f =26-30 mm Lamp Metal halide lamp 270 W Image Size 610-7620 mm (...
... FCC Class A requirements Digital Light Proccessing, DLP, Digital Micromirror Device and DMD are trademarks of Texas Instruments. SPECIFICATIONS 76 6 SPECIFICATIONS 75 This section provides technical information about the MultiSync LT80 Projector's performance. Optical DMDTM Single Chip Digital Micromirror... Device(DMDTM), 800×600 dots Lens Manual zoom, manual focus F 2.44 f =26-30 mm Lamp Metal halide lamp 270 W Image Size 610-7620 mm (...
User Manual
Page 45
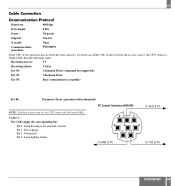
If the received data is not attached correctly Bit 1: Fan stoppage Bit 2: Overheated Bit 3: Lamp lighting failure 87 5 4 2 6 3 1 To GND of PC ᮤ To RxD of PC ᮣ 44 To TxD of the projector has received the data correctly, it returns an ACK(C5H). 87 Cable Connection Communication Protocol Baud rate: 9600 bps...
If the received data is not attached correctly Bit 1: Fan stoppage Bit 2: Overheated Bit 3: Lamp lighting failure 87 5 4 2 6 3 1 To GND of PC ᮤ To RxD of PC ᮣ 44 To TxD of the projector has received the data correctly, it returns an ACK(C5H). 87 Cable Connection Communication Protocol Baud rate: 9600 bps...

