

PJ control command reference manual appendixes
Page 1
.... Projector Control Command Reference Manual Projector Control Command Reference Manual Appendixes This is the supplemental document to the principal about detailed information including precautions. "Input terminal" Modified Model name from NPPH1005QL to NP-PX1005QL. Corrected the error. No.BDT140014 Revision History Revision 20.0 Date April 16, 2020 Description Added the supported models. Reference 7.1 Supported models NP4100 / NP4100W NP-M420X / NP-M420XV / NP-M350X / NP-M300X / NP-M260X / NP-M230X / NP-M300W / NP-M260W / NP-M350XS / NP...
.... Projector Control Command Reference Manual Projector Control Command Reference Manual Appendixes This is the supplemental document to the principal about detailed information including precautions. "Input terminal" Modified Model name from NPPH1005QL to NP-PX1005QL. Corrected the error. No.BDT140014 Revision History Revision 20.0 Date April 16, 2020 Description Added the supported models. Reference 7.1 Supported models NP4100 / NP4100W NP-M420X / NP-M420XV / NP-M350X / NP-M300X / NP-M260X / NP-M230X / NP-M300W / NP-M260W / NP-M350XS / NP...

PJ control command reference manual appendixes
Page 8
... / NP-U310W / NP-U260W NP-UM330X / NP-UM280X / NP-UM330W / NP-UM280W NP-V311W / NP-V281W / NP-V311X NP-V300X / NP-V260X / NP-V300W / NP-V260W / NP-V230X / NP-V260 / NP-V230 / NP-V260R NP-VE281X / NP-VE280X / NP-VE281 / NP-VE280 ©NEC Display Solutions, Ltd. 2014-2020 8 NP-M402W / NP-M362W / NP-M402X / NP-M362X / NP-M322X / NP-M282X / NP-M322W / NP-M352WS / NP-M302WS / NP-M332XS NP-PA622U / NP-PA522U / NP-PA672W / NP-PA572W / NP-PA722X / NP-PA622X / NP-PA621U / NP-PA521U / NP-PA671W / NP-PA571W / 2.0 May 29, 2015 Changed the supported models.
... / NP-U310W / NP-U260W NP-UM330X / NP-UM280X / NP-UM330W / NP-UM280W NP-V311W / NP-V281W / NP-V311X NP-V300X / NP-V260X / NP-V300W / NP-V260W / NP-V230X / NP-V260 / NP-V230 / NP-V260R NP-VE281X / NP-VE280X / NP-VE281 / NP-VE280 ©NEC Display Solutions, Ltd. 2014-2020 8 NP-M402W / NP-M362W / NP-M402X / NP-M362X / NP-M322X / NP-M282X / NP-M322W / NP-M352WS / NP-M302WS / NP-M332XS NP-PA622U / NP-PA522U / NP-PA672W / NP-PA572W / NP-PA722X / NP-PA622X / NP-PA621U / NP-PA521U / NP-PA671W / NP-PA571W / 2.0 May 29, 2015 Changed the supported models.

PJ control command reference manual appendixes
Page 25
...; - * The following models use a different menu item name. ・NP4100 / NP4100W : Lamp Mode ・NP-PX620X / NP-PX550W : Lamp Mode 04h 05h - - - - - - - - LONG LIFE LONG LIFE - - - - - LONG LIFE - - - - - BOOST - - - BOOST - - - - - ©NEC Display Solutions, Ltd. 2014-2020...
...; - * The following models use a different menu item name. ・NP4100 / NP4100W : Lamp Mode ・NP-PX620X / NP-PX550W : Lamp Mode 04h 05h - - - - - - - - LONG LIFE LONG LIFE - - - - - LONG LIFE - - - - - BOOST - - - BOOST - - - - - ©NEC Display Solutions, Ltd. 2014-2020...

PJ control command reference manual appendixes
Page 28
... NP-PA621U NP-PA621X NP-PA622U NP-PA622X NP-PA653U NP-PA653UL NP-PA671W NP-PA672W NP-PA703W NP-PA721X NP-PA722X NP-PA723U NP-PA803U NP-PA803UL NP-PA804UL NP-PA853W NP-PA903X NP-PA1004UL * NP-PE401H * NP-PE501X NP-PE523X * NP-PH1000U NP-PH1002HL NP-PH1202HL * NP-PH1400U NP-PH2601QL NP-PH3501QL * NP-PX550W NP-PX581W NP-PX602UL NP-PX602WL * NP-PX620X NP-PX651X * NP-PX700W * NP-PX750U * NP-PX800X NP-PX803UL NP-PX1004UL 078-1. Supplementary Information by Command 078-1. SETTING REQUEST 305-1. BASE MODEL TYPE REQUEST The asterisked models exclusively support...
... NP-PA621U NP-PA621X NP-PA622U NP-PA622X NP-PA653U NP-PA653UL NP-PA671W NP-PA672W NP-PA703W NP-PA721X NP-PA722X NP-PA723U NP-PA803U NP-PA803UL NP-PA804UL NP-PA853W NP-PA903X NP-PA1004UL * NP-PE401H * NP-PE501X NP-PE523X * NP-PH1000U NP-PH1002HL NP-PH1202HL * NP-PH1400U NP-PH2601QL NP-PH3501QL * NP-PX550W NP-PX581W NP-PX602UL NP-PX602WL * NP-PX620X NP-PX651X * NP-PX700W * NP-PX750U * NP-PX800X NP-PX803UL NP-PX1004UL 078-1. Supplementary Information by Command 078-1. SETTING REQUEST 305-1. BASE MODEL TYPE REQUEST The asterisked models exclusively support...
User Manual
Page 10
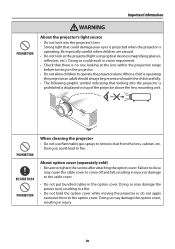
... cleaning the projector • Do not use flammable gas sprays to operate the projector alone. Important Information PROHIBITION WARNING About the projector's light source • Do not look at the lens within the projection range before turning on top of the projector above the lens mounting unit. Doing so could damage your eyes is projected when the projector is displayed on the projector. • Do not allow children to remove...
... cleaning the projector • Do not use flammable gas sprays to operate the projector alone. Important Information PROHIBITION WARNING About the projector's light source • Do not look at the lens within the projection range before turning on top of the projector above the lens mounting unit. Doing so could damage your eyes is projected when the projector is displayed on the projector. • Do not allow children to remove...
User Manual
Page 11
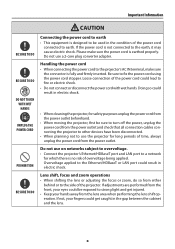
... power cord from the power outlet and check that all connection cables connecting the projector to other devices have been disconnected. • When planning not to use a 2-core plug converter adapter. If adjustments are performed from either behind or to fix the power cord using the power cord stopper. Overvoltage applied to fire or electric shock. • Do not connect or disconnect the power cord with wet hands. Lens shift, focus and zoom operations...
... power cord from the power outlet and check that all connection cables connecting the projector to other devices have been disconnected. • When planning not to use a 2-core plug converter adapter. If adjustments are performed from either behind or to fix the power cord using the power cord stopper. Overvoltage applied to fire or electric shock. • Do not connect or disconnect the power cord with wet hands. Lens shift, focus and zoom operations...

User Manual
Page 19
... remote control - To interrupt the AC power supply while images are generated - xviii Places where strong magnetic fields are being projected, use the projector for consecutive days. • When the same still image is present. • Select [HIGH] in [FAN MODE] if you continue to malfunction. • Do not touch the surface of time with bare hands. We recommend using a screensaver on the screen. The projector...
... remote control - To interrupt the AC power supply while images are generated - xviii Places where strong magnetic fields are being projected, use the projector for consecutive days. • When the same still image is present. • Select [HIGH] in [FAN MODE] if you continue to malfunction. • Do not touch the surface of time with bare hands. We recommend using a screensaver on the screen. The projector...
User Manual
Page 41
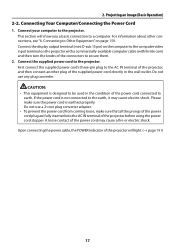
...-available computer cable (with ferrite core) and then turn the knobs of the power cord connected to the computer video input terminal on page 159. Do not use any plug converter. Connecting Your Computer/Connecting the Power Cord 1. 2. Projecting an Image (Basic Operation) 2-2. Connect the display output terminal (mini D-sub 15 pin) on the computer to earth. Connect the supplied power cord to the projector. A loose contact of the projector before using the power cord stopper.
...-available computer cable (with ferrite core) and then turn the knobs of the power cord connected to the computer video input terminal on page 159. Do not use any plug converter. Connecting Your Computer/Connecting the Power Cord 1. 2. Projecting an Image (Basic Operation) 2-2. Connect the display output terminal (mini D-sub 15 pin) on the computer to earth. Connect the supplied power cord to the projector. A loose contact of the projector before using the power cord stopper.
User Manual
Page 44
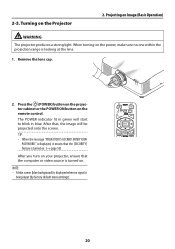
... turned on the remote control. Press the (POWER) button on the projector cabinet or the POWER ON button on . The POWER indicator lit in green will be projected onto the screen. ENTER YOUR PASSWORD." is displayed, it means that the [SECURITY] feature is turned on. (→ page 50) After you turn on your projector, ensure that , the image will start to blink in blue. After that the computer or video source is being input (by factory default menu settings...
... turned on the remote control. Press the (POWER) button on the projector cabinet or the POWER ON button on . The POWER indicator lit in green will be projected onto the screen. ENTER YOUR PASSWORD." is displayed, it means that the [SECURITY] feature is turned on. (→ page 50) After you turn on your projector, ensure that , the image will start to blink in blue. After that the computer or video source is being input (by factory default menu settings...
User Manual
Page 68
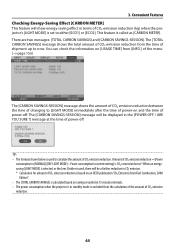
... between the time of changing to [LIGHT MODE] immediately after the time of power-on and the time of power-off . The [CARBON SAVINGS-SESSION] message will be displayed in the [POWER OFF / ARE YOU SURE ?] message at the time of CO2 emission reduction = (Power consumption in [NORMAL] [REF. TIP: • The formula shown below is used , there will be a further reduction in standby mode is calculated...
... between the time of changing to [LIGHT MODE] immediately after the time of power-on and the time of power-off . The [CARBON SAVINGS-SESSION] message will be displayed in the [POWER OFF / ARE YOU SURE ?] message at the time of CO2 emission reduction = (Power consumption in [NORMAL] [REF. TIP: • The formula shown below is used , there will be a further reduction in standby mode is calculated...
User Manual
Page 79
..., screen size, viewing distance, etc. • When playing a 3D video software on the signal, [FORMAT] and [L/R INVERT] may be affected if the computer CPU and graphics chip performance are maintained, when you switch to 2D picture, the adjusted screen will be a bright light source near the screen. The power supply of the 3D eyewear is turned off. The viewer is supported by conditions such as the brightness of the main projector...
..., screen size, viewing distance, etc. • When playing a 3D video software on the signal, [FORMAT] and [L/R INVERT] may be affected if the computer CPU and graphics chip performance are maintained, when you switch to 2D picture, the adjusted screen will be a bright light source near the screen. The power supply of the 3D eyewear is turned off. The viewer is supported by conditions such as the brightness of the main projector...
User Manual
Page 113
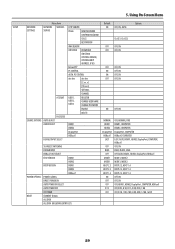
... OFF OFF, ON AUTO POWER ON SELECT OFF OFF, HDMI1, HDMI2, DisplayPort, COMPUTER, HDBaseT AUTO POWER OFF 0:15 OFF, 0:05, 0:10, 0:15, 0:20, 0:30, 1:00 OFF TIMER OFF OFF, 0:30, 1:00, 2:00, 4:00, 8:00, 12:00, 16:00 RESET CURRENT SIGNAL ALL DATA ALL DATA (INCLUDING ENTRY LIST) 89 Using On-Screen Menu Menu Item Default Options SETUP NETWORK NETWORK SERVICES HTTP SERVER SETTINGS SERVICE PJLink NEW PASSWORD ON OFF, ON, AUTH...
... OFF OFF, ON AUTO POWER ON SELECT OFF OFF, HDMI1, HDMI2, DisplayPort, COMPUTER, HDBaseT AUTO POWER OFF 0:15 OFF, 0:05, 0:10, 0:15, 0:20, 0:30, 1:00 OFF TIMER OFF OFF, 0:30, 1:00, 2:00, 4:00, 8:00, 12:00, 16:00 RESET CURRENT SIGNAL ALL DATA ALL DATA (INCLUDING ENTRY LIST) 89 Using On-Screen Menu Menu Item Default Options SETUP NETWORK NETWORK SERVICES HTTP SERVER SETTINGS SERVICE PJLink NEW PASSWORD ON OFF, ON, AUTH...
User Manual
Page 167
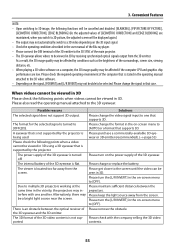
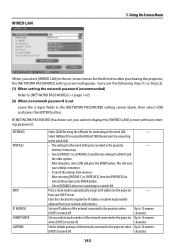
...] is turned off . WIRED LAN 5. Using On-Screen Menu When you cannot display the [WIRED LAN] screen without entering password. Select [OK] and press the ENTER button. • Select [DISABLE] when not connecting to a wired LAN Place a check mark to automatically assign an IP address to [NETWORK PASSWORD] (→ page 142). (2) When no network password is turned off . Select [HDBaseT] for using the LAN port for [DHCP] and the other options. Set your...
...] is turned off . WIRED LAN 5. Using On-Screen Menu When you cannot display the [WIRED LAN] screen without entering password. Select [OK] and press the ENTER button. • Select [DISABLE] when not connecting to a wired LAN Place a check mark to automatically assign an IP address to [NETWORK PASSWORD] (→ page 142). (2) When no network password is turned off . Select [HDBaseT] for using the LAN port for [DHCP] and the other options. Set your...
User Manual
Page 177
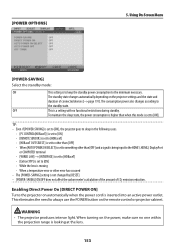
... the lens. 153 The standby state changes automatically depending on the remote control or projector cabinet. Enabling Direct Power On [DIRECT POWER ON] Turns the projector on the power, make sure no functional restrictions during standby. This eliminates the need to other error has occurred • The [POWER-SAVING] setting is moving - Using On-Screen Menu [POWER-SAVING] Select the standby mode: ON This setting is set to always use the POWER button on the projector settings and...
... the lens. 153 The standby state changes automatically depending on the remote control or projector cabinet. Enabling Direct Power On [DIRECT POWER ON] Turns the projector on the power, make sure no functional restrictions during standby. This eliminates the need to other error has occurred • The [POWER-SAVING] setting is moving - Using On-Screen Menu [POWER-SAVING] Select the standby mode: ON This setting is set to always use the POWER button on the projector settings and...
User Manual
Page 187
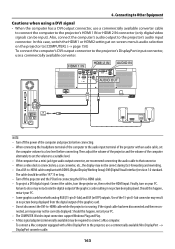
...; The COMPUTER IN video input connectors support Windows Plug and Play. • A Mac signal adapter (commercially available) may not be correctly displayed. Use of the computer alternately to set the computer volume to connect a Mac computer. Should this happen, restart your PC. HDMI 1 IN HDMI 2 IN AUDIO IN AUDIO OUT NOTE: • Turn off the projector and the PC before connecting. To connect a Mac computer equipped with DDWG (Digital DisplayWorking Group) DVI...
...; The COMPUTER IN video input connectors support Windows Plug and Play. • A Mac signal adapter (commercially available) may not be correctly displayed. Use of the computer alternately to set the computer volume to connect a Mac computer. Should this happen, restart your PC. HDMI 1 IN HDMI 2 IN AUDIO IN AUDIO OUT NOTE: • Turn off the projector and the PC before connecting. To connect a Mac computer equipped with DDWG (Digital DisplayWorking Group) DVI...
User Manual
Page 218
... setting to [HIGH ALTITUDE] can cause the projector to think the trouble is enabled. (→ page 50) • If the HDMI input or the DisplayPort signal cannot be displayed, try turn off ) buttons are not liable for a moment and try the following. - Install the updated driver or OS on page 191.) 8. We are not pressed. • Reset the settings or adjustments to factory preset levels using the [RESET] in standby mode...
... setting to [HIGH ALTITUDE] can cause the projector to think the trouble is enabled. (→ page 50) • If the HDMI input or the DisplayPort signal cannot be displayed, try turn off ) buttons are not liable for a moment and try the following. - Install the updated driver or OS on page 191.) 8. We are not pressed. • Reset the settings or adjustments to factory preset levels using the [RESET] in standby mode...
User Manual
Page 220
... projected image may not be seen on a Mac adapter may bounce an image slightly or may not be set the DIP switch to take affect. Refer to owner's manual supplied with a MacBook, output may not be displayed correctly. Mirroring on process for the changes to the 13" fixed mode and then restart your Mac for the projector and the PC. Should this happen, deactivate the notebook PC's LCD screen...
... projected image may not be seen on a Mac adapter may bounce an image slightly or may not be set the DIP switch to take affect. Refer to owner's manual supplied with a MacBook, output may not be displayed correctly. Mirroring on process for the changes to the 13" fixed mode and then restart your Mac for the projector and the PC. Should this happen, deactivate the notebook PC's LCD screen...

User Manual
Page 223
... network administrator. https://www.nec-display.com/dl/en/pj_manual/lineup.html How to connect with an external device There are two methods to a computer by a serial cable (a cross cable). 2. Connection interface 1. Connection via HDBaseT) Item Communication speed Supported standard Information 100 Mbps IEEE802.3u (100BASE-TX, Auto-Negotiation) Use the TCP port number 7142 for transmitting and receiving command. 8. About the ASCII Control Command This device supports...
... network administrator. https://www.nec-display.com/dl/en/pj_manual/lineup.html How to connect with an external device There are two methods to a computer by a serial cable (a cross cable). 2. Connection interface 1. Connection via HDBaseT) Item Communication speed Supported standard Information 100 Mbps IEEE802.3u (100BASE-TX, Auto-Negotiation) Use the TCP port number 7142 for transmitting and receiving command. 8. About the ASCII Control Command This device supports...
User Manual
Page 237
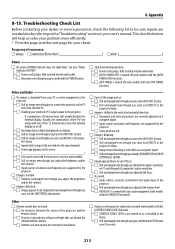
... out the [KEYSTONE] adjustment). Video and Audio □ No image is displayed from [HIGH ALTITUDE] to [AUTO]. □ Image appears blurry or out of focus. □ Still unchanged even though you checked the signal's resolution on PC and changed it to projector's native resolution. □ Still unchanged even though you adjusted the focus. □ No sound. □ Audio cable is correctly connected to the audio input of the image are lost . □ Image is flickering. □ Still...
... out the [KEYSTONE] adjustment). Video and Audio □ No image is displayed from [HIGH ALTITUDE] to [AUTO]. □ Image appears blurry or out of focus. □ Still unchanged even though you checked the signal's resolution on PC and changed it to projector's native resolution. □ Still unchanged even though you adjusted the focus. □ No sound. □ Audio cable is correctly connected to the audio input of the image are lost . □ Image is flickering. □ Still...
User Manual
Page 238
... Green Indicator Message: □ POWER Blinks in □ Blue □ Green □ Orange □ Red [ ] cycles Lights in □ Blue □ Green □ Orange □ Red □ STATUS Blinks in □ Blue □ Green □ Orange □ Red [ ] cycles Lights in □ Blue □ Green □ Orange □ Red □ LIGHT Blinks in □ Blue □ Green □ Orange □ Red [ ] cycles Lights in □ Blue □ Green □ Orange □ Red Remote control model number: Signal cable NEC standard or other Manufacturer: Model number...
... Green Indicator Message: □ POWER Blinks in □ Blue □ Green □ Orange □ Red [ ] cycles Lights in □ Blue □ Green □ Orange □ Red □ STATUS Blinks in □ Blue □ Green □ Orange □ Red [ ] cycles Lights in □ Blue □ Green □ Orange □ Red □ LIGHT Blinks in □ Blue □ Green □ Orange □ Red [ ] cycles Lights in □ Blue □ Green □ Orange □ Red Remote control model number: Signal cable NEC standard or other Manufacturer: Model number...

