

NP115 : RS232 codes- Projectors
Page 34
...01H 01H 00H 01H 01H 02H 03H 02H 0DH Error contents Unknown command. Setting not possible. REMOTE KEY CODE Function: This command sends remote control key codes of projector. Specified terminal is unavailable or cannot be selected. Command: 02H 0FH 00H 00H 02H DATA01 DATA02... CKS (*3) Data Portion Contents DATA01 .. 02 : Remote control key code (Word type) Key number DATA01 DATA02 Key name 1 01H 00H ...
...01H 01H 00H 01H 01H 02H 03H 02H 0DH Error contents Unknown command. Setting not possible. REMOTE KEY CODE Function: This command sends remote control key codes of projector. Specified terminal is unavailable or cannot be selected. Command: 02H 0FH 00H 00H 02H DATA01 DATA02... CKS (*3) Data Portion Contents DATA01 .. 02 : Remote control key code (Word type) Key number DATA01 DATA02 Key name 1 01H 00H ...

NP40/50/60 spec sheet
Page 2
...with PJ mount 3-5 ft. NEC Display Solutions 500 Park Boulevard, Suite 1100 Itasca, IL 60143 866-NEC-MORE The lamp is covered for NEC and non-NEC PJ that weigh less than ... 4.43, PAL, PAL-60, PAL-M, PAL-N, SECAM 480i, 480p, 576i, 576p, 720p, 1080i VGA, SVGA, XGA, SXGA, SXGA+, UXGA Yes 15-pin RCA S-Video Mini stereo RS-232, IR, mini DIN 8-pin Separate Sync...projector to receive data from wireless PC Amplified 30-watt speaker for use with PJ mount 2-3 ft. adjustable extension column for use with ceiling mount Replacement lamp for NP40/NP50 Replacement lamp for NP60 Replacement remote control...
...with PJ mount 3-5 ft. NEC Display Solutions 500 Park Boulevard, Suite 1100 Itasca, IL 60143 866-NEC-MORE The lamp is covered for NEC and non-NEC PJ that weigh less than ... 4.43, PAL, PAL-60, PAL-M, PAL-N, SECAM 480i, 480p, 576i, 576p, 720p, 1080i VGA, SVGA, XGA, SXGA, SXGA+, UXGA Yes 15-pin RCA S-Video Mini stereo RS-232, IR, mini DIN 8-pin Separate Sync...projector to receive data from wireless PC Amplified 30-watt speaker for use with PJ mount 2-3 ft. adjustable extension column for use with ceiling mount Replacement lamp for NP40/NP50 Replacement lamp for NP60 Replacement remote control...

NP40/50/60 UM
Page 6
...lamp has been burned out. CAUTION: When removing the lamp from a ceiling-mounted projector, make sure that its brightness gradually decreases with age. Important Information Remote Control Precautions • Handle the remote control carefully. • If the remote control gets wet, wipe it dry immediately. • Avoid excessive heat and humidity. ... its usable life, the lamp bulb may shatter, and pieces of glass may cause injury. A Lamp Characteristic The projector has a high-pressure mercury lamp as the pieces of glass may be using the remote control for lamp replacement.
...lamp has been burned out. CAUTION: When removing the lamp from a ceiling-mounted projector, make sure that its brightness gradually decreases with age. Important Information Remote Control Precautions • Handle the remote control carefully. • If the remote control gets wet, wipe it dry immediately. • Avoid excessive heat and humidity. ... its usable life, the lamp bulb may shatter, and pieces of glass may cause injury. A Lamp Characteristic The projector has a high-pressure mercury lamp as the pieces of glass may be using the remote control for lamp replacement.

NP40/50/60 UM
Page 7
Table of the Remote Control 7 Battery Installation 8 Remote Control Precautions 8 Operating Range for Wireless Remote Control 8 2. Projecting an Image (Basic Operation 16 ➊ Turning on the Projector 16 Note on Startup Screen (Menu Language Select screen 17 ➋ Selecting a Source ...18 ... Manually 25 ➏ Optimizing RGB Picture Automatically 26 ➐ Turning off the Projector 27 ❽ After Use...27 v Installation and Connections 9 ➊ Setting Up the Screen and the Projector 9 Selecting a Location 9 Throw Distance and Screen Size 10 ➋ Making ...
Table of the Remote Control 7 Battery Installation 8 Remote Control Precautions 8 Operating Range for Wireless Remote Control 8 2. Projecting an Image (Basic Operation 16 ➊ Turning on the Projector 16 Note on Startup Screen (Menu Language Select screen 17 ➋ Selecting a Source ...18 ... Manually 25 ➏ Optimizing RGB Picture Automatically 26 ➐ Turning off the Projector 27 ❽ After Use...27 v Installation and Connections 9 ➊ Setting Up the Screen and the Projector 9 Selecting a Location 9 Throw Distance and Screen Size 10 ➋ Making ...
NP40/50/60 UM
Page 9
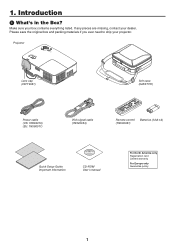
HELP R-CLICK EXIT FREEZE OFF FOCUS PIC-MUTPEOWER ON UP PAGE DOWN Remote control Batteries (AAA×2) (7N900681) Quick Setup Guide Important Information CD-ROM User's manual For North America only Registration card Limited warranty For Europe only Guarantee policy 1 1. Projector SOURCE ON/STAND BY SELECT ADAJ.UTO FOCUS POWSETRATLUASMP Lens cap (24FT9981) ... box and packing materials if you ever need to ship your box contains everything listed. Introduction ➊ What's in the Box? Make sure your projector. If any pieces are missing, contact your dealer.
HELP R-CLICK EXIT FREEZE OFF FOCUS PIC-MUTPEOWER ON UP PAGE DOWN Remote control Batteries (AAA×2) (7N900681) Quick Setup Guide Important Information CD-ROM User's manual For North America only Registration card Limited warranty For Europe only Guarantee policy 1 1. Projector SOURCE ON/STAND BY SELECT ADAJ.UTO FOCUS POWSETRATLUASMP Lens cap (24FT9981) ... box and packing materials if you ever need to ship your box contains everything listed. Introduction ➊ What's in the Box? Make sure your projector. If any pieces are missing, contact your dealer.

NP40/50/60 UM
Page 10
... cabinet design is one of the Projector This DLP™ projector is light, compact and complements any local building codes. The remote control can use the projector to project images from behind the screen, and the projector can control the projector with any office, boardroom or Auditorium...or reposition the projector, the Auto Focus function will work instantly. The projector must be installed by Security function Security feature prevents unauthorized individuals from your new projector and describes the features and controls. up to UXGA compatible, XGA native resolution. ...
... cabinet design is one of the Projector This DLP™ projector is light, compact and complements any local building codes. The remote control can use the projector to project images from behind the screen, and the projector can control the projector with any office, boardroom or Auditorium...or reposition the projector, the Auto Focus function will work instantly. The projector must be installed by Security function Security feature prevents unauthorized individuals from your new projector and describes the features and controls. up to UXGA compatible, XGA native resolution. ...
NP40/50/60 UM
Page 15
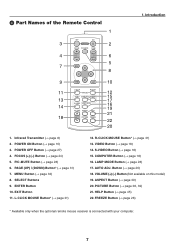
...) Button* (→ page 31) 7. ENTER Button 10. L-CLICK MOUSE Button* (→ page 31) 12. ASPECT Button (→ page 39) 20. ❹ Part Names of the Remote Control 1 OFF ON 3 POWER 2 FOCUS PIC-MUTE PAGE UP 4 6 DOWN 5 7 MENU 8 1. COMPUTER Button (→ page 18) 16. AUTO ADJ. PIC-MUTE Button (→ page 28) 6. PICTURE...
...) Button* (→ page 31) 7. ENTER Button 10. L-CLICK MOUSE Button* (→ page 31) 12. ASPECT Button (→ page 39) 20. ❹ Part Names of the Remote Control 1 OFF ON 3 POWER 2 FOCUS PIC-MUTE PAGE UP 4 6 DOWN 5 7 MENU 8 1. COMPUTER Button (→ page 18) 16. AUTO ADJ. PIC-MUTE Button (→ page 28) 6. PICTURE...
NP40/50/60 UM
Page 16
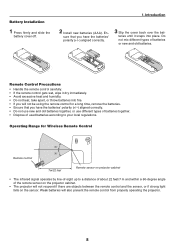
... wet, wipe it snaps into fire. • If you will not be using the remote control for Wireless Remote Control 30° 30° Remote control 7m/22 feet Remote sensor on projector cabinet • The infrared signal operates by line-of-sight up to your local regulations. Operating... Weak batteries will not respond if there are objects between the remote control and the sensor, or if strong light falls on the projector cabinet. • The projector will also prevent the remote control from properly operating the projector. 8 Introduction 2 Install new batteries (AAA). En- sure ...
... wet, wipe it snaps into fire. • If you will not be using the remote control for Wireless Remote Control 30° 30° Remote control 7m/22 feet Remote sensor on projector cabinet • The infrared signal operates by line-of-sight up to your local regulations. Operating... Weak batteries will not respond if there are objects between the remote control and the sensor, or if strong light falls on the projector cabinet. • The projector will also prevent the remote control from properly operating the projector. 8 Introduction 2 Install new batteries (AAA). En- sure ...
NP40/50/60 UM
Page 19
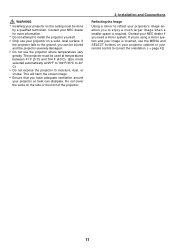
... need a mirror system. Do not cover the vents on the side or the front of the projector. 2. Contact your NEC dealer if you have adequate ventilation around your projector so heat can be used at temperatures between 41˚F (5˚C) and 104˚F (40&#..., use the projector where temperatures vary greatly. If you can dissipate. If the projector falls to correct the orientation. (→ page 42) 11 WARNING * Installing your projector on a solid, level surface. Installation and Connections Reflecting the Image Using a mirror to reflect your remote control to the ground...
... need a mirror system. Do not cover the vents on the side or the front of the projector. 2. Contact your NEC dealer if you have adequate ventilation around your projector so heat can be used at temperatures between 41˚F (5˚C) and 104˚F (40&#..., use the projector where temperatures vary greatly. If you can dissipate. If the projector falls to correct the orientation. (→ page 42) 11 WARNING * Installing your projector on a solid, level surface. Installation and Connections Reflecting the Image Using a mirror to reflect your remote control to the ground...
NP40/50/60 UM
Page 20
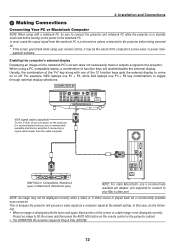
... that you use Fn + F8 key combinations to fill the screen and then press the AUTO ADJ button on the projector. For example, NEC laptops use Fn + F3, while Dell laptops use a commercially available distribution amplifier if connecting a signal cable longer than the cable... Macintosh (Notebook type) NOTE: For older Macintosh, use a commercially available pin adapter (not supplied) to connect to the projector before turning on unless connected to your remote control, it outputs a signal to the notebook PC. This is in standby mode and before being powered up. * If the...
... that you use Fn + F8 key combinations to fill the screen and then press the AUTO ADJ button on the projector. For example, NEC laptops use Fn + F3, while Dell laptops use a commercially available distribution amplifier if connecting a signal cable longer than the cable... Macintosh (Notebook type) NOTE: For older Macintosh, use a commercially available pin adapter (not supplied) to connect to the projector before turning on unless connected to your remote control, it outputs a signal to the notebook PC. This is in standby mode and before being powered up. * If the...

NP40/50/60 UM
Page 24
... by pulling on the remote control for 1 second. The POWER indicator will turn off or when the temperature is in the wall outlet. CAUTION: The projector cannot be turned off while the POWER indicator is blinking green. • Do not turn to green and the projector will become ready to...Projecting an Image (Basic Operation) This section describes how to turn on the projector and to project a picture onto the screen. ➊ Turning on the Projector NOTE: Before turning on and that your projector, ensure that the Control Panel Lock is turned on. (→ page 42) After you turn on ...
... by pulling on the remote control for 1 second. The POWER indicator will turn off or when the temperature is in the wall outlet. CAUTION: The projector cannot be turned off while the POWER indicator is blinking green. • Do not turn to green and the projector will become ready to...Projecting an Image (Basic Operation) This section describes how to turn on the projector and to project a picture onto the screen. ➊ Turning on the Projector NOTE: Before turning on and that your projector, ensure that the Control Panel Lock is turned on. (→ page 42) After you turn on ...
NP40/50/60 UM
Page 26
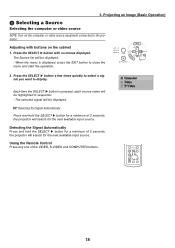
...source NOTE: Turn on the cabinet 1. When the menu is pressed, each source name will be displayed. - Using the Remote Control Press any one of 2 seconds, the projector will be displayed. The Source list will search for a minimum of the VIDEO, S-VIDEO and COMPUTER buttons. Press the ...the menu and start the operation. Press the SELECT ▶ button with buttons on the computer or video source equipment connected to the projector. Detecting the Signal Automatically Press and hold the SELECT ▶ button for the next available input source. 3. Adjusting with no menus...
...source NOTE: Turn on the cabinet 1. When the menu is pressed, each source name will be displayed. - Using the Remote Control Press any one of 2 seconds, the projector will be displayed. The Source list will search for a minimum of the VIDEO, S-VIDEO and COMPUTER buttons. Press the ...the menu and start the operation. Press the SELECT ▶ button with buttons on the computer or video source equipment connected to the projector. Detecting the Signal Automatically Press and hold the SELECT ▶ button for the next available input source. 3. Adjusting with no menus...
NP40/50/60 UM
Page 32
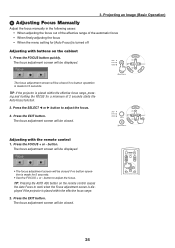
...adjustment screen will be displayed. LAMP STATUS POWER FOCUS AUTO ADJ. LAMP STATUS POWER FOCUS AUTO ADJ. TIP: If the projector is turned off Adjusting with the remote control 1. Press the FOCUS + or - The focus adjustment screen will be displayed. • The focus adjustment screen will ...8226; Use the FOCUS + or - SELECT SOURCE ON/STAND BY Adjusting with buttons on the remote control causes the Auto Focus to work when the Focus adjustment screen is displayed if the projector is made for a minimum of the automatic focus • When finely adjusting the focus •...
...adjustment screen will be displayed. LAMP STATUS POWER FOCUS AUTO ADJ. LAMP STATUS POWER FOCUS AUTO ADJ. TIP: If the projector is turned off Adjusting with the remote control 1. Press the FOCUS + or - The focus adjustment screen will be displayed. • The focus adjustment screen will ...8226; Use the FOCUS + or - SELECT SOURCE ON/STAND BY Adjusting with buttons on the remote control causes the Auto Focus to work when the Focus adjustment screen is displayed if the projector is made for a minimum of the automatic focus • When finely adjusting the focus •...
NP40/50/60 UM
Page 33
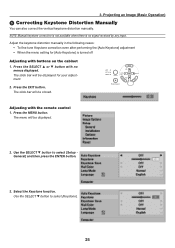
... [Keystone]. 25 Use the SELECT ▼ button to select [Setup General] and then press the ENTER button. 3. SELECT SOURCE ON/STAND BY Adjusting with the remote control 1. The menu will be displayed for [Auto Keystone] is no menus displayed. The slide bar will be closed.
... [Keystone]. 25 Use the SELECT ▼ button to select [Setup General] and then press the ENTER button. 3. SELECT SOURCE ON/STAND BY Adjusting with the remote control 1. The menu will be displayed for [Auto Keystone] is no menus displayed. The slide bar will be closed.
NP40/50/60 UM
Page 34
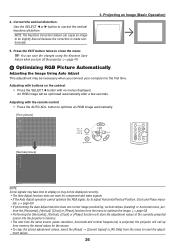
...function will be slightly blurred because the correction is projected; An RGB image will store the adjustment values of the currently projected source into the projector's memory. • The next time the same source (same resolution, horizontal and vertical frequencies) is made electronically. 3. form the [...cabinet • Press the SELECT ◀ button with the remote control • Press the AUTO ADJ. NOTE: The Keystone Correction feature can save the changes using the Keystone Save feature when you turn off the projector. (→ page 41) ➏ Optimizing RGB Picture ...
...function will be slightly blurred because the correction is projected; An RGB image will store the adjustment values of the currently projected source into the projector's memory. • The next time the same source (same resolution, horizontal and vertical frequencies) is made electronically. 3. form the [...cabinet • Press the SELECT ◀ button with the remote control • Press the AUTO ADJ. NOTE: The Keystone Correction feature can save the changes using the Keystone Save feature when you turn off the projector. (→ page 41) ➏ Optimizing RGB Picture ...

NP40/50/60 UM
Page 35
... (Basic Operation) LAMP STATUS POWER FOCUS AUTO ADJ. NOTE: Do not turn off the projector using the "Direct Power Off" function within 10 seconds of the projector will become heated during operation. Unplug the power cable. 2. SELECT ON/STAND BY OFF ON...projector when projecting an image. CAUTION: Use caution when putting the projector in the supplied soft case. The "Power Off / Are you sure?" message will glow orange. Cover the lens with the lens cap. 5. Put the projector and its accessories in the soft case immediately after turning on the remote control...
... (Basic Operation) LAMP STATUS POWER FOCUS AUTO ADJ. NOTE: Do not turn off the projector using the "Direct Power Off" function within 10 seconds of the projector will become heated during operation. Unplug the power cable. 2. SELECT ON/STAND BY OFF ON...projector when projecting an image. CAUTION: Use caution when putting the projector in the supplied soft case. The "Power Off / Are you sure?" message will glow orange. Cover the lens with the lens cap. 5. Put the projector and its accessories in the soft case immediately after turning on the remote control...
NP40/50/60 UM
Page 39
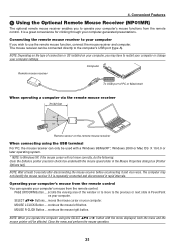
... it is a great convenience for clicking through your computer's mouse from the remote control. moves the mouse cursor on your computer's mouse functions from the remote control. NOTE: When you wish to operate your computer. Operating your computer's mouse from the remote control You can be used with the menu displayed, both the menu and the...
... it is a great convenience for clicking through your computer's mouse from the remote control. moves the mouse cursor on your computer's mouse functions from the remote control. NOTE: When you wish to operate your computer. Operating your computer's mouse from the remote control You can be used with the menu displayed, both the menu and the...
NP40/50/60 UM
Page 41
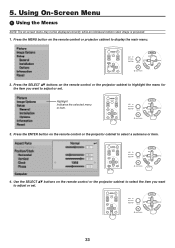
...AUTO ADJ. SELECT SOURCE ENTER EXIT ON/STAND BY 3. SELECT SOURCE ENTER EXIT ON/STAND BY 33 Press the MENU button on the remote control or the projector cabinet to adjust or set . OFF ON POWER FOCUS PIC-MUTE PAGE UP MENU DOWN LAMP STATUS POWER FOCUS AUTO ADJ. Using On...-Screen Menu ➊ Using the Menus NOTE: The on the remote control or the projector cabinet to highlight the menu for the item you want to select a submenu or item. Press the SELECT ▲▼ buttons on -...
...AUTO ADJ. SELECT SOURCE ENTER EXIT ON/STAND BY 3. SELECT SOURCE ENTER EXIT ON/STAND BY 33 Press the MENU button on the remote control or the projector cabinet to adjust or set . OFF ON POWER FOCUS PIC-MUTE PAGE UP MENU DOWN LAMP STATUS POWER FOCUS AUTO ADJ. Using On...-Screen Menu ➊ Using the Menus NOTE: The on the remote control or the projector cabinet to highlight the menu for the item you want to select a submenu or item. Press the SELECT ▲▼ buttons on -...
NP40/50/60 UM
Page 47
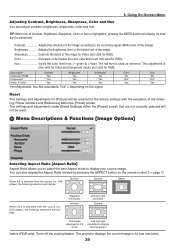
...Yes Yes Yes=Adjustable, No=Not adjustable, Yes* = depending on the remote control. (→ page 7) When 4:3 is selected from +/- DVD player), the following selections will display its true resolution. 39 The projector displays the current image in 4:3 mode Left and right stretched to the ... or decreases the color saturation level (not valid for adjustment. Contrast Adjusts the intensity of the image according to +/-blue. Sharpness Controls the detail of the image). Preset numbers and [Reference] within the [Preset] screen that are not currently selected will display: ...
...Yes Yes Yes=Adjustable, No=Not adjustable, Yes* = depending on the remote control. (→ page 7) When 4:3 is selected from +/- DVD player), the following selections will display its true resolution. 39 The projector displays the current image in 4:3 mode Left and right stretched to the ... or decreases the color saturation level (not valid for adjustment. Contrast Adjusts the intensity of the image according to +/-blue. Sharpness Controls the detail of the image). Preset numbers and [Reference] within the [Preset] screen that are not currently selected will display: ...

NP40/50/60 UM
Page 50
...Selecting Communication Speed [Communication Speed] This feature sets the baud rate of the menu when Control Panel Lock is enabled. 42 NOTE: Your selected communication speed will not affect the remote control or PC Control Functions. • When the cabinet buttons are : desktop front projection, ceiling rear projection... turns on the equipment, a lower baud rate may be displayed at the bottom right of the PC Control port (Mini DIN 8 Pin). Using On-Screen Menu Selecting Projector Orientation [Orientation] This sets your image for your equipment to enable. • The Key Lock icon ...
...Selecting Communication Speed [Communication Speed] This feature sets the baud rate of the menu when Control Panel Lock is enabled. 42 NOTE: Your selected communication speed will not affect the remote control or PC Control Functions. • When the cabinet buttons are : desktop front projection, ceiling rear projection... turns on the equipment, a lower baud rate may be displayed at the bottom right of the PC Control port (Mini DIN 8 Pin). Using On-Screen Menu Selecting Projector Orientation [Orientation] This sets your image for your equipment to enable. • The Key Lock icon ...


