

NP40/50/60 spec sheet
Page 2
...control, battteries, power cord, RGB signal cable, lens cap, user's manual on CD-ROM, quick start guide, product registration card WARRANTY Registered owers...program to change. 10/08 ver. 2. ©2008 NEC Display Solutions of NEC Display Solutions. and Canadian customers loaner and repair services in...60, PAL-M, PAL-N, SECAM 480i, 480p, 576i, 576p, 720p, 1080i VGA, SVGA, XGA, SXGA, SXGA+, UXGA Yes 15-pin RCA S-Video Mini stereo RS-232, IR, mini ... mount Replacement lamp for NP40/NP50 Replacement lamp for adaptive color tone correction to the projector 64-step image magnification with...
...control, battteries, power cord, RGB signal cable, lens cap, user's manual on CD-ROM, quick start guide, product registration card WARRANTY Registered owers...program to change. 10/08 ver. 2. ©2008 NEC Display Solutions of NEC Display Solutions. and Canadian customers loaner and repair services in...60, PAL-M, PAL-N, SECAM 480i, 480p, 576i, 576p, 720p, 1080i VGA, SVGA, XGA, SXGA, SXGA+, UXGA Yes 15-pin RCA S-Video Mini stereo RS-232, IR, mini ... mount Replacement lamp for NP40/NP50 Replacement lamp for adaptive color tone correction to the projector 64-step image magnification with...

NP40/50/60 IG
Page 1
... projector Resolution: 1024 x 768 Brightness: NP40: 2200 ANSI Lumens NP50: 2600 ANSI Lumens NP60: 3000 ANSI Lumens Lens Specifications Throw Ratio: 1.8 - 2.2 (for 100" diagonal) Offset Angle: 9.8° - 11.7° (for 100" diagonal) Screen Sizes: 30" - 300" diagonal (4:3) NEC ...5mm F/#: 2.2 - 2.34 Manual Zoom/Power Focus (w/autofocus) Notes ƒ For screen sizes not indicated on a 4:3 aspect ratio. • Distances are in the Projection Formulas. Use the Screen Formulas below . Plug in the width for "W" in inches, for calculation. NP40/50/60 Installation Guide Ceiling...
... projector Resolution: 1024 x 768 Brightness: NP40: 2200 ANSI Lumens NP50: 2600 ANSI Lumens NP60: 3000 ANSI Lumens Lens Specifications Throw Ratio: 1.8 - 2.2 (for 100" diagonal) Offset Angle: 9.8° - 11.7° (for 100" diagonal) Screen Sizes: 30" - 300" diagonal (4:3) NEC ...5mm F/#: 2.2 - 2.34 Manual Zoom/Power Focus (w/autofocus) Notes ƒ For screen sizes not indicated on a 4:3 aspect ratio. • Distances are in the Projection Formulas. Use the Screen Formulas below . Plug in the width for "W" in inches, for calculation. NP40/50/60 Installation Guide Ceiling...
NP40/50/60 UM
Page 1
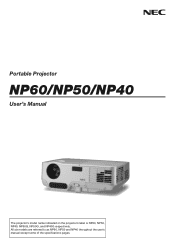
Portable Projector NP60/NP50/NP40 User's Manual The projector's model name indicated on the projector's label is NP60, NP50, NP40, NP60G, NP50G, and NP40G respectively. All six models are referred to as NP60, NP50 and NP40 throughout the user's manual except some of the specifications pages.
Portable Projector NP60/NP50/NP40 User's Manual The projector's model name indicated on the projector's label is NP60, NP50, NP40, NP60G, NP50G, and NP40G respectively. All six models are referred to as NP60, NP50 and NP40 throughout the user's manual except some of the specifications pages.

NP40/50/60 UM
Page 2
and other matters deemed to change without permission. (2) The contents of this user's manual are subject to result from using the Projector. NOTES (1) The contents of this user's manual may be responsible for any question- however, should you notice any claims on loss of profit...the U.S. able points, errors or omissions, please contact us. (4) Notwithstanding article (3), NEC will not be the trademarks or registered trade- © NEC Viewtechnology, Ltd. 2006 First edition September 2006 • DLP is a trademark of Texas Instruments. • IBM is a trademark or registered ...
and other matters deemed to change without permission. (2) The contents of this user's manual are subject to result from using the Projector. NOTES (1) The contents of this user's manual may be responsible for any question- however, should you notice any claims on loss of profit...the U.S. able points, errors or omissions, please contact us. (4) Notwithstanding article (3), NEC will not be the trademarks or registered trade- © NEC Viewtechnology, Ltd. 2006 First edition September 2006 • DLP is a trademark of Texas Instruments. • IBM is a trademark or registered ...

NP40/50/60 UM
Page 3
... - 3. Disposing of separately from power outlet. This includes projectors and their electrical accessories or lamps. The mark on the bottom of this manual carefully before using your NEC NP60/NP50/NP40 projector and keep the manual handy for Canada only) This Class B digital apparatus meets all... requirements of your projector. REFER SERVICING TO QUALIFIED SERVICE PERSONNEL. The power ...
... - 3. Disposing of separately from power outlet. This includes projectors and their electrical accessories or lamps. The mark on the bottom of this manual carefully before using your NEC NP60/NP50/NP40 projector and keep the manual handy for Canada only) This Class B digital apparatus meets all... requirements of your projector. REFER SERVICING TO QUALIFIED SERVICE PERSONNEL. The power ...

NP40/50/60 UM
Page 4
...operation and reduce the risk of bodily injury. - This equipment generates, uses, and can be strong enough to install the projector yourself. - Failure to comply with the instructions, may cause harmful interference to provide reasonable protection against harmful interference in a residential...; ii Installation • Do not place the projector in a dusty, smoky or steamy environment. - Do not attempt to support the projector and the installation must be determined by NEC Corporation of America in accor- If this manual. If a power cable is not supplied with the...
...operation and reduce the risk of bodily injury. - This equipment generates, uses, and can be strong enough to install the projector yourself. - Failure to comply with the instructions, may cause harmful interference to provide reasonable protection against harmful interference in a residential...; ii Installation • Do not place the projector in a dusty, smoky or steamy environment. - Do not attempt to support the projector and the installation must be determined by NEC Corporation of America in accor- If this manual. If a power cable is not supplied with the...

NP40/50/60 UM
Page 5
...the object removed by a qualified NEC service personnel under the projector, or any other cables before carrying the projector. • Turn off the projector and unplug the power cable before attempting to use any objects on a power supply of 100-240V AC 50/60 Hz (NP60/NP50/NP40) or 200-240V AC 50...). Do not use your hands burned from the heat that is emitted from falling into your projector, disconnect it has been exposed to rain or water. - Ensure that your power supply fits this user's manual. - Do not handle the power plug with other than the supplied one. - Do not...
...the object removed by a qualified NEC service personnel under the projector, or any other cables before carrying the projector. • Turn off the projector and unplug the power cable before attempting to use any objects on a power supply of 100-240V AC 50/60 Hz (NP60/NP50/NP40) or 200-240V AC 50...). Do not use your hands burned from the heat that is emitted from falling into your projector, disconnect it has been exposed to rain or water. - Ensure that your power supply fits this user's manual. - Do not handle the power plug with other than the supplied one. - Do not...

NP40/50/60 UM
Page 7
...Laser Disc Player 14 Connecting the Supplied Power Cable 15 3. Projecting an Image (Basic Operation 16 ➊ Turning on the Projector 16 Note on Startup Screen (Menu Language Select screen 17 ➋ Selecting a Source ...18 ➌ Adjusting the Picture ...Size and Position 20 ➍ Adjusting Focus Manually 24 ➎ Correcting Keystone Distortion Manually 25 ➏ Optimizing RGB Picture Automatically 26 ➐ Turning off the Projector 27 ❽ After Use...27 v Table of the Remote Control 7 Battery Installation 8...
...Laser Disc Player 14 Connecting the Supplied Power Cable 15 3. Projecting an Image (Basic Operation 16 ➊ Turning on the Projector 16 Note on Startup Screen (Menu Language Select screen 17 ➋ Selecting a Source ...18 ➌ Adjusting the Picture ...Size and Position 20 ➍ Adjusting Focus Manually 24 ➎ Correcting Keystone Distortion Manually 25 ➏ Optimizing RGB Picture Automatically 26 ➐ Turning off the Projector 27 ❽ After Use...27 v Table of the Remote Control 7 Battery Installation 8...
NP40/50/60 UM
Page 9
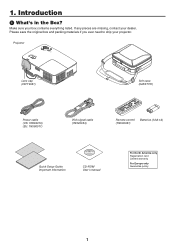
...-MUTPEOWER ON UP PAGE DOWN Remote control Batteries (AAA×2) (7N900681) Quick Setup Guide Important Information CD-ROM User's manual For North America only Registration card Limited warranty For Europe only Guarantee policy 1 Projector SOURCE ON/STAND BY SELECT ADAJ.UTO FOCUS POWSETRATLUASMP Lens cap (24FT9981) Power cable (US: 7N080216) (EU: 7N080017...'s in the Box? Please save the original box and packing materials if you ever need to ship your box contains everything listed. Make sure your projector. 1. If any pieces are missing, contact your dealer.
...-MUTPEOWER ON UP PAGE DOWN Remote control Batteries (AAA×2) (7N900681) Quick Setup Guide Important Information CD-ROM User's manual For North America only Registration card Limited warranty For Europe only Guarantee policy 1 Projector SOURCE ON/STAND BY SELECT ADAJ.UTO FOCUS POWSETRATLUASMP Lens cap (24FT9981) Power cable (US: 7N080216) (EU: 7N080017...'s in the Box? Please save the original box and packing materials if you ever need to ship your box contains everything listed. Make sure your projector. 1. If any pieces are missing, contact your dealer.

NP40/50/60 UM
Page 11
Take a few minutes now to take your time and do everything right the first time. At the beginning of each section of the manual you can skip it. 3 If the section doesn't apply, you 'll find an overview. This may save you time later on. Introduction About this user's manual The fastest way to get started is to review the user's manual. 1.
Take a few minutes now to take your time and do everything right the first time. At the beginning of each section of the manual you can skip it. 3 If the section doesn't apply, you 'll find an overview. This may save you time later on. Introduction About this user's manual The fastest way to get started is to review the user's manual. 1.
NP40/50/60 UM
Page 21
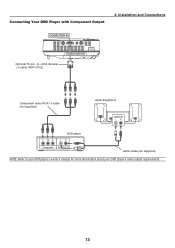
to your DVD player's owner's manual for more information about your DVD player's video output requirements. 13 RCA (female) ×3 cable (ADP-CV1E) Component video RCA×3 cable (not supplied) Audio Equipment AUDIO IN LR Y Cb Cr DVD player LR Component AUDIO OUT Audio cable (not supplied) NOTE: Refer to - Installation and Connections COMPUTER IN PC CONTROL COMPUTER IN VIDEO IN S-VIDEO IN AC IN Optional 15-pin - Connecting Your DVD Player with Component Output 2.
to your DVD player's owner's manual for more information about your DVD player's video output requirements. 13 RCA (female) ×3 cable (ADP-CV1E) Component video RCA×3 cable (not supplied) Audio Equipment AUDIO IN LR Y Cb Cr DVD player LR Component AUDIO OUT Audio cable (not supplied) NOTE: Refer to - Installation and Connections COMPUTER IN PC CONTROL COMPUTER IN VIDEO IN S-VIDEO IN AC IN Optional 15-pin - Connecting Your DVD Player with Component Output 2.
NP40/50/60 UM
Page 22
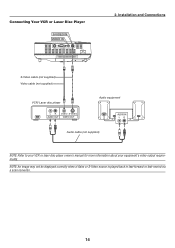
... L R VIDEO S-VIDEO AUDIO OUT VIDEO OUT Audio equipment AUDIO IN LR Audio cable (not supplied) NOTE: Refer to your VCR or laser disc player owner's manual for more information about your equipment's video output requirements. Connecting Your VCR or Laser Disc Player S-VIDEO IN VIDEO IN PC CONTROL COMPUTER IN VIDEO...
... L R VIDEO S-VIDEO AUDIO OUT VIDEO OUT Audio equipment AUDIO IN LR Audio cable (not supplied) NOTE: Refer to your VCR or laser disc player owner's manual for more information about your equipment's video output requirements. Connecting Your VCR or Laser Disc Player S-VIDEO IN VIDEO IN PC CONTROL COMPUTER IN VIDEO...
NP40/50/60 UM
Page 30
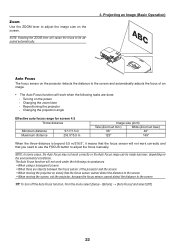
... the Auto Focus may not work correctly and that the focus sensor cannot detect the distance to the screen. • When moving the projector so slowly that you need to use the FOCUS button to adjust the image size on the screen. Turning on the environmental conditions. Changing... and automatically adjusts the focus of the projector and the screen. • When moving the screen, not the projector, because the focus sensor cannot detect the distance to be made narrower, depending on the power - Zoom Use the ZOOM lever to adjust the focus manually. Options] → [Auto Focus] and...
... the Auto Focus may not work correctly and that the focus sensor cannot detect the distance to the screen. • When moving the projector so slowly that you need to use the FOCUS button to adjust the image size on the screen. Turning on the environmental conditions. Changing... and automatically adjusts the focus of the projector and the screen. • When moving the screen, not the projector, because the focus sensor cannot detect the distance to be made narrower, depending on the power - Zoom Use the ZOOM lever to adjust the focus manually. Options] → [Auto Focus] and...
NP40/50/60 UM
Page 31
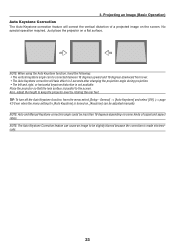
No special operation required. Just place the projector on some kinds of a projected image on , [Keystone] can be slightly blurred because the correction is turned on the screen. Also, adjust the height to be adjusted manually. NOTE: Auto and Manual Keystone correction angle could be corrected between 16...the Auto Keystone function, heed the following: • The vertical keystone angle can cause an image to keep the projector level by rotating the rear feet. Place the projector so that the lens surface is not available. TIP: To turn off the Auto Keystone function, from level. ...
No special operation required. Just place the projector on some kinds of a projected image on , [Keystone] can be slightly blurred because the correction is turned on the screen. Also, adjust the height to be adjusted manually. NOTE: Auto and Manual Keystone correction angle could be corrected between 16...the Auto Keystone function, heed the following: • The vertical keystone angle can cause an image to keep the projector level by rotating the rear feet. Place the projector so that the lens surface is not available. TIP: To turn off the Auto Keystone function, from level. ...
NP40/50/60 UM
Page 32
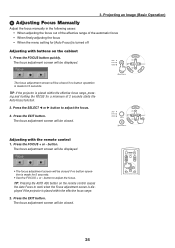
.../STAND BY Adjusting with buttons on the remote control causes the Auto Focus to work when the Focus adjustment screen is displayed if the projector is made for 5 seconds. • Use the FOCUS + or - The focus adjustment screen will be displayed. • The focus... adjustment screen will be displayed. Press the EXIT button. TIP: If the projector is turned off Adjusting with the remote control 1. 3. Projecting an Image (Basic Operation) ➍ Adjusting Focus Manually Adjust the focus manually in the following cases: • When adjusting the focus out of the effective ...
.../STAND BY Adjusting with buttons on the remote control causes the Auto Focus to work when the Focus adjustment screen is displayed if the projector is made for 5 seconds. • Use the FOCUS + or - The focus adjustment screen will be displayed. • The focus... adjustment screen will be displayed. Press the EXIT button. TIP: If the projector is turned off Adjusting with the remote control 1. 3. Projecting an Image (Basic Operation) ➍ Adjusting Focus Manually Adjust the focus manually in the following cases: • When adjusting the focus out of the effective ...
NP40/50/60 UM
Page 33
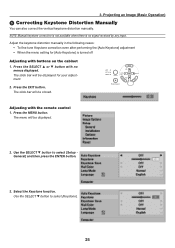
NOTE: Manual keystone correction is not available when there is turned off Adjusting with buttons on the cabinet 1. The slide bar will be displayed. 2. Press the EXIT ... the SELECT ▼ button to select [Keystone]. 25 Projecting an Image (Basic Operation) ➎ Correcting Keystone Distortion Manually You can also correct the vertical keystone distortion manually. Press the MENU button. Adjust the keystone distortion manually in the following cases: • To fine tune Keystone correction even after performing the [Auto Keystone] adjustment...
NOTE: Manual keystone correction is not available when there is turned off Adjusting with buttons on the cabinet 1. The slide bar will be displayed. 2. Press the EXIT ... the SELECT ▼ button to select [Keystone]. 25 Projecting an Image (Basic Operation) ➎ Correcting Keystone Distortion Manually You can also correct the vertical keystone distortion manually. Press the MENU button. Adjust the keystone distortion manually in the following cases: • To fine tune Keystone correction even after performing the [Auto Keystone] adjustment...
NP40/50/60 UM
Page 44
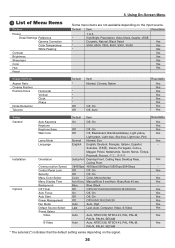
... Yes English English, Deutsch, Français, Italiano, Español, - Off Off, On Yes Off Off, On - Color Color, Monochrome Yes Auto 45 sec Manual/Auto 5 sec/Auto 15sec/Auto 45 sec Yes Blue Blue, Black - ➌ List of Menu Items Picture Preset Detail Settings Reference Gamma Correction Color Temperature...
... Yes English English, Deutsch, Français, Italiano, Español, - Off Off, On Yes Off Off, On - Color Color, Monochrome Yes Auto 45 sec Manual/Auto 5 sec/Auto 15sec/Auto 45 sec Yes Blue Blue, Black - ➌ List of Menu Items Picture Preset Detail Settings Reference Gamma Correction Color Temperature...

NP40/50/60 UM
Page 48
...gives best image quality by copyright law. NOTE: • This feature is the case when selecting [Cinema]. • You can adjust the image manually for position and stability; [Horizontal], [Vertical], [Clock] and [Phase]. [Horizontal/Vertical] (available for RGB signal only) Adjusts the image location ... only after the [Clock] is evident when part of Image [Cinema Position] (for Cinema aspect. Off For signals other than the projector's native resolution, will call up from memory the stored values for setting the image position. See [Cinema Position] for the source. Adjusting...
...gives best image quality by copyright law. NOTE: • This feature is the case when selecting [Cinema]. • You can adjust the image manually for position and stability; [Horizontal], [Vertical], [Clock] and [Phase]. [Horizontal/Vertical] (available for RGB signal only) Adjusts the image location ... only after the [Clock] is evident when part of Image [Cinema Position] (for Cinema aspect. Off For signals other than the projector's native resolution, will call up from memory the stored values for setting the image position. See [Cinema Position] for the source. Adjusting...
NP40/50/60 UM
Page 49
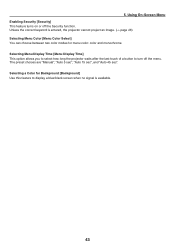
... blue, Sky blue, Light rose and Pink. The following 9 options are saved when the projector is the default setting (100% Brightness). NOTE: • The Lamp Mode can correct vertical distortion manually. (→ page 25) TIP: When this mode to Normal mode. To turn on the...life and reduce fan noise (NP60: approx. 80% Brightness, NP50/ NP40: approx. 90% Brightness). Selecting Wall Color Correction Mode [Wall Color] This function allows for the on the Auto Keystone feature, select "On". When the projector is not white. Normal Mode ........ Select [Information] → [Usage ...
... blue, Sky blue, Light rose and Pink. The following 9 options are saved when the projector is the default setting (100% Brightness). NOTE: • The Lamp Mode can correct vertical distortion manually. (→ page 25) TIP: When this mode to Normal mode. To turn on the...life and reduce fan noise (NP60: approx. 80% Brightness, NP50/ NP40: approx. 90% Brightness). Selecting Wall Color Correction Mode [Wall Color] This function allows for the on the Auto Keystone feature, select "On". When the projector is not white. Normal Mode ........ Select [Information] → [Usage ...
NP40/50/60 UM
Page 51
The preset choices are "Manual", "Auto 5 sec", "Auto 15 sec", and "Auto 45 sec". 5. Selecting a Color for menu color: color and monochrome. Selecting Menu Display Time [Menu Display Time] This option allows you to select how long the projector waits after the last touch of a button to display a blue.../black screen when no signal is entered, the projector cannot project an image. (→ page 28) Selecting Menu Color [Menu Color Select] ...
The preset choices are "Manual", "Auto 5 sec", "Auto 15 sec", and "Auto 45 sec". 5. Selecting a Color for menu color: color and monochrome. Selecting Menu Display Time [Menu Display Time] This option allows you to select how long the projector waits after the last touch of a button to display a blue.../black screen when no signal is entered, the projector cannot project an image. (→ page 28) Selecting Menu Color [Menu Color Select] ...


