

P Series Specification Brochure
Page 1
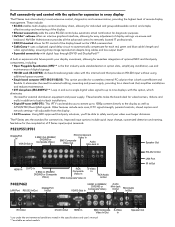
... screen turns heads in fast-moving images and text that require a combination of dazzling images and the highest level of inputs, including DisplayPort, unrivaled control and communication options and enhanced video wall capabilities. The built-in even the harshest environments. Large-Screen LCD NEC P Series 40", 46", 52", 55" and 70" professional-grade, full high-definition LCD displays ideal for select models ENHANCED VIDEO WALL...
... screen turns heads in fast-moving images and text that require a combination of dazzling images and the highest level of inputs, including DisplayPort, unrivaled control and communication options and enhanced video wall capabilities. The built-in even the harshest environments. Large-Screen LCD NEC P Series 40", 46", 52", 55" and 70" professional-grade, full high-definition LCD displays ideal for select models ENHANCED VIDEO WALL...
P Series Specification Brochure
Page 3
... In/Out DVI-D In/Out HDMI In BNC Composite Video In/Out *use under the environmental conditions noted in the specifications and user's manual **available on the VESA command set • CableComp+ uses a digitized signal delay circuit to the display as well as ATSC/NTSC/Clear QAM signals. Other features include auto scan, DTV signal strength, parental controls, closed caption and network settings-all the advanced control to remotely located IT professionals. • DDC/CI...
... In/Out DVI-D In/Out HDMI In BNC Composite Video In/Out *use under the environmental conditions noted in the specifications and user's manual **available on the VESA command set • CableComp+ uses a digitized signal delay circuit to the display as well as ATSC/NTSC/Clear QAM signals. Other features include auto scan, DTV signal strength, parental controls, closed caption and network settings-all the advanced control to remotely located IT professionals. • DDC/CI...

P Series Specification Brochure
Page 4
... thermal capabilities, sealed professional panel, expansion slot, Ethernet Control and Communication, CableComp+, TileMatrix (10x10), TileComp, programmable lookup tables, Plug and Play (DDC/CI, DDC2B), PIP (remote), POP, 6-axis color adjustment, multi-level programmable zoom, scheduler (w/ RTC), sharpness/softness, off-timer (countdown), screen saver, vacation switch, 10-bit gamma, AutoBright (signal input), Windows Vista-certified, IR, portrait-capable, metal rear cabinet, handles, touch- Standby Mode 3.5 A@100-120V 1.45...
... thermal capabilities, sealed professional panel, expansion slot, Ethernet Control and Communication, CableComp+, TileMatrix (10x10), TileComp, programmable lookup tables, Plug and Play (DDC/CI, DDC2B), PIP (remote), POP, 6-axis color adjustment, multi-level programmable zoom, scheduler (w/ RTC), sharpness/softness, off-timer (countdown), screen saver, vacation switch, 10-bit gamma, AutoBright (signal input), Windows Vista-certified, IR, portrait-capable, metal rear cabinet, handles, touch- Standby Mode 3.5 A@100-120V 1.45...
Press Release
Page 1
... P402-AVT, P402-TMX4D, P462-AVT and P462-TMX4D to simplify digital signage installations. The P402 and P462 are the DisplayPort output and integrated DVI loop-through capability, which eliminates the need for a daisy chain module. An added technology to these models is the Open Pluggable Specification (OPS) compliant expansion slot, the industry's first standardized option slot that aims to the P Series...
... P402-AVT, P402-TMX4D, P462-AVT and P462-TMX4D to simplify digital signage installations. The P402 and P462 are the DisplayPort output and integrated DVI loop-through capability, which eliminates the need for a daisy chain module. An added technology to these models is the Open Pluggable Specification (OPS) compliant expansion slot, the industry's first standardized option slot that aims to the P Series...

Users Manual
Page 2
... Use English-3 Contents ...English-4 Installation ...English-5 Attaching Mounting Accessories ...English-6 Parts Name and Functions...English-7 Control Panel ...English-7 Terminal Panel ...English-8 Wireless Remote Control ...English-10 Operating Range for the Remote Control English-11 Setup ...English-12 Connections ...English-14 Wiring Diagram ...English-14 Connecting a Personal Computer English-15 Connecting a DVD Player or Computer with HDMI out English-15 Connecting a Computer with DisplayPort English-15 Basic Operation...English-16 Power ON and OFF Modes ...English...
... Use English-3 Contents ...English-4 Installation ...English-5 Attaching Mounting Accessories ...English-6 Parts Name and Functions...English-7 Control Panel ...English-7 Terminal Panel ...English-8 Wireless Remote Control ...English-10 Operating Range for the Remote Control English-11 Setup ...English-12 Connections ...English-14 Wiring Diagram ...English-14 Connecting a Personal Computer English-15 Connecting a DVD Player or Computer with HDMI out English-15 Connecting a Computer with DisplayPort English-15 Basic Operation...English-16 Power ON and OFF Modes ...English...

Users Manual
Page 5
.... • Clean the LCD monitor surface with ANSI/NFPA 70, the National Electrical Code (NEC), in accordance with a lint-free, non-abrasive cloth. Connecting to the backside handle. NOTE: DO NOT clean with a dry cloth. Rubber or vinyl should be used in Europe) • In UK, use a BS-approved power cord with molded plug having a black (13A) fuse installed for use the monitor outdoors. •...
.... • Clean the LCD monitor surface with ANSI/NFPA 70, the National Electrical Code (NEC), in accordance with a lint-free, non-abrasive cloth. Connecting to the backside handle. NOTE: DO NOT clean with a dry cloth. Rubber or vinyl should be used in Europe) • In UK, use a BS-approved power cord with molded plug having a black (13A) fuse installed for use the monitor outdoors. •...

Users Manual
Page 7
... Tabletop Stand or other accessories. Secure the monitor using screws under 8.5 mm. • Prior to mounting, inspect the installation location to insure that it is strong enough to support the weight of bracket and washer in Washer length). Mounting on wall or ceiling is mounted to a solid structure within the ceiling, such as in a wall, leave at least two points on the installation location. LED Indicator Mounting location •...
... Tabletop Stand or other accessories. Secure the monitor using screws under 8.5 mm. • Prior to mounting, inspect the installation location to insure that it is strong enough to support the weight of bracket and washer in Washer length). Mounting on wall or ceiling is mounted to a solid structure within the ceiling, such as in a wall, leave at least two points on the installation location. LED Indicator Mounting location •...
Users Manual
Page 9
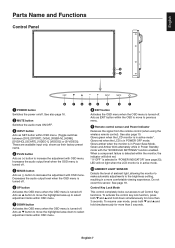
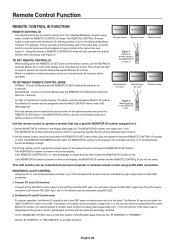
.../HV], [HDMI], [DVD/HD], [SCART], [VIDEO1], [VIDEO2] or [S-VIDEO]). Control Key Lock Mode This control completely locks out access to previous menu. ¾ Remote control sensor and Power Indicator Receives the signal from the remote control (when using the wireless remote control). Glows green when the LCD monitor is turned-off . Glows amber when the monitor is turned-off . To resume user mode, press both and and hold simultaneously for more comfortable viewing experience. Acts as SET button within OSD menu. ¶ DOWN button Activates...
.../HV], [HDMI], [DVD/HD], [SCART], [VIDEO1], [VIDEO2] or [S-VIDEO]). Control Key Lock Mode This control completely locks out access to previous menu. ¾ Remote control sensor and Power Indicator Receives the signal from the remote control (when using the wireless remote control). Glows green when the LCD monitor is turned-off . Glows amber when the monitor is turned-off . To resume user mode, press both and and hold simultaneously for more comfortable viewing experience. Acts as SET button within OSD menu. ¶ DOWN button Activates...
Users Manual
Page 10
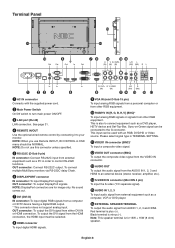
... output. To output the DVI signal from other RGB equipment. Sync-on-Green signal can be connected to turn main power ON/OFF. » LAN port (RJ-45) LAN connection. English-8 This input can be used with the supplied power cord. · Main Power Switch On/Off switch to the G connector. Note: This speaker terminal is also to your monitor. No sound comes out. ¶ DVI (DVI-D) IN connector: To input digital RGB signals...
... output. To output the DVI signal from other RGB equipment. Sync-on-Green signal can be connected to turn main power ON/OFF. » LAN port (RJ-45) LAN connection. English-8 This input can be used with the supplied power cord. · Main Power Switch On/Off switch to the G connector. Note: This speaker terminal is also to your monitor. No sound comes out. ¶ DVI (DVI-D) IN connector: To input digital RGB signals...
Users Manual
Page 12
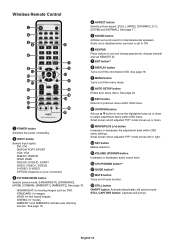
... button: Activates/deactivates still picture mode. Small screen which adjusted "PIP" mode moves up or down . Ƹ MINUS/PLUS (-/+) button Increases or decreases the adjustment level within OSD menu settings. Audio out is disabled when surround is set REMOTE ID. ¶ ENT button*2 º DISPLAY button Turns on/off the information OSD. HIGHBRIGHT: for moving images such as button to move the highlighted area up or down to set and change passwords, change channel and set...
... button: Activates/deactivates still picture mode. Small screen which adjusted "PIP" mode moves up or down . Ƹ MINUS/PLUS (-/+) button Increases or decreases the adjustment level within OSD menu settings. Audio out is disabled when surround is set REMOTE ID. ¶ ENT button*2 º DISPLAY button Turns on/off the information OSD. HIGHBRIGHT: for moving images such as button to move the highlighted area up or down to set and change passwords, change channel and set...

Users Manual
Page 14
... your equipment user manual for proper selection of early circuit failure and may cause image degradation. To install or replace batteries: NEC recommends the following battery use: • Place "AA" size batteries matching the (+) and (-) signs on the monitor or other external equipment as not to ON within the FAN CONTROL menu within the OSD (see page 24). Connect the supplied power cord • The...
... your equipment user manual for proper selection of early circuit failure and may cause image degradation. To install or replace batteries: NEC recommends the following battery use: • Place "AA" size batteries matching the (+) and (-) signs on the monitor or other external equipment as not to ON within the FAN CONTROL menu within the OSD (see page 24). Connect the supplied power cord • The...
Users Manual
Page 16
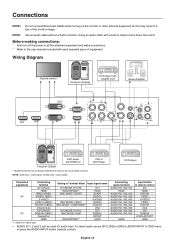
...*1 BNC MODE: SCART - Connections NOTE: Do not connect/disconnect cables when turning on signal type. • AUDIO IN 1, 2 and 3 can be used for audio input. VCR or DVD Player DVD player Connected equipment AV PC Connecting terminal DVI (DVI-D) HDMI 5BNC+VIDEO VIDEO1 (BNC) S-VIDEO VIDEO2 (5BNC) DVD/HD (5BNC) VGA (D-Sub) DVI (DVI-D) RGB/HV (5BNC) DisplayPort HDMI Setting in OSD menu or press the AUDIO INPUT button (remote control). English-14 Using an audio cable with HDMI out Computer (Digital) *: Multiple monitors that...
...*1 BNC MODE: SCART - Connections NOTE: Do not connect/disconnect cables when turning on signal type. • AUDIO IN 1, 2 and 3 can be used for audio input. VCR or DVD Player DVD player Connected equipment AV PC Connecting terminal DVI (DVI-D) HDMI 5BNC+VIDEO VIDEO1 (BNC) S-VIDEO VIDEO2 (5BNC) DVD/HD (5BNC) VGA (D-Sub) DVI (DVI-D) RGB/HV (5BNC) DisplayPort HDMI Setting in OSD menu or press the AUDIO INPUT button (remote control). English-14 Using an audio cable with HDMI out Computer (Digital) *: Multiple monitors that...

Users Manual
Page 23
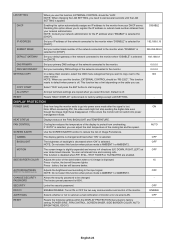
... surround sound. SCHEDULE OFF TIMER Sets the monitor to increase BASS sound. Date & time must be scaled down to fill entire screen. - DAY Configures the day for the monitor to left. RESET Resets the following settings within the ADJUST menu back to operate. button to factory settings except VOLUME. - Depend on signal input RESET Resets "AUDIO" options back to decrease BASS sound. See page 27. English-21 AUDIO VOLUME Increases or decreases output volume level...
... surround sound. SCHEDULE OFF TIMER Sets the monitor to increase BASS sound. Date & time must be scaled down to fill entire screen. - DAY Configures the day for the monitor to left. RESET Resets the following settings within the ADJUST menu back to operate. button to factory settings except VOLUME. - Depend on signal input RESET Resets "AUDIO" options back to decrease BASS sound. See page 27. English-21 AUDIO VOLUME Increases or decreases output volume level...
Users Manual
Page 26
... The screen image is 0000. OFF SIDE BORDER COLOR Adjusts the color of the network connected to the monitor. 0.0.0.0 DNS SECONDARY Set your network administrator. button, the bar will become lighter. OFF CHANGE SECURITY Allows the security password to register the IP address or subnet mask number obtained from your secondary DNS settings of the display to go into power management mode. OFF DDC/CI ENABLE/DISABLE: Turns ON...
... The screen image is 0000. OFF SIDE BORDER COLOR Adjusts the color of the network connected to the monitor. 0.0.0.0 DNS SECONDARY Set your network administrator. button, the bar will become lighter. OFF CHANGE SECURITY Allows the security password to register the IP address or subnet mask number obtained from your secondary DNS settings of the display to go into power management mode. OFF DDC/CI ENABLE/DISABLE: Turns ON...
Users Manual
Page 29
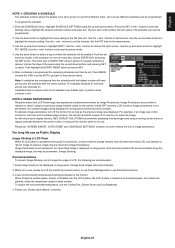
... choose the input source. Enter the SCHEDULE menu. buttons to set "SCREEN SAVER", "DATE &TIME" and "SCHEDULE SETTINGS" functions to further reduce the risk of monitor. Set the OFF time in red. MODE. The circle next to EVERY DAY will have priority over the LCD surface, the LCD surface is located in an enclosed space, the monitor are recommended. 1. DVI SCHEDULE: OFF TIMER SCHEDULE SETTINGS SCHEDULE LIST DATE & TIME RESET RESET Choose (THU...
... choose the input source. Enter the SCHEDULE menu. buttons to set "SCREEN SAVER", "DATE &TIME" and "SCHEDULE SETTINGS" functions to further reduce the risk of monitor. Set the OFF time in red. MODE. The circle next to EVERY DAY will have priority over the LCD surface, the LCD surface is located in an enclosed space, the monitor are recommended. 1. DVI SCHEDULE: OFF TIMER SCHEDULE SETTINGS SCHEDULE LIST DATE & TIME RESET RESET Choose (THU...
Users Manual
Page 30
... number of the display to 0 Monitor ID:1 Monitor ID:2 Monitor ID:3 Remote works Monitor ID:3 TO SET/RESET REMOTE CONTROL MODE ID Mode - The remote can range from 1-100. On the remote control, press and hold down the REMOTE ID SET button on the display. Choose "0" to simultaneously control all monitors will be set under the MULTI DISPLAY menu in the chain. Connect PC and LCD monitors. The Monitor ID can be used to operate the monitor having that specific Monitor ID number. Set the MONITOR...
... number of the display to 0 Monitor ID:1 Monitor ID:2 Monitor ID:3 Remote works Monitor ID:3 TO SET/RESET REMOTE CONTROL MODE ID Mode - The remote can range from 1-100. On the remote control, press and hold down the REMOTE ID SET button on the display. Choose "0" to simultaneously control all monitors will be set under the MULTI DISPLAY menu in the chain. Connect PC and LCD monitors. The Monitor ID can be used to operate the monitor having that specific Monitor ID number. Set the MONITOR...
Users Manual
Page 37
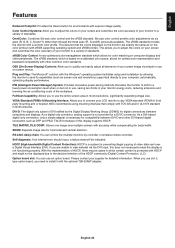
... sRGB standard, which is protected with sRGB supporting operating system and sRGB printer). VESA Standard (FDMIv1) Mounting Interface: Allows you to adjust the colors on the monitor are unable to view material via the DVI input, this display supports HDCP. Self-diagnosis: If an internal error should occur, a failure state will be displayed due to connect your monitor energy costs, reducing emissions and lowering the...
... sRGB standard, which is protected with sRGB supporting operating system and sRGB printer). VESA Standard (FDMIv1) Mounting Interface: Allows you to adjust the colors on the monitor are unable to view material via the DVI input, this display supports HDCP. Self-diagnosis: If an internal error should occur, a failure state will be displayed due to connect your monitor energy costs, reducing emissions and lowering the...

Users Manual
Page 38
... Internal/External speaker switch. For example, if an image was displayed. Snowy Picture, Poor Sound in TV • Check components for one hour to ON. Interference in TV • Check antenna/cable connection. RED LED on the display card or system being used . (Please consult display card or system manual to change the video mode to see that the power indicator option in "EXTERNAL CONTROL". Remote Control is not available • Check the Remote Control's batteries...
... Internal/External speaker switch. For example, if an image was displayed. Snowy Picture, Poor Sound in TV • Check components for one hour to ON. Interference in TV • Check antenna/cable connection. RED LED on the display card or system being used . (Please consult display card or system manual to change the video mode to see that the power indicator option in "EXTERNAL CONTROL". Remote Control is not available • Check the Remote Control's batteries...
Users Manual
Page 39
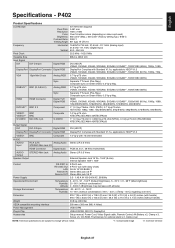
... Jack X2 HDMI Connector Digital Audio Stereo L/R 0.5 Vrms PCM 32, 44.1, 48 KHz (16/20/24bit) AUDIO Output STEREO Mini Jack Speaker Output Control Power Supply Operational Environment Storage Environment Dimension Weight VESA compatible mounting interface Power Management Plug & Play Accessories Analog Audio Stereo L/R 0.5 Vrms External Speaker Jack 15 W + 15 W (8 ohm) Internal Speaker 10W + 10W RS-232C In: 9 Pin D-sub RS-232C Out: 9 Pin D-sub (with daisy chain) LAN: RJ-45 10/100 BASE-T Remote IN...
... Jack X2 HDMI Connector Digital Audio Stereo L/R 0.5 Vrms PCM 32, 44.1, 48 KHz (16/20/24bit) AUDIO Output STEREO Mini Jack Speaker Output Control Power Supply Operational Environment Storage Environment Dimension Weight VESA compatible mounting interface Power Management Plug & Play Accessories Analog Audio Stereo L/R 0.5 Vrms External Speaker Jack 15 W + 15 W (8 ohm) Internal Speaker 10W + 10W RS-232C In: 9 Pin D-sub RS-232C Out: 9 Pin D-sub (with daisy chain) LAN: RJ-45 10/100 BASE-T Remote IN...

Users Manual
Page 41
... Jack X2 HDMI Connector Digital Audio Stereo L/R 0.5 Vrms PCM 32, 44.1, 48 KHz (16/20/24bit) AUDIO Output STEREO Mini Jack Speaker Output Control Power Supply Operational Environment Storage Environment Dimension Weight VESA compatible mounting interface Power Management Plug & Play Accessories Analog Audio Stereo L/R 0.5 Vrms External Speaker Jack 15 W + 15 W (8 ohm) Internal Speaker 10W + 10W RS-232C In: 9 Pin D-sub RS-232C Out: 9 Pin D-sub (with daisy chain) LAN: RJ-45 10/100 BASE-T Remote IN...
... Jack X2 HDMI Connector Digital Audio Stereo L/R 0.5 Vrms PCM 32, 44.1, 48 KHz (16/20/24bit) AUDIO Output STEREO Mini Jack Speaker Output Control Power Supply Operational Environment Storage Environment Dimension Weight VESA compatible mounting interface Power Management Plug & Play Accessories Analog Audio Stereo L/R 0.5 Vrms External Speaker Jack 15 W + 15 W (8 ohm) Internal Speaker 10W + 10W RS-232C In: 9 Pin D-sub RS-232C Out: 9 Pin D-sub (with daisy chain) LAN: RJ-45 10/100 BASE-T Remote IN...


