

P Series Specification Brochure
Page 1
... your digital signage applications. P SERIES HIGHLIGHTS IMPROVED MECHANICAL DESIGN* SLIMMER DEPTH INTEGRATED SPEAKER OPS & CURRENT SLOT SUPPORT DIGITAL SIGNAGE TECHNOLOGY SUITE INTEGRATED THERMAL PROTECTION SEALED PANEL DESIGN *available for 24/7 operation in fast-moving images and text that require a combination of dazzling images and the highest level of inputs, including DisplayPort, unrivaled control and communication options and enhanced video wall capabilities...
... your digital signage applications. P SERIES HIGHLIGHTS IMPROVED MECHANICAL DESIGN* SLIMMER DEPTH INTEGRATED SPEAKER OPS & CURRENT SLOT SUPPORT DIGITAL SIGNAGE TECHNOLOGY SUITE INTEGRATED THERMAL PROTECTION SEALED PANEL DESIGN *available for 24/7 operation in fast-moving images and text that require a combination of dazzling images and the highest level of inputs, including DisplayPort, unrivaled control and communication options and enhanced video wall capabilities...
P Series Specification Brochure
Page 3
... each red, green and blue cable's length and video signal delay, ensuring sharp image reproduction despite long cables and low output level* • Expanded connectivity with digital loop through (DVI-D and DisplayPort)** A built-in expansion slot future-proofs your video over longer distances. The P Series sets the standard for external distribution equipment and power supply. Other features include auto scan, DTV signal strength, parental controls, closed caption and network settings-all the advanced control to remotely located...
... each red, green and blue cable's length and video signal delay, ensuring sharp image reproduction despite long cables and low output level* • Expanded connectivity with digital loop through (DVI-D and DisplayPort)** A built-in expansion slot future-proofs your video over longer distances. The P Series sets the standard for external distribution equipment and power supply. Other features include auto scan, DTV signal strength, parental controls, closed caption and network settings-all the advanced control to remotely located...

P Series Specification Brochure
Page 4
... panel, expansion slot, Ethernet Control and Communication, CableComp+, TileMatrix (10x10), TileComp, programmable lookup tables, Plug and Play (DDC/CI, DDC2B), PIP (remote), POP, 6-axis color adjustment, multi-level programmable zoom, scheduler (w/ RTC), sharpness/softness, off-timer (countdown), screen saver, vacation switch, 10-bit gamma, AutoBright (signal input), Windows Vista-certified, IR, portrait-capable, metal rear cabinet, handles, touch- and protective screen-ready, ambient light sensor, carbon footprint meter, color...
... panel, expansion slot, Ethernet Control and Communication, CableComp+, TileMatrix (10x10), TileComp, programmable lookup tables, Plug and Play (DDC/CI, DDC2B), PIP (remote), POP, 6-axis color adjustment, multi-level programmable zoom, scheduler (w/ RTC), sharpness/softness, off-timer (countdown), screen saver, vacation switch, 10-bit gamma, AutoBright (signal input), Windows Vista-certified, IR, portrait-capable, metal rear cabinet, handles, touch- and protective screen-ready, ambient light sensor, carbon footprint meter, color...
Users Manual
Page 2
...-7 Control Panel ...English-7 Terminal Panel ...English-8 Wireless Remote Control ...English-10 Operating Range for the Remote Control English-11 Setup ...English-12 Connections ...English-14 Wiring Diagram ...English-14 Connecting a Personal Computer English-15 Connecting a DVD Player or Computer with HDMI out English-15 Connecting a Computer with DisplayPort English-15 Basic Operation...English-16 Power ON and OFF Modes ...English-16 Power Indicator...English-17 Using Power Management ...English-17 Selecting a video source...English-17 Picture Aspect...
...-7 Control Panel ...English-7 Terminal Panel ...English-8 Wireless Remote Control ...English-10 Operating Range for the Remote Control English-11 Setup ...English-12 Connections ...English-14 Wiring Diagram ...English-14 Connecting a Personal Computer English-15 Connecting a DVD Player or Computer with HDMI out English-15 Connecting a Computer with DisplayPort English-15 Basic Operation...English-16 Power ON and OFF Modes ...English-16 Power Indicator...English-17 Using Power Management ...English-17 Selecting a video source...English-17 Picture Aspect...
Users Manual
Page 5
... screen. • The power supply cord you use a BS-approved power cord with molded plug having a black (13A) fuse installed for long periods of a Coaxial Cable. Rubber or vinyl should be used in the building installation. * The product you purchased may expose you notice any cleaning solution or glass cleaner! • Adjust the monitor's brightness, contrast and sharpness controls to enhance readability. • Avoid displaying fixed patterns...
... screen. • The power supply cord you use a BS-approved power cord with molded plug having a black (13A) fuse installed for long periods of a Coaxial Cable. Rubber or vinyl should be used in the building installation. * The product you purchased may expose you notice any cleaning solution or glass cleaner! • Adjust the monitor's brightness, contrast and sharpness controls to enhance readability. • Avoid displaying fixed patterns...
Users Manual
Page 7
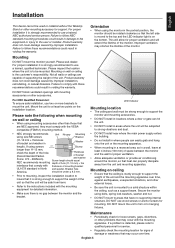
... or other accessories. If using bolts, spring lock washers, washer and nut. • DO NOT mount to the instructions included with the mounting apparatus. Bracket hole America. Please note the following when mounting on the installation location. Failure to follow these recommendations could result in a wall, leave at least 4 inches (100 mm) of space between the monitor and the wall for detailed information. •...
... or other accessories. If using bolts, spring lock washers, washer and nut. • DO NOT mount to the instructions included with the mounting apparatus. Bracket hole America. Please note the following when mounting on the installation location. Failure to follow these recommendations could result in a wall, leave at least 4 inches (100 mm) of space between the monitor and the wall for detailed information. •...
Users Manual
Page 9
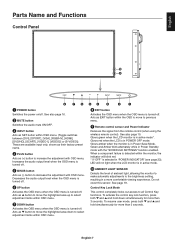
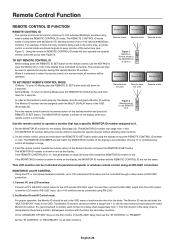
... Receives the signal from the remote control (when using the wireless remote control). When a component failure is detected within the monitor, the indicator will blink red. * If "OFF" is selected in "POWER INDICATOR" (see page 23), LED will not light when the LCD monitor is turned off. ´ MINUS button Acts as EXIT button within OSD menu. ¶ DOWN button Activates the OSD menu when the OSD menu is turned-off . Control Key Lock Mode This control completely locks out access...
... Receives the signal from the remote control (when using the wireless remote control). When a component failure is detected within the monitor, the indicator will blink red. * If "OFF" is selected in "POWER INDICATOR" (see page 23), LED will not light when the LCD monitor is turned off. ´ MINUS button Acts as EXIT button within OSD menu. ¶ DOWN button Activates the OSD menu when the OSD menu is turned-off . Control Key Lock Mode This control completely locks out access...
Users Manual
Page 10
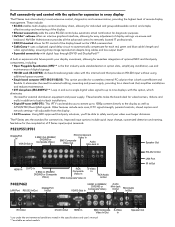
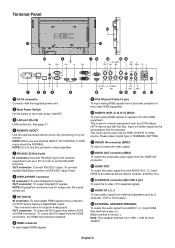
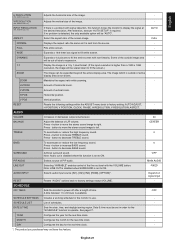
... (D-Sub 9 pin) IN connector: Connect RS-232C input from external equipment such as a computer, VCR or DVD player. ƻ EXTERNAL SPEAKER TERMINAL To output the audio signal from external equipment such as a PC in OSD menu should be connected to connect equipment such as a DVD player, HDTV device and Set-Top-Box. This is for image only. Sync-on-Green signal can be selected. º HDMI connector To input digital HDMI signals. ¾ VGA IN (mini...
... (D-Sub 9 pin) IN connector: Connect RS-232C input from external equipment such as a computer, VCR or DVD player. ƻ EXTERNAL SPEAKER TERMINAL To output the audio signal from external equipment such as a PC in OSD menu should be connected to connect equipment such as a DVD player, HDTV device and Set-Top-Box. This is for image only. Sync-on-Green signal can be selected. º HDMI connector To input digital HDMI signals. ¾ VGA IN (mini...
Users Manual
Page 12
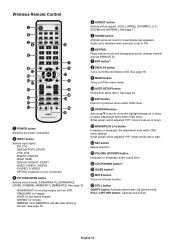
... menu. ¹ UP/DOWN button Acts as DVD. STILL CAPTURE button: Captures still picture. See page 20. ¸ EXIT button Returns to set and change passwords, change channel and set REMOTE ID. ¶ ENT button*2 º DISPLAY button Turns on /standby. · INPUT button Selects input signal. sRGB: for movies. CINEMA: for text based images. See page 17. ´ SOUND button Artificial surround sound for internal/external speakers. See page 18. ¾ MENU button Turns on your connection » PICTURE MODE button Selects picture mode...
... menu. ¹ UP/DOWN button Acts as DVD. STILL CAPTURE button: Captures still picture. See page 20. ¸ EXIT button Returns to set and change passwords, change channel and set REMOTE ID. ¶ ENT button*2 º DISPLAY button Turns on /standby. · INPUT button Selects input signal. sRGB: for movies. CINEMA: for text based images. See page 17. ´ SOUND button Artificial surround sound for internal/external speakers. See page 18. ¾ MENU button Turns on your connection » PICTURE MODE button Selects picture mode...
Users Manual
Page 14
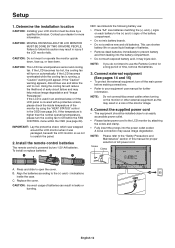
... operating temperature, please turn off the main power before making connections. • Refer to the LCD monitor by a qualified technician. IMPORTANT: Lay the protective sheet, which was packaged, beneath the LCD monitor so as this caution may cause image degradation. Install the remote control batteries The remote control is covered with a protective screen, please check the inside the case. To install or replace batteries: NEC...
... operating temperature, please turn off the main power before making connections. • Refer to the LCD monitor by a qualified technician. IMPORTANT: Lay the protective sheet, which was packaged, beneath the LCD monitor so as this caution may cause image degradation. Install the remote control batteries The remote control is covered with a protective screen, please check the inside the case. To install or replace batteries: NEC...
Users Manual
Page 16
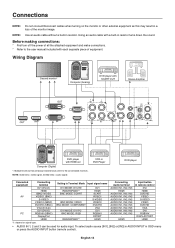
... audio cable with HDMI out Computer (Digital) *: Multiple monitors that are daisy-chained have a limit to the user manual included with each separate piece of the monitor image. Wiring Diagram Second monitor* Computer (Analog) DVD player with SCART OUT Stereo Amplifier DVD player with a built-in resistor turns down the sound. Connections NOTE: Do not connect/disconnect cables when turning on signal type. • AUDIO IN 1, 2 and 3 can be used for audio input. BNC MODE: VIDEO BNC MODE: COMPONENT...
... audio cable with HDMI out Computer (Digital) *: Multiple monitors that are daisy-chained have a limit to the user manual included with each separate piece of the monitor image. Wiring Diagram Second monitor* Computer (Analog) DVD player with SCART OUT Stereo Amplifier DVD player with a built-in resistor turns down the sound. Connections NOTE: Do not connect/disconnect cables when turning on signal type. • AUDIO IN 1, 2 and 3 can be used for audio input. BNC MODE: VIDEO BNC MODE: COMPONENT...
Users Manual
Page 23
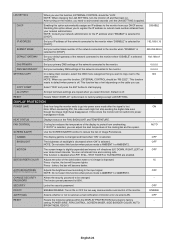
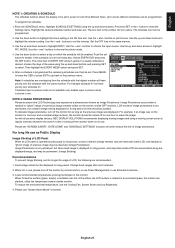
... - FIXED AUDIO INPUT Selects audio input source [IN1], [IN2], [IN3], [HDMI], [OPTION]*. A time between 1 to 24 hours is set to fit the screen.) ZOOM The image can be set in a 1 by 1 pixel format. (If the input resolution is detected, the only available option will be "AUTO". Note: Audio out is disabled when this function forces the monitor to use. - OFF SCHEDULE SETTINGS Creates a working schedule for the real-time clock. - SCHEDULE LIST List of...
... - FIXED AUDIO INPUT Selects audio input source [IN1], [IN2], [IN3], [HDMI], [OPTION]*. A time between 1 to 24 hours is set to fit the screen.) ZOOM The image can be set in a 1 by 1 pixel format. (If the input resolution is detected, the only available option will be "AUTO". Note: Audio out is disabled when this function forces the monitor to use. - OFF SCHEDULE SETTINGS Creates a working schedule for the real-time clock. - SCHEDULE LIST List of...
Users Manual
Page 26
... monitor, you need to factory settings except LAN SETTING. - LAN SETTING When you use this function when picture mode is AMBIENT1 or AMBIENT2. ALL INPUT All input terminals settings are enabled. AUTO SCREEN SAVER Use the SCREEN SAVER function to reduce the risk of the display to register the IP address or subnet mask number obtained from overheating. Press - DHCP Enabling this item. Disabling this function, EXTERNAL CONTROL should be "LAN". RESET Resets...
... monitor, you need to factory settings except LAN SETTING. - LAN SETTING When you use this function when picture mode is AMBIENT1 or AMBIENT2. ALL INPUT All input terminals settings are enabled. AUTO SCREEN SAVER Use the SCREEN SAVER function to reduce the risk of the display to register the IP address or subnet mask number obtained from overheating. Press - DHCP Enabling this item. Disabling this function, EXTERNAL CONTROL should be "LAN". RESET Resets...
Users Manual
Page 28
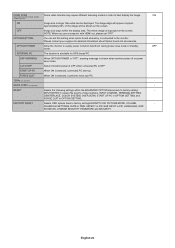
... standby mode. Resets OSD options back to best display the image. Resets the following settings within the display area. OVER SCAN HDMI, DVD/HD, SCART, VIDEO1, VIDEO2, S-VIDEO inputs only ON OFF OPTION SETTING OPTION POWER INTERNAL PC OFF WARNING AUTO OFF START UP PC FORCE QUIT 120Hz (not adjustable) MURA COMP (not adjustable) RESET FACTORY RESET Some video formats may require different scanning modes in order to factory settings EXCEPT FOR: PICTURE MODE, VOLUME, SCHEDULE SETTINGS, DATE & TIME, ASPECT in PIP, SUB INPUT...
... standby mode. Resets OSD options back to best display the image. Resets the following settings within the display area. OVER SCAN HDMI, DVD/HD, SCART, VIDEO1, VIDEO2, S-VIDEO inputs only ON OFF OPTION SETTING OPTION POWER INTERNAL PC OFF WARNING AUTO OFF START UP PC FORCE QUIT 120Hz (not adjustable) MURA COMP (not adjustable) RESET FACTORY RESET Some video formats may require different scanning modes in order to factory settings EXCEPT FOR: PICTURE MODE, VOLUME, SCHEDULE SETTINGS, DATE & TIME, ASPECT in PIP, SUB INPUT...
Users Manual
Page 29
..., use "Screen Saver Mode" of the monitor. Up to EVERY DAY will turn off the monitor when not in use. The box next to enter the Settings menu. Use the + and - Use the up and down buttons to highlight the minutes setting. MODE. Unlike CRT monitors, LCD monitors' image persistence is shown in the same manner. 3. For example, if an image was displayed. Press the SET or the + button to the number...
..., use "Screen Saver Mode" of the monitor. Up to EVERY DAY will turn off the monitor when not in use. The box next to enter the Settings menu. Use the + and - Use the up and down buttons to highlight the minutes setting. MODE. Unlike CRT monitors, LCD monitors' image persistence is shown in the same manner. 3. For example, if an image was displayed. Press the SET or the + button to the number...
Users Manual
Page 30
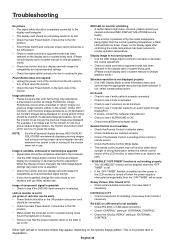
... 0 Monitor ID:1 Monitor ID:2 Monitor ID:3 Remote works Monitor ID:3 TO SET/RESET REMOTE CONTROL MODE ID Mode - Choose "0" to the LCD monitor RS-232C input. If the MONITOR ID number is shown in white on the first monitor in the RS-232C daisy chain set within the group (see Figure 1). The MONITOR ID number is in red on the remote control, use REMOTE ID:3 Remote works Use the remote control to operate a monitor that is shown in the chain. Connect a PC's RS-232C control output...
... 0 Monitor ID:1 Monitor ID:2 Monitor ID:3 Remote works Monitor ID:3 TO SET/RESET REMOTE CONTROL MODE ID Mode - Choose "0" to the LCD monitor RS-232C input. If the MONITOR ID number is shown in white on the first monitor in the RS-232C daisy chain set within the group (see Figure 1). The MONITOR ID number is in red on the remote control, use REMOTE ID:3 Remote works Use the remote control to operate a monitor that is shown in the chain. Connect a PC's RS-232C control output...
Users Manual
Page 37
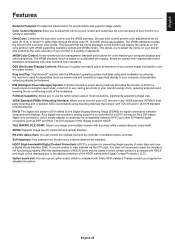
... standards. Plug and Play: The Microsoft® solution with the Windows® operating system facilitates setup and installation by allowing the monitor to send its capabilities (such as screen size and resolutions supported) directly to the decision/intention of the workplace. NEC recommends using mounting interface that comply with sRGB supporting operating system and sRGB printer). As a DVI-based digital only connection, only a simple adapter is necessary for compatibility between...
... standards. Plug and Play: The Microsoft® solution with the Windows® operating system facilitates setup and installation by allowing the monitor to send its capabilities (such as screen size and resolutions supported) directly to the decision/intention of the workplace. NEC recommends using mounting interface that comply with sRGB supporting operating system and sRGB printer). As a DVI-based digital only connection, only a simple adapter is necessary for compatibility between...
Users Manual
Page 38
... the remote control sensor of the LCD monitor, or when there is an object in TV • Check antenna/cable connection. NOTE: As with respect to compatibility and recommended signal timings. • If your nearest authorized NEC DISPLAY SOLUTIONS service facility. • If the monitor is powered off when the power supply is interrupted unexpectedly, then the "OFF TIMER" will blink six times. Power on the display card or system being used . (Please consult display...
... the remote control sensor of the LCD monitor, or when there is an object in TV • Check antenna/cable connection. NOTE: As with respect to compatibility and recommended signal timings. • If your nearest authorized NEC DISPLAY SOLUTIONS service facility. • If the monitor is powered off when the power supply is interrupted unexpectedly, then the "OFF TIMER" will blink six times. Power on the display card or system being used . (Please consult display...

Users Manual
Page 39
...), 1080p, 1080i DisplayPort DisplayPort Connector Digital RGB DisplayPort Complies with handle) 919.7 (W) x 532.2 (H) x 103.0 (D) mm / 36.2 (W) x 21.0 (H) x 4.1 (D) inches (without handle) Weight 20.8 kg (45.9 lbs) VESA compatible arm mounting interface 300 mm x 300 mm (M6, 4 Holes) Power Management VESA DPM Plug & Play VESA DDC2B, DDC/CI, DisplayPort Accessories Setup manual, Power Cord, Video Signal cable, Remote Control, AA Battery x 2, Clamp x 3, Screw x 5, CD-ROM, Thumbscrew for optional stand x 2, Cable cover NOTE: Technical specifi...
...), 1080p, 1080i DisplayPort DisplayPort Connector Digital RGB DisplayPort Complies with handle) 919.7 (W) x 532.2 (H) x 103.0 (D) mm / 36.2 (W) x 21.0 (H) x 4.1 (D) inches (without handle) Weight 20.8 kg (45.9 lbs) VESA compatible arm mounting interface 300 mm x 300 mm (M6, 4 Holes) Power Management VESA DPM Plug & Play VESA DDC2B, DDC/CI, DisplayPort Accessories Setup manual, Power Cord, Video Signal cable, Remote Control, AA Battery x 2, Clamp x 3, Screw x 5, CD-ROM, Thumbscrew for optional stand x 2, Cable cover NOTE: Technical specifi...

Users Manual
Page 40
...;C) regarding over 40°C Dimension 1055.4 (W) x 608.6 (H) x 118.0 (D) mm / 41.6 (W) x 24.0 (H) x 4.6 (D) inches (with Standard V1.1a, applicable to change without handle) Weight 23.8 kg (52.5 lbs) VESA compatible arm mounting interface 300 mm x 300 mm (M6, 4 Holes) Power Management VESA DPM Plug & Play VESA DDC2B, DDC/CI, DisplayPort Accessories Setup manual, Power Cord, Video Signal cable, Remote Control, AA Battery x 2, Clamp x 3, Screw x 5, CD-ROM, Thumbscrew for optional stand x 2, Cable cover NOTE: Technical specifi...
...;C) regarding over 40°C Dimension 1055.4 (W) x 608.6 (H) x 118.0 (D) mm / 41.6 (W) x 24.0 (H) x 4.6 (D) inches (with Standard V1.1a, applicable to change without handle) Weight 23.8 kg (52.5 lbs) VESA compatible arm mounting interface 300 mm x 300 mm (M6, 4 Holes) Power Management VESA DPM Plug & Play VESA DDC2B, DDC/CI, DisplayPort Accessories Setup manual, Power Cord, Video Signal cable, Remote Control, AA Battery x 2, Clamp x 3, Screw x 5, CD-ROM, Thumbscrew for optional stand x 2, Cable cover NOTE: Technical specifi...


