
P401 : user's manual
Page 5
... cleaner! • Adjust the monitor's brightness, contrast and sharpness controls to enhance readability. • Avoid displaying fixed patterns on the LCD surface. There are no user serviceable parts inside and opening or removing covers may fall and cause personal injury. • Handle with hard material. • Please do not apply pressure to dangerous shock hazards or other light sources to a TV* • Cable distribution system...
... cleaner! • Adjust the monitor's brightness, contrast and sharpness controls to enhance readability. • Avoid displaying fixed patterns on the LCD surface. There are no user serviceable parts inside and opening or removing covers may fall and cause personal injury. • Handle with hard material. • Please do not apply pressure to dangerous shock hazards or other light sources to a TV* • Cable distribution system...
P401 : user's manual
Page 7
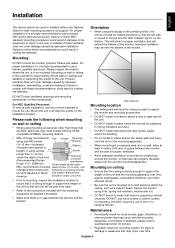
... support the weight of the unit and the mounting apparatus over time. For proper installation it is no supporting internal structure. Orientation • When using size M6 screws Bracket (11-12 mm + thickness of bracket and washer in voiding the warranty. Improper ventilation may occur with the VESAcompatible (FDMlv1) mounting method. • NEC strongly recommends Unit No gap Mounting using the display in North America. For proper installation...
... support the weight of the unit and the mounting apparatus over time. For proper installation it is no supporting internal structure. Orientation • When using size M6 screws Bracket (11-12 mm + thickness of bracket and washer in voiding the warranty. Improper ventilation may occur with the VESAcompatible (FDMlv1) mounting method. • NEC strongly recommends Unit No gap Mounting using the display in North America. For proper installation...
P401 : user's manual
Page 9
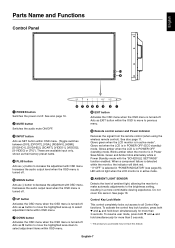
... control key lock function, press both and and hold down to all Control Key functions. English Parts Name and Functions Control Panel POWER button Switches the power on/off . Remote control sensor and Power Indicator Receives the signal from the remote control (when using the wireless remote control). Blinks amber when the monitor is turned-off . Glows green when the LCD monitor is turned off . To resume user mode, press both and and hold simultaneously for more comfortable viewing experience. Decreases the audio output...
... control key lock function, press both and and hold down to all Control Key functions. English Parts Name and Functions Control Panel POWER button Switches the power on/off . Remote control sensor and Power Indicator Receives the signal from the remote control (when using the wireless remote control). Blinks amber when the monitor is turned-off . Glows green when the LCD monitor is turned off . To resume user mode, press both and and hold simultaneously for more comfortable viewing experience. Decreases the audio output...
P401 : user's manual
Page 10
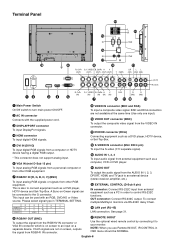
... a DVD player, HDTV device and Set-Top-Box. AUDIO OUT To output the audio signal from a computer or HDTV device having a digital RGB output. * This connector does not support analog input. To connect multiple MultiSync monitors via RS-232C daisy Chain. See page 31. NOTE: When you use Remote IN/OUT, IR CONTROL in OSD menu should be connected to the G connector. DVI IN (DVI-D) To input digital RGB signals from the AUDIO IN 1, 2, 3, DPORT, HDMI, and...
... a DVD player, HDTV device and Set-Top-Box. AUDIO OUT To output the audio signal from a computer or HDTV device having a digital RGB output. * This connector does not support analog input. To connect multiple MultiSync monitors via RS-232C daisy Chain. See page 31. NOTE: When you use Remote IN/OUT, IR CONTROL in OSD menu should be connected to the G connector. DVI IN (DVI-D) To input digital RGB signals from the AUDIO IN 1, 2, 3, DPORT, HDMI, and...
P401 : user's manual
Page 12
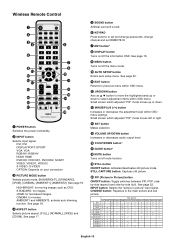
...- Wireless Remote Control POWER button Switches the power on /off the menu mode. See page 18. ENT button* DISPLAY button Turns on your connection PICTURE MODE button Selects picture mode, [HIGHBRIGHT], [STANDARD], [sRGB], [CINEMA], [AMBIENT1], [AMBIENT2]. MENU button Turns on /standby. EXIT button Returns to set and change passwords, change channel and set REMOTE ID. Small screen which adjusted "PIP" mode moves up or down . DVD/HD2 - - - - INPUT button Selects input signal. DVI: DVI DISPLAYPORT: DPORT VGA: VGA RGB/HV: RGB/HV HDMI: HDMI DVD/HD: DVD/HD1, DVD/HD2...
...- Wireless Remote Control POWER button Switches the power on /off the menu mode. See page 18. ENT button* DISPLAY button Turns on your connection PICTURE MODE button Selects picture mode, [HIGHBRIGHT], [STANDARD], [sRGB], [CINEMA], [AMBIENT1], [AMBIENT2]. MENU button Turns on /standby. EXIT button Returns to set and change passwords, change channel and set REMOTE ID. Small screen which adjusted "PIP" mode moves up or down . DVD/HD2 - - - - INPUT button Selects input signal. DVI: DVI DISPLAYPORT: DPORT VGA: VGA RGB/HV: RGB/HV HDMI: HDMI DVD/HD: DVD/HD1, DVD/HD2...
P401 : user's manual
Page 14
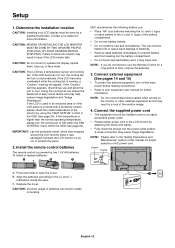
... leakage of time, remove the batteries. 3. A loose connection may injure skin. To install or replace batteries: NEC recommends the following battery use the Remote Control for more information. NOTE: Do not connect/disconnect cables when turning on automatically. Align the batteries according to scratch the panel. 2. Replace the cover. Setup 1. CAUTION: Do not mount or operate the display upside down, face up, or face down. Connect the supplied power cord • The...
... leakage of time, remove the batteries. 3. A loose connection may injure skin. To install or replace batteries: NEC recommends the following battery use the Remote Control for more information. NOTE: Do not connect/disconnect cables when turning on automatically. Align the batteries according to scratch the panel. 2. Replace the cover. Setup 1. CAUTION: Do not mount or operate the display upside down, face up, or face down. Connect the supplied power cord • The...
P401 : user's manual
Page 23
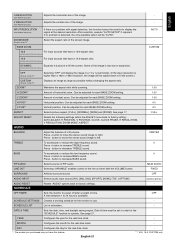
... frequency sound. 0 Press + button to decrease BASS sound. button to increase BASS sound. FIXED SURROUND Artificial surround sound. SCHEDULE OFF TIMER Sets the monitor to left. YEAR Configures the year for the real-time clock. - If no problem is detected, the only available option will be "AUTO". Some of L/R volume. HDMI, DVD/HD1, DVD/HD2, SCART, VIDEO1, VIDEO2, S-VIDEO inputs only OFF All inputs, except TV* Selecting "OFF" will display the...
... frequency sound. 0 Press + button to decrease BASS sound. button to increase BASS sound. FIXED SURROUND Artificial surround sound. SCHEDULE OFF TIMER Sets the monitor to left. YEAR Configures the year for the real-time clock. - If no problem is detected, the only available option will be "AUTO". Some of L/R volume. HDMI, DVD/HD1, DVD/HD2, SCART, VIDEO1, VIDEO2, S-VIDEO inputs only OFF All inputs, except TV* Selecting "OFF" will display the...
P401 : user's manual
Page 26
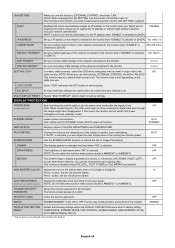
.... button, the bar will become darker. ENABLE DISPLAY PROTECTION Resets the following settings within the DISPLAY PROTECTION menu back to factory settings. - RESET POWER SAVE, STANDBY MODE, FAN CONTROL, SCREEN SAVER, SIDE BORDER COLOR, AUTO BRIGHTNESS, DDC/CI. *: The product you use this function, EXTERNAL CONTROL should be "RS-232C". DNS PRIMARY Set your primary DNS settings of the network connected to the monitor. 0.0.0.0 DNS SECONDARY Set your default gateway of the network connected to go into power management mode (standby mode). DISPLAY...
.... button, the bar will become darker. ENABLE DISPLAY PROTECTION Resets the following settings within the DISPLAY PROTECTION menu back to factory settings. - RESET POWER SAVE, STANDBY MODE, FAN CONTROL, SCREEN SAVER, SIDE BORDER COLOR, AUTO BRIGHTNESS, DDC/CI. *: The product you use this function, EXTERNAL CONTROL should be "RS-232C". DNS PRIMARY Set your primary DNS settings of the network connected to the monitor. 0.0.0.0 DNS SECONDARY Set your default gateway of the network connected to go into power management mode (standby mode). DISPLAY...
P401 : user's manual
Page 29
... schedule function allows the display to be set to power on and off at regular intervals whenever the screen is idle or turning off the monitor when not in use. Highlight the desired schedule number and press set. buttons to the previous menu. The circle next to EVERY DAY will turn off the monitor by remote control, or use Power Management or use Schedule Functions. 3. MODE: EVERY DAY EVERY...
... schedule function allows the display to be set to power on and off at regular intervals whenever the screen is idle or turning off the monitor when not in use. Highlight the desired schedule number and press set. buttons to the previous menu. The circle next to EVERY DAY will turn off the monitor by remote control, or use Power Management or use Schedule Functions. 3. MODE: EVERY DAY EVERY...
P401 : user's manual
Page 30
... ID mode. Point the remote control towards the remote sensor of the display to operate the monitor having that specific Monitor ID number. English-28 The MONITOR ID number is in red on the remote control, use REMOTE ID:3 Point the remote control towards the remote sensor of up to input the REMOTE CONTROL ID number (1-100). Connect PC and LCD monitors. No two monitors should be set in the OSD menu of the display to another LCD monitor RS-232C input. For proper operation, the Monitor ID...
... ID mode. Point the remote control towards the remote sensor of the display to operate the monitor having that specific Monitor ID number. English-28 The MONITOR ID number is in red on the remote control, use REMOTE ID:3 Point the remote control towards the remote sensor of up to input the REMOTE CONTROL ID number (1-100). Connect PC and LCD monitors. No two monitors should be set in the OSD menu of the display to another LCD monitor RS-232C input. For proper operation, the Monitor ID...
P401 : user's manual
Page 36
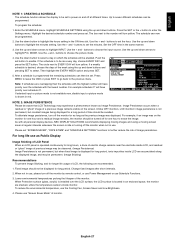
... (dull signals) caused by controller or wireless remote controller. OSD (On-Screen-Display) Controls: Allow you to use , saving two-thirds of your monitor energy costs, reducing emissions and lowering the air conditioning costs of your computer, automatically optimizing display performance. NEC recommends using mounting interface that the colors displayed on the monitor are exactly the same as on computer displays and other DVI-based digital connectors such as screen size and resolutions supported...
... (dull signals) caused by controller or wireless remote controller. OSD (On-Screen-Display) Controls: Allow you to use , saving two-thirds of your monitor energy costs, reducing emissions and lowering the air conditioning costs of your computer, automatically optimizing display performance. NEC recommends using mounting interface that the colors displayed on the monitor are exactly the same as on computer displays and other DVI-based digital connectors such as screen size and resolutions supported...
P401 : user's manual
Page 37
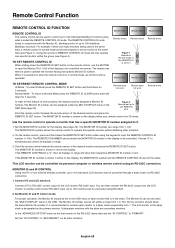
... LAN cable connection. • Check "CONTROL" setting in TV • Check antenna/cable connection. Snowy Picture, Poor Sound in "EXTERNAL CONTROL". RS-232C or LAN control is interrupted unexpectedly, then the "OFF TIMER" will blink six times. This is powered off and reset the monitor. Image persistence • Please be aware that LCD Technology may need to be re-adjusted. • Check the monitor and your display card with respect to compatibility and recommended signal timings...
... LAN cable connection. • Check "CONTROL" setting in TV • Check antenna/cable connection. Snowy Picture, Poor Sound in "EXTERNAL CONTROL". RS-232C or LAN control is interrupted unexpectedly, then the "OFF TIMER" will blink six times. This is powered off and reset the monitor. Image persistence • Please be aware that LCD Technology may need to be re-adjusted. • Check the monitor and your display card with respect to compatibility and recommended signal timings...

P401 : user's manual
Page 38
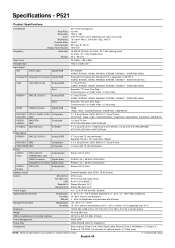
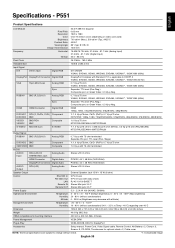
...% - 3.5% x (Temp - 40°C) regarding over 40°C Dimension 919.7 (W) x 532.2 (H) x 140.0 (D) mm / 36.2 (W) x 21.0 (H) x 5.5 (D) inches Weight 24.0 Kg (52.9 lbs) VESA compatible arm mounting interface 300 mm x 300 mm (M6, 4 Holes) Power Management VESA DPM Plug & Play VESA DDC2B, DDC/CI, DisplayPort Accessories Setup manual, Power Cord, Video Signal cable, Remote Control, AA Battery x 2, Clamp x 3, Screw x 9, CD-ROM, Thumbscrew for optional stand x 2, Cable cover NOTE: Technical specifications are subject to HDCP1.3 VGA60, SVGA60, XGA60...
...% - 3.5% x (Temp - 40°C) regarding over 40°C Dimension 919.7 (W) x 532.2 (H) x 140.0 (D) mm / 36.2 (W) x 21.0 (H) x 5.5 (D) inches Weight 24.0 Kg (52.9 lbs) VESA compatible arm mounting interface 300 mm x 300 mm (M6, 4 Holes) Power Management VESA DPM Plug & Play VESA DDC2B, DDC/CI, DisplayPort Accessories Setup manual, Power Cord, Video Signal cable, Remote Control, AA Battery x 2, Clamp x 3, Screw x 9, CD-ROM, Thumbscrew for optional stand x 2, Cable cover NOTE: Technical specifications are subject to HDCP1.3 VGA60, SVGA60, XGA60...

P401 : user's manual
Page 39
...% - 3.5% x (Temp - 40°C) regarding over 40°C Dimension 1055.4 (W) x 608.6 (H) x 140.0 (D) mm / 41.6 (W) x 24.0 (H) x 5.5 (D) inches Weight 29.0 Kg (63.9 lbs) VESA compatible arm mounting interface 300 mm x 300 mm (M6, 4 Holes) Power Management VESA DPM Plug & Play VESA DDC2B, DDC/CI, DisplayPort Accessories Setup manual, Power Cord, Video Signal cable, Remote Control, AA Battery x 2, Clamp x 3, Screw x 9, CD-ROM, Thumbscrew for optional stand x 2, Cable cover NOTE: Technical specifications are subject to HDCP1.3 VGA60, SVGA60, XGA60...
...% - 3.5% x (Temp - 40°C) regarding over 40°C Dimension 1055.4 (W) x 608.6 (H) x 140.0 (D) mm / 41.6 (W) x 24.0 (H) x 5.5 (D) inches Weight 29.0 Kg (63.9 lbs) VESA compatible arm mounting interface 300 mm x 300 mm (M6, 4 Holes) Power Management VESA DPM Plug & Play VESA DDC2B, DDC/CI, DisplayPort Accessories Setup manual, Power Cord, Video Signal cable, Remote Control, AA Battery x 2, Clamp x 3, Screw x 9, CD-ROM, Thumbscrew for optional stand x 2, Cable cover NOTE: Technical specifications are subject to HDCP1.3 VGA60, SVGA60, XGA60...
P401 : user's manual
Page 40
...% - 3.5% x (Temp - 40°C) regarding over 40°C Dimension 1200.0 (W) x 696.0 (H) x 147.5 (D) mm / 47.2 (W) x 27.4 (H) x 5.8 (D) inches Weight 40.0 Kg (88.2 lbs) VESA compatible arm mounting interface 400 mm x 400 mm (M6, 4 Holes) Power Management VESA DPM Plug & Play VESA DDC2B, DDC/CI, DisplayPort Accessories Setup manual, Power Cord, Video Signal cable, Remote Control, AA Battery x 2, Clamp x 3, Screw x 9, CD-ROM, Thumbscrew for optional stand x 2, Cable cover NOTE: Technical specifications are subject to HDCP1.3 VGA60, SVGA60, XGA60...
...% - 3.5% x (Temp - 40°C) regarding over 40°C Dimension 1200.0 (W) x 696.0 (H) x 147.5 (D) mm / 47.2 (W) x 27.4 (H) x 5.8 (D) inches Weight 40.0 Kg (88.2 lbs) VESA compatible arm mounting interface 400 mm x 400 mm (M6, 4 Holes) Power Management VESA DPM Plug & Play VESA DDC2B, DDC/CI, DisplayPort Accessories Setup manual, Power Cord, Video Signal cable, Remote Control, AA Battery x 2, Clamp x 3, Screw x 9, CD-ROM, Thumbscrew for optional stand x 2, Cable cover NOTE: Technical specifications are subject to HDCP1.3 VGA60, SVGA60, XGA60...
P401 : user's manual
Page 41
...% - 3.5% x (Temp - 40°C) regarding over 40°C Dimension 1250.2 (W) x 721.0 (H) x 150.0 (D) mm / 49.2 (W) x 28.4 (H) x 5.9 (D) inches Weight 40.0 Kg (88.2 lbs) VESA compatible arm mounting interface 400 mm x 400 mm (M6, 4 Holes) Power Management VESA DPM Plug & Play VESA DDC2B, DDC/CI, DisplayPort Accessories Setup manual, Power Cord, Video Signal cable, Remote Control, AA Battery x 2, Clamp x 3, Screw x 9, CD-ROM, Thumbscrew for optional stand x 2, Cable cover NOTE: Technical specifications are subject to HDCP1.3 VGA60, SVGA60, XGA60...
...% - 3.5% x (Temp - 40°C) regarding over 40°C Dimension 1250.2 (W) x 721.0 (H) x 150.0 (D) mm / 49.2 (W) x 28.4 (H) x 5.9 (D) inches Weight 40.0 Kg (88.2 lbs) VESA compatible arm mounting interface 400 mm x 400 mm (M6, 4 Holes) Power Management VESA DPM Plug & Play VESA DDC2B, DDC/CI, DisplayPort Accessories Setup manual, Power Cord, Video Signal cable, Remote Control, AA Battery x 2, Clamp x 3, Screw x 9, CD-ROM, Thumbscrew for optional stand x 2, Cable cover NOTE: Technical specifications are subject to HDCP1.3 VGA60, SVGA60, XGA60...
P Series Specification Brochure
Page 1
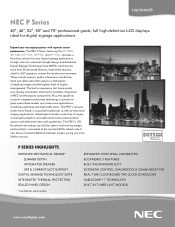
... even more lifelike viewing. It also shows increased definition between images, giving you more applications, including wayfinding and high-traffic areas. Large-Screen LCD NEC P Series 40", 46", 52", 55" and 70" professional-grade, full high-definition LCD displays ideal for select models ENHANCED VIDEO WALL CAPABILITIES ECO-FRIENDLY FEATURES BUILT-IN EXPANSION SLOT EXTENSIVE CONTROL, DIAGNOSTICS & COMMUNICATION REAL-TIME CLOCK/ROUND...
... even more lifelike viewing. It also shows increased definition between images, giving you more applications, including wayfinding and high-traffic areas. Large-Screen LCD NEC P Series 40", 46", 52", 55" and 70" professional-grade, full high-definition LCD displays ideal for select models ENHANCED VIDEO WALL CAPABILITIES ECO-FRIENDLY FEATURES BUILT-IN EXPANSION SLOT EXTENSIVE CONTROL, DIAGNOSTICS & COMMUNICATION REAL-TIME CLOCK/ROUND...
P Series Specification Brochure
Page 3
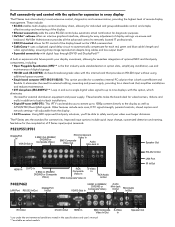
Other features include auto scan, DTV signal strength, parental controls, closed caption and network settings-all the advanced control to remotely located IT professionals. • DDC/CI standard allows for PC control of the display based on select models S-Video In Speaker Out The P Series sets the standard for video banners, ribbons and walls in addition to back-to-back installations. • Digital IP tuner (MPD-DTi): This IPTV card enables you 'll be able to...
Other features include auto scan, DTV signal strength, parental controls, closed caption and network settings-all the advanced control to remotely located IT professionals. • DDC/CI standard allows for PC control of the display based on select models S-Video In Speaker Out The P Series sets the standard for video banners, ribbons and walls in addition to back-to-back installations. • Digital IP tuner (MPD-DTi): This IPTV card enables you 'll be able to...

P Series Specification Brochure
Page 4
... Speakers Thin bezel (P701-standard bezel), advanced thermal capabilities, sealed professional panel, expansion slot, Ethernet Control and Communication, CableComp+, TileMatrix (10x10), TileComp, programmable lookup tables, Plug and Play (DDC/CI, DDC2B), PIP (remote), POP, 6-axis color adjustment, multi-level programmable zoom, scheduler (w/ RTC), sharpness/softness, off-timer (countdown), screen saver, vacation switch, 10-bit gamma, AutoBright (signal input), Windows Vista-certified, IR, portrait-capable, metal rear...
... Speakers Thin bezel (P701-standard bezel), advanced thermal capabilities, sealed professional panel, expansion slot, Ethernet Control and Communication, CableComp+, TileMatrix (10x10), TileComp, programmable lookup tables, Plug and Play (DDC/CI, DDC2B), PIP (remote), POP, 6-axis color adjustment, multi-level programmable zoom, scheduler (w/ RTC), sharpness/softness, off-timer (countdown), screen saver, vacation switch, 10-bit gamma, AutoBright (signal input), Windows Vista-certified, IR, portrait-capable, metal rear...

MPD-DTi Specification Brochure
Page 1
Product Highlights ¤ Supports multiple video and audio codec along with MPEG transport or program streams ¤ Auto scan function allows you to automatically scan for available ATSC/NTSC channels pending the source (air or cable) ¤ DTV signal strength easily recognizes the strength of your digital signal ¤ Parental controls allows you to safeguard what is seen by blocking programs based on -screen display of entertainment with the ability...
Product Highlights ¤ Supports multiple video and audio codec along with MPEG transport or program streams ¤ Auto scan function allows you to automatically scan for available ATSC/NTSC channels pending the source (air or cable) ¤ DTV signal strength easily recognizes the strength of your digital signal ¤ Parental controls allows you to safeguard what is seen by blocking programs based on -screen display of entertainment with the ability...


