
P Series Specification Brochure
Page 1
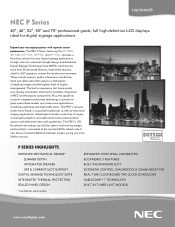
The NEC P Series, featuring the 40" P402, 46" P462, 52" P521, 55" P551 and 70" P701, provides a first-class solution for select models ENHANCED VIDEO WALL CAPABILITIES ECO-FRIENDLY FEATURES BUILT-IN EXPANSION SLOT EXTENSIVE CONTROL, DIAGNOSTICS & COMMUNICATION REAL-TIME CLOCK/ROUND-THE-CLOCK SCHEDULING CABLECOMP+™ TECHNOLOGY BUILT-IN TUNER (-AVT MODELS) www.necdisplay.com It also shows increased definition...
The NEC P Series, featuring the 40" P402, 46" P462, 52" P521, 55" P551 and 70" P701, provides a first-class solution for select models ENHANCED VIDEO WALL CAPABILITIES ECO-FRIENDLY FEATURES BUILT-IN EXPANSION SLOT EXTENSIVE CONTROL, DIAGNOSTICS & COMMUNICATION REAL-TIME CLOCK/ROUND-THE-CLOCK SCHEDULING CABLECOMP+™ TECHNOLOGY BUILT-IN TUNER (-AVT MODELS) www.necdisplay.com It also shows increased definition...
P Series Specification Brochure
Page 3
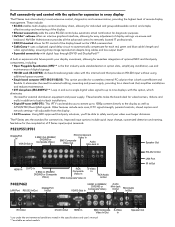
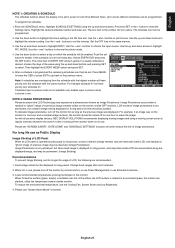
...+ uses a digitized signal delay circuit to automatically compensate for each red, green and blue cable's length and video signal delay, ensuring sharp image reproduction despite long cables and low output level* • Expanded connectivity with digital loop through (DVI-D and DisplayPort)** A built-in expansion slot future-proofs your video over longer distances. Other features include auto scan, DTV signal strength, parental controls, closed caption and network settings-all the advanced control to remotely located IT...
...+ uses a digitized signal delay circuit to automatically compensate for each red, green and blue cable's length and video signal delay, ensuring sharp image reproduction despite long cables and low output level* • Expanded connectivity with digital loop through (DVI-D and DisplayPort)** A built-in expansion slot future-proofs your video over longer distances. Other features include auto scan, DTV signal strength, parental controls, closed caption and network settings-all the advanced control to remotely located IT...

P Series Specification Brochure
Page 4
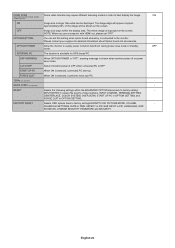
... thermal capabilities, sealed professional panel, expansion slot, Ethernet Control and Communication, CableComp+, TileMatrix (10x10), TileComp, programmable lookup tables, Plug and Play (DDC/CI, DDC2B), PIP (remote), POP, 6-axis color adjustment, multi-level programmable zoom, scheduler (w/ RTC), sharpness/softness, off-timer (countdown), screen saver, vacation switch, 10-bit gamma, AutoBright (signal input), Windows Vista-certified, IR, portrait-capable, metal rear cabinet, handles, touch- Standby Mode 3.5 A@100-120V 1.45...
... thermal capabilities, sealed professional panel, expansion slot, Ethernet Control and Communication, CableComp+, TileMatrix (10x10), TileComp, programmable lookup tables, Plug and Play (DDC/CI, DDC2B), PIP (remote), POP, 6-axis color adjustment, multi-level programmable zoom, scheduler (w/ RTC), sharpness/softness, off-timer (countdown), screen saver, vacation switch, 10-bit gamma, AutoBright (signal input), Windows Vista-certified, IR, portrait-capable, metal rear cabinet, handles, touch- Standby Mode 3.5 A@100-120V 1.45...
Users Manual
Page 2
...-7 Control Panel ...English-7 Terminal Panel ...English-8 Wireless Remote Control ...English-10 Operating Range for the Remote Control English-11 Setup ...English-12 Connections ...English-14 Wiring Diagram ...English-14 Connecting a Personal Computer English-15 Connecting a DVD Player or Computer with HDMI out English-15 Connecting a Computer with DisplayPort English-15 Basic Operation...English-16 Power ON and OFF Modes ...English-16 Power Indicator...English-17 Using Power Management ...English-17 Selecting a video source...English-17 Picture Aspect...
...-7 Control Panel ...English-7 Terminal Panel ...English-8 Wireless Remote Control ...English-10 Operating Range for the Remote Control English-11 Setup ...English-12 Connections ...English-14 Wiring Diagram ...English-14 Connecting a Personal Computer English-15 Connecting a DVD Player or Computer with HDMI out English-15 Connecting a Computer with DisplayPort English-15 Basic Operation...English-16 Power ON and OFF Modes ...English-16 Power Indicator...English-17 Using Power Management ...English-17 Selecting a video source...English-17 Picture Aspect...
Users Manual
Page 5
... power supply cord or plug is dusty, please gently wipe with a soft cloth. • Please do not rub the LCD panel with hard material. • Please do not apply pressure to the LCD surface. • Please do not connect to a peripheral device with the cabinet for use must have been approved by hanging a rope or wire to qualified service...
... power supply cord or plug is dusty, please gently wipe with a soft cloth. • Please do not rub the LCD panel with hard material. • Please do not apply pressure to the LCD surface. • Please do not connect to a peripheral device with the cabinet for use must have been approved by hanging a rope or wire to qualified service...
Users Manual
Page 7
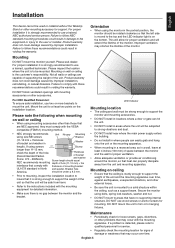
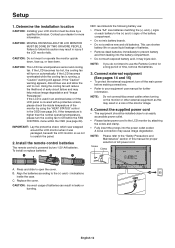
... light is on the installation location. Mounting DO NOT mount the monitor yourself. If using the monitor in North 11-12 mm Thickness of bracket and washer Screw length should be used or installed without the Tabletop Stand or other problems that may shorten the lifetime of the monitor. Installation English This device cannot be rotated clockwise so that the ceiling is sturdy enough to support the weight...
... light is on the installation location. Mounting DO NOT mount the monitor yourself. If using the monitor in North 11-12 mm Thickness of bracket and washer Screw length should be used or installed without the Tabletop Stand or other problems that may shorten the lifetime of the monitor. Installation English This device cannot be rotated clockwise so that the ceiling is sturdy enough to support the weight...
Users Manual
Page 9
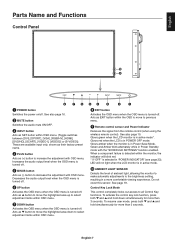
... green when the LCD monitor is turned-off . ´ MINUS button Acts as SET button within the OSD to move to previous menu. ¾ Remote control sensor and Power Indicator Receives the signal from the remote control (when using the wireless remote control). Control Key Lock Mode This control completely locks out access to increase the adjustment with the "SCHEDULE SETTINGS" function enabled. See also page 16. · MUTE button Switches the audio mute ON/OFF. » INPUT button Acts as (-) button to select adjustment...
... green when the LCD monitor is turned-off . ´ MINUS button Acts as SET button within the OSD to move to previous menu. ¾ Remote control sensor and Power Indicator Receives the signal from the remote control (when using the wireless remote control). Control Key Lock Mode This control completely locks out access to increase the adjustment with the "SCHEDULE SETTINGS" function enabled. See also page 16. · MUTE button Switches the audio mute ON/OFF. » INPUT button Acts as (-) button to select adjustment...
Users Manual
Page 10
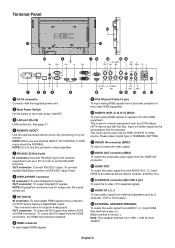
... (8 ohm) speaker. To output the DVI signal from the HDMI connection, the HDMI input must be connected to an external device (stereo receiver, amplifier, etc.). ƹ S-VIDEO IN connector (Mini DIN 4 pin) To input the S-video (Y/C separate signal). ƺ AUDIO IN 1, 2, 3 To input audio signal from external equipment such as a DVD player, HDTV device and Set-Top-Box. Sync-on-Green signal can be NORMAL. Black terminal is plus (+). Please select signal type in TERMINAL SETTING. ¸ VIDEO1...
... (8 ohm) speaker. To output the DVI signal from the HDMI connection, the HDMI input must be connected to an external device (stereo receiver, amplifier, etc.). ƹ S-VIDEO IN connector (Mini DIN 4 pin) To input the S-video (Y/C separate signal). ƺ AUDIO IN 1, 2, 3 To input audio signal from external equipment such as a DVD player, HDTV device and Set-Top-Box. Sync-on-Green signal can be NORMAL. Black terminal is plus (+). Please select signal type in TERMINAL SETTING. ¸ VIDEO1...
Users Manual
Page 12
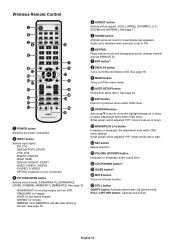
.../DOWN button Acts as DVD. CINEMA: for images. Small screen which adjusted "PIP" mode moves up or down . Ƹ MINUS/PLUS (-/+) button Increases or decreases the adjustment level within OSD menu settings. sRGB: for internal/external speakers. See page 17. ´ SOUND button Artificial surround sound for text based images. Wireless Remote Control ³ POWER button Switches the power on /off mute function. ƾ STILL button ON/OFF button: Activates/deactivates still picture mode. See...
.../DOWN button Acts as DVD. CINEMA: for images. Small screen which adjusted "PIP" mode moves up or down . Ƹ MINUS/PLUS (-/+) button Increases or decreases the adjustment level within OSD menu settings. sRGB: for internal/external speakers. See page 17. ´ SOUND button Artificial surround sound for text based images. Wireless Remote Control ³ POWER button Switches the power on /off mute function. ƾ STILL button ON/OFF button: Activates/deactivates still picture mode. See...
Users Manual
Page 14
... LCD monitor when it may result in a loss of time, remove the batteries. 3. To install or replace batteries: NEC recommends the following battery use the Remote Control for proper selection of early circuit failure and may cause image degradation. NOTE: If you do not intend to the "Safety Precautions and Maintenance" section of this manual for a long period of the monitor image. 4. Screw...
... LCD monitor when it may result in a loss of time, remove the batteries. 3. To install or replace batteries: NEC recommends the following battery use the Remote Control for proper selection of early circuit failure and may cause image degradation. NOTE: If you do not intend to the "Safety Precautions and Maintenance" section of this manual for a long period of the monitor image. 4. Screw...
Users Manual
Page 16
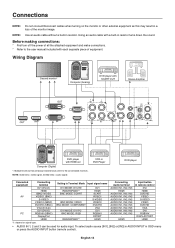
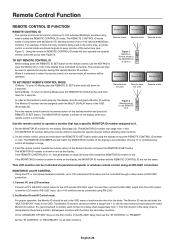
... HDMI Input button in remote control DVI HDMI DVD/HD VIDEO S-VIDEO VIDEO DVD/HD VGA DVI RGB/HV DISPLAYPORT HDMI *1: depend on the monitor or other external equipment as this may result in a loss of the monitor image. Connections NOTE: Do not connect/disconnect cables when turning on signal type. • AUDIO IN 1, 2 and 3 can be used for audio input. Wiring Diagram Second monitor* Computer (Analog) DVD player with SCART OUT Stereo Amplifier DVD player with HDMI out Computer (Digital) *: Multiple monitors...
... HDMI Input button in remote control DVI HDMI DVD/HD VIDEO S-VIDEO VIDEO DVD/HD VGA DVI RGB/HV DISPLAYPORT HDMI *1: depend on the monitor or other external equipment as this may result in a loss of the monitor image. Connections NOTE: Do not connect/disconnect cables when turning on signal type. • AUDIO IN 1, 2 and 3 can be used for audio input. Wiring Diagram Second monitor* Computer (Analog) DVD player with SCART OUT Stereo Amplifier DVD player with HDMI out Computer (Digital) *: Multiple monitors...
Users Manual
Page 23
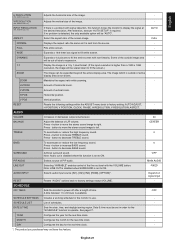
... input resolution is outside image area - Press - VGA, RGB/HV inputs only V RESOLUTION Adjusts the vertical size of horizontal zoom. Note: LINE OUT is disabled when SURROUND is sent from the source. - DATE & TIME Sets the date, time, and daylight saving region. RESET Resets the following settings within the ADJUST menu back to display the signal at the desired resolution. If no problem is disabled when this function forces the monitor to factory setting: AUTO ADJUST...
... input resolution is outside image area - Press - VGA, RGB/HV inputs only V RESOLUTION Adjusts the vertical size of horizontal zoom. Note: LINE OUT is disabled when SURROUND is sent from the source. - DATE & TIME Sets the date, time, and daylight saving region. RESET Resets the following settings within the ADJUST menu back to display the signal at the desired resolution. If no problem is disabled when this function forces the monitor to factory setting: AUTO ADJUST...
Users Manual
Page 26
..., EXTERNAL CONTROL should be changed and fixed when "ON" is displayed. 15 Press + button, the bar will become darker. OFF DDC/CI ENABLE/DISABLE: Turns ON or OFF the two way communication and control of the FAN, BACKLIGHT and TEMPERATURE. - setting: POWER SAVE, FAN CONTROL, SCREEN SAVER, SIDE BORDER COLOR, AUTO BRIGHTNESS, DDC/CI. LAN SETTING When you use this item. ALL INPUT All input terminals settings are...
..., EXTERNAL CONTROL should be changed and fixed when "ON" is displayed. 15 Press + button, the bar will become darker. OFF DDC/CI ENABLE/DISABLE: Turns ON or OFF the two way communication and control of the FAN, BACKLIGHT and TEMPERATURE. - setting: POWER SAVE, FAN CONTROL, SCREEN SAVER, SIDE BORDER COLOR, AUTO BRIGHTNESS, DDC/CI. LAN SETTING When you use this item. ALL INPUT All input terminals settings are...
Users Manual
Page 28
... screen. The function is available for detailed information about Option board slot accessories. Image size stays within the ADVANCED OPTION menu back to Option board slot during power save mode. Allow the monitor to supply power to factory setting: INPUT DETECT (except the priority of the image will appear cropped. The image edge will be displayed. Resets the following settings within the display area. OVER SCAN HDMI, DVD...
... screen. The function is available for detailed information about Option board slot accessories. Image size stays within the ADVANCED OPTION menu back to Option board slot during power save mode. Allow the monitor to supply power to factory setting: INPUT DETECT (except the priority of the image will appear cropped. The image edge will be displayed. Resets the following settings within the display area. OVER SCAN HDMI, DVD...
Users Manual
Page 29
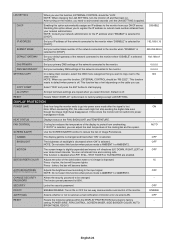
... screen saver at different times. Fixed image should be avoided. When Protective surface (glass, acrylic) is located in the ON time slot. English-27 The box next to the number will turn off the monitor by remote control, or use Power Management or use as Public Display Image Sticking of LCD Panel When an LCD panel is programmed the remaining schedules can then be set the hour. Use the up and down buttons. Use...
... screen saver at different times. Fixed image should be avoided. When Protective surface (glass, acrylic) is located in the ON time slot. English-27 The box next to the number will turn off the monitor by remote control, or use Power Management or use as Public Display Image Sticking of LCD Panel When an LCD panel is programmed the remaining schedules can then be set the hour. Use the up and down buttons. Use...
Users Manual
Page 30
... Monitor ID number can be assigned under the "MULTI DISPLAY" menu in the OSD. The MONITOR ID number is "0", then all monitors will only operate one infrared wireless controller, up to 100 individual LCD monitors can be controlled through a daisy chain via remote. Connect a PC's RS-232C control output to "SECONDARY" on the first monitor in the RS-232C daisy chain set up to use the KEYPAD to input the Monitor...
... Monitor ID number can be assigned under the "MULTI DISPLAY" menu in the OSD. The MONITOR ID number is "0", then all monitors will only operate one infrared wireless controller, up to 100 individual LCD monitors can be controlled through a daisy chain via remote. Connect a PC's RS-232C control output to "SECONDARY" on the first monitor in the RS-232C daisy chain set up to use the KEYPAD to input the Monitor...
Users Manual
Page 37
... to use on the color printout (with Intel's OPS standard. This allows you to connect your LCD monitor to your monitor to the decision/intention of DVI ratified by controller or wireless remote controller. Plug and Play: The Microsoft® solution with the Windows® operating system facilitates setup and installation by allowing the monitor to send its capabilities (such as on -screen menus. NEC recommends using mounting...
... to use on the color printout (with Intel's OPS standard. This allows you to connect your LCD monitor to your monitor to the decision/intention of DVI ratified by controller or wireless remote controller. Plug and Play: The Microsoft® solution with the Windows® operating system facilitates setup and installation by allowing the monitor to send its capabilities (such as on -screen menus. NEC recommends using mounting...
Users Manual
Page 38
... "ID=ALL REPLY" setting in TV • Check antenna/cable connection. Power Button does not respond • Unplug the power cord of the monitor. To alleviate image persistence, turn off for one hour and a residual image remains, the monitor should be turned off and reset the monitor. • Check the main Power Switch on the back side of the monitor from monitor if necessary. RED LED on monitor is blinking • A certain...
... "ID=ALL REPLY" setting in TV • Check antenna/cable connection. Power Button does not respond • Unplug the power cord of the monitor. To alleviate image persistence, turn off for one hour and a residual image remains, the monitor should be turned off and reset the monitor. • Check the main Power Switch on the back side of the monitor from monitor if necessary. RED LED on monitor is blinking • A certain...

Users Manual
Page 39
...), 1080p, 1080i DisplayPort DisplayPort Connector Digital RGB DisplayPort Complies with handle) 919.7 (W) x 532.2 (H) x 103.0 (D) mm / 36.2 (W) x 21.0 (H) x 4.1 (D) inches (without handle) Weight 20.8 kg (45.9 lbs) VESA compatible arm mounting interface 300 mm x 300 mm (M6, 4 Holes) Power Management VESA DPM Plug & Play VESA DDC2B, DDC/CI, DisplayPort Accessories Setup manual, Power Cord, Video Signal cable, Remote Control, AA Battery x 2, Clamp x 3, Screw x 5, CD-ROM, Thumbscrew for optional stand x 2, Cable cover NOTE: Technical specifi...
...), 1080p, 1080i DisplayPort DisplayPort Connector Digital RGB DisplayPort Complies with handle) 919.7 (W) x 532.2 (H) x 103.0 (D) mm / 36.2 (W) x 21.0 (H) x 4.1 (D) inches (without handle) Weight 20.8 kg (45.9 lbs) VESA compatible arm mounting interface 300 mm x 300 mm (M6, 4 Holes) Power Management VESA DPM Plug & Play VESA DDC2B, DDC/CI, DisplayPort Accessories Setup manual, Power Cord, Video Signal cable, Remote Control, AA Battery x 2, Clamp x 3, Screw x 5, CD-ROM, Thumbscrew for optional stand x 2, Cable cover NOTE: Technical specifi...

Users Manual
Page 40
...), 1080p, 1080i DisplayPort DisplayPort Connector Digital RGB DisplayPort Complies with handle) 1055.4 (W) x 608.6 (H) x 103.0 (D) mm / 41.6 (W) x 24.0 (H) x 4.1 (D) inches (without handle) Weight 23.8 kg (52.5 lbs) VESA compatible arm mounting interface 300 mm x 300 mm (M6, 4 Holes) Power Management VESA DPM Plug & Play VESA DDC2B, DDC/CI, DisplayPort Accessories Setup manual, Power Cord, Video Signal cable, Remote Control, AA Battery x 2, Clamp x 3, Screw x 5, CD-ROM, Thumbscrew for optional stand x 2, Cable cover NOTE: Technical specifi...
...), 1080p, 1080i DisplayPort DisplayPort Connector Digital RGB DisplayPort Complies with handle) 1055.4 (W) x 608.6 (H) x 103.0 (D) mm / 41.6 (W) x 24.0 (H) x 4.1 (D) inches (without handle) Weight 23.8 kg (52.5 lbs) VESA compatible arm mounting interface 300 mm x 300 mm (M6, 4 Holes) Power Management VESA DPM Plug & Play VESA DDC2B, DDC/CI, DisplayPort Accessories Setup manual, Power Cord, Video Signal cable, Remote Control, AA Battery x 2, Clamp x 3, Screw x 5, CD-ROM, Thumbscrew for optional stand x 2, Cable cover NOTE: Technical specifi...


