

P Series Specification Brochure
Page 4
...LCD MODULE Viewable Size (Diagonal) Panel Technology Native Resolution Pixel Pitch Brightness (Typical/Maximum) Contrast Ratio (Typical) Active Screen Area (W x H) P402 P462 P521 P551 P701 40" 46" 0.46mm 0.53mm 500 cd/m2 / 650 cd/m2 3000:1 3500:1 34.9 x 19.6 in. / 885...standard bezel), advanced thermal capabilities, sealed professional panel, expansion slot, Ethernet Control and Communication, CableComp+, TileMatrix (10x10), TileComp, programmable lookup tables, Plug and Play (DDC/CI, DDC2B), PIP (remote), POP, 6-axis color adjustment, multi-level programmable zoom, scheduler (w/ ...
...LCD MODULE Viewable Size (Diagonal) Panel Technology Native Resolution Pixel Pitch Brightness (Typical/Maximum) Contrast Ratio (Typical) Active Screen Area (W x H) P402 P462 P521 P551 P701 40" 46" 0.46mm 0.53mm 500 cd/m2 / 650 cd/m2 3000:1 3500:1 34.9 x 19.6 in. / 885...standard bezel), advanced thermal capabilities, sealed professional panel, expansion slot, Ethernet Control and Communication, CableComp+, TileMatrix (10x10), TileComp, programmable lookup tables, Plug and Play (DDC/CI, DDC2B), PIP (remote), POP, 6-axis color adjustment, multi-level programmable zoom, scheduler (w/ ...
Users Manual
Page 2
P462...English-38 Pin Assignment...English-39 Manufacturer's Recycling and Energy Information English-40 www.necdisplaysolutions.com P402...English-37 Specifications - Index DECLARATION OF ... ...English-22 OSD ...English-22 MULTI DISPLAY ...English-23 DISPLAY PROTECTION ...English-24 ADVANCED OPTION ...English-25 Remote Control Function ...English-28 Controlling the LCD monitor via RS-232C Remote Control English-30 Controlling the LCD monitor via LAN Control English-31 Connecting to a Network ...English-31 Network Setting by Using an HTTP Browser English-31 Features...
P462...English-38 Pin Assignment...English-39 Manufacturer's Recycling and Energy Information English-40 www.necdisplaysolutions.com P402...English-37 Specifications - Index DECLARATION OF ... ...English-22 OSD ...English-22 MULTI DISPLAY ...English-23 DISPLAY PROTECTION ...English-24 ADVANCED OPTION ...English-25 Remote Control Function ...English-28 Controlling the LCD monitor via RS-232C Remote Control English-30 Controlling the LCD monitor via LAN Control English-31 Connecting to a Network ...English-31 Network Setting by Using an HTTP Browser English-31 Features...

Users Manual
Page 6
...shipped. English-4 Contents Your new MultiSync monitor box* should contain the following: • LCD monitor • Power cord*1 • Video Signal Cable • Wireless Remote Control and AA Batteries • Setup Manual • Cable cover • Clamp x 3 • Screw (M4 x 10) x 5 • CD-ROM •...*1 Screw (M4 x 10) x 5 CD-ROM Setup Manual Thumbscrew for optional stand x 2 Cable cover Clamp x 3 Setup Manual Wireless Remote Control and AA Batteries * Remember to save your original box and packing material to transport or ship the monitor. *1 Type and number of power ...
...shipped. English-4 Contents Your new MultiSync monitor box* should contain the following: • LCD monitor • Power cord*1 • Video Signal Cable • Wireless Remote Control and AA Batteries • Setup Manual • Cable cover • Clamp x 3 • Screw (M4 x 10) x 5 • CD-ROM •...*1 Screw (M4 x 10) x 5 CD-ROM Setup Manual Thumbscrew for optional stand x 2 Cable cover Clamp x 3 Setup Manual Wireless Remote Control and AA Batteries * Remember to save your original box and packing material to transport or ship the monitor. *1 Type and number of power ...
Users Manual
Page 9
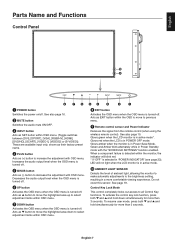
... adjustment items within the OSD to move the highlighted area down simultaneously for more than 3 seconds. English-7 English Parts Name and Functions Control Panel ³ POWER button Switches the power on/off . Acts as (-) button to select adjustment items within OSD menu. (Toggle ... function enabled. See also page 10. Acts as (+) button to previous menu. ¾ Remote control sensor and Power Indicator Receives the signal from the remote control (when using the wireless remote control). Acts as SET button within OSD menu. ¶ DOWN button Activates the OSD menu when ...
... adjustment items within the OSD to move the highlighted area down simultaneously for more than 3 seconds. English-7 English Parts Name and Functions Control Panel ³ POWER button Switches the power on/off . Acts as (-) button to select adjustment items within OSD menu. (Toggle ... function enabled. See also page 10. Acts as (+) button to previous menu. ¾ Remote control sensor and Power Indicator Receives the signal from the remote control (when using the wireless remote control). Acts as SET button within OSD menu. ¶ DOWN button Activates the OSD menu when ...
Users Manual
Page 10
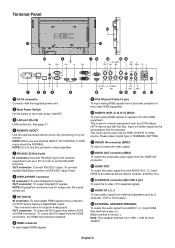
NOTE: Do not use Remote IN/OUT, IR CONTROL in OSD menu should be selected. º HDMI connector To input digital HDMI signals. ¾ VGA IN (mini D-Sub 15 pin) To input analog RGB ... can be used with the supplied power cord. · Main Power Switch On/Off switch to control RS-232C functions. OUT connector: Connect RS-232C output. See page 31. ¿ REMOTE IN/OUT Use the optional wired remote control by connecting it to connect equipment such as a PC in TERMINAL SETTING. ¸ VIDEO1 IN...
NOTE: Do not use Remote IN/OUT, IR CONTROL in OSD menu should be selected. º HDMI connector To input digital HDMI signals. ¾ VGA IN (mini D-Sub 15 pin) To input analog RGB ... can be used with the supplied power cord. · Main Power Switch On/Off switch to control RS-232C functions. OUT connector: Connect RS-232C output. See page 31. ¿ REMOTE IN/OUT Use the optional wired remote control by connecting it to connect equipment such as a PC in TERMINAL SETTING. ¸ VIDEO1 IN...
Users Manual
Page 12
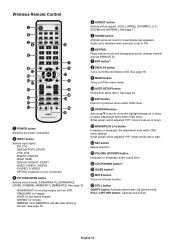
... Audio out is disabled when surround is set to ON. ² KEYPAD Press buttons to set and change passwords, change channel and set REMOTE ID. ¶ ENT button*2 º DISPLAY button Turns on/off the menu mode. µ AUTO SETUP button Enters auto setup menu...; MUTE button Turns on /off the information OSD. See page 20. ¸ EXIT button Returns to select adjustment items within OSD menu settings. Wireless Remote Control ³ POWER button Switches the power on your connection » PICTURE MODE button Selects picture mode, [HIGHBRIGHT], [STANDARD], [sRGB], [CINEMA], [AMBIENT1...
... Audio out is disabled when surround is set to ON. ² KEYPAD Press buttons to set and change passwords, change channel and set REMOTE ID. ¶ ENT button*2 º DISPLAY button Turns on/off the menu mode. µ AUTO SETUP button Enters auto setup menu...; MUTE button Turns on /off the information OSD. See page 20. ¸ EXIT button Returns to select adjustment items within OSD menu settings. Wireless Remote Control ³ POWER button Switches the power on your connection » PICTURE MODE button Selects picture mode, [HIGHBRIGHT], [STANDARD], [sRGB], [CINEMA], [AMBIENT1...
Users Manual
Page 13
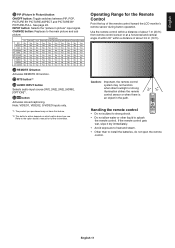
...is an object in picture" input signal. English-11 Refer to the main picture and sub picture. Caution: Important, the remote control system may not have this feature. *2: This button's action depends on which option board you use. INPUT button: Selects the...vertical angle of within 30° within a distance of the remote control toward the LCD monitor's remote sensor during button operation. Use the remote control within a distance of about 3.5 m (10 ft.). Operating Range for further information. If the remote control gets wet, wipe it dry immediately. • Avoid exposure ...
...is an object in picture" input signal. English-11 Refer to the main picture and sub picture. Caution: Important, the remote control system may not have this feature. *2: This button's action depends on which option board you use. INPUT button: Selects the...vertical angle of within 30° within a distance of the remote control toward the LCD monitor's remote sensor during button operation. Use the remote control within a distance of about 3.5 m (10 ft.). Operating Range for further information. If the remote control gets wet, wipe it dry immediately. • Avoid exposure ...
Users Manual
Page 14
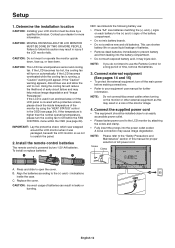
.... 3. IMPORTANT: Lay the protective sheet, which was wrapped around the LCD monitor when it may injure skin. To install or replace batteries: NEC recommends the following battery use: • Place "AA" size batteries matching the (+) and (-) signs on the monitor or other external equipment as... more information. Using the cooling fan will appear. If the temperature is used in leaks or bursting. Install the remote control batteries The remote control is running, a "Caution" warning will reduce the likelihood of AC power cord. Align the batteries according to open the ...
.... 3. IMPORTANT: Lay the protective sheet, which was wrapped around the LCD monitor when it may injure skin. To install or replace batteries: NEC recommends the following battery use: • Place "AA" size batteries matching the (+) and (-) signs on the monitor or other external equipment as... more information. Using the cooling fan will appear. If the temperature is used in leaks or bursting. Install the remote control batteries The remote control is running, a "Caution" warning will reduce the likelihood of AC power cord. Align the batteries according to open the ...
Users Manual
Page 16
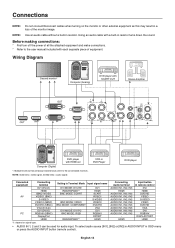
... VIDEO2 (5BNC) DVD/HD (5BNC) VGA (D-Sub) DVI (DVI-D) RGB/HV (5BNC) DisplayPort HDMI Setting in OSD menu or press the AUDIO INPUT button (remote control). Dotted lines = audio signal. Before making connections: * First turn off the power of all the attached equipment and make connections. * Refer to the connectable monitors... IN1, IN2, IN3 AUDIO IN1, IN2, IN3 AUDIO IN1, IN2, IN3 AUDIO IN1, IN2, IN3 AUDIO IN1, IN2, IN3 HDMI Input button in remote control DVI HDMI DVD/HD VIDEO S-VIDEO VIDEO DVD/HD VGA DVI RGB/HV DISPLAYPORT HDMI *1: depend on the monitor or other external equipment as this...
... VIDEO2 (5BNC) DVD/HD (5BNC) VGA (D-Sub) DVI (DVI-D) RGB/HV (5BNC) DisplayPort HDMI Setting in OSD menu or press the AUDIO INPUT button (remote control). Dotted lines = audio signal. Before making connections: * First turn off the power of all the attached equipment and make connections. * Refer to the connectable monitors... IN1, IN2, IN3 AUDIO IN1, IN2, IN3 AUDIO IN1, IN2, IN3 AUDIO IN1, IN2, IN3 AUDIO IN1, IN2, IN3 HDMI Input button in remote control DVI HDMI DVD/HD VIDEO S-VIDEO VIDEO DVD/HD VGA DVI RGB/HV DISPLAYPORT HDMI *1: depend on the monitor or other external equipment as this...
Users Manual
Page 18
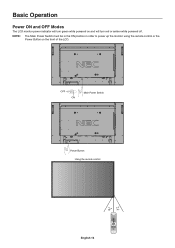
NOTE: The Main Power Switch must be in the ON position in order to power up the monitor using the remote control or the Power Button on and will turn red or amber while powered off. OFF ON Main Power Switch Power Button Using the remote control English-16 Basic Operation Power ON and OFF Modes The LCD monitor power indicator will turn green while powered on the front of the LCD.
NOTE: The Main Power Switch must be in the ON position in order to power up the monitor using the remote control or the Power Button on and will turn red or amber while powered off. OFF ON Main Power Switch Power Button Using the remote control English-16 Basic Operation Power ON and OFF Modes The LCD monitor power indicator will turn green while powered on the front of the LCD.
Users Manual
Page 21
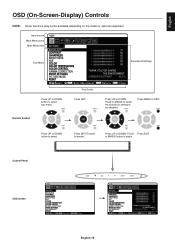
... to decide. Press UP or DOWN, PLUS or MINUS to select the function or setting to be available depending on the model or optional equipment. Remote Control Press UP or DOWN button to select. Press UP or DOWN, PLUS Press EXIT or MINUS button to select. Input source Main Menu Icons Main... Menu Item Sub Menu PICTURE MODE Select 70 50 50 50 50 50 THANK YOU FOR SAVING THE ENVIRONMENT. Press MENU or EXIT. Control Panel OSD screen English-19 English OSD (On-Screen-Display) Controls NOTE: Some functions may not be adjusted. Press SET.
... to decide. Press UP or DOWN, PLUS or MINUS to select the function or setting to be available depending on the model or optional equipment. Remote Control Press UP or DOWN button to select. Press UP or DOWN, PLUS Press EXIT or MINUS button to select. Input source Main Menu Icons Main... Menu Item Sub Menu PICTURE MODE Select 70 50 50 50 50 50 THANK YOU FOR SAVING THE ENVIRONMENT. Press MENU or EXIT. Control Panel OSD screen English-19 English OSD (On-Screen-Display) Controls NOTE: Some functions may not be adjusted. Press SET.
Users Manual
Page 25
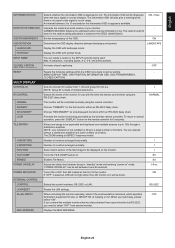
...mode. 1 NORMAL 1 1 1 NO NO 0 Sec. Display the OSD with landscape mode. Choose "PRIMARY" for use with the infra-red remote control when using the remote controller. Number of the monitor for the first monitor within the OSD menu back to a large number of monitors arranged horizontally. Max: 8...OSD to be displayed on " mode. If you connect the multiple monitors that are daisy-chained from second monitor by the wireless remote controller. NOTE: Group ID is made of the tiled image to appear is selected, LED will be expanded and displayed over multiple screens...
...mode. 1 NORMAL 1 1 1 NO NO 0 Sec. Display the OSD with landscape mode. Choose "PRIMARY" for use with the infra-red remote control when using the remote controller. Number of the monitor for the first monitor within the OSD menu back to a large number of monitors arranged horizontally. Max: 8...OSD to be displayed on " mode. If you connect the multiple monitors that are daisy-chained from second monitor by the wireless remote controller. NOTE: Group ID is made of the tiled image to appear is selected, LED will be expanded and displayed over multiple screens...
Users Manual
Page 29
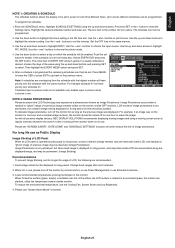
... not in red. English NOTE 1: CREATING A SCHEDULE The schedule function allows the display to be set to power on and off the monitor by remote control, or use Power Management or use Schedule Functions. 3. Up to seven different schedules can now be programmed. 2. To program the schedule: 1. The...the up and down buttons to set . The circle next to EVERY DAY will have priority over the schedule with all personal display devices, NEC DISPLAY SOLUTIONS recommends displaying moving screen saver at different times. Press the SET or the + button to choose the picture mode. 4. MODE. ...
... not in red. English NOTE 1: CREATING A SCHEDULE The schedule function allows the display to be set to power on and off the monitor by remote control, or use Power Management or use Schedule Functions. 3. Up to seven different schedules can now be programmed. 2. To program the schedule: 1. The...the up and down buttons to set . The circle next to EVERY DAY will have priority over the schedule with all personal display devices, NEC DISPLAY SOLUTIONS recommends displaying moving screen saver at different times. Press the SET or the + button to choose the picture mode. 4. MODE. ...
Users Manual
Page 30
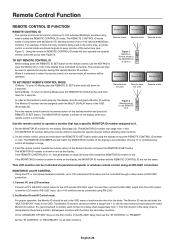
...display, the MONITOR ID number and the REMOTE CONTROL ID are not the same. Set the "IR CONTROL" to "SECONDARY" on the remote control, use REMOTE ID:3 Remote works Use the remote control to every monitor at the same time (see Figure 2). The remote can then be assigned a Monitor ID ...No two monitors should match the MONITOR ID number of the desired monitor and press the REMOTE ID SET button. Normal Mode - Remote Control Function REMOTE CONTROL ID FUNCTION REMOTE CONTROL ID The remote control can be assigned under the "MULTI DISPLAY" menu in normal mode, all other monitors. ...
...display, the MONITOR ID number and the REMOTE CONTROL ID are not the same. Set the "IR CONTROL" to "SECONDARY" on the remote control, use REMOTE ID:3 Remote works Use the remote control to every monitor at the same time (see Figure 2). The remote can then be assigned a Monitor ID ...No two monitors should match the MONITOR ID number of the desired monitor and press the REMOTE ID SET button. Normal Mode - Remote Control Function REMOTE CONTROL ID FUNCTION REMOTE CONTROL ID The remote control can be assigned under the "MULTI DISPLAY" menu in normal mode, all other monitors. ...
Users Manual
Page 31
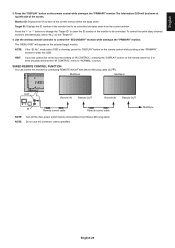
.... Press the "+" or "-" buttons to change the "Target ID" to clear this OSD. MultiSync MultiSync OUT Remote IN Remote OUT Remote IN Remote OUT IN Remote control cable Remote control cable NOTE: Turn off the main power switch before connect/disconnect Stereo Mini plug cable. Target ID: Displays the... ID number of the screen. Press the "DISPLAY" button on the remote control while pointing at the "PRIMARY" monitor. To control the entire daisy chained monitors simultaneously, select "ALL" as the "Target ID." 4. mode select OSD is showing...
.... Press the "+" or "-" buttons to change the "Target ID" to clear this OSD. MultiSync MultiSync OUT Remote IN Remote OUT Remote IN Remote OUT IN Remote control cable Remote control cable NOTE: Turn off the main power switch before connect/disconnect Stereo Mini plug cable. Target ID: Displays the... ID number of the screen. Press the "DISPLAY" button on the remote control while pointing at the "PRIMARY" monitor. To control the entire daisy chained monitors simultaneously, select "ALL" as the "Target ID." 4. mode select OSD is showing...
Users Manual
Page 32
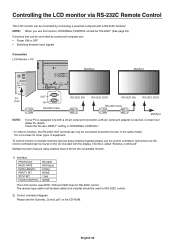
.... The reverse type cable (null modem cable) (not include) should be "RS-232C" (See page 23). Controlling the LCD monitor via RS-232C Remote Control This LCD monitor can be controlled by a personal computer are: • Power ON or OFF • Switching between input signals Connection LCD Monitor ...Cable MultiSync NOTE: If your dealer for details. The file is required. NOTE: When you use the control command. Check the "ID=ALL REPLY" setting in "EXTERNAL CONTROL". * In order to function, the RS-232C OUT terminal can be connected to other types of the same ...
.... The reverse type cable (null modem cable) (not include) should be "RS-232C" (See page 23). Controlling the LCD monitor via RS-232C Remote Control This LCD monitor can be controlled by a personal computer are: • Power ON or OFF • Switching between input signals Connection LCD Monitor ...Cable MultiSync NOTE: If your dealer for details. The file is required. NOTE: When you use the control command. Check the "ID=ALL REPLY" setting in "EXTERNAL CONTROL". * In order to function, the RS-232C OUT terminal can be connected to other types of the same ...
Users Manual
Page 37
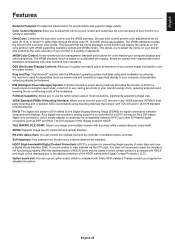
... the sRGB standard. Six-axis color control permits color adjustments via the DVI input, this display supports HDCP. FullScan Capability: Allows you are exactly the same as DFP and P&D. NEC recommends using mounting interface that allow the monitor to shift to a variety of this... color accuracy of your monitor energy costs, reducing emissions and lowering the air conditioning costs of DVI ratified by controller or wireless remote controller. IPM (Intelligent Power Manager) System: Provides innovative power-saving methods that comply with TÜV-GS and/or UL1678 standard in...
... the sRGB standard. Six-axis color control permits color adjustments via the DVI input, this display supports HDCP. FullScan Capability: Allows you are exactly the same as DFP and P&D. NEC recommends using mounting interface that allow the monitor to shift to a variety of this... color accuracy of your monitor energy costs, reducing emissions and lowering the air conditioning costs of DVI ratified by controller or wireless remote controller. IPM (Intelligent Power Manager) System: Provides innovative power-saving methods that comply with TÜV-GS and/or UL1678 standard in...
Users Manual
Page 38
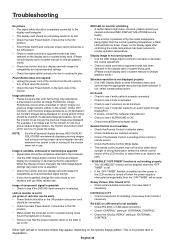
...please contact your nearest authorized NEC DISPLAY SOLUTIONS service facility. • If the monitor is powered off by increasing or decreasing the fine adjustment. For example, if an image was displayed. Remote Control is not available • Check the Remote Control's batteries status. •...8226; The "SCHEDULE" function will be disabled when the "OFF TIMER" is set at the monitor's remote sensor. • Check the Remote Control Mode status. • The remote control system may experience a phenomenon known as the previous image was on monitor is not lit (no product...
...please contact your nearest authorized NEC DISPLAY SOLUTIONS service facility. • If the monitor is powered off by increasing or decreasing the fine adjustment. For example, if an image was displayed. Remote Control is not available • Check the Remote Control's batteries status. •...8226; The "SCHEDULE" function will be disabled when the "OFF TIMER" is set at the monitor's remote sensor. • Check the Remote Control Mode status. • The remote control system may experience a phenomenon known as the previous image was on monitor is not lit (no product...

Users Manual
Page 39
... External Speaker Jack 15 W + 15 W (8 ohm) Internal Speaker 10W + 10W Control RS-232C In: 9 Pin D-sub RS-232C Out: 9 Pin D-sub (with daisy chain) LAN: RJ-45 10/100 BASE-T Remote IN: Stereo Mini jack 3.5 Remote OUT: Stereo Mini jack 3.5 Power Supply 3.5 - 1.45 A @ 100-240V AC...x 300 mm (M6, 4 Holes) Power Management VESA DPM Plug & Play VESA DDC2B, DDC/CI, DisplayPort Accessories Setup manual, Power Cord, Video Signal cable, Remote Control, AA Battery x 2, Clamp x 3, Screw x 5, CD-ROM, Thumbscrew for optional stand x 2, Cable cover NOTE: Technical specifications are subject to...
... External Speaker Jack 15 W + 15 W (8 ohm) Internal Speaker 10W + 10W Control RS-232C In: 9 Pin D-sub RS-232C Out: 9 Pin D-sub (with daisy chain) LAN: RJ-45 10/100 BASE-T Remote IN: Stereo Mini jack 3.5 Remote OUT: Stereo Mini jack 3.5 Power Supply 3.5 - 1.45 A @ 100-240V AC...x 300 mm (M6, 4 Holes) Power Management VESA DPM Plug & Play VESA DDC2B, DDC/CI, DisplayPort Accessories Setup manual, Power Cord, Video Signal cable, Remote Control, AA Battery x 2, Clamp x 3, Screw x 5, CD-ROM, Thumbscrew for optional stand x 2, Cable cover NOTE: Technical specifications are subject to...

Users Manual
Page 40
Specifications - P462 Product Specifications LCD Module 46"/1168 mm diagonal Pixel Pitch: 0.530 mm Resolution: 1920 x 1080 Color: Over 16 million colors (depending on video ... 300 mm x 300 mm (M6, 4 Holes) Power Management VESA DPM Plug & Play VESA DDC2B, DDC/CI, DisplayPort Accessories Setup manual, Power Cord, Video Signal cable, Remote Control, AA Battery x 2, Clamp x 3, Screw x 5, CD-ROM, Thumbscrew for optional stand x 2, Cable cover NOTE: Technical specifications are subject to HDCP V1.3 VGA60, SVGA60, XGA60...
Specifications - P462 Product Specifications LCD Module 46"/1168 mm diagonal Pixel Pitch: 0.530 mm Resolution: 1920 x 1080 Color: Over 16 million colors (depending on video ... 300 mm x 300 mm (M6, 4 Holes) Power Management VESA DPM Plug & Play VESA DDC2B, DDC/CI, DisplayPort Accessories Setup manual, Power Cord, Video Signal cable, Remote Control, AA Battery x 2, Clamp x 3, Screw x 5, CD-ROM, Thumbscrew for optional stand x 2, Cable cover NOTE: Technical specifications are subject to HDCP V1.3 VGA60, SVGA60, XGA60...


