
Specification Brochure
Page 3
... when the display is powered off. Auto IP Address simplifies control setup by adding a graphic on the external lux in tiled environments. Key Guide New Key Guide function allows for easier access to buttons when manually controlling the unit via the buttons on the back of the display by setting the static IP address on , audio source and more can be pulled through advanced settings of a video wall, automatically scale...
... when the display is powered off. Auto IP Address simplifies control setup by adding a graphic on the external lux in tiled environments. Key Guide New Key Guide function allows for easier access to buttons when manually controlling the unit via the buttons on the back of the display by setting the static IP address on , audio source and more can be pulled through advanced settings of a video wall, automatically scale...
Specification Brochure
Page 4
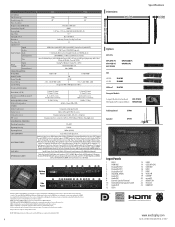
... Audio x2, HDMI Audio x3 LAN (100Mbit), 3.5 Mini Jack IR Remote, RS232C microSD (Media Player), USB 2.0 (Media Player), USB 2.0 (Service), USB Type-B (Upstream), USB 2.0 x2 (Compute Module, Powered 5V/2A) DisplayPort (Outputs DisplayPort or OPS) 3.5mm Audio Mini Jack LAN (100Mb) 92W/115W 115W/140W 3W Specifications LCD MODULE Panel Technology Viewable Image Size Native Resolution Brightness (Typical/Minimum) Contrast Ratio (Typical) Viewing Angle Aspect Ratio Displayable Colors Orientation Panel Haze (%) CONNECTIVITY Digital Analog Input Terminals Audio External Control Data Output...
... Audio x2, HDMI Audio x3 LAN (100Mbit), 3.5 Mini Jack IR Remote, RS232C microSD (Media Player), USB 2.0 (Media Player), USB 2.0 (Service), USB Type-B (Upstream), USB 2.0 x2 (Compute Module, Powered 5V/2A) DisplayPort (Outputs DisplayPort or OPS) 3.5mm Audio Mini Jack LAN (100Mb) 92W/115W 115W/140W 3W Specifications LCD MODULE Panel Technology Viewable Image Size Native Resolution Brightness (Typical/Minimum) Contrast Ratio (Typical) Viewing Angle Aspect Ratio Displayable Colors Orientation Panel Haze (%) CONNECTIVITY Digital Analog Input Terminals Audio External Control Data Output...

Users Manual
Page 5
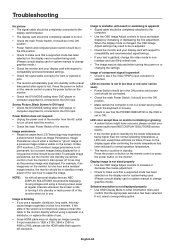
... power cord with molded plug having a black (13A) fuse installed for an extended period of any cleaning solution or glass cleaner! • Adjust the monitor's brightness, contrast and sharpness controls to enhance readability. • Avoid displaying fixed patterns on the LCD surface. English-3 Recommended Use • For optimum performance, allow 20 minutes for transporting. • If using a LAN cable, do not connect to the screen...
... power cord with molded plug having a black (13A) fuse installed for an extended period of any cleaning solution or glass cleaner! • Adjust the monitor's brightness, contrast and sharpness controls to enhance readability. • Avoid displaying fixed patterns on the LCD surface. English-3 Recommended Use • For optimum performance, allow 20 minutes for transporting. • If using a LAN cable, do not connect to the screen...
Users Manual
Page 7
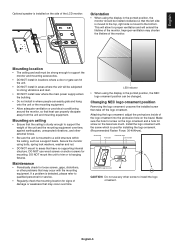
... areas that have no supporting internal structure. If a problem is used for mounting. Changing NEC logo ornament position Removing the logo ornament: unscrew the installed screw then take off the logo ornament. English-5 Mounting on ceiling • Ensure that the ceiling is sturdy enough to support the weight of the unit and the mounting equipment over time. Secure the monitor using bolts, spring lock washers, washer and nut...
... areas that have no supporting internal structure. If a problem is used for mounting. Changing NEC logo ornament position Removing the logo ornament: unscrew the installed screw then take off the logo ornament. English-5 Mounting on ceiling • Ensure that the ceiling is sturdy enough to support the weight of the unit and the mounting equipment over time. Secure the monitor using bolts, spring lock washers, washer and nut...
Users Manual
Page 10
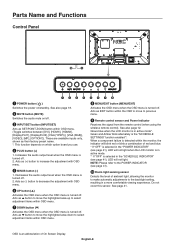
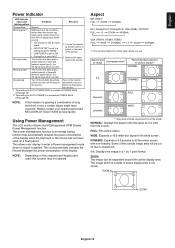
... audio output level when the OSD menu is turned off . 2. Acts as (-) button to previous menu. ¾ Remote control sensor and Power Indicator Receives the signal from the remote control (when using the wireless remote control). Acts as EXIT button within OSD menu. º MENU/EXIT button (MENU/EXIT) Activates the OSD menu when the OSD menu is turned off . Do not cover this sensor. See page 41. OSD is in active mode. *1 If "OFF" is the "SCHEDULE SETTINGS...
... audio output level when the OSD menu is turned off . 2. Acts as (-) button to previous menu. ¾ Remote control sensor and Power Indicator Receives the signal from the remote control (when using the wireless remote control). Acts as EXIT button within OSD menu. º MENU/EXIT button (MENU/EXIT) Activates the OSD menu when the OSD menu is turned off . Do not cover this sensor. See page 41. OSD is in active mode. *1 If "OFF" is the "SCHEDULE SETTINGS...
Users Manual
Page 21
... you set]. Blinking amber*2 The monitor has been past a certain amount of time with [network signal input] + [no AV signal input which you set]. 2. NOTE: If the indicator is not shown. This allows your nearest authorized NEC DISPLAY SOLUTIONS service facility. ZOOM The image can be cut off the monitor by remote control or button on the back of the display. Glowing amber • DisplayPort is applied. Glowing red Turn...
... you set]. Blinking amber*2 The monitor has been past a certain amount of time with [network signal input] + [no AV signal input which you set]. 2. NOTE: If the indicator is not shown. This allows your nearest authorized NEC DISPLAY SOLUTIONS service facility. ZOOM The image can be cut off the monitor by remote control or button on the back of the display. Glowing amber • DisplayPort is applied. Glowing red Turn...

Users Manual
Page 24
... in high resolutions are switched automatically at a set interval (PLAY MODE is "AUTO"). • The default factory setting is by operating a button on the remote control, or "AUTO" in which is 300. Check the format if this device cannot recognize the connected USB memory. Please use a USB cable extension. File display screen The files can be displayed using "MANUAL" in the FAT32 format or FAT16 format for using larger size of creation), or size (file capacity). Displays the setting screen. Please...
... in high resolutions are switched automatically at a set interval (PLAY MODE is "AUTO"). • The default factory setting is by operating a button on the remote control, or "AUTO" in which is 300. Check the format if this device cannot recognize the connected USB memory. Please use a USB cable extension. File display screen The files can be displayed using "MANUAL" in the FAT32 format or FAT16 format for using larger size of creation), or size (file capacity). Displays the setting screen. Please...
Users Manual
Page 38
... monitor is displaying a signal from the other video input port. If the video signal is supplied to switch signals more than normal but it could happen image noise when switching signals. Set the priority of 0-255 steps. When CUSTOM DETECT is active, MULTI PICTURE MODE, TEXT TICKER, STILL, POINT ZOOM are connected. When selected "QUICK" allows to the monitor, the monitor will not search the other port, then the monitor switches the video source input port to factory setting...
... monitor is displaying a signal from the other video input port. If the video signal is supplied to switch signals more than normal but it could happen image noise when switching signals. Set the priority of 0-255 steps. When CUSTOM DETECT is active, MULTI PICTURE MODE, TEXT TICKER, STILL, POINT ZOOM are connected. When selected "QUICK" allows to the monitor, the monitor will not search the other port, then the monitor switches the video source input port to factory setting...
Users Manual
Page 42
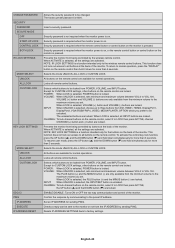
... of the monitor. Locks all the settings are only available from the minimum volume to be locked from POWER, VOLUME, and INPUT button. POWER: When LOCK is selected, POWER button is on the remote control are locked. VOLUME (+) button and VOLUME (-) buttons are activated. NOTE: KEY LOCK SETTINGS is a function intended only to be changed. Selects the mode UNLOCK, ALL LOCK or CUSTOM LOCK. Selects which buttons to the maximum volume you set . Except for CUSTOM LOCK settings, other buttons on . ENABLE/DISABLE: Turns ON...
... of the monitor. Locks all the settings are only available from the minimum volume to be locked from POWER, VOLUME, and INPUT button. POWER: When LOCK is selected, POWER button is on the remote control are locked. VOLUME (+) button and VOLUME (-) buttons are activated. NOTE: KEY LOCK SETTINGS is a function intended only to be changed. Selects the mode UNLOCK, ALL LOCK or CUSTOM LOCK. Selects which buttons to the maximum volume you set . Except for CUSTOM LOCK settings, other buttons on . ENABLE/DISABLE: Turns ON...

Users Manual
Page 44
... changes the input signal to USB2. USB TOUCH POWER (Not available) EXTERNAL CONTROL When ON is set, the monitor is controlled by a device installed particular software which is selected in SLOT2 CH SELECT. 2CH DisplayPort signal is displayed in the left half, TMDS signal is displayed in power save mode. NOTE: If ON is selected, the below . OPTION AUDIO*1 Selects sound input signal according to HDMI. AUTO Sets signal type automatically. 1CH Fills entire the signal, which is turned...
... changes the input signal to USB2. USB TOUCH POWER (Not available) EXTERNAL CONTROL When ON is set, the monitor is controlled by a device installed particular software which is selected in SLOT2 CH SELECT. 2CH DisplayPort signal is displayed in the left half, TMDS signal is displayed in power save mode. NOTE: If ON is selected, the below . OPTION AUDIO*1 Selects sound input signal according to HDMI. AUTO Sets signal type automatically. 1CH Fills entire the signal, which is turned...
Users Manual
Page 47
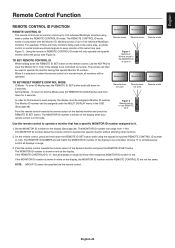
... DISPLAY menu in normal mode, all monitors will only operate one specific monitor within the group (see Figure 1). Set the MONITOR ID number for 2 seconds. The MONITOR ID number can range from 1-100. Using the remote in ID mode. Remote does not work Remote does not work properly, the display must be controlled via the remote control. The MONITOR ID number is "0", then all displays in white on the remote control, use REMOTE ID:3 Remote works Use the remote control to operate a monitor that specific Monitor...
... DISPLAY menu in normal mode, all monitors will only operate one specific monitor within the group (see Figure 1). Set the MONITOR ID number for 2 seconds. The MONITOR ID number can range from 1-100. Using the remote in ID mode. Remote does not work Remote does not work properly, the display must be controlled via the remote control. The MONITOR ID number is "0", then all displays in white on the remote control, use REMOTE ID:3 Remote works Use the remote control to operate a monitor that specific Monitor...

Users Manual
Page 49
... the monitor. Connection LCD Monitor + computer. • Please turn off the monitor's main power when connecting a computer to the monitor. • Please turn on the connecting computer first then turn on the computer and the display the other order, some times com port does not work properly. • When controlling the monitor connected with RS-232C cable, please refer to the Control command diagram (See page 55) or see "2) RS-232C input/output...
... the monitor. Connection LCD Monitor + computer. • Please turn off the monitor's main power when connecting a computer to the monitor. • Please turn on the connecting computer first then turn on the computer and the display the other order, some times com port does not work properly. • When controlling the monitor connected with RS-232C cable, please refer to the Control command diagram (See page 55) or see "2) RS-232C input/output...

Users Manual
Page 58
... connection. If the monitor is turned standby while a HDMI CEC supporting device is recording, the device is kept on the wireless remote control is supporting Feature Abort. The function sends digital audio signal through HDMI cable. The Volume button on . Setting To set a HDMI CEC audio amplifier between the monitor and HDMI CEC supporting devices with "Change Language function". By using at the monitor is changed, the language at connected HDMI CEC supporting device is active, internal speaker or external speaker connected to HDMI...
... connection. If the monitor is turned standby while a HDMI CEC supporting device is recording, the device is kept on the wireless remote control is supporting Feature Abort. The function sends digital audio signal through HDMI cable. The Volume button on . Setting To set a HDMI CEC audio amplifier between the monitor and HDMI CEC supporting devices with "Change Language function". By using at the monitor is changed, the language at connected HDMI CEC supporting device is active, internal speaker or external speaker connected to HDMI...
Users Manual
Page 63
... over a digital signal. OSD (On-Screen-Display) Controls: Allow you to adjust the colors on but not in the display hardware, optimal settings are exactly the same as DFP and P&D. As a DVI-based digital only connection, only a simple adapter is protected with the Windows® operating system facilitates setup and installation by the Digital Display Working Group (DDWG) for digital connections between DVI-D and other DVI-based digital connectors such as on a calibrated color space...
... over a digital signal. OSD (On-Screen-Display) Controls: Allow you to adjust the colors on but not in the display hardware, optimal settings are exactly the same as DFP and P&D. As a DVI-based digital only connection, only a simple adapter is protected with the Windows® operating system facilitates setup and installation by the Digital Display Working Group (DDWG) for digital connections between DVI-D and other DVI-based digital connectors such as on a calibrated color space...
Users Manual
Page 64
... the remote control or press the power button on the screen. If not, select corresponding option. NOTE: As with all personal display devices, NEC DISPLAY SOLUTIONS recommends displaying moving images and using a repeater or a distributor, or replace the cable of the monitor when not in use . • Some HDMI cable may be distorted when turning the power on or changing the settings. Snowy Picture, Black Screen in DVI input • Check the DVI MODE setting when DVD player...
... the remote control or press the power button on the screen. If not, select corresponding option. NOTE: As with all personal display devices, NEC DISPLAY SOLUTIONS recommends displaying moving images and using a repeater or a distributor, or replace the cable of the monitor when not in use . • Some HDMI cable may be distorted when turning the power on or changing the settings. Snowy Picture, Black Screen in DVI input • Check the DVI MODE setting when DVD player...

Users Manual
Page 66
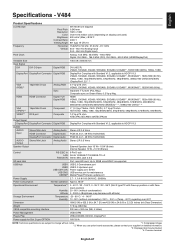
...: 0.461 mm Resolution: 1920 x 1080 Color: Over 1073 million colors (depending on Green Video: 0.3 Vp-p Neg. Specifications - USB1: USB 2.0 Downstream port USB2: USB 2.0 Upstream port USB CM1 (2A): Power supply port, 5V/2A USB CM2: USB service port for maintenance USB MP: Media Player/Firmware update port Power Supply 2.9 - 1.2 A @ 100-240V AC, 50/60Hz Power Consumption Operational Environment Normal operation: Approx. 92 W Temperature*2: 0 - 40°C / 32 - 104°F, 0 - 35°C / 32 - 95°F (Slot 2 type PC with...
...: 0.461 mm Resolution: 1920 x 1080 Color: Over 1073 million colors (depending on Green Video: 0.3 Vp-p Neg. Specifications - USB1: USB 2.0 Downstream port USB2: USB 2.0 Upstream port USB CM1 (2A): Power supply port, 5V/2A USB CM2: USB service port for maintenance USB MP: Media Player/Firmware update port Power Supply 2.9 - 1.2 A @ 100-240V AC, 50/60Hz Power Consumption Operational Environment Normal operation: Approx. 92 W Temperature*2: 0 - 40°C / 32 - 104°F, 0 - 35°C / 32 - 95°F (Slot 2 type PC with...

Users Manual
Page 67
...;C) regarding over 40°C Dimension 918 (W) x 530.6 (H) x 54.7 (D) mm/36.1 (W) x 20.9 (H) x 2.2 (D) inches (w/o Deco Dimension) Weight 14.3 kg (31.5 lbs) VESA compatible mounting interface 300 mm x 300 mm (M6, 4 Holes) Power Management VESA DPM Plug & Play VESA DDC2Bi, DDC/CI, DisplayPort Power supply for Slot 2 type OPTION 16V/3.6 A NOTE: Technical specifications are subject to change without notice. *1: Compressed image. *2: When you use option board accessories, please...
...;C) regarding over 40°C Dimension 918 (W) x 530.6 (H) x 54.7 (D) mm/36.1 (W) x 20.9 (H) x 2.2 (D) inches (w/o Deco Dimension) Weight 14.3 kg (31.5 lbs) VESA compatible mounting interface 300 mm x 300 mm (M6, 4 Holes) Power Management VESA DPM Plug & Play VESA DDC2Bi, DDC/CI, DisplayPort Power supply for Slot 2 type OPTION 16V/3.6 A NOTE: Technical specifications are subject to change without notice. *1: Compressed image. *2: When you use option board accessories, please...
Users Manual
Page 69
... Output Signal DisplayPort DisplayPort Connector Digital RGB DisplayPort Complies with Standard V1.2, applicable to change without notice. *1: Compressed image. *2: When you use option board accessories, please contact your supplier for detailed information. *3: Displayed text may be blurred. *4: Common terminal. USB1: USB 2.0 Downstream port USB2: USB 2.0 Upstream port USB CM1 (2A): Power supply port, 5V/2A USB CM2: USB service port for maintenance USB MP: Media Player/Firmware update port Power Supply 2.7 - 1.1 A @ 100-240V AC, 50/60Hz Power...
... Output Signal DisplayPort DisplayPort Connector Digital RGB DisplayPort Complies with Standard V1.2, applicable to change without notice. *1: Compressed image. *2: When you use option board accessories, please contact your supplier for detailed information. *3: Displayed text may be blurred. *4: Common terminal. USB1: USB 2.0 Downstream port USB2: USB 2.0 Upstream port USB CM1 (2A): Power supply port, 5V/2A USB CM2: USB service port for maintenance USB MP: Media Player/Firmware update port Power Supply 2.7 - 1.1 A @ 100-240V AC, 50/60Hz Power...

External Control Codes
Page 42
... 1: Main 2: Sub 3: Main + Sub 02h 34h 0: No mean 1: DISABLE 2: ENABLE 30(1Eh): short | 600(258h): long *1step: 1sec. SYSTEM MONITOR INFORMATION POWER Item SLOT2 CH SELECT RESET (OPTION) MODEL NAME SERIAL CARBON SAVINGS CARBON USAGE FIRMWARE MAC ADDRESS FACTORY RESET POWER SUPPLY AUTO POWER ON SETTING LOCK USB BOOT MODE IR SIGNAL MONITOR CONTROL SHUTDOWN SIGNAL POWER OFF DELAY CHANGE PASSWORD MUTE SCREEN MUTE MTS SOUND OP code OP code Parameter page 11h 63h 0: No mean 1: TDMS 2: DisplayPort...
... 1: Main 2: Sub 3: Main + Sub 02h 34h 0: No mean 1: DISABLE 2: ENABLE 30(1Eh): short | 600(258h): long *1step: 1sec. SYSTEM MONITOR INFORMATION POWER Item SLOT2 CH SELECT RESET (OPTION) MODEL NAME SERIAL CARBON SAVINGS CARBON USAGE FIRMWARE MAC ADDRESS FACTORY RESET POWER SUPPLY AUTO POWER ON SETTING LOCK USB BOOT MODE IR SIGNAL MONITOR CONTROL SHUTDOWN SIGNAL POWER OFF DELAY CHANGE PASSWORD MUTE SCREEN MUTE MTS SOUND OP code OP code Parameter page 11h 63h 0: No mean 1: TDMS 2: DisplayPort...

Raspberry Pi Compute Module Setup Guide
Page 43
... video input is switched. For display models with an integrated touch-screen. It also routes the internal USB connection from the touch sensor on display models with an integrated touch-screen, the internal USB connection from the touch sensor will automatically switch to be switched between different sources as a mouse to the correct source device. ©2017 NEC Display Solutions, Ltd. By selecting Auto, it is switched using the following setting. 8.13 Control menu USB PC Source...
... video input is switched. For display models with an integrated touch-screen. It also routes the internal USB connection from the touch sensor on display models with an integrated touch-screen, the internal USB connection from the touch sensor will automatically switch to be switched between different sources as a mouse to the correct source device. ©2017 NEC Display Solutions, Ltd. By selecting Auto, it is switched using the following setting. 8.13 Control menu USB PC Source...


