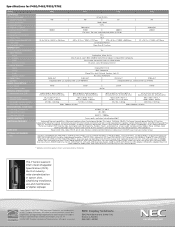
P Series Specification Brochure
Page 1
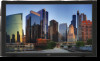
.../7 operation in expansion slot future-proofs your display investment, allowing for seamless integration of NEC and third-party components. Highlights IMPROVED MECHANICAL DESIGN* SLIMMER DEPTH INTEGRATED 10W SPEAKERS OPS & CURRENT SLOT SUPPORT DIGITAL SIGNAGE TECHNOLOGY SUITE INTEGRATED THERMAL PROTECTION SEALED PANEL DESIGN * available on select P Series models ENHANCED VIDEO WALL CAPABILITIES ECO-FRIENDLY FEATURES BUILT-IN EXPANSION SLOT EXTENSIVE CONTROL, DIAGNOSTICS & COMMUNICATION REAL-TIME...
.../7 operation in expansion slot future-proofs your display investment, allowing for seamless integration of NEC and third-party components. Highlights IMPROVED MECHANICAL DESIGN* SLIMMER DEPTH INTEGRATED 10W SPEAKERS OPS & CURRENT SLOT SUPPORT DIGITAL SIGNAGE TECHNOLOGY SUITE INTEGRATED THERMAL PROTECTION SEALED PANEL DESIGN * available on select P Series models ENHANCED VIDEO WALL CAPABILITIES ECO-FRIENDLY FEATURES BUILT-IN EXPANSION SLOT EXTENSIVE CONTROL, DIAGNOSTICS & COMMUNICATION REAL-TIME...
P Series Specification Brochure
Page 2
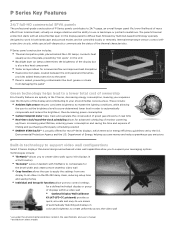
... spots" on select models Technologies include: •• TileMatrix™ allows you to create video walls (up to 100 displays in a 10x10 matrix) •• TileComp™ works in tandem with an extra thermal layer on the display panel to support video wall configurations Select P Series displays' thin-bezel design and enhanced video wall capabilities allow users to control settings for a defined individual display or group of finding...
... spots" on select models Technologies include: •• TileMatrix™ allows you to create video walls (up to 100 displays in a 10x10 matrix) •• TileComp™ works in tandem with an extra thermal layer on the display panel to support video wall configurations Select P Series displays' thin-bezel design and enhanced video wall capabilities allow users to control settings for a defined individual display or group of finding...
P Series Specification Brochure
Page 3
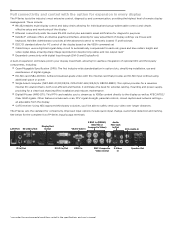
... expansion slot future-proofs your video over longer distances. The P Series sets the standard for a clean look that is both cost-efficient and flexible. It eliminates the need for external cabling, mounting and power supply, providing for connectivity. Other features include auto scan, DTV signal strength, parental controls, closed caption and network settings- NaViSet Administrator provides all adjustable from the display. •• CAT5 receiver: Using NEC-approved third-party solutions, you...
... expansion slot future-proofs your video over longer distances. The P Series sets the standard for a clean look that is both cost-efficient and flexible. It eliminates the need for external cabling, mounting and power supply, providing for connectivity. Other features include auto scan, DTV signal strength, parental controls, closed caption and network settings- NaViSet Administrator provides all adjustable from the display. •• CAT5 receiver: Using NEC-approved third-party solutions, you...
P Series Specification Brochure
Page 4
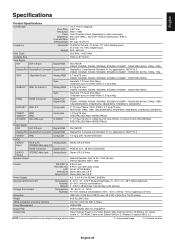
... 155W Specifications for P402/P462/P552/P702 MODEL LCD MODULE Panel Technology Viewable Image Size Native Resolution Backlight Type Brightness (Typical) Contrast Ratio (Typical) Viewing Angle Response Time (G-to-G) Aspect Ratio Active Screen Area (W x H) Orientation Displayable Colors CONNECTIVITY PC/Mac Signal Compatibility Input Terminals Digital Analog Audio External Control Output Terminals Digital Analog Audio External Control Digital Tuner Speakers POWER CONSUMPTiON On (Typical) ECO Mode Standby PHYSICAL SPECIFICATIONS Bezel Width (L/R, T/B) Net Dimensions (without stand) VESA Hole...
... 155W Specifications for P402/P462/P552/P702 MODEL LCD MODULE Panel Technology Viewable Image Size Native Resolution Backlight Type Brightness (Typical) Contrast Ratio (Typical) Viewing Angle Response Time (G-to-G) Aspect Ratio Active Screen Area (W x H) Orientation Displayable Colors CONNECTIVITY PC/Mac Signal Compatibility Input Terminals Digital Analog Audio External Control Output Terminals Digital Analog Audio External Control Digital Tuner Speakers POWER CONSUMPTiON On (Typical) ECO Mode Standby PHYSICAL SPECIFICATIONS Bezel Width (L/R, T/B) Net Dimensions (without stand) VESA Hole...

Users Manual
Page 2
...-8 Control Panel ...English-8 Terminal Panel ...English-9 Wireless Remote Control ...English-11 Operating Range for the Remote Control English-12 Setup ...English-13 Connections ...English-15 Wiring Diagram ...English-15 Connecting a Personal Computer English-16 Connecting a DVD Player or Computer with HDMI out English-16 Connecting a Computer with DisplayPort English-16 Basic Operation...English-17 Power ON and OFF Modes ...English-17 Power Indicator...English-18 Using Power Management ...English-18 Selecting a video source...English-18 Picture Aspect...
...-8 Control Panel ...English-8 Terminal Panel ...English-9 Wireless Remote Control ...English-11 Operating Range for the Remote Control English-12 Setup ...English-13 Connections ...English-15 Wiring Diagram ...English-15 Connecting a Personal Computer English-16 Connecting a DVD Player or Computer with HDMI out English-16 Connecting a Computer with DisplayPort English-16 Basic Operation...English-17 Power ON and OFF Modes ...English-17 Power Indicator...English-18 Using Power Management ...English-18 Selecting a video source...English-18 Picture Aspect...
Users Manual
Page 5
... realize the maximum ergonomic benefits, we recommend the following: • Use the preset Size and Position controls with standard signals. • Do not cover vent on the power cord. Cleaning the LCD Panel • When the liquid crystal panel is easily accessible. • Do not move or mount this product by and comply with the safety standards of a Coaxial...
... realize the maximum ergonomic benefits, we recommend the following: • Use the preset Size and Position controls with standard signals. • Do not cover vent on the power cord. Cleaning the LCD Panel • When the liquid crystal panel is easily accessible. • Do not move or mount this product by and comply with the safety standards of a Coaxial...
Users Manual
Page 8
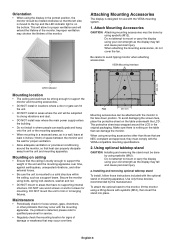
... removing optional tabletop stand To install, follow those devices recommended by using bolts, spring lock washers, washer and nut. • DO NOT mount to mount or carry the display using eyebolts (M12). Use only those instructions included with the VESA mounting system. 1. Improper ventilation may occur with eyebolts (M12), then insert the stand into place. Be careful to hanging fixtures. VESA Mounting Interface 400 mm LED Indicator Mounting location...
... removing optional tabletop stand To install, follow those devices recommended by using bolts, spring lock washers, washer and nut. • DO NOT mount to mount or carry the display using eyebolts (M12). Use only those instructions included with the VESA mounting system. 1. Improper ventilation may occur with eyebolts (M12), then insert the stand into place. Be careful to hanging fixtures. VESA Mounting Interface 400 mm LED Indicator Mounting location...

Users Manual
Page 10
... button Activates the OSD menu when the OSD menu is turned-off . Do not cover this sensor. Control Key Lock Mode This control completely locks out access to select adjustment items within the monitor, the indicator will blink red. * If "OFF" is selected in "POWER INDICATOR" (see page 24), LED will not light when the LCD monitor is in Power Standby mode with OSD menu. Increases the audio output level when the OSD menu is in Power Save Mode. Green...
... button Activates the OSD menu when the OSD menu is turned-off . Do not cover this sensor. Control Key Lock Mode This control completely locks out access to select adjustment items within the monitor, the indicator will blink red. * If "OFF" is selected in "POWER INDICATOR" (see page 24), LED will not light when the LCD monitor is in Power Standby mode with OSD menu. Increases the audio output level when the OSD menu is in Power Save Mode. Green...

Users Manual
Page 11
... connector: To output the DVI signal from a computer or HDTV device having a digital RGB output. * This connector does not support analog input. See page 33. ¿ REMOTE IN/OUT Use the optional wired remote control by connecting it to connect equipment such as a computer, VCR or DVD player. ƻ EXTERNAL SPEAKER TERMINAL To output the audio signal from the HDMI connection, the HDMI input must be used with the supplied power cord. · Main Power Switch On/Off switch to the G connector...
... connector: To output the DVI signal from a computer or HDTV device having a digital RGB output. * This connector does not support analog input. See page 33. ¿ REMOTE IN/OUT Use the optional wired remote control by connecting it to connect equipment such as a computer, VCR or DVD player. ƻ EXTERNAL SPEAKER TERMINAL To output the audio signal from the HDMI connection, the HDMI input must be used with the supplied power cord. · Main Power Switch On/Off switch to the G connector...

Users Manual
Page 13
.... Audio out is disabled when surround is set to ON. ² KEYPAD Press buttons to set and change passwords, change channel and set REMOTE ID. ¶ ENT button*2 º DISPLAY button Turns on your connection » PICTURE MODE button Selects picture mode, [HIGHBRIGHT], [STANDARD], [sRGB], [CINEMA], [AMBIENT1], [AMBIENT2]. Small screen which adjusted "PIP" mode moves left or right. ƹ SET button Makes selection. ƺ VOLUME UP/DOWN button Increases or decreases audio output level. ƻ CH UP/DOWN button*2 Ƽ GUIDE button*2 ƽ MUTE button Turns...
.... Audio out is disabled when surround is set to ON. ² KEYPAD Press buttons to set and change passwords, change channel and set REMOTE ID. ¶ ENT button*2 º DISPLAY button Turns on your connection » PICTURE MODE button Selects picture mode, [HIGHBRIGHT], [STANDARD], [sRGB], [CINEMA], [AMBIENT1], [AMBIENT2]. Small screen which adjusted "PIP" mode moves left or right. ƹ SET button Makes selection. ƺ VOLUME UP/DOWN button Increases or decreases audio output level. ƻ CH UP/DOWN button*2 Ƽ GUIDE button*2 ƽ MUTE button Turns...
Users Manual
Page 15
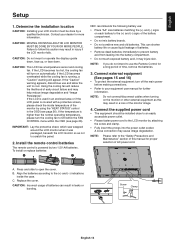
... your equipment user manual for a long period of AC power cord. If the LCD becomes overheated while the cooling fan is higher than the normal operating temperature, please turn the cooling fan to scratch the panel. 2. Connect external equipment (See pages 15 and 16) • To protect the external equipment; C. Determine the installation location CAUTION: Installing your dealer for proper selection of time, remove the batteries...
... your equipment user manual for a long period of AC power cord. If the LCD becomes overheated while the cooling fan is higher than the normal operating temperature, please turn the cooling fan to scratch the panel. 2. Connect external equipment (See pages 15 and 16) • To protect the external equipment; C. Determine the installation location CAUTION: Installing your dealer for proper selection of time, remove the batteries...

Users Manual
Page 17
...-15 VCR or DVD Player DVD player Connected equipment AV PC Connecting terminal DVI (DVI-D) HDMI 5BNC+VIDEO VIDEO1 (BNC) S-VIDEO VIDEO2 (5BNC) DVD/HD (5BNC) VGA (D-Sub) DVI (DVI-D) RGB/HV (5BNC) DisplayPort HDMI Setting in OSD menu or press the AUDIO INPUT button (remote control). Before making connections: * First turn off the power of all the attached equipment and make connections. * Refer to the connectable monitors. BNC MODE: VIDEO BNC MODE: COMPONENT DVI MODE: DVI-PC BNC...
...-15 VCR or DVD Player DVD player Connected equipment AV PC Connecting terminal DVI (DVI-D) HDMI 5BNC+VIDEO VIDEO1 (BNC) S-VIDEO VIDEO2 (5BNC) DVD/HD (5BNC) VGA (D-Sub) DVI (DVI-D) RGB/HV (5BNC) DisplayPort HDMI Setting in OSD menu or press the AUDIO INPUT button (remote control). Before making connections: * First turn off the power of all the attached equipment and make connections. * Refer to the connectable monitors. BNC MODE: VIDEO BNC MODE: COMPONENT DVI MODE: DVI-PC BNC...
Users Manual
Page 24
... sound. button to increase TREBLE sound. Press - Depend on signal input RESET Resets "AUDIO" options back to fill entire screen. - See page 28. VGA, RGB/HV inputs only V RESOLUTION Adjusts the vertical size of time. FULL Fills entire screen. - will be cut off after a length of the image. - H POS Horizontal position. H POSITION, V POSITION, CLOCK, PHASE, H RESOLUTION, V RESOLUTION, ASPECT. Note: Audio out is set to expansion. SCHEDULE OFF TIMER Sets the monitor...
... sound. button to increase TREBLE sound. Press - Depend on signal input RESET Resets "AUDIO" options back to fill entire screen. - See page 28. VGA, RGB/HV inputs only V RESOLUTION Adjusts the vertical size of time. FULL Fills entire screen. - will be cut off after a length of the image. - H POS Horizontal position. H POSITION, V POSITION, CLOCK, PHASE, H RESOLUTION, V RESOLUTION, ASPECT. Note: Audio out is set to expansion. SCHEDULE OFF TIMER Sets the monitor...

Users Manual
Page 27
... screen image is selected. Press - OFF CHANGE SECURITY Allows the security password to the NO other monitor. SECURITY Locks the security password. setting: POWER SAVE, FAN CONTROL, SCREEN SAVER, SIDE BORDER COLOR, AUTO BRIGHTNESS, DDC/CI. English LAN SETTING When you use this function, EXTERNAL CONTROL should be "RS-232C". Disabling this item. This function is displayed. 15 Press + button, the bar will become darker. OFF SIDE BORDER COLOR Adjusts the color...
... screen image is selected. Press - OFF CHANGE SECURITY Allows the security password to the NO other monitor. SECURITY Locks the security password. setting: POWER SAVE, FAN CONTROL, SCREEN SAVER, SIDE BORDER COLOR, AUTO BRIGHTNESS, DDC/CI. English LAN SETTING When you use this function, EXTERNAL CONTROL should be "RS-232C". Disabling this item. This function is displayed. 15 Press + button, the bar will become darker. OFF SIDE BORDER COLOR Adjusts the color...

Users Manual
Page 28
... the default setting. NOTE: When "QUICK" is present. Note: For DVI input "DVI-HD" needs to the monitor, the monitor will change speed. RGB: Analog input (R, G, B, H, V) COMPONENT: Component (Y, Cb/Pb, Cr/Pr) SCART: SCART signal VIDEO: Composite video (VIDEO2) HDMI SIGNAL RAW: Disable the expanded feature. AUTO Automatically chooses Color System setting based on the video format of the input signal. When current video input signal is not present, the monitor searches for other video signals while the current video source is selected, picture may...
... the default setting. NOTE: When "QUICK" is present. Note: For DVI input "DVI-HD" needs to the monitor, the monitor will change speed. RGB: Analog input (R, G, B, H, V) COMPONENT: Component (Y, Cb/Pb, Cr/Pr) SCART: SCART signal VIDEO: Composite video (VIDEO2) HDMI SIGNAL RAW: Disable the expanded feature. AUTO Automatically chooses Color System setting based on the video format of the input signal. When current video input signal is not present, the monitor searches for other video signals while the current video source is selected, picture may...

Users Manual
Page 30
... now, disable input or picture mode is idle or turning off at regular intervals whenever the screen is shown in an enclosed space, the monitor are stacked, utilize the temperature sensors inside LCD are recommended. 1. buttons to seven different schedules can be enabled. buttons to choose the picture mode. 4. After a schedule is located in red. Highlight the desired schedule number and press set the minutes. Use the + and...
... now, disable input or picture mode is idle or turning off at regular intervals whenever the screen is shown in an enclosed space, the monitor are stacked, utilize the temperature sensors inside LCD are recommended. 1. buttons to seven different schedules can be enabled. buttons to choose the picture mode. 4. After a schedule is located in red. Highlight the desired schedule number and press set the minutes. Use the + and...

Users Manual
Page 31
... number can then connect the RS-232C output from 1-100. You can be controlled via RS-232C connection. 1. For proper operation, the Monitor ID should share the same Monitor ID number. The first monitor in red. If the REMOTE CONTROLID is in REMOTE CONTROL ID mode will be set under the MULTI DISPLAY menu in the RS-232C daisy chain set to input the REMOTE CONTROL ID number (1-100). Monitor ID:1 Monitor ID:2 Remote works Remote works Figure 1 Remote...
... number can then connect the RS-232C output from 1-100. You can be controlled via RS-232C connection. 1. For proper operation, the Monitor ID should share the same Monitor ID number. The first monitor in red. If the REMOTE CONTROLID is in REMOTE CONTROL ID mode will be set under the MULTI DISPLAY menu in the RS-232C daisy chain set to input the REMOTE CONTROL ID number (1-100). Monitor ID:1 Monitor ID:2 Remote works Remote works Figure 1 Remote...

Users Manual
Page 39
..., analog support is necessary for a DVI-D connector. As a DVI-based digital only connection, only a simple adapter is not provided for compatibility between computers and displays. ZOOM: Expands image size for preventing illegal copying of DVI ratified by controller or wireless remote controller. RS-232C daisy chain: You can use slot 2 type option board, you are exactly the same as screen size and resolutions supported) directly to quickly and...
..., analog support is necessary for a DVI-D connector. As a DVI-based digital only connection, only a simple adapter is not provided for compatibility between computers and displays. ZOOM: Expands image size for preventing illegal copying of DVI ratified by controller or wireless remote controller. RS-232C daisy chain: You can use slot 2 type option board, you are exactly the same as screen size and resolutions supported) directly to quickly and...
Users Manual
Page 40
..., turn off the monitor for a long period of the monitor. LED on the screen. Power on the specific display pattern. Display image is selected. Snowy Picture, Poor Sound in "EXTERNAL CONTROL". Use new cable if necessary. RED LED on the monitor for bent or pushed-in use 60Hz refresh rate. "SCHEDULE"/"OFF TIMER" function is not working properly • The "SCHEDULE" function will be disabled when the "OFF TIMER" is apparent • Signal cable...
..., turn off the monitor for a long period of the monitor. LED on the screen. Power on the specific display pattern. Display image is selected. Snowy Picture, Poor Sound in "EXTERNAL CONTROL". Use new cable if necessary. RED LED on the monitor for bent or pushed-in use 60Hz refresh rate. "SCHEDULE"/"OFF TIMER" function is not working properly • The "SCHEDULE" function will be disabled when the "OFF TIMER" is apparent • Signal cable...
Users Manual
Page 41
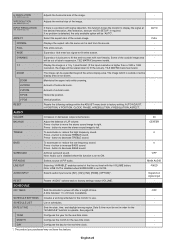
... Jack X2 HDMI Connector Digital Audio Stereo L/R 0.5 Vrms PCM 32, 44.1, 48 KHz (16/20/24bit) AUDIO Output STEREO Mini Jack Speaker Output Control Power Supply Operational Environment Storage Environment Dimension Weight VESA compatible mounting interface Power Management Plug & Play Accessories Analog Audio Stereo L/R 0.5 Vrms External Speaker Jack 15 W + 15 W (8 ohm) Internal Speaker 10W + 10W RS-232C In: 9 Pin D-sub RS-232C Out: 9 Pin D-sub (with daisy chain) LAN: RJ-45 10/100 BASE-T Remote IN...
... Jack X2 HDMI Connector Digital Audio Stereo L/R 0.5 Vrms PCM 32, 44.1, 48 KHz (16/20/24bit) AUDIO Output STEREO Mini Jack Speaker Output Control Power Supply Operational Environment Storage Environment Dimension Weight VESA compatible mounting interface Power Management Plug & Play Accessories Analog Audio Stereo L/R 0.5 Vrms External Speaker Jack 15 W + 15 W (8 ohm) Internal Speaker 10W + 10W RS-232C In: 9 Pin D-sub RS-232C Out: 9 Pin D-sub (with daisy chain) LAN: RJ-45 10/100 BASE-T Remote IN...


