

OPS-PCAFQ-PH Specification Brochure
Page 1
...DDR3 Hard Drive 250GB HDD Video Output Internal DVI, External DisplayPort Audio Output Internal Stereo, External DisplayPort Network Connections Gigabit Ethernet Control I/O USB 2.0 (4) Video Format Support 1080p video playback, MPEG/2, H.264, WM9 Power 16VDC Input Voltage, Power Dissipation (60W) Operating Temperature 32° - 104°F / 0° - 40°C Operating Humidity 80% maximum relative humidity, non-condensing Dimensions (W x H x D) 7.1 x 1.2 x 4.6 in. / 180 x 30 x 118mm Weight 2.5 lbs. / 1.2 kg Gross Weight 3 lbs. DVI video, stereo audio, RS232 control...
...DDR3 Hard Drive 250GB HDD Video Output Internal DVI, External DisplayPort Audio Output Internal Stereo, External DisplayPort Network Connections Gigabit Ethernet Control I/O USB 2.0 (4) Video Format Support 1080p video playback, MPEG/2, H.264, WM9 Power 16VDC Input Voltage, Power Dissipation (60W) Operating Temperature 32° - 104°F / 0° - 40°C Operating Humidity 80% maximum relative humidity, non-condensing Dimensions (W x H x D) 7.1 x 1.2 x 4.6 in. / 180 x 30 x 118mm Weight 2.5 lbs. / 1.2 kg Gross Weight 3 lbs. DVI video, stereo audio, RS232 control...
Launch Press Release
Page 2
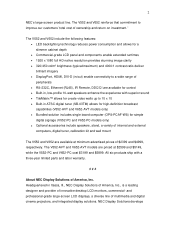
... includes single board computer (OPS-PCAF-WS) for simple digital signage (V552-PC and V652-PC models only) Optional accessories include speakers, stand, a variety of internal and external computers, digital tuner, calibration kit and wall mount The V552 and V652 are priced at minimum advertised prices of innovative desktop LCD monitors, commercial- NEC Display Solutions develops The V552 and V652 reinforce that commitment to 10 x 10...
... includes single board computer (OPS-PCAF-WS) for simple digital signage (V552-PC and V652-PC models only) Optional accessories include speakers, stand, a variety of internal and external computers, digital tuner, calibration kit and wall mount The V552 and V652 are priced at minimum advertised prices of innovative desktop LCD monitors, commercial- NEC Display Solutions develops The V552 and V652 reinforce that commitment to 10 x 10...
User's Manual
Page 2
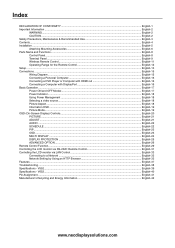
... Use English-3 Contents ...English-4 Installation ...English-5 Attaching Mounting Accessories ...English-6 Parts Name and Functions...English-8 Control Panel ...English-8 Terminal Panel ...English-9 Wireless Remote Control ...English-11 Operating Range for the Remote Control English-12 Setup ...English-13 Connections ...English-15 Wiring Diagram ...English-15 Connecting a Personal Computer English-16 Connecting a DVD Player or Computer with HDMI out English-16 Connecting a Computer with DisplayPort English-16 Basic Operation...English-17 Power ON and OFF Modes ...English...
... Use English-3 Contents ...English-4 Installation ...English-5 Attaching Mounting Accessories ...English-6 Parts Name and Functions...English-8 Control Panel ...English-8 Terminal Panel ...English-9 Wireless Remote Control ...English-11 Operating Range for the Remote Control English-12 Setup ...English-13 Connections ...English-15 Wiring Diagram ...English-15 Connecting a Personal Computer English-16 Connecting a DVD Player or Computer with HDMI out English-16 Connecting a Computer with DisplayPort English-16 Basic Operation...English-17 Power ON and OFF Modes ...English...
User's Manual
Page 5
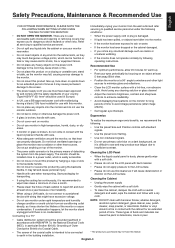
..., the National Electrical Code (NEC), in contact with the liquid crystal and handle with the cabinet for an extended period of time as it may cause permanent damage to the screen. • The power supply cord you to the backside handle. Blink often. • Position the monitor at a 90° angle to windows and other light sources to the LCD surface. •...
..., the National Electrical Code (NEC), in contact with the liquid crystal and handle with the cabinet for an extended period of time as it may cause permanent damage to the screen. • The power supply cord you to the backside handle. Blink often. • Position the monitor at a 90° angle to windows and other light sources to the LCD surface. •...

User's Manual
Page 7
... to support the monitor and mounting accessories. • DO NOT install in locations where a door or gate can easily grab and hang onto the unit or the mounting apparatus. • When mounting in a wall, leave at least two points on wall or ceiling • When using size M8 screws (15-17 mm + thickness of the unit and the mounting apparatus over time. Product warranty does...
... to support the monitor and mounting accessories. • DO NOT install in locations where a door or gate can easily grab and hang onto the unit or the mounting apparatus. • When mounting in a wall, leave at least two points on wall or ceiling • When using size M8 screws (15-17 mm + thickness of the unit and the mounting apparatus over time. Product warranty does...
User's Manual
Page 10
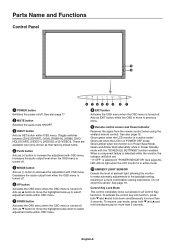
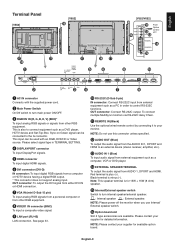
...), LED will not light when the LCD monitor is in Power Save Mode. Glows red when the LCD is turned-off . Acts as SET button within OSD menu. ¶ DOWN button Activates the OSD menu when the OSD menu is in a more than 3 seconds. Control Key Lock Mode This control completely locks out access to select adjustment items within OSD menu. (Toggle switches between [DVI], [DPORT], [VGA], [RGB/HV], [HDMI], [DVD/ HD], [SCART], [VIDEO1], [VIDEO2] or [S-VIDEO]).
...), LED will not light when the LCD monitor is in Power Save Mode. Glows red when the LCD is turned-off . Acts as SET button within OSD menu. ¶ DOWN button Activates the OSD menu when the OSD menu is in a more than 3 seconds. Control Key Lock Mode This control completely locks out access to select adjustment items within OSD menu. (Toggle switches between [DVI], [DPORT], [VGA], [RGB/HV], [HDMI], [DVD/ HD], [SCART], [VIDEO1], [VIDEO2] or [S-VIDEO]).
User's Manual
Page 11
... input can be used with the supplied power cord. · Main Power Switch On/Off switch to connect equipment such as a DVD player, HDTV device and Set-Top-Box. Please select signal type in order to your monitor. OUT connector: To output the DVI signal from either DVI IN or HDMI connection. ¶ VGA IN (mini D-Sub 15 pin) To input analog RGB signals from a personal computer or from a computer or HDTV device having a digital RGB output...
... input can be used with the supplied power cord. · Main Power Switch On/Off switch to connect equipment such as a DVD player, HDTV device and Set-Top-Box. Please select signal type in order to your monitor. OUT connector: To output the DVI signal from either DVI IN or HDMI connection. ¶ VGA IN (mini D-Sub 15 pin) To input analog RGB signals from a personal computer or from a computer or HDTV device having a digital RGB output...

User's Manual
Page 13
... screen which adjusted "PIP" mode moves left or right. ƹ SET button Makes selection. ƺ VOLUME UP/DOWN button Increases or decreases audio output level. ƻ CH UP/DOWN button*2 Ƽ GUIDE button*2 ƽ MUTE button Turns on /off the information OSD. See page 21. ¸ EXIT button Returns to previous menu within OSD menu. ¹ UP/DOWN button Acts as DVD. STANDARD: for text based images. English Wireless Remote Control ³ POWER button Switches the power on...
... screen which adjusted "PIP" mode moves left or right. ƹ SET button Makes selection. ƺ VOLUME UP/DOWN button Increases or decreases audio output level. ƻ CH UP/DOWN button*2 Ƽ GUIDE button*2 ƽ MUTE button Turns on /off the information OSD. See page 21. ¸ EXIT button Returns to previous menu within OSD menu. ¹ UP/DOWN button Acts as DVD. STANDARD: for text based images. English Wireless Remote Control ³ POWER button Switches the power on...

User's Manual
Page 15
... equipment user manual for a long period of time, remove the batteries. 3. NOTE: Do not connect/disconnect cables when turning on the monitor or other external equipment as not to the "Safety Precautions and Maintenance" section of batteries. • Remove dead batteries immediately to ON within the FAN CONTROL menu within the OSD (see page 25). NOTE: Please refer to scratch the panel. 2. Screw Clamp...
... equipment user manual for a long period of time, remove the batteries. 3. NOTE: Do not connect/disconnect cables when turning on the monitor or other external equipment as not to the "Safety Precautions and Maintenance" section of batteries. • Remove dead batteries immediately to ON within the FAN CONTROL menu within the OSD (see page 25). NOTE: Please refer to scratch the panel. 2. Screw Clamp...
User's Manual
Page 17
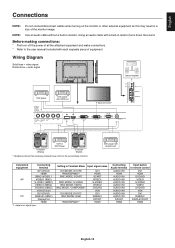
... Diagram Solid lines = video signal Dotted lines = audio signal Stereo Amplifier DVD player DVD player with a built-in resistor turns down the sound. NOTE: Use an audio cable without a built-in remote control DVI HDMI DVD/HD VIDEO S-VIDEO VIDEO DVD/HD VGA DVI RGB/HV DISPLAYPORT HDMI English-15 DVD player with each separate piece of the monitor image. BNC MODE: S-VIDEO BNC MODE: VIDEO BNC MODE: COMPONENT DVI MODE: DVI-PC BNC MODE: RGB RAW/EXPAND*1 DVI HDMI SCART VIDEO1 S-VIDEO VIDEO2 DVD...
... Diagram Solid lines = video signal Dotted lines = audio signal Stereo Amplifier DVD player DVD player with a built-in resistor turns down the sound. NOTE: Use an audio cable without a built-in remote control DVI HDMI DVD/HD VIDEO S-VIDEO VIDEO DVD/HD VGA DVI RGB/HV DISPLAYPORT HDMI English-15 DVD player with each separate piece of the monitor image. BNC MODE: S-VIDEO BNC MODE: VIDEO BNC MODE: COMPONENT DVI MODE: DVI-PC BNC MODE: RGB RAW/EXPAND*1 DVI HDMI SCART VIDEO1 S-VIDEO VIDEO2 DVD...

User's Manual
Page 24
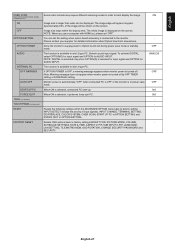
... monitor to factory settings except VOLUME. - VGA, RGB/HV inputs only V RESOLUTION Adjusts the vertical size of horizontal zoom. Some of PIP audio. button to ON. OFF PIP AUDIO Selects source of the outside of the line out level with the VOLUME button. Note: Audio out is disabled when this feature. FIXED AUDIO INPUT Selects audio input source [IN1], [DPORT], [HDMI], [OPTION]*. Depend on signal input RESET Resets "AUDIO" options back to use. - OFF SCHEDULE SETTINGS Creates a working schedule for the real-time clock. - AUTO...
... monitor to factory settings except VOLUME. - VGA, RGB/HV inputs only V RESOLUTION Adjusts the vertical size of horizontal zoom. Some of PIP audio. button to ON. OFF PIP AUDIO Selects source of the outside of the line out level with the VOLUME button. Note: Audio out is disabled when this feature. FIXED AUDIO INPUT Selects audio input source [IN1], [DPORT], [HDMI], [OPTION]*. Depend on signal input RESET Resets "AUDIO" options back to use. - OFF SCHEDULE SETTINGS Creates a working schedule for the real-time clock. - AUTO...
User's Manual
Page 26
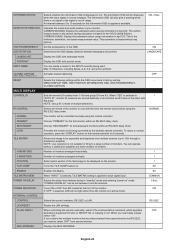
..., 3 Sec. - NOTE: Low resolution is applied to a large number of screens. When "INPUT" is selected, TILE MATRIX setting is not suitable for use with landscape mode. Turns ON or OFF the LED located at a lower number of monitors. Sets the monitor ID number from 1-100 and group ID from being controlled by RS-232C, you need to factory setting: - The monitor will be expanded and displayed over multiple screens (up to appear...
..., 3 Sec. - NOTE: Low resolution is applied to a large number of screens. When "INPUT" is selected, TILE MATRIX setting is not suitable for use with landscape mode. Turns ON or OFF the LED located at a lower number of monitors. Sets the monitor ID number from 1-100 and group ID from being controlled by RS-232C, you need to factory setting: - The monitor will be expanded and displayed over multiple screens (up to appear...
User's Manual
Page 27
..., RIGHT, LEFT) at user determined intervals. SECURITY Locks the security password. setting: POWER SAVE, FAN CONTROL, SCREEN SAVER, SIDE BORDER COLOR, AUTO BRIGHTNESS, DDC/CI. English LAN SETTING When you use . NOTE: When changing the LAN SETTING, you use this function when picture mode is off . NOTE: When you need to the monitor. 0.0.0.0 DNS SECONDARY Set your DHCP server. This function resets to the monitor when "DISABLE" is disabled when PIP, STILL, TEXT TICKER...
..., RIGHT, LEFT) at user determined intervals. SECURITY Locks the security password. setting: POWER SAVE, FAN CONTROL, SCREEN SAVER, SIDE BORDER COLOR, AUTO BRIGHTNESS, DDC/CI. English LAN SETTING When you use . NOTE: When changing the LAN SETTING, you use this function when picture mode is off . NOTE: When you need to the monitor. 0.0.0.0 DNS SECONDARY Set your DHCP server. This function resets to the monitor when "DISABLE" is disabled when PIP, STILL, TEXT TICKER...

User's Manual
Page 28
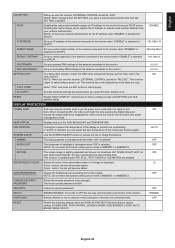
... signal VIDEO: Composite video (VIDEO2) S-VIDEO: Separate video HDMI SIGNAL RAW: Disable the expanded feature. NONE The Monitor will automatically switch to the DVI input. FIRST DETECT When the current video input signal is supplied to the DVD/HD, SCART, VIDEO1, VIDEO2 or S-VIDEO input. INPUT CHANGE Sets input change and keep to the monitor, the monitor will not search the other computer equipment is connected to the new video source. AUTO Automatically chooses Color System setting based on the video format of input detection...
... signal VIDEO: Composite video (VIDEO2) S-VIDEO: Separate video HDMI SIGNAL RAW: Disable the expanded feature. NONE The Monitor will automatically switch to the DVI input. FIRST DETECT When the current video input signal is supplied to the DVD/HD, SCART, VIDEO1, VIDEO2 or S-VIDEO input. INPUT CHANGE Sets input change and keep to the monitor, the monitor will not search the other computer equipment is connected to the new video source. AUTO Automatically chooses Color System setting based on the video format of input detection...
User's Manual
Page 29
... turned off . English OVER SCAN HDMI, DVD/HD, SCART, VIDEO1, VIDEO2, S-VIDEO inputs only ON OFF OPTION SETTING OPTION POWER AUDIO INTERNAL PC OFF WARNING AUTO OFF START UP PC FORCE QUIT 120Hz (not adjustable) TOUCH PANEL (not adjustable) RESET FACTORY RESET Some video formats may require different scanning modes in power save mode or standby mode. Image size is selected, it performs force-quit PC. NOTE: DIGITAL is activated only when OPTION(D) is displayed on the screen...
... turned off . English OVER SCAN HDMI, DVD/HD, SCART, VIDEO1, VIDEO2, S-VIDEO inputs only ON OFF OPTION SETTING OPTION POWER AUDIO INTERNAL PC OFF WARNING AUTO OFF START UP PC FORCE QUIT 120Hz (not adjustable) TOUCH PANEL (not adjustable) RESET FACTORY RESET Some video formats may require different scanning modes in power save mode or standby mode. Image size is selected, it performs force-quit PC. NOTE: DIGITAL is activated only when OPTION(D) is displayed on the screen...
User's Manual
Page 30
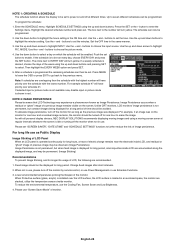
... and down buttons. Set the OFF time in red. Use the down buttons to highlight the minutes setting. Press MENU to leave the OSD or press EXIT to go back to choose the picture mode. 4. If selected input or picture mode is not available now, disable input or picture mode is located in the ON time slot. Unlike CRT monitors, LCD monitors' image persistence is programmed the remaining schedules can then be set. Fixed image...
... and down buttons. Set the OFF time in red. Use the down buttons to highlight the minutes setting. Press MENU to leave the OSD or press EXIT to go back to choose the picture mode. 4. If selected input or picture mode is not available now, disable input or picture mode is located in the ON time slot. Unlike CRT monitors, LCD monitors' image persistence is programmed the remaining schedules can then be set. Fixed image...

User's Manual
Page 31
... not work In order for the display (See page 24). Set the MONITOR ID number for this specific monitor without affecting other monitors. This LCD monitor can then be set under the MULTI DISPLAY menu in white on the display. Connect PC and LCD monitors. Set Monitor ID and IR Control mode. Subsequent monitors with the Monitor ID, allowing control of the display to input the Monitor ID (1-100) of the desired monitor and press the REMOTE ID SET button.
... not work In order for the display (See page 24). Set the MONITOR ID number for this specific monitor without affecting other monitors. This LCD monitor can then be set under the MULTI DISPLAY menu in white on the display. Connect PC and LCD monitors. Set Monitor ID and IR Control mode. Subsequent monitors with the Monitor ID, allowing control of the display to input the Monitor ID (1-100) of the desired monitor and press the REMOTE ID SET button.
User's Manual
Page 39
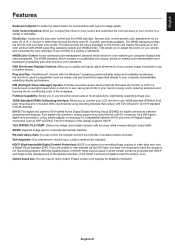
... use , saving two-thirds of your monitor to a variety of your LCD monitor to view material via six axes (R, G, B, C, M and Y) rather than through the three axes (R, G and B) previously available. NEC recommends using mounting interface that the colors displayed on the monitor are unable to any VESA standard (FDMIv1) third party mounting arm or bracket. As a DVI-based digital only connection, only a simple adapter is protected with other DVI-based digital...
... use , saving two-thirds of your monitor to a variety of your LCD monitor to view material via six axes (R, G, B, C, M and Y) rather than through the three axes (R, G and B) previously available. NEC recommends using mounting interface that the colors displayed on the monitor are unable to any VESA standard (FDMIv1) third party mounting arm or bracket. As a DVI-based digital only connection, only a simple adapter is protected with other DVI-based digital...

User's Manual
Page 40
... change the video mode to noninterlace and use . NOTE: As with respect to compatibility and recommended settings. • Check the signal cable connector for one hour and a residual image remains, the monitor should be turned off and reset the monitor. • Check the main Power Switch on the back side of component signal is greenish • Check to see if the DVD/HD input connector is no green or red color...
... change the video mode to noninterlace and use . NOTE: As with respect to compatibility and recommended settings. • Check the signal cable connector for one hour and a residual image remains, the monitor should be turned off and reset the monitor. • Check the main Power Switch on the back side of component signal is greenish • Check to see if the DVD/HD input connector is no green or red color...
Specification Brochure
Page 2
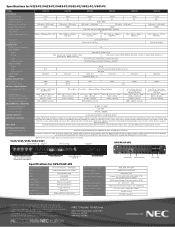
....2 x 996.3mm Orientation Displayable Colors CONNECTIVITY PC/Mac Signal Compatibility Input Terminals Digital Analog Audio External Control Output Terminals Digital Audio External Control Digital Tuner Speakers POWER CONSUMPTiON On (Typical) ECO Mode Standby PHYSICAL SPECIFICATIONS Bezel Width (L/R, T/B) Net Dimensions (without stand) VESA Hole Configuration ENVIRONMENTAL CONDITIONS Operating Temperature Operating Humidity Landscape/Portrait More than 16.7 million More than 1 billion Yes DisplayPort, HDMI, DVI-D VGA 15-pin D-sub (shared S-Video, Video, Component), BNC Composite VGA 15...
....2 x 996.3mm Orientation Displayable Colors CONNECTIVITY PC/Mac Signal Compatibility Input Terminals Digital Analog Audio External Control Output Terminals Digital Audio External Control Digital Tuner Speakers POWER CONSUMPTiON On (Typical) ECO Mode Standby PHYSICAL SPECIFICATIONS Bezel Width (L/R, T/B) Net Dimensions (without stand) VESA Hole Configuration ENVIRONMENTAL CONDITIONS Operating Temperature Operating Humidity Landscape/Portrait More than 16.7 million More than 1 billion Yes DisplayPort, HDMI, DVI-D VGA 15-pin D-sub (shared S-Video, Video, Component), BNC Composite VGA 15...


