User Manual
Page 1
Cinematic Computing for Every User GeForce FX 5200/5500/5600/5700/5900 Series NVIDIA User's Manual GeForceFX Contents Getting Ready Hardware Installation Driver Installation Display Modes Appendies
Cinematic Computing for Every User GeForce FX 5200/5500/5600/5700/5900 Series NVIDIA User's Manual GeForceFX Contents Getting Ready Hardware Installation Driver Installation Display Modes Appendies
User Manual
Page 2
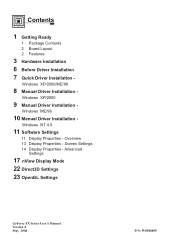
Contents 1 Getting Ready 1 Package Contents 2 Board Layout 2 Features 3 Hardware Installation 6 Before Driver Installation 7 Quick Driver Installation - Windows ME/98 10 Manual Driver Installation - Windows NT 4.0 11 Software Settings 11 Display Properties - Windows XP/2000/ME/98 8 Manual Driver Installation - Overview 13 Display Properties - Screen Settings 14 Display Properties - Advanced Settings 17 nView Display Mode 22 Direct3D Settings 23 OpenGL Settings GeForce FX Series User's Manual Version A May 2004 P/N: W0500895 Windows XP/2000 9 Manual Driver Installation -
Contents 1 Getting Ready 1 Package Contents 2 Board Layout 2 Features 3 Hardware Installation 6 Before Driver Installation 7 Quick Driver Installation - Windows ME/98 10 Manual Driver Installation - Windows NT 4.0 11 Software Settings 11 Display Properties - Windows XP/2000/ME/98 8 Manual Driver Installation - Overview 13 Display Properties - Screen Settings 14 Display Properties - Advanced Settings 17 nView Display Mode 22 Direct3D Settings 23 OpenGL Settings GeForce FX Series User's Manual Version A May 2004 P/N: W0500895 Windows XP/2000 9 Manual Driver Installation -
User Manual
Page 3
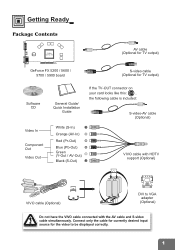
... output) Software CD Video In Component Out Video Out General Guide/ Quick Installation Guide If the TV-OUT connector on your card looks like this: , the following cable is included: S-video-AV cable (Optional) White (S-In) Orange (AV-In) Red (Pr-Out) Blue (Pb-Out) Green (Y-Out / AV-Out) Black (S-Out) VIDEO CARD VIVO cable with HDTV support (Optional) VIVO cable (Optional) DVI to be displayed correctly. 1 Getting Ready Package Contents NVIDIA GeForce FX AV cable...
... output) Software CD Video In Component Out Video Out General Guide/ Quick Installation Guide If the TV-OUT connector on your card looks like this: , the following cable is included: S-video-AV cable (Optional) White (S-In) Orange (AV-In) Red (Pr-Out) Blue (Pb-Out) Green (Y-Out / AV-Out) Black (S-Out) VIDEO CARD VIVO cable with HDTV support (Optional) VIVO cable (Optional) DVI to be displayed correctly. 1 Getting Ready Package Contents NVIDIA GeForce FX AV cable...
User Manual
Page 4
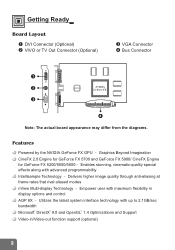
... Out Connector (Optional) VGA Connector Bus Connector NVIDIA GeForce FX Note: The actual board appearance may differ from the diagrams. Features Powered by the NVIDIA GeForce FX GPU Graphics Beyond Imagination CineFX 2.0 Engine for GeForce FX 5700 and GeForce FX 5900/ CineFX Engine for GeForce FX 5200/5500/5600 Enables stunning, cinematic-quality special effects along with advanced programmability Intellisample Technology Delivers higher image quality through anti-aliasing at frame rates that rival aliased modes nView Multi-display Technology Empower user...
... Out Connector (Optional) VGA Connector Bus Connector NVIDIA GeForce FX Note: The actual board appearance may differ from the diagrams. Features Powered by the NVIDIA GeForce FX GPU Graphics Beyond Imagination CineFX 2.0 Engine for GeForce FX 5700 and GeForce FX 5900/ CineFX Engine for GeForce FX 5200/5500/5600 Enables stunning, cinematic-quality special effects along with advanced programmability Intellisample Technology Delivers higher image quality through anti-aliasing at frame rates that rival aliased modes nView Multi-display Technology Empower user...
User Manual
Page 6
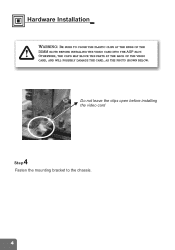
OTHERWISE, THE CLIPS MAY BLOCK THE PARTS AT THE BACK OF THE VIDEO CARD, AND WILL POSSIBLY DAMAGE THE CARD, AS THE PHOTO SHOWN BELOW. Hardware Installation W : ARNING BE SURE TO CLOSE THE PLASTIC CLIPS AT THE ENDS OF THE DIMM SLOTS BEFORE INSTALLING THE VIDEO CARD INTO THE AGP SLOT. Do not leave the clips open before installing the video card 4 Step Fasten the mounting bracket to the chassis. 4
OTHERWISE, THE CLIPS MAY BLOCK THE PARTS AT THE BACK OF THE VIDEO CARD, AND WILL POSSIBLY DAMAGE THE CARD, AS THE PHOTO SHOWN BELOW. Hardware Installation W : ARNING BE SURE TO CLOSE THE PLASTIC CLIPS AT THE ENDS OF THE DIMM SLOTS BEFORE INSTALLING THE VIDEO CARD INTO THE AGP SLOT. Do not leave the clips open before installing the video card 4 Step Fasten the mounting bracket to the chassis. 4
User Manual
Page 8
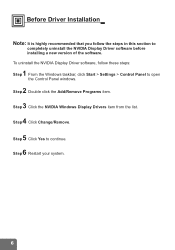
To uninstall the NVIDIA Display Driver software, follow the steps in this section to continue. 6 Step Restart your system. 6 Before Driver Installation Note: It is highly recommended that you follow these steps: 1 Step From the Windows taskbar, click Start > Settings > Control Panel to open the Control Panel windows. 2 Step Double click the Add/Remove Programs item. 3 Step Click the NVIDIA Windows Display Drivers item from the list. 4 Step Click Change/Remove. 5 Step Click Yes to completely uninstall the NVIDIA Display Driver software before installing a new version of the software.
To uninstall the NVIDIA Display Driver software, follow the steps in this section to continue. 6 Step Restart your system. 6 Before Driver Installation Note: It is highly recommended that you follow these steps: 1 Step From the Windows taskbar, click Start > Settings > Control Panel to open the Control Panel windows. 2 Step Double click the Add/Remove Programs item. 3 Step Click the NVIDIA Windows Display Drivers item from the list. 4 Step Click Change/Remove. 5 Step Click Yes to completely uninstall the NVIDIA Display Driver software before installing a new version of the software.
User Manual
Page 10
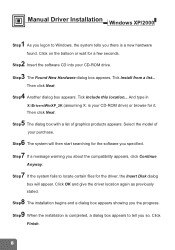
Select the model of graphics products appears. Manual Driver Installation Windows XP/2000 1 Step As you logon to locate certain files for the driver, the Insert Disk dialog box will appear. Then click Next. 4 Step Another dialog box appears. Tick Include this location... And type in X:\Drivers\WinXP_2K (assuming X: is a new hardware found. Click on the balloon or wait for it. Click Finish...
Select the model of graphics products appears. Manual Driver Installation Windows XP/2000 1 Step As you logon to locate certain files for the driver, the Insert Disk dialog box will appear. Then click Next. 4 Step Another dialog box appears. Tick Include this location... And type in X:\Drivers\WinXP_2K (assuming X: is a new hardware found. Click on the balloon or wait for it. Click Finish...
User Manual
Page 11
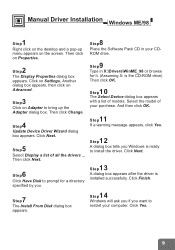
... the driver is ready to install the driver. Then click Change. 4 Step Update Device Driver Wizard dialog box appears. Click Next. 6 Step Click Have Disk to prompt for it. (Assuming X: is the CD-ROM drive) Then click OK. 1 Step 0 The Select Device dialog box appears with a list of all the drivers ... Click Yes. 9 Manual Driver Installation Windows ME/98 1 Step Right click on the desktop...
... the driver is ready to install the driver. Then click Change. 4 Step Update Device Driver Wizard dialog box appears. Click Next. 6 Step Click Have Disk to prompt for it. (Assuming X: is the CD-ROM drive) Then click OK. 1 Step 0 The Select Device dialog box appears with a list of all the drivers ... Click Yes. 9 Manual Driver Installation Windows ME/98 1 Step Right click on the desktop...
User Manual
Page 12
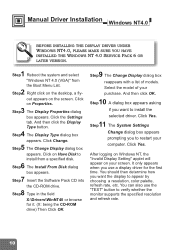
... screen. After logging on Windows NT, the "Invalid Display Setting" applet will appear on Properties. 3 Step The Display Properties dialog box appears. Click the Settings tab. Click Change. 5 Step The Change Display dialog box appears. Manual Driver Installation Windows NT4.0 BEFORE INSTALLING THE DISPLAY DRIVER UNDER WINDOWS NT4.0, PLEASE MAKE SURE YOU HAVE INSTALLED THE WINDOWS NT 4.0 SERVICE PACK 6 OR LATER VERSION. 1 Step Reboot the system and select "Windows NT 4.0 (VGA)" from a specified disk. 6 Step The Install...
... screen. After logging on Windows NT, the "Invalid Display Setting" applet will appear on Properties. 3 Step The Display Properties dialog box appears. Click the Settings tab. Click Change. 5 Step The Change Display dialog box appears. Manual Driver Installation Windows NT4.0 BEFORE INSTALLING THE DISPLAY DRIVER UNDER WINDOWS NT4.0, PLEASE MAKE SURE YOU HAVE INSTALLED THE WINDOWS NT 4.0 SERVICE PACK 6 OR LATER VERSION. 1 Step Reboot the system and select "Windows NT 4.0 (VGA)" from a specified disk. 6 Step The Install...
User Manual
Page 14
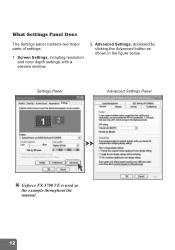
What Settings Panel Does The Settings panel contains two major parts of settings: 1 Screen Settings, including resolution and color depth settings, with a preview window. 2. Advanced Settings, accessed by clicking the Advanced button as the example throughout the manual. 12 Settings Panel Advanced Settings Panel Geforce FX 5700 VE is used as shown in the figure below.
What Settings Panel Does The Settings panel contains two major parts of settings: 1 Screen Settings, including resolution and color depth settings, with a preview window. 2. Advanced Settings, accessed by clicking the Advanced button as the example throughout the manual. 12 Settings Panel Advanced Settings Panel Geforce FX 5700 VE is used as shown in the figure below.

User Manual
Page 15
... be changed individually; In addition, the resolution of your primary screen a big 1a, and the extended, 1b, as in any fashion (see Page 11). Identify button Click this button on one is the primary screen; Screen Settings Resolution and color depth of either screen icons freely and arrange them in the second figure. Software Settings Display Properties- You can also extend your desktop to...
... be changed individually; In addition, the resolution of your primary screen a big 1a, and the extended, 1b, as in any fashion (see Page 11). Identify button Click this button on one is the primary screen; Screen Settings Resolution and color depth of either screen icons freely and arrange them in the second figure. Software Settings Display Properties- You can also extend your desktop to...

User Manual
Page 16
If 85Hz is unavailable, use the default value. 14 38 Advanced Settings Settings ¾ Advanced settings Monitor Model-specific Settings p. 14 1 1 Monitor Refresh Rate We recommend you set the refresh rate to 85 Hz to reduce the flickering of the screen. Software Settings Display Properties-
If 85Hz is unavailable, use the default value. 14 38 Advanced Settings Settings ¾ Advanced settings Monitor Model-specific Settings p. 14 1 1 Monitor Refresh Rate We recommend you set the refresh rate to 85 Hz to reduce the flickering of the screen. Software Settings Display Properties-

User Manual
Page 17
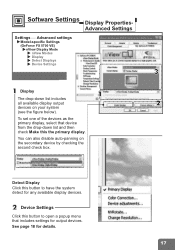
Software Settings Display Properties- Advanced Settings Settings ¾ Advanced settings Model-specific Settings (GeForce FX 5700 VE) nView Display Mode Performance and Quality Settings Overlay Controls Desktop Utilities NVRotate 2 6 4 1 3 5 1 nView Display Mode p. 16 p. 21 2 Performance and Quality Settings Includes Direct3D and OpenGL settings. 21 English 15
Software Settings Display Properties- Advanced Settings Settings ¾ Advanced settings Model-specific Settings (GeForce FX 5700 VE) nView Display Mode Performance and Quality Settings Overlay Controls Desktop Utilities NVRotate 2 6 4 1 3 5 1 nView Display Mode p. 16 p. 21 2 Performance and Quality Settings Includes Direct3D and OpenGL settings. 21 English 15
User Manual
Page 19
... this button to open a popup menu that device from the drop-down list includes all available display output 2 devices on the secondary device by checking the second check box. Software Settings Display Properties- Advanced Settings Settings ¾ Advanced settings Model-specific Settings (GeForce FX 5700 VE) nView Display Mode nView Modes Display Detect Displays Device Settings 3 1 Display 1 The drop-down list and then check Make this button to have the system detect for any...
... this button to open a popup menu that device from the drop-down list includes all available display output 2 devices on the secondary device by checking the second check box. Software Settings Display Properties- Advanced Settings Settings ¾ Advanced settings Model-specific Settings (GeForce FX 5700 VE) nView Display Mode nView Modes Display Detect Displays Device Settings 3 1 Display 1 The drop-down list and then check Make this button to have the system detect for any...
User Manual
Page 20
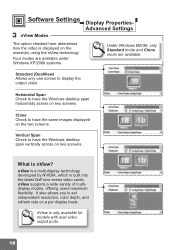
... only one screen to set independent resolution, color depth, and refresh rate on a per display basis. Clone Check to have the Windows desktop span horizontally across on the two screens. nView is a multi-display technology developed by NVIDIA, which is nView? It also allows you to display the output video. Vertical Span Check to have the same images displayed on two screens. What is built into the latest GeForce series video cards. nView is displayed on two screens. Advanced Settings 3 nView Modes The option...
... only one screen to set independent resolution, color depth, and refresh rate on a per display basis. Clone Check to have the Windows desktop span horizontally across on the two screens. nView is a multi-display technology developed by NVIDIA, which is nView? It also allows you to display the output video. Vertical Span Check to have the same images displayed on two screens. What is built into the latest GeForce series video cards. nView is displayed on two screens. Advanced Settings 3 nView Modes The option...
User Manual
Page 21
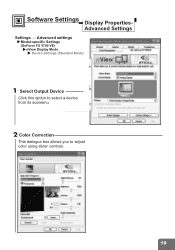
Software Settings Display Properties- Advanced Settings Settings ¾ Advanced settings Model-specific Settings (GeForce FX 5700 VE) nView Display Mode Device Settings (Standard Mode) 1 Select Output Device Click this option to select a device from its submenu. 2 Color Correction This dialogue box allows you to adjust color using slider controls. 19
Software Settings Display Properties- Advanced Settings Settings ¾ Advanced settings Model-specific Settings (GeForce FX 5700 VE) nView Display Mode Device Settings (Standard Mode) 1 Select Output Device Click this option to select a device from its submenu. 2 Color Correction This dialogue box allows you to adjust color using slider controls. 19
User Manual
Page 23
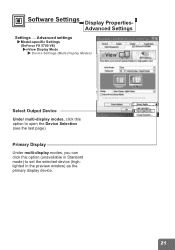
Advanced Settings Settings ¾ Advanced settings Model-specific Settings (GeForce FX 5700 VE) nView Display Mode Device Settings (Multi-Display Modes) Select Output Device Under multi-display modes, click this option (unavailable in Standard mode) to open the Device Selection (see the last page). Software Settings Display Properties- Primary Display Under multi-display modes, you can click this option to set the selected device (highlighted in the preview window) as the primary display device. 21
Advanced Settings Settings ¾ Advanced settings Model-specific Settings (GeForce FX 5700 VE) nView Display Mode Device Settings (Multi-Display Modes) Select Output Device Under multi-display modes, click this option (unavailable in Standard mode) to open the Device Selection (see the last page). Software Settings Display Properties- Primary Display Under multi-display modes, you can click this option to set the selected device (highlighted in the preview window) as the primary display device. 21
User Manual
Page 24
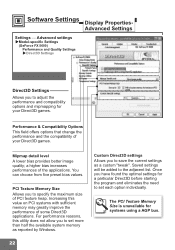
Software Settings Display Properties- Advanced Settings Settings ¾ Advanced settings Model-specific Settings (GeForce FX 5600) Performance and Quality Settings Direct3D Settings Direct3D Settings Allows you to specify the maximum size of the applications. Custom Direct3D settings Allows you to adjust the performance and compatibility options and mipmapping for systems using a AGP bus. 22 34 Saved settings will be added to set more than half the available system memory as a custom "tweak". Once you...
Software Settings Display Properties- Advanced Settings Settings ¾ Advanced settings Model-specific Settings (GeForce FX 5600) Performance and Quality Settings Direct3D Settings Direct3D Settings Allows you to specify the maximum size of the applications. Custom Direct3D settings Allows you to adjust the performance and compatibility options and mipmapping for systems using a AGP bus. 22 34 Saved settings will be added to set more than half the available system memory as a custom "tweak". Once you...
User Manual
Page 25
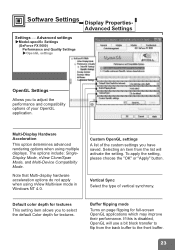
... Mode, nView Clone/Span Mode, and Multi-Device Compatiblity Mode. Software Settings Display Properties- Selecting an item from the list will use a bit block transfer to flip from the back buffer to select the default Color depth for full-screen OpenGL applications which may improve their performance. Note that Multi-display hardware acceleration options do not apply when using multiple displays. Vertical Sync Select the type of your OpenGL application. If this is disabled...
... Mode, nView Clone/Span Mode, and Multi-Device Compatiblity Mode. Software Settings Display Properties- Selecting an item from the list will use a bit block transfer to flip from the back buffer to select the default Color depth for full-screen OpenGL applications which may improve their performance. Note that Multi-display hardware acceleration options do not apply when using multiple displays. Vertical Sync Select the type of your OpenGL application. If this is disabled...
User Manual
Page 26
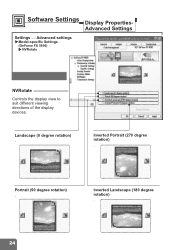
Portrait (90 degree rotation) . Inverted Landscape (180 degree rotation) . 24 34 Inverted Portrait (270 degree rotation) . Advanced Settings Settings ¾ Advanced settings Model-specific Settings (GeForce FX 5600) NVRotate NVRotate Controls the display view to suit different viewing directions of the display devices. Landscape (0 degree rotation) . Software Settings Display Properties-
Portrait (90 degree rotation) . Inverted Landscape (180 degree rotation) . 24 34 Inverted Portrait (270 degree rotation) . Advanced Settings Settings ¾ Advanced settings Model-specific Settings (GeForce FX 5600) NVRotate NVRotate Controls the display view to suit different viewing directions of the display devices. Landscape (0 degree rotation) . Software Settings Display Properties-


